Create Distribution Lines Procedures
Create Distribution Lines Procedures
Definition
The Create Distribution Lines concurrent process is used to distribute all types of pay to Oracle Grants Accounting and Oracle Projects projects and awards and to Oracle General Ledger accounts based on the labor schedules defined for the employee assignment.
Overview
The Create Distribution Lines process includes the following inputs:
-
Payroll sublines generated by the Import Payroll Transactions process
-
Payroll sublines exported into and maintained through the Maintain Non-Oracle Payroll Interface process
-
Labor schedules defined within the labor scheduling process
-
Oracle Human Resources and Oracle Payroll information
-
General Ledger account information
-
Grants Accounting and Projects accounting information
Using these inputs, the Create Distribution Lines process calculates payroll distribution records that generate transactions to be posted to either Grants Accounting, Projects, or General Ledger.
Process
The Create Distribution Lines process consists of the following tasks:
Create Distribution Lines
For each payroll subline, Oracle Labor Distribution creates one or more distribution lines. The number of distribution lines created depends on the following:
-
Number of unique schedule lines across the payroll periods
-
Number of working days in the payroll sublines
Example
If the payroll subline covers January 16 to January 31, the number of distribution lines equals the number of Grants Accounting and Projects charging instructions and General Ledger accounts for that employee assignment across all periods of the element labor schedule that includes a date in the period from January 16 to January 31. As a result, distribution sublines are created for each day in the payroll period, for each employee, assignment, element type, and for each Grants Accounting and Projects charging instruction and General Ledger account.
Auto-Population
You need to set up the auto-population configuration value for the Create Distribution Lines process to apply the auto-population rules. Labor Distribution applies auto-population rules at all levels in the labor schedule hierarchy: See Enabling or Disabling Auto-Population Rules for more information.
Note: If you have enabled auto-population, Create Distribution Lines invokes auto-population once on a set of distribution lines for the same person, assignment, element and charging instructions, and payroll sub-line (rather than for each individual distribution line). It invokes auto-population as of the maximum distribution date for this set of distribution lines.
For information on enabling the auto-population profile option, see System Administration Setup.
For information on setting up auto-population, see Expenditure Type and Natural Account Auto-Population Setup.
Determine Labor Schedule and Charging Instructions to Be Used for Distribution
To determine the labor schedule to be used for an element on a payroll, Labor Distribution begins searching at the bottom of the schedule hierarchy and moves upward until it finds a defined labor schedule or account for the day being processed. The lower levels, which include Element, Element Group, and Assignment, are defined for the employee assignment linked to the element on the payroll. The upper levels, which include Organization Suspense Account, Organization Default Account, and Default Labor Schedule, are defined at the human resources organization level for the specified employee assignment.
For information on the labor scheduling hierarchy process and hierarchy rules, see the following:
Distribution of Hours
Oracle Labor Distribution now enables you to configure Oracle Labor Distribution to distribute and encumber the hours an employee worked during a payroll time period. In Oracle Payroll, apart from costing monetary costs, you can cost hours. You can import any element containing hours that you cost in Oracle Payroll into Oracle Labor Distribution.
For more information on the configuration value, see: Setup Configuration Options.
The following diagram illustrates how Oracle Labor Distribution distributes hours.
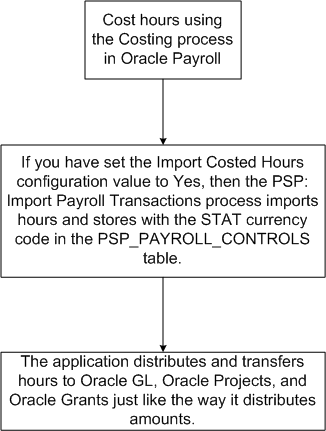
For more information on how the application distributes hours with the help of an example, see the example in the Determine Charging Instructions Using Element Entries section in this topic.
Determine Employee Work Schedules to Distribute and Encumber Labor Costs
You can process distribution lines based on work schedules of employees in Oracle HRMS. Employees in your organization may work on varying schedules; for example, an employee may work Saturday through Wednesday, and another may work Monday through Friday. In such cases, you can have Oracle Labor Distribution distribute and encumber labor costs based on the work schedules of the employees.
The default strategy that Oracle Labor Distribution uses to distribute labor costs is to consider the working week from Monday through Friday. However, if you have defined work schedules elsewhere, you can set the Enable Work Schedule for payroll distribution and encumbrance configuration value to Yes, and have the application use those work schedules to distribute and encumber labor costs. For more information on the configuration value, see: Setup Configuration Options.
You can define work schedules using several methods in Oracle HRMS. As part of your business requirements, you may have used the Oracle HRMS availability functionality that enables you to define the work and non-work times of an employee based on work schedules and calendar events. If such a schedule exists, then the application uses this schedule to distribute and encumber labor costs.
If you have not defined work schedules using the Oracle HRMS availability functionality, Oracle Labor Distribution checks for schedules that you may have defined using the Statutory Information page from the Assignment window. If such a schedule exists, then the application uses this schedule to distribute and encumber labor costs.
If you have not defined any schedules for the employee, or if you set the Enable Work Schedule for payroll distribution and encumbrance configuration value to No, then the application uses the default method of distributing and encumbering labor costs from Monday through Friday.
Using Element Entries For Payroll Distribution
About Using Element Entries That Contain Charging Instructions
If the element entries for the employee assignment contain charging instructions in descriptive flexfields, then you can configure Oracle Labor Distribution to use those charging instructions for payroll distribution and override the labor schedule that you defined in Oracle Labor Distribution.
For more information on the configuration value, see: Setup Configuration Options.
The following example demonstrates how Oracle Labor Distributions distributes pay if an employee's element entry contains charging instructions.
Assume that an employee, John Doe, is on a weekly payroll from 23-October (Monday) through 29-October (Sunday) and has a labor schedule defined in Oracle Labor Distribution. The employee enters timecard information on certain days that override the labor schedule. These timecard transactions are available as element entries and they also contain charging instructions stored in descriptive flexfields (DFF). The following tables illustrate how Oracle Labor Distribution performs the distributions on the basis of the example.
The following table lists the weekly salary of John Doe for the time period from 23-Oct to 29-Oct:
| Element | Pay Amount |
|---|---|
| Regular Salary | $1200.00 |
| Supplemental Pay | $320.00 |
Apart from the regular salary, John Doe has the following time information in element entries:
| Date Earned | Element | Hours | Rate | Pay Amount | Charging Instruction |
|---|---|---|---|---|---|
| 27-Oct | Supplemental Pay | 8 | $20 | $160 | PTAEO1 |
| 28-Oct | Supplemental Pay | 4 | $20 | $80 | PTAEO1 |
| 29-Oct | Supplemental Pay | 4 | $20 | $80 | PTAEO1 |
The following table lists the labor schedule of John Doe:
| Start date | End Date | Element | % Distribution | Charging Instruction |
|---|---|---|---|---|
| 01-Jan | 31-Dec | Regular Salary, Supplemental Pay | 100 | PTAEO2 |
Assuming that you have set the Import Costed Hours configuration option to Yes and mapped the charging instructions using the Mapping of Charging Instruction for Labor Schedule Override configuration option, the PSP: Import Payroll Transactions process creates the following payroll lines / sublines:
| Start Date | End Date | Element | Pay Amount | Hours | Override Charging Instruction |
|---|---|---|---|---|---|
| 23-Oct | 29-Oct | Regular Salary | $1200.00 | - | |
| 27-Oct | 27-Oct | Supplemental Pay | $160.00 | PTAEO1 | |
| 28-Oct | 28-Oct | Supplemental Pay | $80 | PTAEO1 | |
| 29-Oct | 29-Oct | Supplemental Pay | $80 | PTAEO1 | |
| 27-Oct | 27-Oct | Supplemental Pay | 8 | PTAEO1 | |
| 28-Oct | 28-Oct | Supplemental Pay | 4 | PTAEO1 | |
| 29-Oct | 29-Oct | Supplemental Pay | 4 | PTAEO1 |
The PSP: Create Distribution Lines process creates the following distribution lines:
In the following table, note that on 27-Oct, 28-Oct, and 29-Oct, the application overrides the labor schedule with the charging instructions that exist in the element entry.
| Distribution Date | Element | Amount | Hours | Charging Instruction |
|---|---|---|---|---|
| Monday, 23-Oct | Regular Salary | $240 | PTAEO2 | |
| Tuesday, 24-Oct | Regular Salary | $240 | PTAEO2 | |
| Wednesday, 25-Oct | Regular Salary | $240 | PTAEO2 | |
| Thursday, 26-Oct | Regular Salary | $240 | PTAEO2 | |
| Friday, 27-Oct | Regular Salary | $240 | PTAEO2 | |
| Friday, 27-Oct | Supplemental Pay | $160 | PTAEO1* | |
| Saturday, 28-Oct | Supplemental Pay | $80 | PTAEO1* | |
| Sunday, 29-Oct | Supplemental Pay | $80 | PTAEO1* | |
| Friday, 27-Oct | Supplemental Pay | 8 | PTAEO1* | |
| Saturday, 28-Oct | Supplemental Pay | 4 | PTAEO1* | |
| Sunday, 29-Oct | Supplemental Pay | 4 | PTAEO1* |
* - Since the charging instruction exists in the element entry, the application will not apply the labor schedule.
The application creates the following summary lines:
| Effective Date | Charging Instruction | Summary Amount / Hours |
|---|---|---|
| 27-Oct | PTAEO2 | $1200 |
| 29-Oct | PTAEO1 | $320 |
| 27-Oct | PTAEO1 | 16* |
* The application stores the hours information in the summary_amount column of the psp_summary_lines table. The application distinguishes the amounts and hours using the STAT currency code in the corresponding control record in the psp_payroll_controls table.
About Using Element Entries Without Charging Instructions
If the element entries of the employee assignment do not contain charging instructions in descriptive flexfields, then Oracle Labor Distribution applies the schedule that you defined using the Labor Schedule window for that employee.
Assume that an employee, John Doe, is on a weekly payroll from 23-October (Monday) through 29-October (Sunday) and has a labor schedule defined in Oracle Labor Distribution. The employee enters timecard information on certain days that override the labor schedule. These timecard transactions are available as element entries and they do not contain charging instructions stored in descriptive flexfields (DFF). The following tables illustrate how Oracle Labor Distribution performs the distributions on the basis of the example.
The following table lists the weekly salary of John Doe for the time period from 01-Jan to 31-Dec:
| Element | Pay Amount |
|---|---|
| Regular Salary | $1200.00 |
| Supplemental Pay | $320.00 |
Apart from the regular salary, John Doe has the following time information in element entries:
| Date Earned | Element | Hours | Rate | Pay Amount | Charging Instruction |
|---|---|---|---|---|---|
| 27-Oct | Supplemental Pay | 8 | $20 | $160 | <No charging instructions> |
| 28-Oct | Supplemental Pay | 4 | $20 | $80 | <No charging instructions> |
| 29-Oct | Supplemental Pay | 4 | $20 | $80 | <No charging instructions> |
The following table lists the labor schedule of John Doe:
| Start date | End Date | Element | % Distribution | Charging Instruction |
|---|---|---|---|---|
| 01-Jan | 31-Dec | Regular Salary, Supplemental Pay | 100 | PTAEO2 |
Assuming that you have set the Import Costed Hours configuration option to Yes, the PSP: Import Payroll Transactions process creates the following payroll lines / sublines:
| Start Date | End Date | Element | Pay Amount | Hours | Override Charging Instruction |
|---|---|---|---|---|---|
| 23-Oct | 29-Oct | Regular Salary | $1200.00 | - | |
| 27-Oct | 27-Oct | Supplemental Pay | $160.00 | - | |
| 28-Oct | 28-Oct | Suppelmental Pay | $80.00 | - | |
| 29-Oct | 29-Oct | Supplemental Pay | $80.00 | - | |
| 27-Oct | 27-Oct | Supplemental Pay | 8 | - | |
| 28-Oct | 28-Oct | Supplemental Pay | 4 | - | |
| 29-Oct | 29-Oct | Supplmental Pay | 4 | - |
The PSP: Create Distribution Lines process creates the following distribution lines:
| Distribution Date | Element | Amount | Hours | Charging Instruction |
|---|---|---|---|---|
| Monday, 23-Oct | Regular Salary | $240 | PTAEO2 | |
| Tuesday, 24-Oct | Regular Salary | $240 | PTAEO2 | |
| Wednesday, 25-Oct | Regular Salary | $240 | PTAEO2 | |
| Thursday, 26-Oct | Regular Salary | $240 | PTAEO2 | |
| Friday, 27-Oct | Regular Salary | $240 | PTAEO2 | |
| Friday, 27-Oct | Supplemental Pay | $160 | PTAEO2* | |
| Saturday, 28-Oct | Supplemental Pay | $80 | PTAEO2* | |
| Sunday, 29-Oct | Supplemental Pay | $80 | PTAEO2* | |
| Friday, 27-Oct | Supplemental Pay | 8 | PTAEO2* | |
| Saturday, 28-Oct | Supplemental Pay | 4 | PTAEO2* | |
| Sunday, 29-Oct | Supplemental Pay | 4 | PTAEO2* |
* - Since no charging instructions accompany the element entry, Oracle Labor Distribution applies the labor schedule that was created using the Labor Schedules window.
The application creates the following summary lines:
| Effective Date | Charging Instruction | Summary Amount / hours |
|---|---|---|
| 27-Oct | PTAEO2 | $1520 |
| 27-Oct | PTAEO2 | 16* |
* The application stores the hours information in the Summary Amount column. The application distinguishes the amounts and hours using the STAT currency code in the corresponding control record in the psp_payroll_controls table.
Calculate Distribution Amounts
For each distribution line, Labor Distribution calculates the amount to be distributed for the Grants Accounting or Projects charging instruction or the General Ledger account of that line for the dates of the distribution line. The distribution amount is calculated for each charging instruction for each day. The amount for a single day is the daily rate. The distribution amount is then stored in the Distribution Lines table.
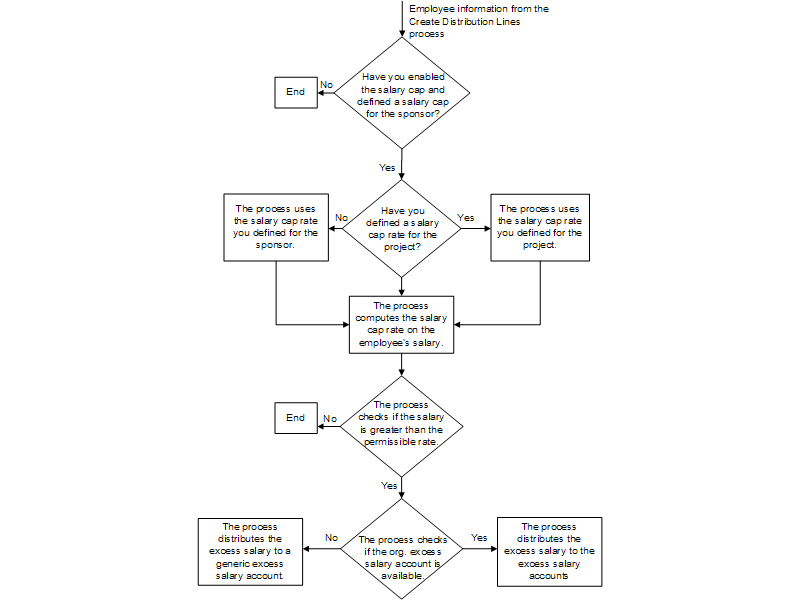
Salary Cap
The National Institute of Health (NIH) restricts the amount of direct salary that organizations can pay to individuals under an Agency for Healthcare Research and Quality (AHRQ) grant, cooperative agreement, or application contract. The maximum amount of direct salary is the Salary Cap. As a Labor Distribution Administrator, you use Labor Distribution to transfer salary in excess of the predefined salary cap to another PTAEO or GL Account (Excess Salary Account).
To set up Salary Cap, use the Salary Cap page. The Salary Cap page enables you to:
-
Create new salary cap values for a sponsor.
-
Set up overrides for a project. You can override the salary cap for a project if, for example, you have explicit permission from the sponsor, or if you have some salary cap amount remaining to distribute from a previous year.
-
Create an excess salary account at the organization level.
The Create Distribution Lines process distributes the excess salary to the excess salary account based on your setup. If the organization excess salary account does not exist, or if its charging instruction dates are not valid, then the application transfers the funds to the generic excess salary account. For more information, see Setting Up a Generic Excess Salary Account
Important: The Create Distribution Lines process does not apply salary cap rates to the suspense account. This is because a suspense account is a temporary location to store funds and not the actual account where the process distributes funds. Therefore, ensure that the process does not charge funds to the suspense account.
You can run the Reconciliation Between Sublines and Distribution Lines process to find out if the Create Distribution Lines process has charged funds to suspense accounts. If the process has charged funds to suspense accounts, run the Rollback Distribution Lines process, modify your labor schedule accordingly, and run the Create Distribution Lines process again.
To use Salary Cap, you must configure the following:
-
Enabled Salary Cap for your organization
-
Associated the predefined sponsor details to the sponsor name
-
Select an override element set to ignore salary basis elements and use the override element set to apply salary cap
-
Identify a generic organization so that you can create a generic excess salary account.
See: Configuring Values for Labor Distribution
The following diagram illustrates how the application computes salary cap rates for employees' salaries:
Salary Cap calculation when distribution is 100% to a single award
The table displays how Labor Distribution calculates the salary cap for an employee, John Doe, with a monthly salary of $15,000. The distribution is 100% to an NIH award with a salary cap and the NIH Salary Cap for the period 1 January 2005 and 31 December 2005 is $180,100.
The application calculates the monthly NIH cap amount by dividing the annual salary cap by 12: $180,100/12 = $15,008.33.
| Payroll Period | Salary in (US Dollars) | NIH Award Account (US Dollars) | Excess Salary Account (US Dollars) |
|---|---|---|---|
| January | 15,000 | 15,008.33 | 0.00 The salary is less than the monthly salary cap, hence the application does not transfer any amount to the excess salary account. |
| February | 15,000 | 15,008.33 | 0.00 |
| March | 15,000 | 15,008.33 | 0.00 |
| April | 15,000 | 15,008.33 | 0.00 |
| May | 15,000 | 15,008.33 | 0.00 |
| June | 15,000 | 15,008.33 | 0.00 |
| July | 20,000 | 15,008.33 | 4,991.67 (Salary - NIH Award Account) The salary exceeds the monthly salary cap amount, hence the application transfers the excess amount to the Excess Salary Account. |
| August | 20,000 | 15,008.33 | 4,991.67 |
| September | 20,000 | 15,008.33 | 4,991.67 |
| October | 20,000 | 15,008.33 | 4,991.67 |
| November | 20,000 | 15,008.33 | 4,991.67 |
| December | 20,000 | 15,008.33 | 4,991.67 |
| Total | 210,000.00 | 180,099.96 | 29,950.02 |
Salary Cap calculation when distribution is to two Awards, one having a salary cap
The table displays how Labor Distribution calculates the salary cap for an employee, John Doe, with a monthly salary of $15,000. The distribution is 10% to an NIH award with a salary cap and 90% to a NASA award not having a salary cap. The NIH Salary Cap for the period 1 January 2005 and 31 December 2005 is $180,100.
The application calculates the monthly NIH cap amount by dividing the annual salary cap by 12 and multiplying by 10%, which is $180,100/12*10% = $15,00.83.
| Payroll Period | Salary (US Dollars) | NIH Award Account (US Dollars) | NASA Award Account (US Dollars) | Excess Salary Account (US Dollars) |
|---|---|---|---|---|
| January | 15,000 | 1,500 | 13,500 | 0.00 The salary is less than the monthly salary cap, hence the application does not transfer any amount to the excess salary account. |
| February | 15,000 | 1,500 | 13,500 | 0.00 |
| March | 15,000 | 1,500 | 13,500 | 0.00 |
| April | 15,000 | 1,500 | 13,500 | 0.00 |
| May | 15,000 | 1,500 | 13,500 | 0.00 |
| June | 15,000 | 1,500 | 13,500 | 0.00 |
| July | 20,000 | 1,500.83 | 18,000 | 4,99.17 (Salary - NIH Award Account - NASA Award Account) 10% of the monthly salary ($2000) exceeds the NIH Salary Cap ($1500.83), hence the application transfers the excess amount ($2000 - $1500.83 = 499.17) to the Excess Salary Account. |
| August | 20,000 | 1,500.83 | 18,000 | 4,99.17 |
| September | 20,000 | 1,500.83 | 18,000 | 4,99.17 |
| October | 20,000 | 1,500.83 | 18,000 | 4,99.17 |
| November | 20,000 | 1,500.83 | 18,000 | 4,99.17 |
| December | 20,000 | 1,500.83 | 18,000 | 4,99.17 |
| Total | 210,000.00 | 18,004.98 | 189,000 | 2,995.02 |
Perform Validation of Charging Instructions
A final validation of the charging instructions is performed after the charging instruction population is completed. All validations performed during labor scheduling are applied at this time with the following changes:
-
The expenditure item date used for validation is the effective date from the payroll sublines.
-
All edit failures are considered errors.
-
If an edit failure occurs, the charging instruction is replaced by the organizational suspense charging account.
For information on the validation process and rules, see Data Entry Validations Process.
Produce Control Reports
Labor Distribution provides control reports to assist the user with reconciling the payroll sublines with the distribution lines generated. The following reports can be produced:
-
Suspense Account Report
-
Payroll reconciliation reports
For information on Suspense Account Report, see Reports Procedures.
For information on payroll reconciliation reports, see Reconciliation and Control Reports Procedures.
Roll Back Distribution Lines
The Roll Back Distribution Lines process rolls back distribution lines to rectify errors after the Create Distribution Lines process is run but before the Summarize and Transfer Payroll Distributions process is run. This process reduces the need to create distribution adjustments to a great extent.
To roll back Oracle Payroll distributions, users specify the following:
-
Payroll source name
-
Payroll source code
-
Optionally, payroll period to roll back a specific payroll
Note: If the user does not specify a payroll period, the process rolls back all Oracle payroll distribution lines that are not summarized and transferred.
To roll back non-Oracle payroll distributions, users specify the following:
-
Payroll source name
-
Payroll source code
-
Optionally, batch name to roll back a specific batch
Note: If the user does not specify a batch name, the process rolls back all non-Oracle payroll distribution lines that are not summarized and transferred.
After the Roll Back Distribution Lines process is run, users run one of the following processes to rectify errors:
-
Rollback Import Payroll Transactions
-
Rollback of Non-Oracle Payroll
For information on rolling back Oracle Payroll distribution lines, see Rolling Back Oracle Payroll Import Procedure.
For information on rolling back non-Oracle Payroll distribution lines, see Rolling Back Non-Oracle Payroll Procedure.
Example
If the user runs the Reconciliation Report between Payroll Sublines and Distribution Lines after running Create Distribution Lines, the user can identify distributions that are not targeted for the correct transfer destination. To rectify the distributions, the user rolls back the distribution lines and the imported Oracle or non-Oracle payroll, makes changes to labor schedules, and reruns the processes. This rollback process is essential to preclude making adjustments in Distribution Adjustments for a large amount of distribution lines.
For information on running Reconciliation Report between Payroll Sublines and Distribution Lines, see Generating Reconciliation and Control Reports Procedure.
Creating Distribution Lines Procedure
-
In Labor Distribution, navigate to the Submit Request window as follows:
Processes & Reports - Run
The Submit a New Request pop-up window appears.
-
Select the Single Request radio button.
-
Click OK.
The Submit Request window appears.
-
In the Name field, select PSP: Create Distribution Lines from the list of values.
-
Click OK.
The Parameters pop-up window appears.
Note: If auto-population is enabled, Create Distribution Lines is run with auto-population.
-
In the Source type field, select a source type from the list of values.
-
In the Source code field, select a source code from the list of values.
-
In the Payroll Name field, select a payroll from the list of values.
-
In the Time period field, select a time period from the list of values.
-
In the Batch name field, select a batch name from the list of values.
-
To apply the parameters, click OK.
-
In the Submit Request window, click Submit.
The Requests window appears.
-
To view the report file, select the appropriate Request ID and click View Output.
-
Close the window.
Additional Information: To improve performance, you can run the PSP: Create Distribution Lines process in multiple threads. To do this, you must define an Action Group Parameter in the Pay Action Parameters window. Ensure that you enable the Action Parameters Group (HR: Action Parameter Group Name) profile you define for your responsibility in the System Profile Values window.
For more information on enabling Action Group Parameters, see My Oracle Support Document 302304.1
Rolling Back Distribution Lines Procedure
To roll back distribution lines, perform the following steps.
-
In Labor Distribution, navigate to the Submit Request window as follows:
Processes & Reports - Run
The Submit a New Request pop-up window appears.
-
Select the Single Request radio button.
-
Click OK.
The Submit Request window appears.
-
In the Name field, select PSP: Roll Back Distribution Lines from the list of values.
The Parameters pop-up window appears.
-
In the Source Type field, select a payroll name from the list of values.
Note: O indicates an Oracle payroll and N indicates a non-Oracle payroll batch.
-
In the Source Code field, enter a source code from the list of values.
Note: PAY indicates an Oracle payroll and NON-ORACLE indicates a non-Oracle payroll batch.
-
Perform one of the following:
-
If rolling back distribution lines from an Oracle payroll, in the Time Period Id field, enter a time period from the list of values.
-
If rolling back distribution lines from a non-Oracle payroll batch, in the Batch Name field, select a batch from the list of values.
-
-
To apply the parameters, click OK.
-
In the Submit Request window, click Submit.
The Requests window appears.
-
To view the report file, select the appropriate Request ID and click View Output.
-
Close the window.
Setting Up a Generic Excess Salary Account
It is mandatory that you set up a generic excess salary account. The application transfers excess funds to this account if you do not define an organization excess salary account for the organization of the employee's assignment.
To set up a generic excess salary account, you identify an organization as a generic organization, and then set up an organization excess salary account under that organization.
To set up a generic excess salary account
-
On the Configuration Values page, select Salary Cap as the module from the Module Name list.
-
Select Assign Generic Organization for Excess Salary Account from the Configuration Type list.
-
Click Update, select the organization that you want to identify as a generic organization, and click Apply.
-
On the Salary Cap page, in the Excess Salary Accounts tab, create an excess salary account under the organization that you identified as a generic organization.
Setting Up Salary Cap Rates
You can set up annual salary cap rates for a sponsor. Based on the annual salary cap rate that you define, the Create Distribution Lines process determines the excess funds. Ensure that you use the Configuration Values page to map the sponsor code to the sponsor that you created in Oracle Grants Accounting.
See: Configuring Values for Labor Distribution
To set up a salary cap rate
-
From the Setup menu, click Salary Cap.
-
On the Salary Cap page, click Add Salary Cap in the Annual Salary Cap tab.
-
On the Add Salary Cap page, specify the required information and click Apply. If you want to add another salary cap rate, then click Add Another.
Setting Up Project Overrides
You can set up a salary cap rate for a project. When the Create Distribution Lines process processes the salary cap for a project that contains an override, it overrides the annual salary cap rate and uses the salary cap rate that you defined for that project.
To set up a project override
-
From the Setup menu, click Salary Cap.
-
On the Salary Cap page, click the Project Overrides tab, and click Add Override.
-
On the Add Override page, specify the required information and click Apply. If you want to add another override, then click Add Another.
Setting Up an Organization Excess Salary Account
You must create an organization excess salary account to enable the Create Distribution Lines process to transfer excess funds.
To set up an organization excess salary account
-
From the Setup menu, click Salary Cap.
-
On the Salary Cap page, click the Excess Salary Accounts tab, and click Add Account.
-
On the Add Account page, specify the required information, and click Apply. If you want to add another organization excess salary account, then click Add Another.