29 Creating Business Mashups
Business mashups are reusable components that you can create or edit at runtime. A mashup can be an ensemble of multiple UI widgets that interact with each other. Each component in a business mashup could be working against a different data source such as SQL, Web Services, or XML. A mashup can display data retrieved from a data source as a graph or table, or write to a data source using a form.
Oracle WebCenter Portal provides a powerful way for developers, administrators, and power users to create mashups in the running portal or social and collaborative application without bringing the system to a halt. A fully-integrated data publisher enables you to perform the following tasks:
-
Create data controls to retrieve information from different data sources.
-
Create mashups by consuming data controls in task flows or application pages.
-
Provide users the flexibility to customize their view of a mashup.
This chapter explains how to perform these tasks. It includes the following sections:
This chapter is intended for users who want to provide and manage Resource Catalogs in their Spaces application. Portal designers with the application permission Application-Resource Catalogs-Create Edit Delete can manage application-level Resource Catalogs. Space moderators with the permission Space-Resources-Create Edit Delete (simple permission model) or Space-Resource Catalogs-Create Edit Delete (detailed permission model) can manage space-level Resource Catalogs. For information about roles and permissions, see Chapter 23, "Understanding Security."
29.1 Introducing Business Mashups
Business mashups are visualizations created by gathering data from various data sources and publishing the gathered data using different layouts such as forms, tables, and graphs. The Resource Manager (Resources page), shown in Figure 29-1, provides the following options to create business mashups:
-
Data Controls: Opens the Data Controls page to create and manage SQL and Web Services data controls.
-
Task Flows: Opens the Task Flows page to create and manage task flows that can be consumed in application pages. You may want to create task flows to consume data controls and wire parameters so that users can control the data displayed in their view of the data controls.
-
Mashup Styles: Opens the Mashup Styles page to manage the templates available for creating task flows.
Figure 29-1 Mashups Section in the Resource Manager

Description of "Figure 29-1 Mashups Section in the Resource Manager"
You can create data controls, task flows, and mashup styles at the application level and space level. While application-level resources are also available for consumption in spaces, space-level resources are available only to the space in which they were created. You cannot modify or delete application-level resources from within a space.
Note:
If you consume application-level data controls inside a space and want to export that space to another Spaces instance, you must perform all the necessary checks to ensure that the data control works properly. For more information, see Section 29.2.5.1, "Steps You Must Perform After an Import."
This section includes the following subsections:
29.1.1 Supported Data Controls
Spaces applications support the creation of data controls that can be used to view data from a data source and filter the data using parameters, enter data into a data source (provided the data source supports it), and drive the data in one component from the data in another component.
The advantage of creating data controls at runtime is that you can get data from different data sources and create visualizations or mashups without having to redeploy and restart your application. What's more, you can modify visualizations at any point of time and control what is retrieved from the data source and rendered. You can also write to the data sources using forms within business mashups.
The type of data control to use depends on where the data is stored and how it is exposed. For example, use a Web Service data control to call a Web Service for data. The process of collecting data is different for each data source. The Resource Manager - Data Controls page in your application or space provides options to create SQL and Web Service data controls. This section describes these data control types in brief. It includes the following subsections:
29.1.1.1 SQL Data Controls
Used to collect data from relational databases. To create a SQL data control, you must have a data source connection from the application server to the database. You can retrieve data by specifying a SQL query. To limit the data retrieved to specific criteria, you can specify bind parameters as part of the SQL query. You can add as many bind parameters as required.
Data controls created at runtime can be used only to query the database, you cannot update the retrieved data. However, design time data controls that were created with read-write capabilities allow the retrieved data to be updated.
Bind parameters provide the following benefits:
-
They enable reuse of a data control. A data control with one or more bind variables can be used many times in different visualizations, each instance displaying different data.
-
They enable end users to control the data displayed in the data control. Data controls that you create are eventually consumed in pages or task flows and viewed by end users. You can include the data control in a task flow and wire its parameters to task flow parameters so that the task flow parameter drives the data in the data control. For more information, see Section 29.4.3, "Binding Data Control Parameters to Task Flow Parameters."
Another way to control the data displayed is by wiring a data control parameter to an input text component on the task flow. You can achieve this type of wiring easily by using a parameter form task flow. For more information, see Section C.2.4, "Adding the Data Control in a Parameter Form Task Flow."
-
If a database has imposed an IO limit, and the query happens to traverse large number of records that exceed the IO limit, then adding such a data control to a page or task flow may result in an error and failure to render. You can limit the data retrieved from a database to specific criteria by specifying bind parameters in your query.
For the steps to create a SQL data control, see Section 29.2.1, "Creating a SQL Data Control."
29.1.1.2 Web Service Data Controls
Used to collect data from a business service that can be accessed over the Internet using standard protocols, such as SOAP and HTTP. To collect data from a Web Service, you must know the path to the Web Service Description Language (WSDL) file. The WSDL file describes the Web Service and specifies the methods that can be called, including the expected parameters. It also describes the returned data.
Based on the permissions you have on a Web Service data source, you can only specify values for parameters exposed by its methods; you cannot add or delete parameters. You can specify values for the following types of parameters:
-
Scalar parameters: These are simple parameters for which you can directly specify string or EL values to display data.
-
Complex parameters: These are derived parameters that take objects as parameters. They may also get their value from scalar parameters exposed by the method. Complex parameters are available in XML format.
See Section C.5, "Creating a Mashup with Data from a Siebel Data Source" for an example of how you can use complex parameters.
Note:
You cannot pass values to complex parameters that are recursive, that is, if A includes B and B in turn references A.
-
Array parameters: These parameters enable you to pass multiple values at a time, thereby updating multiple records in the data source simultaneously. See Section C.5, "Creating a Mashup with Data from a Siebel Data Source" for an example of how you can use array parameters.
Apart from querying the data source, for data sources that allow updating, Web Service data controls also provide an option to update records.
For more information, see Section 29.2.2, "Creating a Web Service Data Control."
29.1.2 Supported Visualizations
The data gathered using SQL and Web Service data controls can be rendered on a page or task flow in different ways. While editing a page or task flow, when you click Add against a data control's accessor, method, or parameter in the Resource Catalog, the Add menu displays different drop handlers. The drop handlers enable you to add a data control's objects as UI elements such as tables, graphs, forms, buttons, or labels. Depending on the type of object and the flavors supported, you can different UI elements. This section describes these elements. It includes the following subsections:
29.1.2.1 Table
This option is displayed when you select a data control accessor that returns a collection of objects that can be displayed in columns of a table. Select this option to display data in a tabular layout. When you add a data control inside a task flow, you can wire data control parameters to task flow parameters so that the table displays data based on a parameter value that you specify. You can add an editable table, or a read-only table that displays data based on your specification, but cannot be edited.
For more information, see Section 29.4.1.1, "Adding a Data Control as a Table."
29.1.2.2 Form
This option is displayed when you select a data control accessor that returns a collection of objects that can be displayed in a form. Select this option to display source data in a form. When you add a data control inside a task flow, you can wire data control parameters to task flow parameters so that the form displays data based on a parameter value that you specify. You can add an editable form, or a read-only form that displays data based on your specification, but cannot be edited. However, using an editable form makes sense only if the data source supports writing back to it.
For more information, see Section 29.4.1.2, "Adding a Data Control as a Form."
29.1.2.3 Graph
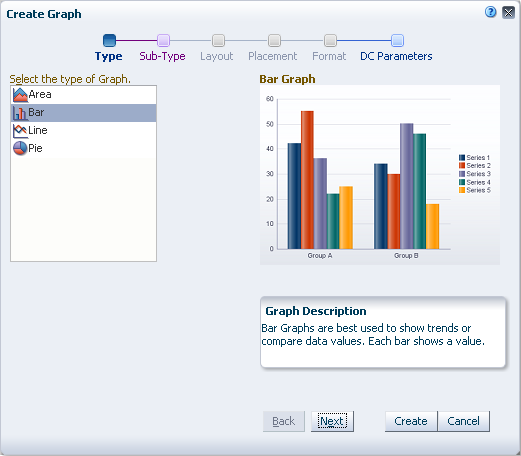
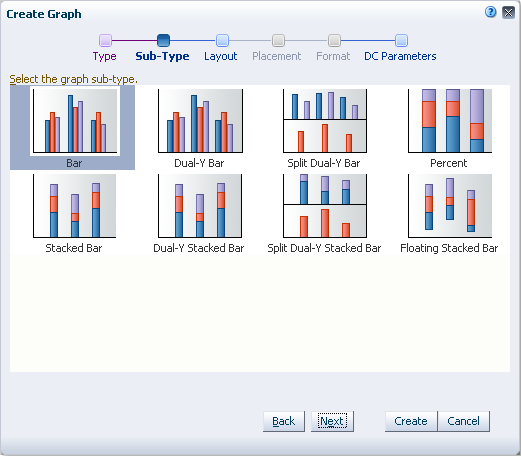
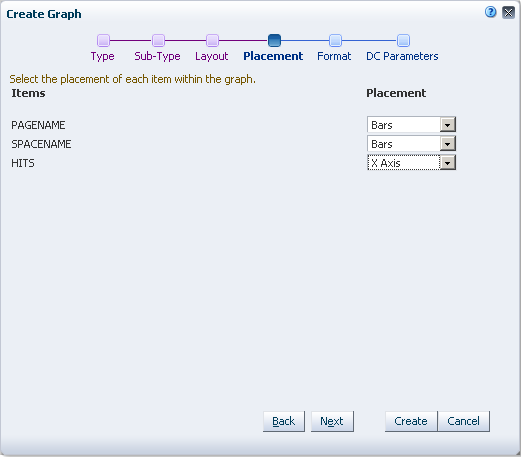
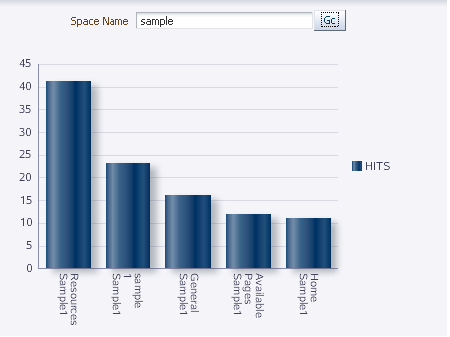
This option is displayed when you select a data control accessor that returns a collection of objects that can be displayed in a graph. This is useful for the purpose of analysis, when you want to generate a report. Graphs cannot be edited. Select this option to display your data graphically, as a bar, pie, line, or an area chart. When you add a data control inside a task flow, you can wire data control parameters to task flow parameters so that the graph displays data based on a parameter value that you specify.
For more information, see Section 29.4.1.3, "Adding a Data Control as a Graph."
29.1.2.4 Button or Link
The ADF Button, ADF Link, ADF Image Link, and ADF Toolbar Button options are displayed when you select a data control's methods or operations that perform an action. Select any of the button or link options while adding methods or operations such as Create, Update, Delete, Commit, Rollback, Save, or Close. Different options are available for different data controls depending on the methods exposed by the data source. For more information, see Section 29.4.7, "Writing to a Data Source from a Visualization."
29.1.2.5 Text or Label
The ADF Output Text, ADF Output Text w/ Label, ADF Output Formatted, ADF Output Formatted w/ Label, ADF Input Text, ADF Input Text w/ Label, and ADF Label options are displayed when you select a data control's attributes or methods that return a single object. An attribute can be a scalar parameter of an accessor, a method return, or an object member of a complex parameter. Select a text or label option depending on whether you want to display the value to users or want users to specify a value. When you add a data control inside a task flow, you can wire data control parameters to task flow parameters so that the task flow displays data based on a parameter value that you specify. You can even add an input text component and wire it to a data control parameter. For more information about this type of wiring, see Section 29.4.4, "Wiring a Data Control to a Parameter Form Task Flow."
29.2 Creating and Managing Data Controls
This section describes how to create SQL and Web Service data controls. It includes the following sections:
29.2.1 Creating a SQL Data Control
SQL data controls enable you to retrieve data from a relational database using a SQL query. Therefore, before creating the data control, you must have a database connection. The task of creating a database connection must be performed by a WebCenter Portal administrator. For reference, in addition to the steps to create a SQL data control, this section also describes how to create a database connection. It includes the following subsections:
29.2.1.1 Prerequisites When Using a DB2 or SQL Server Database
If you are using a DB2 or a SQL Server database, perform the following prerequisite tasks before you create a database connection:
If You Use a DB2 or a SQL Server Database Connection:
The default SQL style for all database connections is "Oracle". If you create a database connection to an IBM DB2 or Microsoft SQL Server database, then you must perform the following tasks:
-
Manually override the SQL style with one that supports the DB2 or SQL Server database. For this, you must specify a Java system property,
jbo.SQLBuilder, with the valueDB2orSQLServer. When Oracle WebLogic Server is started with this configuration, it supports the SQL style you specified.Specify the system property as a Java command line option in either of the following ways (examples show property values for DB2):
-
Open the
DomainHome/bin/setDomainEnv.shfile and add-Djbo.SQLBuilder=DB2to theJAVA_OPTIONSline. -
Edit the managed server start script in a text editor and add
-Djbo.SQLBuilder=DB2to theJAVA_OPTIONSline.For more information, see "Specifying Java Options for a WebLogic Server Instance" in Oracle Fusion Middleware Managing Server Startup and Shutdown for Oracle WebLogic Server.
-
-
Specify
Javaas a typemap entry using thejbo.TypeMapEntriesproperty as follows:-Djbo.TypeMapEntries="Java"
29.2.1.2 Creating a Database Connection
This section describes the procedure to create a database connection from the Oracle WebLogic Server Administration Console.
Note:
This section is included here for reference. The task must be performed by a WebCenter Portal administrator. For more information, see "Setting Up Database Connections" in Oracle Fusion Middleware Administrator's Guide for Oracle WebCenter Portal.
To create a database connection:
-
In the Domain Configuration section, under Services, select Data Sources.
-
On the Summary of Data Sources page, click New and select Generic Data Source.
-
On the JDBC Data Sources Properties page, enter or select the following information:
-
Name - Enter a name for this JDBC data source.
-
JNDI Name - Enter the JNDI path to where this JDBC data source will be bound. Applications look up the data source on the JNDI tree by this name when reserving a connection.
-
Database Type - Select the DBMS of the database that you want to connect to. If your DBMS is not listed, select Other.
-
-
Click Next to continue.
-
Select the JDBC driver you want to use to connect to the database. The list includes common JDBC drivers for the selected DBMS.
-
Note:
You must install JDBC drivers before you can use them to create database connections. Some JDBC drivers are installed with WebLogic Server, but many are not installed.
For more information, see "Using JDBC Drivers with WebLogic Server" in Oracle Fusion Middleware Configuring and Managing JDBC Data Sources for Oracle WebLogic Server.
-
-
On the Transaction Options page, follow these steps. Depending on the driver you selected on the JDBC Data Source Properties page, you may not need to specify any of these options.
-
Supports Global Transactions - Select this check box (the default) to enable global transaction support in this data source. Deselect this check box to disable (ignore) global transactions in this data source. In most cases, you should leave the option selected.
If you selected Supports Global Transactions, select an option for transaction processing: (available options vary depending on whether you select an XA driver or a non-XA driver)
-
Two-Phase Commit - Select this option to enable standard XA processing.
This option is only available when you select an XA JDBC driver to make database connections.
-
Logging Last Resource - Select this option to enable a non-XA JDBC connection to participate in global transactions using the Logging Last Resource (LLR) transaction optimization. Recommended in place of Emulate Two-Phase Commit.
This option is only available when you select a non-XA JDBC driver to make database connections.
-
Emulate Two-Phase Commit - Enables a non-XA JDBC connection to emulate participation in distributed transactions using JTA. Select this option only if your application can tolerate heuristic conditions.
This option is only available when you select a non-XA JDBC driver to make database connections.
-
One-Phase Commit - Select this option to enable the non-XA connection to participate in a global transaction as the only transaction participant.
This option is only available when you select a non-XA JDBC driver to make database connections.
-
-
-
Click Next to continue.
-
On the Connection Properties page, enter values for the following properties:
-
Database Name - Enter the name of the database that you want to connect to. Exact database name requirements vary by JDBC driver and by DBMS.
-
Host Name - Enter the DNS name or IP address of the server that hosts the database. If you are creating an Oracle GridLink service-instance connection, this must be the same for each data source in a given multi data source.
-
Port - Enter the port on which the database server listens for connections requests.
-
Database User Name - Enter the database user account name that you want to use for each connection in the data source.
-
Password/Confirm Password - Enter the password for the database user account.
-
-
Click Next to continue.
-
On the Test Database Connection page, review the connection parameters and click Test Configuration.
WebLogic attempts to create a connection from the Administration Server to the database. Results from the connection test are displayed at the top of the page. If the test is unsuccessful, you should correct any configuration errors and retry the test.
If the JDBC driver you selected is not installed on the Administration Server, you should click Next to skip this step.
-
Click Next to continue.
-
On the Select Targets page, select the server on which you want to deploy the data source. Select WC_SPACES to deploy the data source to your Spaces instance.
-
Click Finish to save the JDBC data source configuration and deploy the data source to the target that you selected.
See Also:
Oracle Fusion Middleware Configuring and Managing JDBC Data Sources for Oracle WebLogic Server for information about JDBC data sources.
29.2.1.3 Creating the Data Control
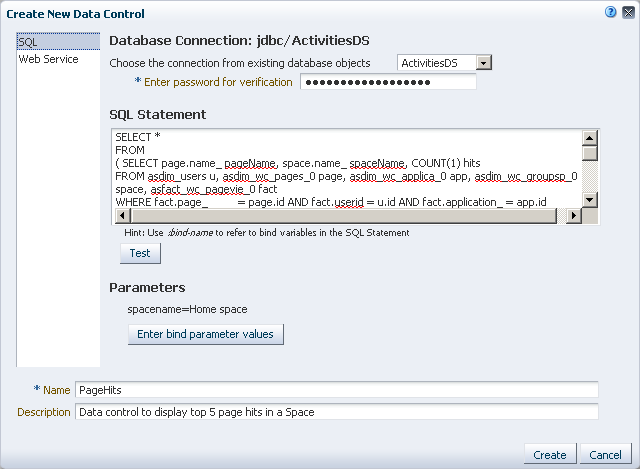
To create a SQL data control in Spaces:
-
On the Resources page, under Mashups, select Data Controls, and on the resulting Data Controls page, click Create.
-
In the Create new Data Control dialog, select SQL in the left pane (Figure 29-2).
-
In the Name and Description fields at the bottom of the dialog, enter a name and description for the data control.
-
In the Database Connection section, from the dropdown list, select the database connection that you will use for this SQL data control. For more information, see Section 29.2.1.2, "Creating a Database Connection."
-
In the password field, specify the connection password.
This field is used to ensure that only users who know the password to connect to the data source can create a data control. You must specify the password every time you create or edit a data control.
-
In the SQL Statement text box, enter a SQL query, for example:
SELECT * FROM Persons WHERE City LIKE 'sa%'
Specify any bind parameters as part of the query. Bind parameters are useful in controlling the data displayed in the data control. Consider the following example:
select ename, empno, mgr, deptno from emp where job in (:job) order by empno asc
This query returns details of all employees with a particular designation, for example, sales managers. In this query
:jobdefines the parameterjob, which maps to thejobcolumn in theempdatabase table. The query returns data based on thejobvalue (how you specify this is explained in the next step). You can add as many parameters as required. You can also use the same parameter multiple times in a statement.Notes:
-
Avoid using SQL reserved words and keywords for bind parameter names. For more information, see the topic titled "Oracle SQL Reserved Words and Keywords" in the Oracle Database SQL Language Reference in the Oracle Database documentation library.
-
If you are using a SQL Server database, you may get an error if the query contains a column with the NCHAR or NVARCHAR data type. To work around this limitation, you must modify the query using the
convertfunction as shown in the following example:select convert(varchar(20), col1) col1, convert(varchar(20), col2) col2 from table1
-
-
If you added bind variables in your SQL query, for example,
job, then click Enter bind parameter values to define initial values for those variables. -
In the Enter bind parameter values dialog, shown in Figure 29-3, specify values for the parameters. The dialog lists all parameters that you defined as part of your SQL query.
Figure 29-3 The Dialog for Setting Bind Parameter Values
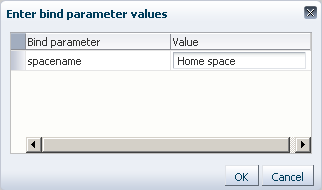
Description of "Figure 29-3 The Dialog for Setting Bind Parameter Values"
-
Click OK.
-
Click Test to test the query you entered.
If you added bind parameters, but did not specify initial values for the parameters, you will see a validation exception.
If the query is correct, you will see a table displaying the data retrieved from the data source. The table displays up to a maximum of 25 rows.
-
Click OK to return to the Create new Data Control dialog.
-
Click OK.
The new data control is listed on the Resources - Data Controls page. However, the data control is hidden by default. You can consume it in pages or task flows only if it is made available to the application. For more information, see Section 29.2.3.2, "Showing or Hiding a Data Control in the Resource Catalog."
You can now add this data control to a page or task flow. For more information, see Section 29.4.1, "Consuming a Data Control in a Task Flow."
29.2.2 Creating a Web Service Data Control
To create a Web Service data control:
-
On the Resources page, under Mashups, select Data Controls, and on the resulting Data Controls page, click Create.
-
In the Create new Data Control dialog, select Web Service in the left pane (Figure 29-4).
Figure 29-4 New Web Service Data Control Wizard
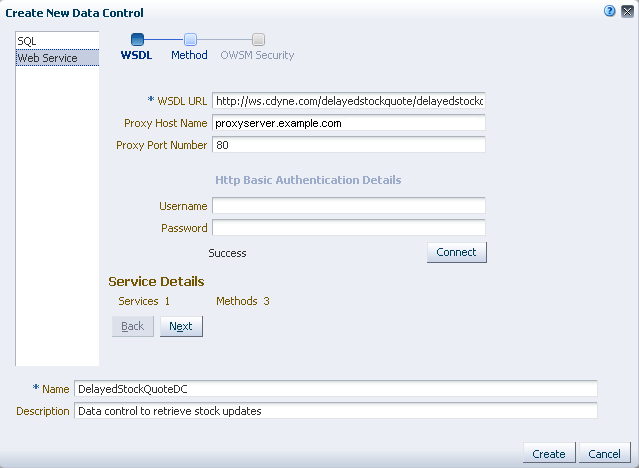
Description of "Figure 29-4 New Web Service Data Control Wizard"
-
At the bottom of the dialog, use the Name and Description fields to specify a name and description for the Web Service data control.
-
In the WSDL URL field, enter the WSDL for the data control. For example:
http://ws.cdyne.com/delayedstockquote/delayedstockquote.asmx?wsdl
-
Use the Proxy Host Name and Proxy Port Number fields to configure proxy authentication.
To ensure a secure connection to the Web Service, you must first configure your application to use proxy authentication.
Notes:
-
If a central WebCenter Portal proxy (or RSS proxy) is already configured, then the proxy fields are automatically populated with that proxy host name and port number. You can modify the proxy details or deselect the fields if you do not want to configure proxy.
Changing the WebCenter Portal central proxy does not change the proxy setting against the Web Service data control. However, changing the Web Service data control proxy setting changes the WebCenter Portal central proxy setting.
For more information about RSS proxy, see "Setting Up a Proxy Server for the RSS Service" in Oracle Fusion Middleware Developer's Guide for Oracle WebCenter Portal.
-
If Web Logic Domain proxy is already configured, and if you choose not to set proxy while creating or editing the Web Service data control, then the Web Logic Domain proxy is used as the default setting.
-
-
If you are connecting to a secured Web Service, enter user name and password to access the Web Service endpoint.
If access to the WSDL itself is secured, then you cannot connect to the Web Service from the Create new Data Control dialog. To work around this limitation, access the WSDL in a browser by specifying the user name and password, download the WSDL page, save it locally as a
.wsdldocument, then specify the path to this document in the WSDL URL field in the Create new Data Control dialog. -
Optionally, click Connect to establish the connection to the producer whose WSDL you specified.
If the connection is successful, the Service Details section displays a count of the services and methods that exist in the Web Service.
If you do not click Connect at this stage, the connection is established later, when required.
-
Optionally, click View XML to view the XML content of the WSDL document.
-
Click Next.
The Methods page displays the methods available for the selected service, and the parameters exposed for each method, as shown in Figure 29-5.
Figure 29-5 Web Service Data Control Methods
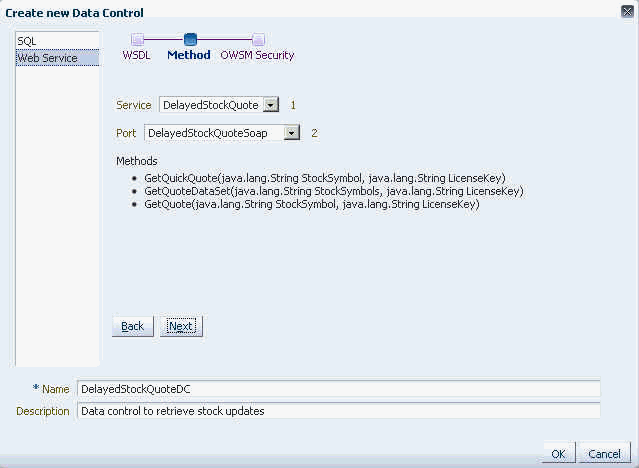
Description of "Figure 29-5 Web Service Data Control Methods"
A Web Service may expose scalar and complex parameters that control the data displayed in the data control. For more information, see Section 29.1.1.2, "Web Service Data Controls."
You can specify values for any exposed parameters. However, you can specify values only while consuming the data control in a task flow or a page. For more information, see "Editing Parameter Values for Web Service Data Controls".
-
From the Service dropdown list, select a different service, if required.
-
From the Port dropdown list, select one of the available ports.
All methods under that port are added to the data control. These methods are later available for selection in the Resource Catalog.
-
Click Next.
-
If the Web Service is secured using OWSM, use the OWSM Security panel to specify the policies to be used, as described in Table 29-1.
Table 29-1 OWSM Security Information
Name Description MTOM
The MTOM (message transmission optimization mechanism) policy you want to use.
Reliability
The reliability policy you want to use.
Addressing
The addressing policy you want to use.
Security
Any additional security policies you want to apply.
For example, if your Web Service is secured using a policy named
mycompany/wss_username_token_service_policy, populate the Security field with the client policy, which ismycompany/wss_username_token_client_policy.See Also:
Oracle Fusion Middleware Security and Administrator's Guide for Web Services for more information about security policies.
-
You can override properties on the security policy that you specified in the previous step. Use the Add Property and Remove Property buttons to add or remove entries in the Override OWSM Policy Properties section.
Note:
Override properties are defined by the policy. Therefore, to perform this step, you must know the policy being used and the properties that you can override.
For example, if you specified a Security policy,
mycompany/wss_username_token_client_policy, and the policy has acsf-keyproperty, then in the override section, shown in Figure 29-6, click Add Property to add a value forcsf-key. Note that this key must exist in configured keystore.See Also:
"Adding Keys and User Credentials to the Credential Store" in Oracle Fusion Middleware Security and Administrator's Guide for Web Services for information about adding
csf-keyto the credential store.Figure 29-6 New Web Service Data Control - OWSM Security
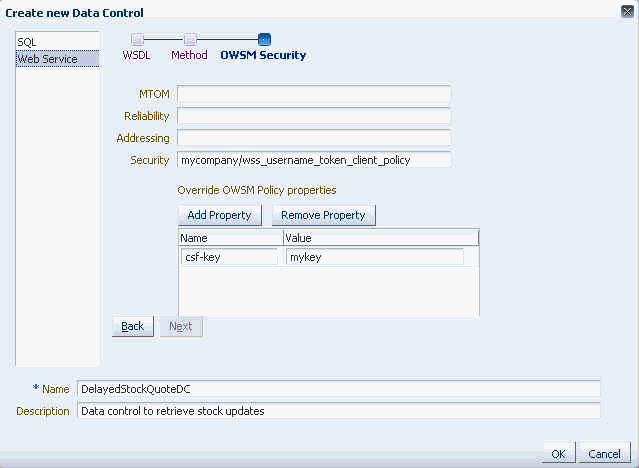
Description of "Figure 29-6 New Web Service Data Control - OWSM Security"
-
Click OK.
The new data control is listed on the Resources - Data Controls page. However, the data control is hidden by default. You can consume it in pages or task flows only after it is made available to the application. For more information, see Section 29.2.3.2, "Showing or Hiding a Data Control in the Resource Catalog."
You can now add this data control to a page or task flow. For more information, see Section 29.4.1, "Consuming a Data Control in a Task Flow."
29.2.3 Managing Data Controls
In addition to creating data controls, you can also edit, copy, expose, and delete data controls on the Resources - Data Controls page. This section describes these tasks. It includes the following subsections:
29.2.3.1 What You Should Know About Editing or Deleting a Data Control
The data controls that you create are consumed in pages or task flows. As a result, when you edit or delete a data control, the references to this data control in pages or task flows may be broken. Therefore, use the Edit and Delete options on a data control with caution, after considering the impact on the consuming pages and task flows.
If you added a data control inside a task flow and later deleted the data control, you can repair the task flow by removing references to the data control from the task flow's source files. Perform the following steps to repair a task flow that has broken references to a data control:
-
In the Resource Manager (see Section 11.1.4, "Accessing Resources"), select the task flow that you need to repair.
-
From the Edit menu, select Edit Source.
-
Click each of the three tabs, Taskflow Definition, Fragment, and Page Definition, and remove any references to the data control from the source files.
Note:
To ensure that you do not end up with an invalid task flow that does not render properly, edit the source code very carefully.
-
Click OK.
29.2.3.2 Showing or Hiding a Data Control in the Resource Catalog
Data controls created from the Resources - Data Controls page must be available in the Resource Catalog so that they can be consumed in your application pages or task flows. By using the Show and Hide options from the Edit menu on the Resources - Data Controls page, you can control whether a selected data control is included in the Resource Catalog. When you mark a data control as shown, it is automatically included in the default Resource Catalog for the application or current space. Further, for a data control created at the application level, you can control whether it is available to any, all, or selected spaces in the application.
For generic information about hiding and showing resources, see Section 11.4.3, "Showing and Hiding Resources."
For generic information about resource availability in spaces, see Section 11.4.2.5, "Setting the Availability of an Application-Level Resource in Other Spaces."
29.2.3.3 Copying Data Controls
You can make a copy of a data control by selecting it and choosing Copy from the Edit menu. The procedure to copy a data control is similar to that for copying any other resource. For the generic procedure, see Section 11.4.1, "Copying a Resource."
Note:
Avoid copying an inherited Web Service data control as you may see an internal error when you run or edit the copy.
29.2.3.4 Editing Data Controls
You can modify a data control by selecting it and choosing Edit from the Edit menu. The Edit dialog enables you to modify the values that you provided while creating the data control. For information about the fields, see the detailed steps in Section 29.2.1, "Creating a SQL Data Control" and Section 29.2.2, "Creating a Web Service Data Control."
29.2.3.5 Editing Data Control Bind Variables
You can add or rename bind variables in existing SQL data controls by editing the SQL query used for the data control. Modify the SQL query in the Create or Edit Data Control dialog. For the detailed steps, see Section 29.2.1.3, "Creating the Data Control."
Note:
You cannot create or edit parameters for Web Services data controls. A Web Services data control only allows you to specify values for the parameters exposed by its methods.
When you consume a data control, you can control the display of data in the visualization by specifying proper values for the data control's bind variables or parameters. For more information, see Section 29.4.6.1, "Editing Parameter Values for a Data Control Visualization."
29.2.3.6 Setting Properties on a Data Control
Each data control has certain properties associated with it that control how it is displayed in the application or space. You can edit these properties through the Edit Properties dialog. For the generic procedure, see Section 11.4.2, "Setting Properties on a Resource."
29.2.3.7 Setting Security on a Data Control
When you create a data control, the default application-level or space-level security settings are applied to it. You can select Security Settings from the Edit menu to modify the default settings in the following ways:
-
Change the default permissions granted to users and roles.
-
Revoke all permissions for a user or role.
-
Grant
EditandManagepermissions to additional users and roles.
For the detailed steps, see Section 11.4.4, "Setting Security for a Resource."
29.2.3.8 Deleting Data Controls
You can delete a data control by selecting it and choosing Delete from the Edit menu. For the generic procedure, see Section 11.4.5, "Deleting a Resource."
29.2.4 Using Design-Time Data Controls
Oracle WebCenter Portal: Framework exposes a large number of service data controls that can be added to application pages and task flows. Design-time data controls are not available out-of-the-box in the Spaces Resource Catalogs, but they are available in the Resource Registry. You can add these data controls to custom catalogs from the Resource Registry. The data controls can then be added to pages and task flows in your Spaces instance.
Note:
The Design-Time DataControls folder lists all the WebCenter Portal service data controls. However, adding the ConnectionsNetworkDC and KudosServiceDC data controls at runtime is not supported. Avoid adding these data controls to your page or task flow.
Design-time data controls can also be added to custom catalogs in JDeveloper. For more information, see "How to Expose Data Controls Creating at Design Time" in Oracle Fusion Middleware Developer's Guide for Oracle WebCenter Portal.
29.2.5 Exporting and Importing Data Controls Across Spaces
WebCenter Portal: Spaces enables you to export and import runtime data controls as part of a space export and import. When you export a space, the data controls available in the space are also exported. This is the only way to export data controls created at runtime.
For the steps to export and import a space, see Section 55.5, "Importing and Exporting Spaces and Space Templates."
Note:
-
Unlike other portal resources, you cannot edit runtime data controls in JDeveloper. The Data Controls page in the Resource Manager does not provide Upload and Download options.
-
While importing or exporting a space that contains a Web Service data control, the Web Service must be up and accessible. If not, an import or export operation throws exceptions.
29.2.5.1 Steps You Must Perform After an Import
You must be careful while exporting and importing data controls. You may get errors if you use application-level data controls in spaces, for example, if you create an application-level data control, consume it in a space, export the space, and import it into another instance, then pages or task flows containing the application-level data control may be broken.
After a successful import, the following files on the target instance list the data controls being used in different pages, page templates, and task flows:
-
oracle/webcenter/webcenterapp/bindings/DataBindings.cpx -
oracle/webcenter/sitetemplate/view/DataBindings.cpx
To ensure that an imported data control works properly, you must perform the following tasks after importing the space to the target instance:
-
Open pages in the imported space and verify that the data controls display properly. If a data control is available on the page but does not display any data, then you must edit the page and add that data control to the page again. For the steps to add a data control, see Section 29.4.1, "Consuming a Data Control in a Task Flow."
An imported data control may not display data due to the following issues:
-
The target Spaces instance and the imported space use different data bindings CPX files.
-
The CPX file used by the page does not contain a usage entry for that data control.
-
-
For SQL data controls: In the WLS Administration Console of the target instance, create a JDBC data source connection with the same name as the connection used on the source instance. For the detailed steps, see Section 29.2.1.2, "Creating a Database Connection."
An imported page or task flow that uses a SQL data control will not work in the new space until a JDBC Connection of the same name is created.
-
For Web Services data controls:
-
In the Resource Manager (see Section 11.1.4, "Accessing Resources"), edit the data control, and provide the credentials afresh. Credentials are not exported or imported with the application. For the detailed steps, see Section 29.2.3.4, "Editing Data Controls."
You do not have to specify security policies again as they are imported and exported along with the application.
-
Open the
DCConnections.xmlfile in the imported EAR and modify the proxy host name and port number to point to the target instance. TheDCConnections.xmlfile is available in the/META-INF/mdssys/cust/adfshare/adfshare/directory.To ensure a secure connection to the Web Service, you must set up a proxy server on the target instance.
-
29.3 Creating and Managing Task Flows
In the previous sections, you learned how to create data controls to retrieve data from different data sources. These data controls can be added to pages or task flows to provide visualizations of the gathered data. Just like pages, task flows are also containers in which you can add components such as portlets, content, and other task flows. However, task flows provide the advantage of component wiring to create mashups of your choice. When you add a data control to a page, you cannot modify or control the data displayed in the data control. If you want a more flexible setup, you can add a data control inside a task flow.
You can control the data displayed in the data control by adding it inside a task flow and wiring data control parameters to task flow parameters or input text components. For example, if you have a SQL data control, with a bind parameter DeptNo, that retrieves data from an employee database, you can add this data control inside a task flow and wire a task flow parameter to the DeptNo parameter. The data control now displays data based on the value specified for the task flow parameter. You can change the task flow parameter value in Oracle WebCenter Portal's Composer to view corresponding data in the data control.
This section describes how to create and manage task flows in the Resource Manager. It includes the following subsections:
29.3.1 Creating a Task Flow
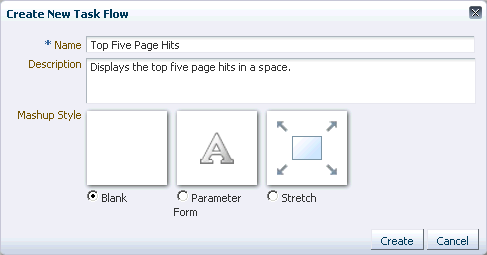
-
On the Resources page, under Mashups, select Task Flows, and on the resulting Task Flows page, click Create.
-
In the Create new Task Flow dialog, in the Name field, enter a name for the task flow.
-
In the Description field, enter a meaningful description of the task flow (Figure 29-7).
-
Select a style for the task flow. For more information, see Section 29.3.4.1, "Out-of-the-Box Mashup Styles."
-
Click OK.
The new task flow is listed on the Resources - Task Flows page. However, the task flow is hidden by default. You cannot consume it unless it is made available to the application. For more information, see Section 29.3.2.1, "Showing or Hiding a Task Flow in the Resource Catalog."
You can now edit the new task flow and populate it with different resources, including data controls, that are available in the Resource Catalog. For more information, see Section 29.3.2.3, "Editing a Task Flow."
29.3.2 Managing Task Flows
This section includes the following subsections:
29.3.2.1 Showing or Hiding a Task Flow in the Resource Catalog
Task flows created from the Resources - Task Flows page must be available in the Resource Catalog so that they can be consumed in pages. By using the Show and Hide options from the Edit menu on the Resources - Task Flows page, you can control whether a selected task flow is included in the Resource Catalog. When you mark a task flow as shown, it is automatically included in the default Resource Catalog for the application or space. In the out-of-the-box catalog, the task flow is available in a Task Flows folder that is nested inside the Mash-Ups folder.
For generic information about hiding and showing resources, see Section 11.4.3, "Showing and Hiding Resources."
In addition to showing or hiding a task flow, you can control whether an application-level task flow is available to any, all, or selected spaces in the application. For generic information about resource availability in spaces, see Section 11.4.2.5, "Setting the Availability of an Application-Level Resource in Other Spaces."
29.3.2.2 Copying a Task Flow
You can create a copy of a task flow by selecting it and choosing Copy from the Edit menu on the Resources - Task Flows page. The Copy feature enables you to replicate a local task flow in the runtime environment without having to actually export and upload the task flow.
For the generic procedure, see Section 11.4.1, "Copying a Resource."
29.3.2.3 Editing a Task Flow
You may want to edit a task flow for the following reasons:
-
Design the task flow's view fragment.
-
Create or modify task flow parameters.
The Resource Manager provides the following two options to edit a task flow:
-
Edit the task flow's view fragment in Composer.
-
Edit the source code of the task flow definition file, its view fragment, and the fragment's page definition file in a text editor.
Note:
To perform certain advanced editing tasks, you may need to download the task flow to JDeveloper, edit it, and upload it back to your Spaces instance. For more information, see Section 29.3.2.8, "Using JDeveloper to Modify a Task Flow."
This section describes both these editing tasks. It includes the following sections:
29.3.2.3.1 Editing a Task Flow in Composer
You can modify a task flow by selecting it and choosing Edit from the Edit menu on the Resources - Task Flows page. The task flow's view fragment opens in Composer. You can add a variety of resources to the view fragment from the Resource Catalog.
As this chapter focuses on how to create mashups using data from different data sources, it is useful to know how to populate task flows with data controls and bind task flow parameters to data control parameters. For more information, see Section 29.4.1, "Consuming a Data Control in a Task Flow."
For generic information about adding content to a page or task flow in Composer, see Part IX, "Organizing Your Collaborative and Social Networking Environment".
29.3.2.3.2 Editing a Task Flow's Source Files in a Text Editor
The Resource Manager provides the Edit Source option for editing the source code of the task flow fragment, its page definition, and the task flow definition file. You may want to edit a task flow's source files for the following reasons:
-
Clean up the page fragment and its page definition when you delete a referenced component, such as a data control.
When you delete a data control after it is included in a task flow, the task flow has broken links. The source editor enables you to search and delete references to the data control from the fragment and its page definition file.
-
Make adjustments to the task flow's code without having to download it, edit it in JDeveloper, and upload it back into Spaces.
To edit a task flow's source files:
Note:
Edit a task flow's source files only when absolutely necessary. To ensure that you do not end up with an invalid task flow that does not render properly, edit the source code very carefully.
-
In the Resource Manager (see Section 11.1.4, "Accessing Resources"), select the task flow, and from the Edit menu, select Edit Source.
A simple Edit Source dialog (Figure 29-8) displays with three tabs, Taskflow Definition (task flow definition XML file), Fragment (page fragment JSFF file), and Page Definition (fragment's page definition XML file).
Figure 29-8 Edit Source Dialog for a Task Flow
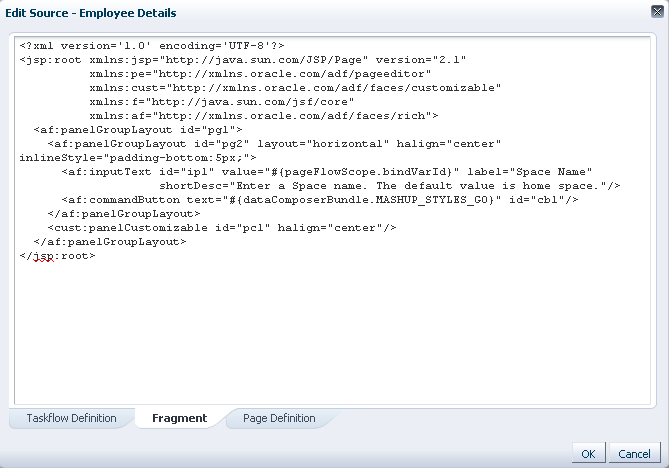
Description of "Figure 29-8 Edit Source Dialog for a Task Flow"
-
Click a tab to edit the source code for that file.
The format of the code is validated and an error message is displayed if you miss any tags or add them incorrectly.
-
Click OK.
29.3.2.4 Previewing a Task Flow
Use the Preview option to see how the task flow appears when it is consumed in a page or another task flow. In preview mode, the task flow displays Edit and Close buttons. Click Close to exit preview mode. Click Edit if you want to modify the task flow in Composer. For more information, see Section 29.3.2.3, "Editing a Task Flow."
29.3.2.5 Setting Properties on a Task Flow
Each task flow has certain properties associated with it that control how it is displayed in the application or space. You can edit these properties through the Edit Properties dialog. For the generic procedure, see Section 11.4.2, "Setting Properties on a Resource."
29.3.2.6 Setting Security on a Task Flow
When you create a task flow, the default application-level or space-level security settings are applied to it. You can select Security Settings from the Edit menu to modify the default settings in the following ways:
-
Change the default permissions granted to users and roles.
-
Revoke all permissions for a user or role.
-
Grant
EditandManagepermissions to additional users and roles.
For the detailed steps, see Section 11.4.4, "Setting Security for a Resource."
29.3.2.7 Deleting a Task Flow
You can delete a task flow by selecting it and choosing Delete from the Edit menu on the Resources - Task Flows page. For the generic procedure, see Section 11.4.5, "Deleting a Resource."
29.3.2.8 Using JDeveloper to Modify a Task Flow
You may prefer to edit a runtime task flow in JDeveloper. To do this, you have several options:
-
Use the Edit Source option to view the source code of the task flow's source files. You can copy the contents of the dialog to JDeveloper for editing and then copy the edited code back into the dialog. For more information, see Section 29.3.4.4, "Editing a Mashup Style."
-
Download an existing Spaces task flow, import it into JDeveloper, edit it, and then upload it back to Spaces.
Note:
As a task flow typically involves multiple files, trying to create a task flow in JDeveloper, expose it as a portal resource, and export all files and metadata correctly can cause errors. The deployed task flow may be broken and not work properly. Therefore, it is recommended that you use JDeveloper to only modify runtime task flows. Do not export design-time task flows as portal resources.
For information about using design-time task flows in Spaces, see Section 29.3.3, "Using Task Flows Created at Design Time."
The generic steps to upload and download a resource from Spaces are described in Section 11.5.2, "Downloading a Resource"and Section 11.5.3, "Uploading a Resource."
For information about how a task flow is imported, edited, and exported in JDeveloper, see the section "Working with Mashup Styles" in Oracle Fusion Middleware Developer's Guide for Oracle WebCenter Portal.
Note:
Task flows and mashup styles are similar resources and can be edited the same way in JDeveloper.
You must note that task flows created at runtime may contain components that are bound to data controls. When you download such a task flow, the referenced data controls are not downloaded. When you open such a task flow in JDeveloper, you will not see a fully running task flow because the associated data controls are not available in JDeveloper. The task flow will work properly only when you take it back to the Spaces instance.
29.3.3 Using Task Flows Created at Design Time
If you created a custom task flow in Oracle JDeveloper and want to consume it in Spaces, you must ensure that the task flow is available in the Resource Catalog. Users can then consume the task flow in their pages and task flows. To expose a custom task flow created in JDeveloper, you must deploy the application containing the task flow as a shared library to the Spaces instance. The task flow is then included automatically in the Resource Registry. You can add the task flow to custom catalogs from the Resource Registry.
Oracle WebCenter Portal: Framework provides a workspace specifically for deploying and undeploying Spaces Shared Library Extensions. You must use that workspace to deploy task flows to Spaces. For more information, see "Deploying Your Own Custom Code and Task Flows in Shared Libraries" in Oracle Fusion Middleware Developer's Guide for Oracle WebCenter Portal.
Design-time data controls can also be added to custom catalogs in JDeveloper. For more information, see "How to Manage Content in the Resource Catalog" in Oracle Fusion Middleware Developer's Guide for Oracle WebCenter Portal.
29.3.4 Managing Mashup Styles
Mashup styles are templates used to create new task flows in your application. They are useful if you want to reuse a custom visualization in different task flows in your application. The Create Task Flow dialog, which is invoked from the Resources - Mashup Styles page, displays all available mashup styles. The Resource Manager (Resources page) provides options to manage mashup styles that are displayed in the Create Task Flow dialog. You can offer a wider selection of mashup styles to users or restrict mashup styles so that users build only the types of task flows that you intend.
You can manage mashup styles in the following ways:
-
Copy an out-of-the-box mashup style and modify its properties.
-
Upload a mashup style created in Oracle JDeveloper.
-
Download a custom mashup style, edit it in Oracle JDeveloper, and upload it back to the runtime application.
-
Show or hide a mashup style in the Create Task Flow dialog.
-
Edit a custom mashup style or its properties.
-
Change security settings on a custom mashup style.
-
Delete a custom mashup style.
Note:
The default, out-of-the-box mashup styles cannot be edited or deleted. You can only copy these styles or hide them in the Create Task Flow dialog.
See Section C.6, "Building and Using a Custom Mashup Style with Predefined Columns" for an example of how to create a custom mashup style.
This section provides information about the out-of-the-box mashup styles included in Spaces and explains how to manage mashup styles in the Resource Manager. It includes the following sections:
-
Section 29.3.4.3, "Showing or Hiding a Mashup Style in the Create Task Flow Dialog"
-
Section 29.3.4.9, "Using JDeveloper to Build Your Mashup Style"
29.3.4.1 Out-of-the-Box Mashup Styles
Table 29-2 describes the mashup styles available out of the box.
| Name | Description |
|---|---|
|
Blank |
A one-column task flow with one layout box into which you can add content, including additional layout components. Switching this task flow style is allowed. |
|
Stretch |
Maximizes the task flow to take up all available space. For an example of a page based on the Stretch style, see the Documents page or the Announcements page in your Spaces application. Task flows based on this style cannot be switched. |
|
Parameter Form |
Provides an input text field where a user can specify a value. Out-of-the-box, the input text is wired to For example, you can use this mashup style to create a task flow with a search field and a search results table. If the results table displays data from a data control, you can wire the search field parameter to the data control parameter, so that the table displays data specific to the criteria you specify in the search field. |
29.3.4.2 Copying a Mashup Style
You can make a copy of an existing mashup style by selecting it and choosing Copy from the Edit menu on the Resources - Mashup Styles page. Copying a mashup style enables you to replicate a local style in the runtime environment without having to actually export and upload the mashup style. As there is no option to create a mashup style from scratch, you can create a copy of a default style and replace its code with that of a custom visualization that you want to create.
For the generic procedure, see Section 11.4.1, "Copying a Resource."
You can create a custom visualization with the required UI components and use a dummy EL value, #{dataPresenter.dummyData.collectionModel}, as a placeholder for the real data. When you create a new task flow using this style, you can replace the dummy EL value with the real binding. For an example showing how to create a custom mashup style, see Section C.6, "Building and Using a Custom Mashup Style with Predefined Columns."
29.3.4.3 Showing or Hiding a Mashup Style in the Create Task Flow Dialog
The Create Task Flow dialog displays all the mashup styles available for building task flows. You can control whether a mashup style is displayed in the Create Task Flow dialog by marking it as shown or hidden. For generic information about hiding and showing resources, see Section 11.4.3, "Showing and Hiding Resources."
Further, for a mashup style created at the application level, you can control whether it is available to any, all, or selected spaces in the application. For generic information about availability in spaces, see Section 11.4.2.5, "Setting the Availability of an Application-Level Resource in Other Spaces."
29.3.4.4 Editing a Mashup Style
Use the Edit Source option in the Resource Manager to edit the source code of the mashup style's task flow definition file, view fragment, and the fragment's page definition file. You may want to edit a custom mashup style to alter its layout. You can create a create a custom visualization with the required UI components and use a dummy EL value, #{dataPresenter.dummyData.collectionModel}, as a placeholder for the real data. When you create a new task flow using this style, you can replace the dummy EL value with the real binding. For an example showing how to create a custom mashup style, see Section C.6, "Building and Using a Custom Mashup Style with Predefined Columns."
To edit a mashup style's source files:
Note:
Edit a mashup style's source files only when absolutely necessary. To ensure that you do not end up with an invalid style that does not render properly, edit the source code very carefully.
-
In the Resource Manager (see Section 11.1.4, "Accessing Resources"), select the mashup style, and from the Edit menu, select Edit Source.
A simple Edit Source dialog displays with three tabs, Taskflow Definition, Fragment, and Page Definition, as shown in Figure 29-9.
-
Click a tab and edit the source code for that file.
The format of the code is validated and an error message is displayed if you miss any tags or add them incorrectly.
-
Click OK.
To perform certain advanced editing tasks, you may need to download the style, edit it in JDeveloper, and upload it back to your Spaces instance. For more information, see Section 29.3.4.9, "Using JDeveloper to Build Your Mashup Style."
29.3.4.5 Previewing a Mashup Style
Use the Preview option to see how the style appears when it is applied to a task flow. In preview mode, the mashup style displays Edit and Close buttons. Click Close to exit preview mode. Click Edit if you want to modify the style in Composer. For more information, see Section 29.3.4.4, "Editing a Mashup Style."
29.3.4.6 Setting Properties on a Mashup Style
Default, out-of-the-box mashup styles do not have associated runtime properties. However, each custom mashup style has certain properties associated with it. You can edit these properties through the Edit Properties dialog. For the generic procedure, see Section 11.4.2, "Setting Properties on a Resource."
29.3.4.7 Setting Security on a Mashup Style
When you copy or upload a mashup style, the default application-level or space-level security settings are applied to it. You can select Security Settings from the Edit menu to modify the default settings in the following ways:
-
Change the default permissions granted to users and roles.
-
Revoke all permissions for a user or role.
-
Grant
EditandManagepermissions to additional users and roles.
For the generic procedure, see Section 11.4.4, "Setting Security for a Resource."
29.3.4.8 Deleting a Mashup Style
You can delete a custom mashup style by selecting it and choosing Delete from the Edit menu on the Resources - Mashup Styles page. For the generic procedure, see Section 11.4.5, "Deleting a Resource."
29.3.4.9 Using JDeveloper to Build Your Mashup Style
You may want to create a mashup style that is beyond the editing capabilities of WebCenter Portal: Spaces, or you may prefer working in JDeveloper. To do this, you have several options:
-
Use the Edit Source option to edit the source code of the mashup style's source files. You can edit the source code directly in the Edit Source dialog or you can copy the contents of the dialog to JDeveloper for editing and then copy the edited code back into the dialog. For more information, see Section 29.3.4.4, "Editing a Mashup Style."
-
Download an existing Spaces mashup style, import it into JDeveloper, for editing, and then upload it back to Spaces.
-
Create a completely new mashup style in JDeveloper and upload it to Spaces.
The generic steps to upload and download a resource from Spaces are described in Section 11.5.2, "Downloading a Resource"and Section 11.5.3, "Uploading a Resource."
Oracle provides a special JDeveloper workspace (DesignWebCenterSpaces.jws) for developing Spaces resources, including mashup styles. The workspace offers a design environment in which to create and edit your mashup style, and also enables you to upload them to Spaces for testing. For more information and to download the JDeveloper workspace, see "Developing Spaces Resources" in Oracle Fusion Middleware Developer's Guide for Oracle WebCenter Portal.
For information about how a mashup style is imported, edited, and exported in JDeveloper, see the section "Working with Mashup Styles" in Oracle Fusion Middleware Developer's Guide for Oracle WebCenter Portal. You may need to look at the special considerations for mashup styles in JDeveloper.
29.4 Creating Data Visualizations
You have seen how to create data controls and task flows. Data controls created from the Resources - Data Controls page are available automatically in the Resource Catalog and can therefore be added to task flows and pages. You can consume data controls in task flows or pages and render them in different ways, such as tables, graphs, and forms, to create useful mashups. If you consume them in task flows, you can define parameters on the data control and bind those parameters to task flow parameters so that users can specify a value for a task flow parameter and display data based on that value.
This section describes how to consume data controls and bind data control parameters to task flow parameters. It includes the following subsections:
-
Section 29.4.3, "Binding Data Control Parameters to Task Flow Parameters"
-
Section 29.4.4, "Wiring a Data Control to a Parameter Form Task Flow"
-
Section 29.4.5, "Consuming Task Flows that Contain Visualizations"
-
Section 29.4.7, "Writing to a Data Source from a Visualization"
29.4.1 Consuming a Data Control in a Task Flow
When you add a data control, its accessors, or its methods to a task flow, you can select different UI options for rendering the data. Depending on the object you select and the visualizations it supports, different options are listed on the Add menu. For more information, see Section 29.1.2, "Supported Visualizations."
If you populate a task flow with different elements from a data control that uses bind parameters, then all the objects display data for the same parameter values. You cannot specify different parameter values for elements coming from the same data control.
This section describes the different ways in which you can add a data control inside a task flow. It includes the following subsections:
29.4.1.1 Adding a Data Control as a Table
The Table option is displayed only for data control accessors that return a collection of objects that can be displayed in columns of a table. You can add a data control as a read-only table that displays data using Output Text components by default, or as an editable table that displays data using Input Text components by default. You can also display data using Output Formatted components and hyperlinks.
This section describes the steps to add a sample SQL data control as a read-only table and editable table. It includes the following subsections:
-
Section 29.4.1.1.1, "Adding a Data Control as a Read-Only Table"
-
Section 29.4.1.1.2, "Adding a Data Control as an Editable Table"
-
Section 29.4.1.1.3, "Adding a Web Services Data Control Accessor with Complex Parameters"
29.4.1.1.1 Adding a Data Control as a Read-Only Table
A read-only table displays the data retrieved from a data control in Output Text components. The content in the table cannot be edited.
To add a SQL data control as a read-only table:
-
Select the task flow in which you want to add the data control, then from the Edit menu, select Edit to open the task flow in Composer.
-
Click Add Content in the container in which you want to add the data control.
-
In the Add Content dialog, navigate to the section of the Resource Catalog that contains runtime data controls.
Tip:
The location of data controls depends on the Resource Catalog used for editing pages. For example, in the default Resource Catalog, runtime data controls are present in the Data Controls subfolder, which is nested inside the Web Development folder or Mash Ups folder.
-
Click the Open link next to a data control, for example
PageHits, to display its content. -
Click the Add link next to the
PageHitsaccessor. From the dropdown menu, select Table, as shown in Figure 29-10.Figure 29-10 Add Content Dialog - Table Option
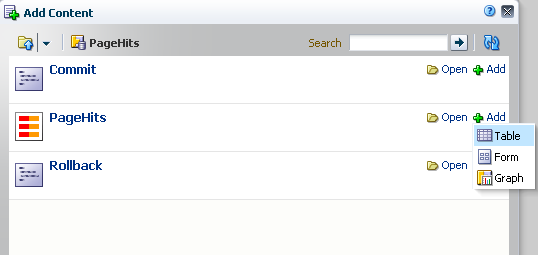
Description of "Figure 29-10 Add Content Dialog - Table Option"
-
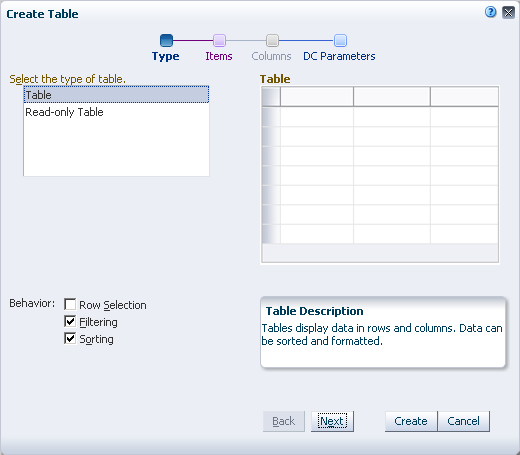
In the Create Table - Type page, shown in Figure 29-11, select Read-only Table.
-
Optionally, in the Behavior section, select the Row Selection, Filtering, and Sorting options to enable customization of the table.
Select
Row Selectionto enable selection of a row on which you can perform any operation.Note:
Using Values from Row Selection
When you enable row selection in a table and select a row, internally, the column values of the selected row are added into a row selection bean. The column values are stored in the following EL format:
#{dataComposerViewContext.dataSelection.COLUMN_NAME}You can use this format to reference the table columns from elsewhere in the task flow. Typically, this is useful in mashups where data visualizations are wired in a master-detail relationship.
However, row selection is not supported if the data control contains bind parameters.
Select
Filteringto display a text field above each column in the table. You can specify a filter criteria in these text fields to display only rows that match the criteria.Select
Sortingto enable sorting of columns. When you select this option, the column headers display Up and Down arrows, which you can use to sort columns in an ascending or descending order. -
Click Next.
-
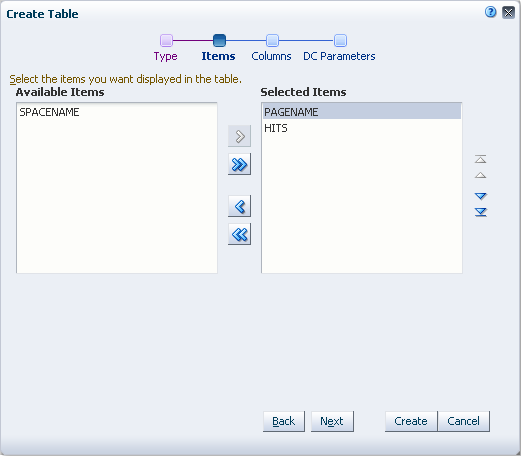
In the Create Table - Items page, select the accessor attributes that you wish to display in the table and move them from the Available Items list to the Selected Items list (Figure 29-12).
The table displays columns for attributes in the same order as they are in this dialog. You can use the Up and Down arrows to the right of the Selected Items box to resequence attributes and thereby, the table columns.
Note:
If an item has a scalar value, you can add the item to the table after initial creation only if the data control was created at design time. You cannot add items with scalar values to a table from data controls created at runtime.
-
Click Next.
-
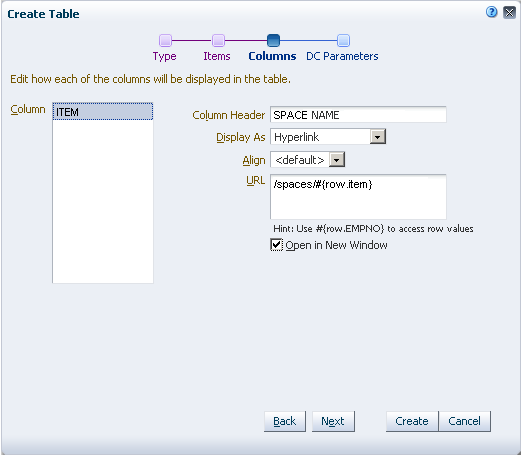
In the Create Table - Columns page (Figure 29-14), specify values for the table's display attributes, as follows:
-
Column Header: Specify a name to be used as a header for the selected column.
-
Display As: Select an output format for the column. Choose from:
-
Output Text
Use to display data records as styled read-only text.
-
Output Formatted
Use to display data records as read-only text with limited formatting.
-
Hyperlink
Use to display data in the selected column as a link, for example, when connecting to an employee database, you can display employee names as hyperlinks. When a user clicks a link, it takes them to the employee's profile page. Another example would be where you add a Spaces Web Service data control as a table that list the spaces; you can use the URL option to display space names as hyperlinks so that clicking a space name opens the space.
-
-
Align: Select whether the data in the table cells must be aligned to the center, end, left, right, or start.
-
URL: Use this field to create dynamic URLs based on the values coming from the data control. Specify the URL along with the EL value that must be appended to the URL. The URL field is enabled only if you selected Hyperlink as the column format.
For example, if you are adding a Spaces Web Service data control as a table that list the spaces of which the current user is a member, you can use the URL option, as shown in Figure 29-13, to display space names as hyperlinks. Clicking a space name in the table opens the space in a separate window.
-
Open in New Window: Select to open the URL in a separate window. This field is enabled only when you select Hyperlink as the column format.
Note:
The Display As field lists both
Input TextandOutput Textoptions if you selected the table type asTable. -
-
Click Next.
-
In the Create Table - DC Parameters page, shown in Figure 29-15, change the default values for the exposed data control parameters, then click Create.
Figure 29-15 Create Table - DC Parameters
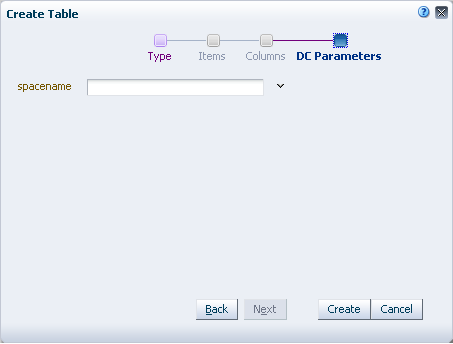
Description of "Figure 29-15 Create Table - DC Parameters"
The DC Parameters page is enabled only if the accessor being added has associated parameters. You can use this page to bind data control parameters to task flow parameters. For more information, see Section 29.4.3, "Binding Data Control Parameters to Task Flow Parameters."
If you skip this step, the parameter values that you specified while creating the data control are used.
-
A table is created in the task flow based on the options you selected, as shown in Figure 29-16.
Figure 29-16 Data Control Added as a Read-Only Table
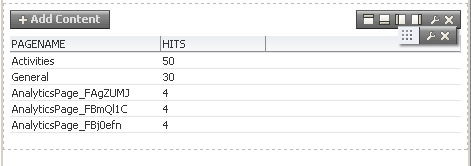
Description of "Figure 29-16 Data Control Added as a Read-Only Table"
You can format the table by sorting data, reordering columns, and so on. For more information, see Section 29.4.6.2, "Customizing a Table."
Now that you have added the data control as a table inside a task flow, you can bind the task flow's parameters to the data control's parameters. By doing this, when you consume the task flow in a page, users can specify a value for the task flow parameter to view corresponding data in the table. For more information, see Section 29.4.3, "Binding Data Control Parameters to Task Flow Parameters."
29.4.1.1.2 Adding a Data Control as an Editable Table
If the data source supports updating of records, you can add a data control accessor or operation return as an editable table. When you create an editable table, you can edit information in the table and commit those changes to the data source. In an editable table, most attributes are represented using ADF Input Text components whose values can be edited. To save your changes back to the data control, you can create command buttons using operations that can modify data records, and place those buttons in a toolbar in the table. For example, you can use the Delete operation to create a button that allows a user to delete a record from the current range. Or you can use the built-in Submit button to submit changes.
If you add an editable table and the underlying data control does not support updating, the table displays as a read-only table.
Note:
Data controls created at runtime do not support editing of data. Currently, only design time BC4J-based SQL data controls support editing of data through tables.
The procedure to add a data control as an editable table is similar that of adding a read-only table. This section lists the additional tasks required to add an editable table and include Create, Update, and Delete options on the table.
To add a data control accessor as an editable table:
-
Perform the steps in Section 29.4.1.1.1, "Adding a Data Control as a Read-Only Table," but with the following exceptions:
-
On the Create Table - Type page, select Table.
-
On the Create Table - Columns page, for each column that you want to make editable, set the Display As field to Input Text w/Label.
Note:
If the data control does not support updating of data, the columns display read-only fields.
-
-
A table is created in the task flow based on the options you selected, as shown in Figure 29-17.
Figure 29-17 Data Control as an Editable Table

Description of "Figure 29-17 Data Control as an Editable Table"
When you add a Web Service data control as an editable table, you can edit records in the table and write the changes back to the Web Service data source. However, you can update data only if the Web Service exposes a method to do so. For more information, see Section 29.4.7, "Writing to a Data Source from a Visualization."
For information about formatting a table and customizing it further, see Section 29.4.6.2, "Customizing a Table."
The next step is to create task flow parameters and bind the task flow's parameters to the data control's parameters. When you consume such a task flow in a page, users can specify a value for the task flow parameter to view corresponding data in the table. For more information, see Section 29.4.2, "Creating Task Flow Parameters" and Section 29.4.3, "Binding Data Control Parameters to Task Flow Parameters."
29.4.1.1.3 Adding a Web Services Data Control Accessor with Complex Parameters
As explained in Section 29.1.1.2, "Web Service Data Controls," Web Services data control accessors may expose scalar or complex parameters. When you add a Web Services data control accessor as a table, you can specify values for data control parameters in the DC Parameters page of the wizard. You must specify values for scalar and complex parameters as follows:
-
Simple EL or static values for scalar parameters.
-
XML values for complex parameters. A complex parameter can expose a set of scalars using an EL value.
The steps to specify values for simple parameters is the same for all types of data controls and are explained in the previous section. However, if a Web Services data control accessor exposes complex parameters, the DC Parameters page of the table creation wizard displays an extra context menu option, Parameter Structure. The Parameter Structure option invokes a Parameters dialog, which lets you expand the complex parameter, as shown in Figure 29-18, and specify values for the complex parameter itself or its included simple parameters.
Figure 29-18 Parameters Dialog Displaying a Complex Parameter
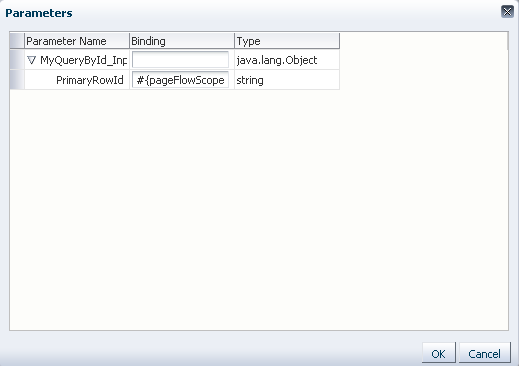
Description of "Figure 29-18 Parameters Dialog Displaying a Complex Parameter"
Section C.5, "Creating a Mashup with Data from a Siebel Data Source" provides an example of using the Parameters dialog to specify values for complex parameters.
29.4.1.2 Adding a Data Control as a Form
The Form option is displayed only for data control accessors that return a collection of objects that can be displayed as a form element. You can add a data control accessor as a read-only form that displays data using Output Text components, or as an editable form that typically displays data using Input Text components. You can also display data using Output Formatted components and URLs.
To add a Web Service data control as a form:
-
In the Resource Manager, select the task flow in which you want to add the data control, then from the Edit menu, select Edit to open the task flow in Composer.
-
Click Add Content in the container in which you want to add the task flow.
-
In the Add Content dialog, navigate to the section of the Resource Catalog that contains runtime data controls.
Tip:
The location of data controls depends on the Resource Catalog used for editing pages. For example, in the default Resource Catalog, runtime data controls are present in the Data Controls subfolder, which is nested inside the Web Development folder and Mash Ups folder.
-
Click the Open link next to a data control name, for example
DelayedStockQuoteDC, to display its contents. -
Click the Add link next to the
DelayedStockQuoteDCaccessor. From the dropdown menu, select Form to display the Create Form dialog. -
Click the Add link next to the operation, and select Form to display the Create Form dialog.
-
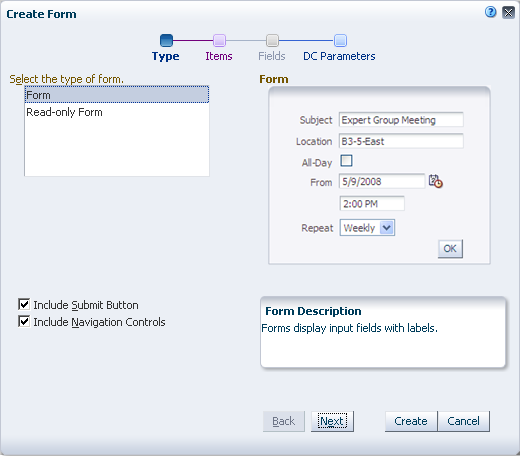
In the Create Form - Type page, select the desired type of form, for example, Form, as shown in Figure 29-19.
-
Select Include Submit Button to display a Submit button on the form. This option is enabled only if you are creating an editable form, because you must display a submit button if users are allowed to specify values or edit form data.
-
Select Include Navigation Controls to display First, Previous, Next, and Last buttons on the form. Navigation controls are helpful when multiple records are retrieved from the data source.
Note:
Navigation controls may not work properly if the data control provides bind parameters.
-
In the Create Form - Items page, from the Available Items box, select the items you wish to display in your form, then click Next.
Note:
If an item has a scalar value, you can add the item to the form after initial creation only if the data control was created at design time. You cannot add items with scalar values to a form from data controls created at runtime.
-
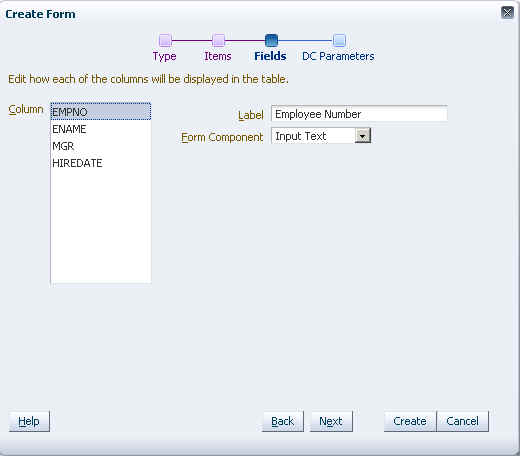
In the Create Form - Fields page, define a label and form component (Figure 29-20) for each column, then click Next.
-
In the Create Form - DC Parameters page, specify the parameter value to display data for that value, then click Create.
Note:
Ensure that you specify the parameter value at this stage as you cannot specify it later.
Unlike a table or a graph, after you create a form, if you edit it in Composer, the Component Properties dialog does not display the Data panel. Therefore, you cannot modify parameter values for a form once it is created.
The new form looks like the one in Figure 29-21.
When you add a Web Service data control as an editable form, you can edit data in the form and write the changes back to the Web Service data source by clicking the Submit button. However, you can update data only if the Web Service supports it by providing methods for creating, updating, and deleting records. For more information, see Section 29.4.7, "Writing to a Data Source from a Visualization."
The next step is to create task flow parameters and bind the task flow's parameters to the data control's parameters. When you consume such a task flow in a page, users can specify a value for the task flow parameter to view corresponding data in the form. For more information, see Section 29.4.2, "Creating Task Flow Parameters" and Section 29.4.3, "Binding Data Control Parameters to Task Flow Parameters."
29.4.1.3 Adding a Data Control as a Graph
-
Edit the task flow in Composer.
-
Click Add Content to display the Add Content dialog.
-
In the Add Content dialog, navigate to the section of the Resource Catalog that contains runtime data controls.
Tip:
The location of data controls depends on the Resource Catalog used for editing pages. For example, in the default Resource Catalog, runtime data controls are present in the Data Controls subfolder, which is nested inside the Web Development folder and Mash Ups folder.
-
Click the Open link next to the data control to display its accessor, operations, and methods associated with it.
-
Click the Add link next to the data control accessor or operation return. From the dropdown menu, select Graph (Figure 29-10), to display the Create Graph dialog.
-
In the Create Graph - Type page, select the desired type of form, for example, Bar, as shown in Figure 29-22, then click Next.
-
In the Create Graph - Sub-Type page, select a subtype, for example Bar, as shown in Figure 29-23, then click Next.
-
In the Create Graph - Layout page, select a suitable layout, then click Next.
-
In the Create Graph - Items page, from the Available Items box, select the items you wish to display in your graph, then click Next.
-
In the Create Graph - Placement page, select the appropriate placement, as shown in Figure 29-24, then click Next.
-
In the Create Graph - Format page, define titles and labels for each graph item, then click Next.
-
In the Create Graph - DC Parameters page, specify the parameter value to display data for that value, then click Create. The new graph looks like Figure 29-25.
For information about formatting a graph and customizing it further, see Section 29.4.6.3, "Customizing a Graph."
The next step is to create task flow parameters and bind the task flow's parameters to the data control's parameters. When you consume such a task flow in a page, users can specify a value for the task flow parameter to view corresponding data in the graph. For more information, see Section 29.4.2, "Creating Task Flow Parameters" and Section 29.4.3, "Binding Data Control Parameters to Task Flow Parameters."
29.4.2 Creating Task Flow Parameters
Task flow parameters enable you to view specific content in the task flow by providing different values for the parameter. When you add a data control inside a task flow, you can wire the task flow parameter to the data control parameter so that the data control displays data based on the task flow parameter you specify. For example, if your task flow contains a data control displaying the top five page hits in a given space, and the data control provides a spacename bind variable, you can create a corresponding spacename parameter on the task flow. When a user edits the task flow and specifies a space name, the data control displays the top five page hits in that space.
To create task flow parameters:
-
Select the task flow on the Resources - Task Flows page and select Edit from the Edit menu.
The task flow opens in Composer.
-
Click the Task Flow Properties button.
-
In the Taskflow Properties dialog, click Create to display the parameter table, shown in Figure 29-26.
-
Enter a name, type, and storage value for the new parameter.
The storage value identifies the scope for the parameter. It specifies the location for storing the parameter value. Out-of-the-box, you are provided with four storage options, as described in Table 29-3. However, you can specify any custom storage by providing the EL value.
Name Description pageFlowScopeThe value is available to all instances of the task flow on the page.
viewScopeThe value is available only to the selected instance, for the current user.
applicationScopeThe value is available to all instances of the task flow within the application or across applications.
sessionScopeThe value is available only to the current user, for the current session.
-
Click OK.
29.4.3 Binding Data Control Parameters to Task Flow Parameters
Data control parameters are used to restrict the data displayed in the data control based on the criteria you specify; for example, if you have a data control that displays page hits in your Spaces application, you can create a spacename bind variable to limit the data retrieved to a given space only. What's more, you can add the data control inside a task flow and bind the data control parameter to a task flow parameter, which can be used to control the data displayed in the data control. As page and task flow designers can edit task flow parameters, you are allowing them to control what is displayed in the data control.
Note:
If you do not want to use task flow parameters or if a data control is added directly on a page, you can wire the data control's parameters to input text components on the page. This type of wiring is similar for pages and task flows. For more information, see Section 29.4.4, "Wiring a Data Control to a Parameter Form Task Flow."
This section describes, with an example, how to bind a task flow parameter to a data control parameter. Before performing the steps in this section, ensure that you have added the data control inside a task flow and created the required task flow parameters. For more information, see Section 29.4.1, "Consuming a Data Control in a Task Flow" and Section 29.4.2, "Creating Task Flow Parameters."
To bind a task flow parameter to a data control parameter, spacename:
-
Click the Task Flow Properties button on the Composer toolbar to open the Task Flow Properties dialog.
-
Select the parameter that you want to bind to a data control parameter, copy its storage value, then close the dialog.
-
Click the Edit icon on the table or graph to open the Component Properties dialog.
-
On the Data tab, shown in Figure 29-27, select a data control parameter and paste the storage value in the field next to the parameter name, for example,
#{pageFlowScope.spacename}.Figure 29-27 Data Panel in the Component Properties Dialog for a Table
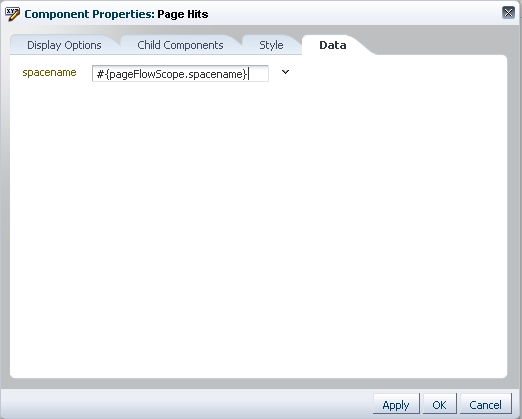
Description of "Figure 29-27 Data Panel in the Component Properties Dialog for a Table"
The data control now displays data specific to the task flow parameter value.
For a SQL data control, if there is no initial value defined for the task flow parameter, the data control retrieves data specific to the initial value of the bind parameter.
However, if you are using a Web Service data control for which you have not defined a parameter value, you must set an initial value for the task flow parameter. If not, the task flow displays an empty visualization (table, form, or graph). Therefore, in the Data tab for a Web Service data control, you must pass an initial value for the task flow parameter as shown in the following example:
#{empty pageFlowScope.stock_Quote ? 'ORCL' : pageFlowScope.stock_Quote} -
Click OK.
-
Click Close to exit Composer.
When you consume this task flow on a page, the data control displays data specific to the task flow parameter value. For more information, see Section 29.4.5, "Consuming Task Flows that Contain Visualizations."
To get a better idea about building mashups, see the different examples in Appendix C, "Business Mashup Examples."
29.4.4 Wiring a Data Control to a Parameter Form Task Flow
If you added a data control as a table inside a task flow, and if the task flow is based on the Parameter Form mashup style, then you can wire the input text field in the parameter form task flow to a data control parameter so that the table displays records based on the value provided in the input text field.
To wire the input text field to a data control parameter:
-
Edit the Parameter Form task flow in Composer.
-
Switch to Source view of the task flow.
-
Select Input Text in the component structure and click Edit on the toolbar.
-
Optionally, specify a suitable label for the field, for example, use
Departmentif your task flow contains an employee details table and the data control has a bind parameter for the department ID. -
From the Value field, copy the value,
#{pageFlowScope.bindVarId}(Figure 29-28), and switch back to Design view.Figure 29-28 Parameter Form Input Text Field Value
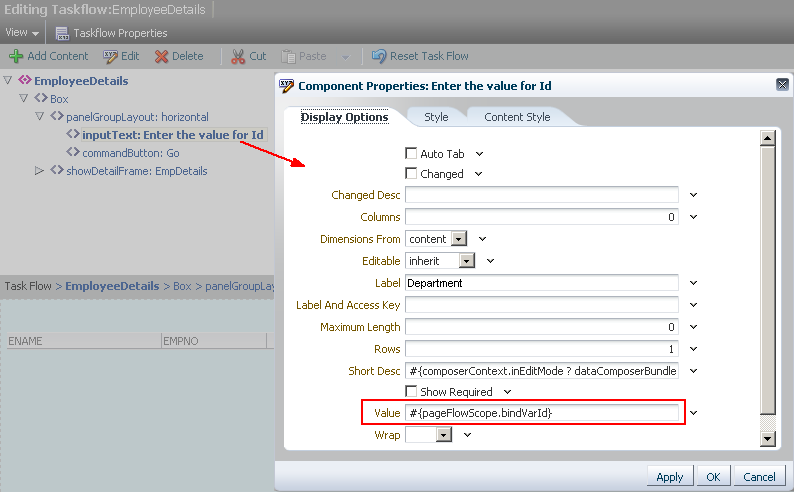
Description of "Figure 29-28 Parameter Form Input Text Field Value"
-
Click the Edit icon on the table.
-
In the Component Properties dialog for the table, click the Data tab.
-
Select the parameter that you want to bind to the Parameter Form's
Input Textcomponent and paste the#{pageFlowScope.bindVarId}value for that parameter, as shown in Figure 29-29. -
Click OK.
The wiring is effective immediately. You can specify a value in the input text field to view the corresponding records in the table, as shown in Figure 29-30.
Figure 29-30 Data Control in a Parameter Form Task Flow

Description of "Figure 29-30 Data Control in a Parameter Form Task Flow"
You can find another example for this in Section C.2, "Creating a Mashup that Displays Employee Data from SQL Data Control."
29.4.5 Consuming Task Flows that Contain Visualizations
To add the task flow to a page where the visualization is displayed to users:
-
Edit the business role page in which you want to add the task flow.
-
In Composer, click Add Content in the container in which you want to add the mashup.
-
In the Add Content dialog, navigate to the section of the Resource Catalog that contains task flows created at runtime.
Tip:
The location of task flows depends on the Resource Catalog used for editing pages. For example, in the default Resource Catalog, task flows are present in the Mashups folder.
-
Select a task flow and click Add.
-
Click Close.
The page displays the mashup with the visualization. If the data control parameters are bound to the task flow parameters, the task flow parameters drive the data that is displayed.
-
To view data for different parameter values:
-
Select the mashup on the page and click Edit to view its properties.
-
On the Parameters tab in the task flow properties dialog, change the values for any exposed parameters, then click OK.
-
29.4.6 Editing Visualizations
The Resource Manager provides different options to modify data control parameter values. In addition, you can modify the visualizations that are created by adding data controls to task flows as tables, graphs, forms, or command buttons and links. This section describes the different editing tasks that you can perform on data visualizations. It includes the following subsections:
29.4.6.1 Editing Parameter Values for a Data Control Visualization
If a data control provides bind variables or parameters, and you consume the data control in a page or task flow, you can use the parameter values to control the display of data in the visualization.
You can change values for a data control's parameters after the data control is consumed in a page or task flow. However, for a SQL data control, you can also change the values in the Edit Data Control wizard. This section describes how to edit parameter values for SQL and Web Services data controls.
Editing Parameter Values for SQL Data Controls
You can edit SQL data control parameters in either of the following ways:
-
Edit the data control directly by selecting it on the Resource Manager - Data Controls page.
-
Edit the data control in the consuming task flow, from the Resource Manager - Task Flows page.
To edit parameters directly on the data control:
-
In the Resource Manager (see Section 11.1.4, "Accessing Resources"), select the data control whose parameters you want to modify.
-
From the Edit menu, select Edit.
-
In the Edit dialog, click Enter bind parameter values.
-
In the resulting Enter bind parameter values dialog, modify values for any of the listed parameters.
-
Click OK.
-
Click OK to exit the Edit dialog.
The table, form, or graph now displays data specific to the parameter values you provided.
To edit data control parameters through the consuming task flow:
-
In the Resource Manager (see Section 11.1.4, "Accessing Resources"), select the task flow containing the data control you want to edit.
-
From the Edit menu, select Edit.
-
In Composer, click the Edit icon on the header of the visualization (table or graph).
-
In the Component Properties dialog displayed for the task flow, click the Data tab.
-
Modify values for any of the listed data control parameters.
-
Click OK.
-
Click Save, then Close to exit Composer.
The table or graph now displays data specific to the parameter values you provided.
Editing Parameter Values for Web Service Data Controls
Unlike SQL data controls that allow you to expose any number of bind parameters, for Web Service data controls, you can only specify values for the parameters already exposed by the Web Service method. The Edit dialog for a Web Service data control does not provide options to specify or modify parameter values. You can specify parameter values only after adding the data control inside a page or task flow.
To specify parameter values for a Web Service data control:
-
In the Resource Manager (see Section 11.1.4, "Accessing Resources"), select the task flow containing the data control you want to edit.
-
From the Edit menu, select Edit.
-
In Composer, click the Edit icon on the header of the visualization (table or graph).
-
In the Component Properties dialog, click the Data tab.
The Data tab lists all parameters exposed by the Web Service method.
-
Modify values for any of the listed data control parameters.
-
Click OK.
-
Click Save, then Close to exit Composer.
The table or graph now displays data specific to the parameter values you provided.
29.4.6.2 Customizing a Table
You can customize a table in the following ways:
-
Sort columns: If you enabled column sorting while creating the table, the column headers display Up and Down arrows, which you can use to sort the contents either in ascending or descending order.
-
Reorder columns: Edit the task flow in Composer. Click the Edit icon on the table to open the Component Properties dialog. On the Child Components tab, use the Up and Down arrows on the right to reorder table columns.
-
Hide or show columns: Edit the task flow in Composer. Click the Edit icon on the table to open the Component Properties dialog. On the Child Components tab, Deselect the check box to the left of a column name to hide it. By default all columns are displayed in the table.
When you add a data control as a table, the table displays only those data columns that you selected in the Create Table dialog. However, the data control retrieves all the columns that you specified in your SQL query. These columns are just not rendered in the table. To display an additional column in the table, all you need to do is edit the source of the task flow, find the hidden column, and set its rendered attribute to true.
Notes:
-
You can edit the source only if the task flow or underlying mashup style was created at runtime.
-
You cannot display additional columns if the table was added to a page directly as you cannot edit the source of a page.
-
If the data in the column has a scalar value, you can add the column to the table only if the data control was created at design time. You cannot add columns with scalar values to a table from data controls created at runtime. Adding such a scalar value will result in no action.
To display an additional column in a table:
-
On the Resource Manger - Task Flows page, select the task flow with the table.
-
From the Edit menu, select Edit Source.
Note:
To ensure that you do not end up with an invalid task flow that does not render properly, edit the source code very carefully.
-
Click the Fragment tab.
-
Select the column that you want to display in the table and set the
renderedattribute totrue.The following example shows the source code for a table column:
<column sortProperty="MGR" filterable="true" sortable="true" headerText="#{bindings.accessor_gsrf2d136f7_d907_481d_ad3a_eb2b9dbe7c35.hints.MGR.label}" id="column4" rendered="true"> <af:inputText value="#{row.bindings.MGR.inputValue}" label="#{bindings.accessor_gsrf2d136f7_d907_481d_ad3a_eb2b9dbe7c35.hints.MGR.label}" required="#{bindings.accessor_gsrf2d136f7_d907_481d_ad3a_eb2b9dbe7c35.hints.MGR.mandatory}" columns="#{bindings.accessor_gsrf2d136f7_d907_481d_ad3a_eb2b9dbe7c35.hints.MGR.displayWidth}" maximumLength="#{bindings.accessor_gsrf2d136f7_d907_481d_ad3a_eb2b9dbe7c35.hints.MGR.precision}" shortDesc="#{bindings.accessor_gsrf2d136f7_d907_481d_ad3a_eb2b9dbe7c35.hints.MGR.tooltip}" id="inputText4"> <f:validator binding="#{row.bindings.MGR.validator}"/> <af:convertNumber groupingUsed="false" pattern="#{bindings.accessor_gsrf2d136f7_d907_481d_ad3a_eb2b9dbe7c35.hints.MGR.format}" id="convertNumber3"/> </af:inputText> </column> -
Click OK to save the changes.
If you want to customize the table further, you can edit the table's properties and modify attributes such as row selection, grid lines, column groups, editable cells, column stretching, and column reordering. For more information about formatting tables, see the section titled "Displaying Data in Tables" in Oracle Fusion Middleware Web User Interface Developer's Guide for Oracle Application Development Framework.
29.4.6.3 Customizing a Graph
You can edit a graph and modify its display attributes in the Component Properties dialog. For more information about formatting graphs, see the section titled "Using ADF Graph Components" in Oracle Fusion Middleware Web User Interface Developer's Guide for Oracle Application Development Framework
29.4.7 Writing to a Data Source from a Visualization
When you add a data control as an editable table or form, you can update the records in the table or form and write those values back to the data source. However, you can update records only if the following is true:
-
The data control is created for a Web Services data source that supports updating, and the insert or update operation is exposed through the published Web Service end-point.
-
For editable tables only - the data control is a BC4J-based SQL data control created at design time. SQL data controls created at runtime do not support editing of data in a table.
You can add the data control's accessor as a table inside a task flow and add the update method so that changes made to the table can be saved to the data source.
If a Web Service supports updating, then the Web Service data control may provide methods to query and update records. Further, to enable multiple records to be updated simultaneously, Web Service data controls created at runtime provide array parameters. You can wire an array parameter to multiple input fields in the task flow so that the values specified in the fields are passed to the data source in one go. This section describes the high-level steps to use the query and update methods from a Web Service data control. It contains the following sections:
For an end-to-end example showing how to query and update a data source, see Section C.5, "Creating a Mashup with Data from a Siebel Data Source."
To perform the steps in this section, you must have created a Web Service data control, which provides methods to query and update data, and consumed the data control's accessor as a table inside a task flow. For the detailed steps, see Section 29.2.2, "Creating a Web Service Data Control" and Section 29.4.1, "Consuming a Data Control in a Task Flow."
29.4.7.1 Querying the Data Source
To add a query option to a task flow displaying records from a database:
-
On the Resource Manger - Task Flows page, select the task flow containing the Web Service data control.
-
From the Edit menu, select Edit.
-
Click Add Content in the container that has the table.
-
In the Add Content dialog, navigate to the Web Service data control and click Open.
-
Locate the method available for querying the data source, and click Add. You can add the method as a button or link of your choice.
The query method in this example takes only one parameter, which is already defined when you add the data control's accessor to the task flow. As a result, the query option added to the task flow is automatically wired to the task flow parameter. However,
The task flow displays the query option, as shown in Figure 29-31.
Figure 29-31 Query Button and Table Inside a Parameter Form Task Flow

Description of "Figure 29-31 Query Button and Table Inside a Parameter Form Task Flow"
You can specify a task flow parameter value and click the query button or link to the relevant records.
29.4.7.2 Updating Records in the Data Source
To add an update option to a task flow displaying records from a database:
-
Open the task flow containing the data visualization.
-
In the Resource Catalog, locate the method available for updating the data source, and add it to the task flow. You can add the method as a button or link of your choice.
Note:
Methods to insert or update records are available only if the Web Service supports updating and the data control was added as an editable table or form.
Typically, an insert or update the method expects values for exposed parameters, based on which it performs the operation. Therefore, the next step is to provide UI elements to specify values for parameters.
-
Add input text components to specify the method parameter values.
Tip:
As the Resource Catalog does not provide ADF Faces components such as
Input Textout-of-the-box, edit the task flow's source files and add the code for such components. -
Wire the update method's parameters to the input text components
valueattributes. This involves:-
Setting an input text component's
valueattribute using the format:#{pageFlowScope.COLUMN_NAME}. -
Referencing the same location,
#{pageFlowScope.COLUMN_NAME}, from the method's parameter. You can set this by selecting the button or link in Composer's Source view, editing its properties, and specifying the value on the Data tab.
When you specify values in the input fields and click the update method's button or link, the values are passed back as Web Service parameter values.
For an end-to-end example showing how to query and update a data source, see Section C.5, "Creating a Mashup with Data from a Siebel Data Source."
-
29.5 Business Mashup Examples
To help you understand better the tasks involved in creating business mashups, Appendix C, "Business Mashup Examples" describes many use cases that illustrate how to create different types of mashups.
In addition, sample applications developed to showcase the different mashup building capabilities are published on Oracle Technology Network (OTN). The following page on OTN provides links to business mashup-specific samples and other sample applications that illustrate the different WebCenter Portal: Spaces capabilities:
http://www.oracle.com/technetwork/middleware/webcenter/ps3-samples-176806.html
A readme file available with each sample on this page describes what the application illustrates and provides guidance for extending or customizing the application for real life use cases.
