55 Administering Spaces and Templates
This chapter describes how a Spaces administrator with Spaces-Manage All or Space Templates-Manage All permissions can manage everyone's spaces and space templates in Spaces.
It includes the following sections:
-
Section 55.1, "What You Should Know About Administering Spaces and Templates"
-
Section 55.2, "Performing Administrative Tasks for All Spaces"
-
Section 55.3, "Performing Administrative Tasks for All Space Templates"
-
Section 55.5, "Importing and Exporting Spaces and Space Templates"
For more information about exporting and importing an entire Spaces application, see "Exporting and Importing Entire Spaces Application for Data Migration" Oracle Fusion Middleware Administrator's Guide for Oracle WebCenter Portal.
To perform the tasks in this chapter, you must have the Spaces Administrator role or a custom role that grants one of the following permissions.
-
Application-Manage All -
Application-Manage Configuration
55.1 What You Should Know About Administering Spaces and Templates
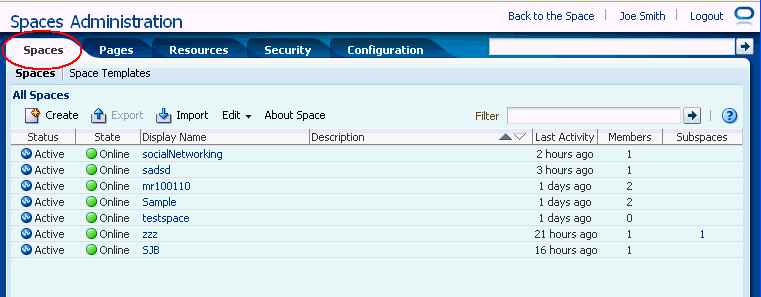
Spaces administrators with Spaces-Manage All or Space Templates-Manage All permissions can manage any space or space template from Spaces Administration (Figure 55-1). From here, you can take any space temporarily offline and close down any spaces deemed inactive. Administrators can rename and edit any space, as well as delete spaces when they are no longer required.
Space moderators do not have access to this page. While moderators may perform some of these tasks for spaces that they own through space administration pages, the Spaces administrator can perform these tasks for all spaces.
The Spaces Administration pages also offers import and export services that enable you to back up or move information between Spaces applications, and stage or production environments. Import and export options are only available to users with full administrative permission, that is, have the Application-Manage All permission. See also Section 55.5, "Importing and Exporting Spaces and Space Templates."
For application-level permissions required to perform administrative tasks through these tabs, see Section 23.3, "Understanding Application Roles and Permissions."
55.2 Performing Administrative Tasks for All Spaces
Spaces administrators can change the status of any space. This section describes the steps to perform the following tasks:
55.2.1 Viewing Information About Any Space
Spaces administrators can view and manage any space through Spaces Administration. From here, you can quickly see whether spaces are active, online, offline, how recently a space was accessed, and membership numbers.
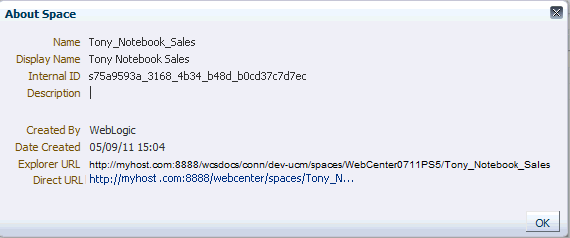
The toolbar offers additional options for editing, changing status, and deleting spaces, and if you select About Space you can access useful information such as the space's direct URL and internal ID (Figure 55-2).
By default, spaces are listed alphabetically. To view the information sorted by a different column, click the sort icon for the column. Sort icons appear when you hover the mouse cursor over the column header.
To display the Administration page for all spaces:
-
Open Spaces Administration.
For details, see Chapter 4, "Accessing Spaces Administration Pages.".
-
Click Spaces, then Spaces (Figure 55-1).
55.2.2 Taking Any Space Offline
When a space is offline, members of the space who do not have Spaces-Manage All permission are unable to access the space. If members try to access the space, they will see the Space Unavailable page. See also Section 7.3, "Working with System Pages."
Administrators and members with the Spaces-Manage All permission can access a space that is offline. So if, for example, an administrator who notices inappropriate content can take a space offline, fix the content, and bring it back online later.
To permanently close down a space that is not being used any more, see Section 55.2.4, "Closing Any Space".
To take a space offline:
-
Open Spaces Administration.
For details, see Chapter 4, "Accessing Spaces Administration Pages."
-
Click Spaces (Figure 55-1).
-
On the Spaces page, select the space you require by highlighting the row in the table. Ctrl-Click rows to select more than one space.
-
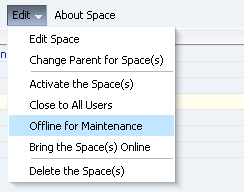
From the Edit menu, select Offline for Maintenance (Figure 55-3).
-
Click OK.
55.2.3 Bringing Any Space Back Online
To bring any space back online:
-
Open Spaces Administration.
For details, see Chapter 4, "Accessing Spaces Administration Pages."
-
Click Spaces (Figure 55-1).
-
On the Spaces page, select the required space by highlighting the row in the table. Ctrl-Click to select more than one space.
-
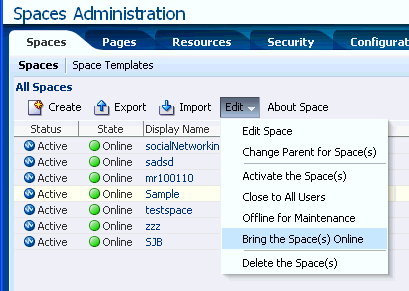
From the Edit menu, select Bring the Space Online (Figure 55-4).
-
Click OK.
55.2.4 Closing Any Space
A Spaces administrator can close any space that is no longer being used. When you close a space, the content is archived. The space is removed from everyone's "Spaces switcher menu" to avoid clutter. The space's content remains accessible and searchable to those who still want to reference it and space members can continue working in the space.
If you want to close down a space temporarily, take the space offline instead. See Section 55.2.2, "Taking Any Space Offline".
To close a space:
-
Open Spaces Administration.
For details, see Chapter 4, "Accessing Spaces Administration Pages."
-
Click Spaces (Figure 55-1).
-
On the Spaces page, select the required space by highlighting the row in the table. Ctrl-Click to select more than one space.
-
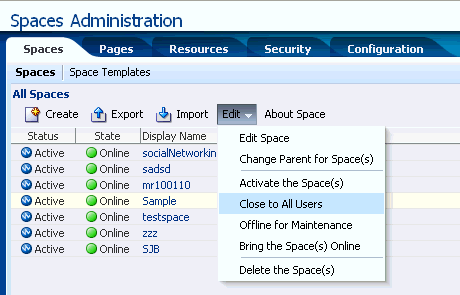
From the Edit menu, select Close to All Users (Figure 55-5).
-
Click OK.
55.2.5 Activating Any Space
Spaces administrators and space moderators may close a space if it is no longer being used. If you want to reopen a space, you can activate it.
To activate a space:
-
Open Spaces Administration.
For details, see Chapter 4, "Accessing Spaces Administration Pages."
-
Click Spaces (Figure 55-1).
-
On the Spaces page, select the required space by highlighting the row in the table. Ctrl-Click to select more than one space.
-
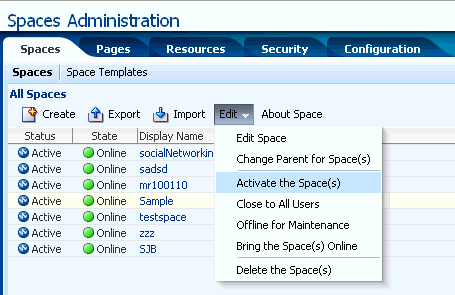
From the Edit menu, select Activate the Space (Figure 55-6).
-
Click OK.
55.2.6 Deleting a Space
Spaces administrators with the Spaces-Manage All permission can delete any space. Once a space is removed from Spaces it cannot be recovered. Spaces are permanently removed and current members will no longer see the space in their view.
When you delete a space:
-
All pages associated with the space are deleted.
-
Links, lists, notes, tags, and events) associated with the space is deleted.
-
Space roles and membership details are deleted.
-
Content managed by discussions and announcements is deleted when it is stored in the default forum or category created by the space. Content managed by nondefault forums or categories is not deleted (for details, see Section 53.10.3, "Modifying Discussion Forum Settings for a Space").
-
The space mail distribution list that is automatically created by the Spaces application is deleted. However, distribution lists that are customized by the space moderator are not deleted (for details, see Section 53.10.2, "Configuring the Mail Distribution List for a Space").
-
Content managed by external services, such as content repositories, mail, and so on, is removed.
-
If the space is a parent in a space hierarchy, child subspaces are deleted too.
You cannot delete a space while the moderator is editing space settings, but there are no other restrictions.
To delete a space that is no longer required:
-
Open Spaces Administration.
For details, see Chapter 4, "Accessing Spaces Administration Pages."
-
Click Spaces (Figure 55-1).
-
On the Spaces page, select the required space by highlighting the row in the table. Ctrl-Click to select more than one space.
-
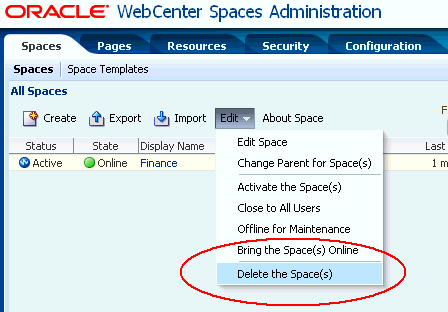
Select the Edit menu, and select Delete the Space(s) (Figure 55-7).
-
Click Delete to confirm that you want to delete the space(s).
If the delete process fails for any reason, the space is not removed from the administrator's Spaces tab; this sometimes happens when a back-end server cannot be contacted. If the administrator clicks Delete again from here, the space will be removed.
55.3 Performing Administrative Tasks for All Space Templates
Spaces administrators with the Space Templates-Manage All permission can review, publish, hide, and delete any space template. This section describes how to perform these tasks:
55.3.1 What You Should Know About Managing Space Templates
When creating a space, users can base it on one of the out-of-the-box space templates, their own custom space template, or a published space template created by others. Space templates provide a consistent look and feel and an efficient way to get started creating a space that is configured exactly as required by an organization. For more information, see Section 52.1, "What You Should Know About Space Templates."
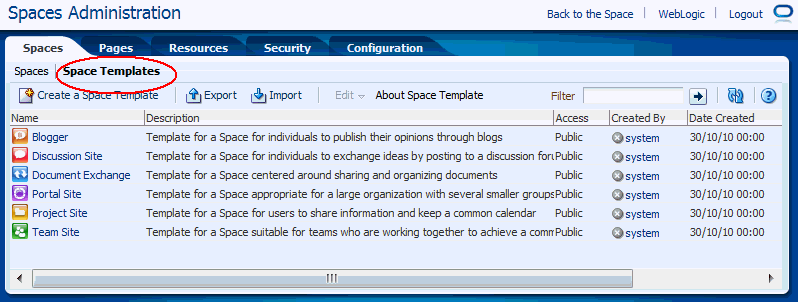
Spaces administrators with the Space Templates-Manage All permission can manage every space template from Spaces Administration (Figure 55-8). You can see which space templates are currently available and delete space templates when they are no longer required. You can also publish templates—making them available to everyone—or restrict them to private use only.
It is important to keep the template list up to date and valid. Anyone who creates a space will see public templates as well as their own private templates.
The Space Templates page provides import and export services, too. For more information, see Section 55.5, "Importing and Exporting Spaces and Space Templates.".
55.3.2 Viewing Space Templates
Spaces administrators or users with the Space Templates-Manage All permission can view and manage any space through Spaces Administration. You can quickly see who created each space template, and the date on which it was created. The Edit menu offers additional options for deleting space templates, and you can publish and hide templates from here, too.
By default, space templates are listed alphabetically. To view the information sorted by a different column, click the sort icon for the column. Sort icons appear when you hover the mouse cursor over the column header.
To see a list of every space template in Spaces, together with their description, creator, and other useful information:
-
Open Spaces Administration.
For details, see Chapter 4, "Accessing Spaces Administration Pages."
-
Click Spaces, then Templates (Figure 55-8).
55.3.3 Publishing and Hiding Space Templates
While the Spaces application can accommodate any number of templates, a limited number of templates is sometimes more effective. The Spaces administrator or users with the Space Templates-Manage All permission can maintain the template list through Spaces Administration. To view the Space Templates page, a user must additionally be granted Application-Configure permission by the Spaces administrator.
To publish or hide a space template (including the out-of-the-box templates):
-
Open Spaces Administration.
For details, see Chapter 4, "Accessing Spaces Administration Pages."
-
Click Spaces, then Templates (Figure 55-8).
-
Select the required space templates by highlighting the row in the table. Ctrl-Click rows to select more than one space template.
-
From the Edit menu, select:
-
Make Public to share the template with everyone.
-
Remove Public Access to remove the template from the space template lists in the Home space for all users, except for the template owner.
-
-
Confirm your selection.
55.3.4 Deleting a Space Template
Spaces administrators or users with the Space Templates-Manage permission can delete any space template, except out-of-the-box templates.Deleting a space template does not effect on the portals that were created using the space template
To delete a space template that is no longer required:
-
Open Spaces Administration.
For details, see Chapter 4, "Accessing Spaces Administration Pages."
-
Click Spaces, then Templates (Figure 55-8).
-
Select the required space templates by highlighting the row in the table. Ctrl-Click rows to select more than one space template.
-
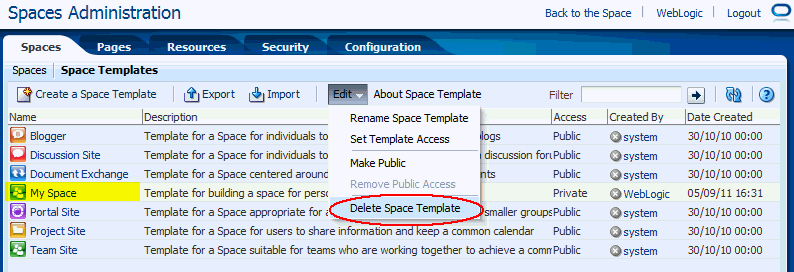
From the Edit menu (Figure 55-9), select Delete Space Template.
-
Click Delete to confirm that you want to delete the selected template(s).
55.4 Enabling and Disabling Services
You can enable and disable services for individual spaces. In most cases, the space moderator will manage service requirements for their own space, but Spaces administrators can also perform this task if required to do so. For details, see Section 53.10.1, "Enabling and Disabling Services Available to a Space".
Spaces services, such as Discussions and Mail, are configured by your Fusion Middleware Administrator through Fusion Middleware Control or using the WLST command-line tool. All services automatically become available in the Spaces application when the application starts up—no additional configuration is required inside Spaces.
There is no facility to disable services for the entire application as the Fusion Middleware Administrator takes care of this through Fusion Middleware Control. See "Getting the Spaces Application Up and Running" in Oracle Fusion Middleware Administrator's Guide for Oracle WebCenter Portal.
55.5 Importing and Exporting Spaces and Space Templates
Spaces provides a set of export and import utilities that enable you to back up or move information between Spaces applications, and stage or production environments. To use these utilities you must have the Spaces Administrator role or a custom role that grants the Application-Manage All permission.
This section describes how to export and import spaces and space templates through Spaces Administration pages. It includes the following sections:
Fusion Middleware Administrators can also export and import spaces and space templates using WLST commands. To find out more about these WLST commands, how to migrate the back-end data associated with spaces, and also how to export an entire Spaces application, see "Exporting and Importing a Spaces Application for Data Migration" in Oracle Fusion Middleware Administrator's Guide for Oracle WebCenter Portal.
55.5.1 Exporting Spaces
Spaces administrators can export individual spaces and import them into other Spaces applications. Each space must be taken offline, even if only temporarily, to prevent data conflicts during the export process. See Section 53.4.3, "Taking a Space Offline."
Space information is exported into a single export archive (.ear file). The .ear file contains a metadata archive (.mar file) and, optionally, a single XML file containing space security policy information. You can save export archives to your local file system or to a remote server file system.
For more information about what is exported, read "Understanding Spaces Export and Import" in Oracle Fusion Middleware Administrator's Guide for Oracle WebCenter Portal.
The export process does not include data associated with external services such as Mail, Discussions, Announcements, Instant Messaging and Presence, Events, and Documents, as all this data is stored on external servers. To learn how to move data associated with these services, refer to documentation for that product. See also "Migrating Back-end Components for Individual Spaces" in Oracle Fusion Middleware Administrator's Guide for Oracle WebCenter Portal.
Note:
Space artifacts must be located in the content directory to be exported. For example, icons and images, and so on, associated with a page template must be placed in the page template's content directory to be exported. For more information, see Section 11.4.2.1, "What You Should Know About a Resource's Properties."
If the space contains Web Service data controls, all the associated Web Services must be up and accessible for the export to succeed.
Out-of-the-box templates and user customizations are never exported. For information on user customizations, see Section 51.11.4.2, "Performing User Customizations on Your Page View."
Spaces administrators can export spaces through Spaces Administration as described here. Fusion Middleware administrators can also export spaces using WLST commands. For details, see "Exporting Individual Spaces Using WLST" in Oracle Fusion Middleware Administrator's Guide for Oracle WebCenter Portal.
You can also export space templates but this is a separate process. You cannot export spaces and space templates into a single archive. For details, see Section 55.5.3, "Exporting Space Templates."
To export one or more spaces through Spaces Administration
-
Open Spaces Administration.
For details, see Chapter 4, "Accessing Spaces Administration Pages."
-
Click Spaces.
-
Select the space required by highlighting the row in the table.
Ctrl-click rows to select more than one space.
Ensure that all the spaces you select (and subspaces) are offline. Spaces must be taken offline, even if only temporarily, to prevent data conflicts during the export process. Unsaved changes are not exported. See also Section 53.4.3, "Taking a Space Offline."
Note:
Other members with the
Spaces-Manage Allpermission should not edit Spaces during the export process. -
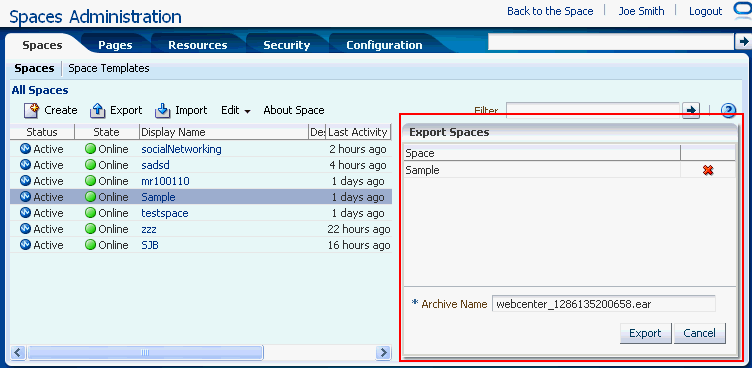
Click Export in the toolbar.
The Export Spaces dialog box opens (Figure 55-10).
-
Change the Archive Name or accept the default name.
To ensure uniqueness, the default
.earfilename contains a timestamp:webcenter_<timestamp>.ear -
Click Export.
-
If any of the spaces selected for export include custom portal resources, you must specify whether or not you want to include resource-specific content in the space archive (Figure 55-11).
Do one of the following:
-
Click Yes to export content, such as images and icons, that is referenced by portal resources in the archive (skins, page templates, and so on).
The Spaces application stores content for all portal resources under a 'shared' directory (
oracle\webcenter\siteresources\scopedMD\shared\...) rather than on a space-by-space basis. Consider the following before exporting content directories for the resources in your archive:-
Entire content directories are exported rather than individual files. For example, if a skin references two files (
...\shared\skins\logos\mylogo.gifand...\shared\skins\icons\myicon.gif), the entire content of both directories (\logosand\icons) are exported. -
The size of
\shared\...content directories. If your Spaces installation utilizes a large number of portal resources (both at the application-level as well as by individual spaces and space templates) then the number of files stored under the\shareddirectory or a\sharedsubdirectory is potentially large. -
On import, all files under the content directories are uploaded to the target application and existing files with the same name are overwritten. While you can opt not to upload content directories on import, it's an all or nothing approach, that is, you cannot upload content specific to a particular resource or space.
-
-
Click No to exclude content under the
\shareddirectory that is referenced by portal resources.If your choose not to include resource content directories in the archive, your system administrator can migrate the resource content for you later on if required (using
exportMetadata/importMetadataWLST commands). For details, see "Exporting Spaces Resources" in Oracle Fusion Middleware Administrator's Guide for Oracle WebCenter Portal.
-
-
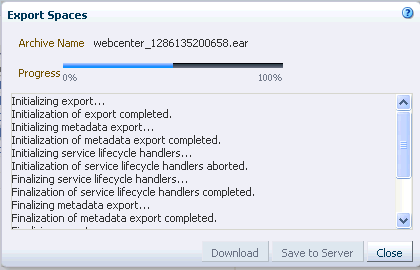
Progress information is displayed during the export process (Figure 55-12).
When the export process is complete, specify a location for the export archive (
.ear).Select one of:
-
Download. Saves the export
.earfile to your local file system.Your Browser downloads and save the archive locally. The actual download location depends on your Browser set up.
-
Save to Server. Saves the export
.earfile to a server location.In the Save to Server dialog box (Figure 55-13), enter a suitable path in Server Location (for example,
/tmp), then click Save. Ensure that the server directory you specify haswritepermissions.Figure 55-13 Saving Space Export Archives to a Server Location

Description of "Figure 55-13 Saving Space Export Archives to a Server Location"
-
-
Click Close.
The export archive (.ear) is saved to the specified location.
55.5.2 Importing Spaces
Spaces administrators can import a space archive (.ear) into another Spaces application.
On import, all spaces included in the archive are created or re-created on the target application. Existing spaces are deleted then replaced, and new spaces are created.
If you intend to import spaces with names identical to those available on the target application, ensure that those spaces are offline in the target application. It is not possible to overwrite a space, on import, if it is online. For details, see Section 53.4.3, "Taking a Space Offline."
Spaces are locked during an import operation to prevent simultaneous imports/exports of the same space. If someone else is importing a particular space, all subsequent attempts to import (or export) the same space are blocked.
All spaces need a security policy to work properly so, when you import a brand new space for the first time, you must include the space's security policy. Existing spaces have a security policy in place so in this case, it's up to you whether to overwrite the security information on import or maintain the existing security policy.
When you import a space with security, security policy updates do not apply immediately. Any user logged in to the Spaces application must log out and log back in to adopt new security policies for the space.
Note:
User IDs in the source and target environments must match to ensure that the space members in the target are exactly the same as those in the source. If a shared identity store is not used, your system administrator must migrate users to the target. Refer to "Migrating Back-end Components for an Entire Spaces Application" in Oracle Fusion Middleware Administrator's Guide for Oracle WebCenter Portal.
If data migration is important, you can elect to import data associated with the space such as activity streams, events, feedback, lists, links, message boards, people connections, and profiles. Documents and discussions can be migrated for individual spaces too but migrating externally stored data is a separate process, as described in "Migrating Back-end Components for Individual Spaces" in Oracle Fusion Middleware Administrator's Guide for Oracle WebCenter Portal.
Spaces administrators can import spaces through Spaces Administration as described here. Fusion Middleware administrators can also import spaces using WLST commands. For details, see "Importing Individual Spaces Using WLST" in Oracle Fusion Middleware Administrator's Guide for Oracle WebCenter Portal.
To import one or more spaces or subspaces:
-
Open Spaces Administration.
For details, see Chapter 4, "Accessing Spaces Administration Pages."
-
Click Spaces.
-
Click Import in the toolbar.
Tip:
To import one or more spaces as a subspace of an existing space, select the target space before clicking the Import button.
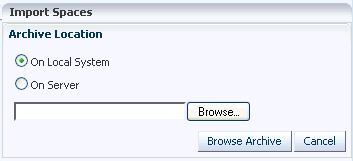
The Import Spaces dialog box opens (Figure 55-14).
-
Specify the location of your space archive (
.ear). Select one of:-
On Local System. Enter the location in the text box. Alternatively, click Browse to locate the directory on the local file system where the
.earfile is stored. -
On Server. Enter the path, including the archive filename, in the text box. For example,
/tmp/MySpaceExport.ear. You can specify any shared location accessible from this Spaces application.
-
-
Click Browse Archive to review the content available for import.
-
Set import options as described in Table 55-1:
Table 55-1 Space Import Options
Field Description Include Services Data
Select to import the following
-
Data stored in the WebCenter repository for the following services: Activity Stream, Events, Feedback, Lists, Links, Message Boards, People Connections, Profiles, and Tags
-
Default settings for Profiles, Message Boards, Feedback, Connections, Activity Stream
-
Activity Stream Task Flow Customizations
Deselect this option if you do not want to import any data associated with lists, events, tags, links, connections, profiles, message boards, activity streams, and feedback. For example, when moving a space from a test environment to a stage or production environment where test data is not required.
Include Customizations
Select to import space customizations. For information about which customizations are optional on import, read "Understanding Spaces Export and Import" in Oracle Fusion Middleware Administrator's Guide for Oracle WebCenter Portal.
If you deselect this option:
-
New spaces are imported without customizations (that is, default task flows are imported without any customizations and the default space settings are used).
-
If you are importing a space that already exists on the target, existing customizations on the target are preserved.
Note: Portlet and page customizations are always imported.
Include Security Policy
Select to import security information with the space.
When selected, the following security related information is imported:
-
Space roles (and permissions assigned to each role).
-
Space members (and member role assignments).
Deselect this option if you do not want to import space security information. This option is useful when importing spaces between a stage and production environments, where:
-
Members used during testing are not required in the production environment.
-
The space exists on the production instance and you do not want to overwrite the security information.
Note: When importing a brand new space, always select (check) this option as you cannot import a new space without a security policy.
-
-
Click Import.
-
If you try to import spaces that exist in the target Spaces application, the Confirm Replace dialog displays. You must confirm whether you want to overwrite the existing spaces.
To delete existing spaces and replace them with imported versions, answer Yes. Answer No to cancel the import process.
-
If the import process detects a conflict between the spaces you are trying to import and those which exist on the target, a message displays to help you resolve the issue. For example, conflict messages display if a space on the target application has the same name but a different GUID to a space you are trying to import. In this instance you could change the name of the source space and create a new export archive, or rename the conflicting space in the target application and import the same archive.
-
If the archive you are importing contains resource content directories, the Overwrite Content Directory dialog displays. You must confirm whether to import all content directories referenced by portal resources (skins, page templates, and so on) in the archive or only import new files/directories.
To import all content directories in the archive, overwriting existing content directories, answer Yes. Answer No to only import new files, that is, content directories and files that do not already exist on the target.
Note:
The Spaces application stores content used by portal resources, such as images and icons, under the 'shared' content directory:
oracle\webcenter\siteresources\scopedMD\shared\...
An information message displays when all spaces import successfully.
-
-
Click Close to dismiss the Import Space window.
Imported spaces are offline initially because, mostly, some additional work is required before they are ready for general use. For example, you may want to migrate data associated with back-end components. For details, refer to the "Migrating Back-end Components for Individual Spaces" in the Oracle Fusion Middleware Administrator's Guide for Oracle WebCenter Portal:
Once content and membership details are finalized you may bring the space online, see Section 53.4.4, "Bringing a Space Back Online."
55.5.3 Exporting Space Templates
Spaces administrators can export space templates and import them into other Spaces applications. Out-of-the-box templates cannot be exported.
Space templates can include pages, resources, discussions, lists, service information, and security information such as custom roles and current members; no other data, such as documents, are stored with the template.
While export and import utilities are primarily used to move information between Spaces applications, the space template export feature is also useful as a backup service, and for sharing and exchanging templates with others.
Space template information is exported into a single export archive (.ear file). The .ear file contains a metadata archive (.mar file) and a single XML file containing space security policy information.
You can save export archives to your local file system or to a remote server file system.
Spaces administrators can export space templates through Spaces Administration as described here. Fusion Middleware administrators can also export space templates using WLST commands. For details, see "Exporting Space Templates Using WLST" in Oracle Fusion Middleware Administrator's Guide for Oracle WebCenter Portal.
Note:
You can also export space information but this is a separate process. For details, see Section 55.5.1, "Exporting Spaces". You cannot export spaces and space templates into a single archive.
To export one or more spaces templates from Spaces Administration:
-
Open Spaces Administration.
For details, see Chapter 4, "Accessing Spaces Administration Pages."
-
Click Spaces, then Space Templates.
-
Select the space template required by highlighting the row in the table.
Ctrl-click rows to select more than one space template.
-
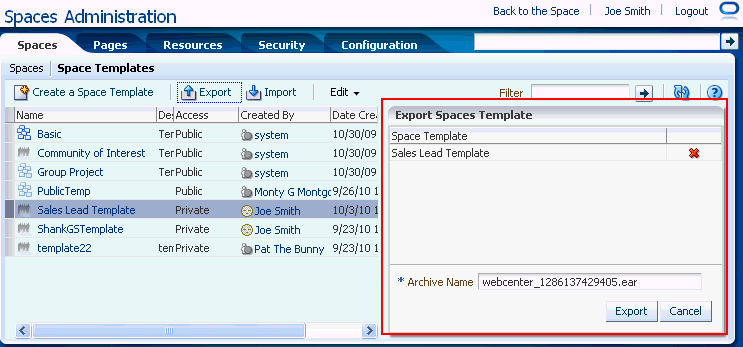
Click Export on the toolbar.
The Export Space Template dialog box opens (Figure 55-15).
-
Change the Archive Name or accept the default name.
To ensure uniqueness, the default
.earfilename contains a timestamp:webcenter_<timestamp>.ear -
Click Export.
-
If any of the space templates selected for export include custom portal resources, you must specify whether or not you want to include resource-specific content in the space template archive (Figure 55-11).
Do one of the following:
-
Click Yes to export content, such as images and icons, that is referenced by portal resources (skins, page templates, and so on).
The Spaces application stores content referenced by portal resource under the 'shared' directory (
oracle\webcenter\siteresources\scopedMD\shared\...) rather than on a template-by-template basis. Consider the following before exporting content directories for the resources in your archive:-
Entire content directories are exported rather than individual files. For example, if a skin references two files (
...\shared\skins\logos\mylogo.gifand...\shared\skins\icons\myicon.gif), the entire content of both directories (\logosand\icons) are exported. -
The size of
\shared\...content directories. If your Spaces installation utilizes a large number of portal resources (both at the application-level as well as by individual spaces and space templates) then the number of files stored under the\shareddirectory or a\sharedsubdirectory is potentially large. -
On import, all files under the content directories are uploaded to the target application and existing files with the same name are overwritten. While you can opt not to upload content directories on import, it's an all or nothing approach, that is, you cannot upload content specific to a particular resource or space template.
-
-
Click No to exclude content under the
\shareddirectory that is referenced by portal resources.If your choose not to include resource content directories in the archive, your system administrator can migrate the resource content for you later on if required (using
exportMetadata/importMetadataWLST commands). For details, see "Exporting Spaces Resources" in Oracle Fusion Middleware Administrator's Guide for Oracle WebCenter Portal.
-
-
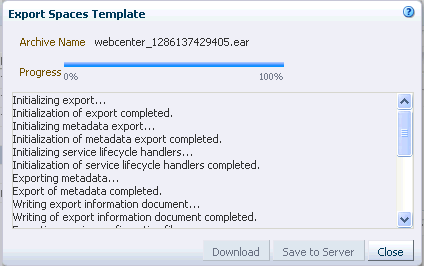
Progress information is displayed during the export process (Figure 55-17).
When the export process is complete, specify a location for the export archive (
.ear).Select one of:
-
Download. Saves the export
.earfile to your local file system.Your browser downloads and saves the archive locally. The actual download location depends on your browser set up.
-
Save to Server. Saves the export
.earfile to a server location. For example,/tmp. Ensure that there are write permissions on the server directory that you specify.After clicking Save to Server, enter the Server Location and then click Save.
-
-
Click Close.
The export archive (.ear) is saved to the specified location.
55.5.4 Importing Space Templates
Spaces administrators can import a space template archive (.ear) into another Spaces application.
On import, all space templates included in the archive are re-created on the target application. If a space template exists on the target, then it is deleted and replaced. If a space template does not exist, then it is created.
Newly imported space templates are not immediately available for general use. You must publish the imported templates to make them available to everyone. See Section 52.3.6, "Publishing or Hiding Space Templates."
If you want the Documents service to be enabled in spaces created from imported templates, you must migrate the space template's folder (on Content Server) to the target instance as well. For details, see "Importing the Back-end Folder for a Space Template" in Oracle Fusion Middleware Administrator's Guide for Oracle WebCenter Portal.
Spaces administrators can import space templates through Spaces Administration as described here. Fusion Middleware administrators can also import space templates using WLST commands. For details, see "Importing Space Templates Using WLST" in Oracle Fusion Middleware Administrator's Guide for Oracle WebCenter Portal.
Note:
If the archive contains content directories for custom portal resources, only new content directories/files are uploaded on import. There is no option to upload all content in the archive through Spaces Administration, that is, you cannot overwrite all existing content directories from here. An option to upload and overwrite all content directories is available using the WLST command importGroupSpaces. For details, see "Importing Space Templates Using WLST" in Oracle Fusion Middleware Administrator's Guide for Oracle WebCenter Portal.
To import one or more space templates through Spaces Administration:
-
Open Spaces Administration.
For details, see Chapter 4, "Accessing Spaces Administration Pages."
-
Click Spaces, then Space Templates.
-
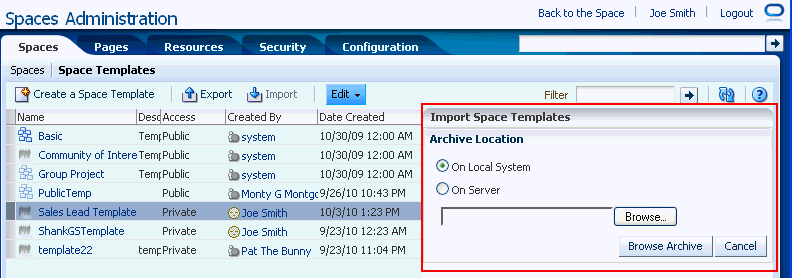
Click Import on the toolbar.
The Import Space Templates dialog box opens (Figure 55-18).
-
Specify the location of your space template archive (
.ear). Select one of:-
On Local System. Enter the location in the text box. Alternatively, click Browse to locate the directory on the local file system where the
.earfile is stored. -
On Server. Enter the path, including the archive filename, in the text box. For example,
/tmp/MySpaceTemplateExport.ear. You can specify any shared location accessible from this Spaces application.
-
-
Click Browse Archive to review the content available for import.
-
Click Import.
If you try to import a space template that exists in the Spaces application, the Confirm Replace dialog displays. You must confirm whether you want to overwrite the existing space templates.
To delete existing space templates and replace them with imported versions, answer Yes. Answer No to cancel the import process.
An information message displays when all templates import successfully.
-
Click Close to dismiss the Import Space Templates window.
Newly imported space templates are not immediately available for general use. You must publish the imported templates to make them available to everyone. See Section 11.4.3, "Showing and Hiding Resources."
55.6 Troubleshooting
This section includes troubleshooting information in the following sections:
55.6.1 Troubleshooting Spaces Workflows
If you experience issues with Spaces workflows, review the following sections:
-
Section 55.6.1.1, "Validating the SpacesWorkflow Configuration"
-
Section 55.6.1.2, "Troubleshooting Issues with Spaces Workflows"
55.6.1.1 Validating the SpacesWorkflow Configuration
The Oracle Fusion Middleware Installation Guide for Oracle WebCenter describes how to install and configure Spaces workflows. For details, see "Back-End Requirements for Spaces Workflows". You can validate the workflow configuration as follows:
-
Log in to Spaces.
-
Create a space and then navigate to the Members tab (Space Settings).
-
Invite a new member with any role (say
User2). -
Log out, and then log in as
User2. -
Navigate to a Worklist task flow.
-
Open the invite notification and click the Accept button.
-
Open the space.
If the Spaces workflows are working properly, the newly created space ia available to User2. If the space is not available or listed, there is some issue with the configuration.
55.6.1.2 Troubleshooting Issues with Spaces Workflows
If Spaces workflows are not working properly, follow these steps to help troubleshoot the issue:
-
Check that Spaces workflows are deployed on the Oracle SOA server:
-
Log in to Fusion Middleware Control.
-
Check that
WebCenterWorklistDetailApp.earis deployed. -
Verify that
sca_CommunityWorkflows.jaris deployed.
For details, see "Oracle SOA Server - Extending the Domain" in Oracle Fusion Middleware Installation Guide for Oracle WebCenter.
-
-
Ensure the Web Service connection between the Oracle SOA server and the Spaces application is secure:
-
Check the alias in the keystore file on the Oracle SOA server.
For example, use the following command to list the content of the keystore file on the Oracle SOA server:
keytool -list -v -keystore bpel.jks -storepass <password>There should be an entry with:
Alias name: webcenter_spaces_ws
See "Setting Up the SOA Domain" in Oracle Fusion Middleware Installation Guide for Oracle WebCenter.
-
Verify that the credential stores for both Spaces and Oracle SOA server are configured correctly.
See "Updating the Credential Store" in the Oracle Fusion Middleware Administrator's Guide for Oracle WebCenter Portal.
-
Check that keystores exist at both ends of the connection, for example:
-
webcenter.jks(copied to Spaces server end)-
bpel.jks(copied to Oracle SOA server end)For example, the following commands generate
webcenter.jksandbpel.jks:keytool -genkeypair -keyalg RSA -dname "cn=webcenter,dc=us,dc=oracle,dc=com" -alias webcenter -keypass mypassword -keystore webcenter.jks -storepass mypassword -validity 360 keytool -exportcert -v -alias webcenter -keystore webcenter.jks -storepass mypassword -rfc -file webcenter.cer keytool -importcert -alias webcenter_spaces_ws -file webcenter.cer -keystore bpel.jks -storepass mypassword keytool -genkeypair -keyalg RSA -dname "cn=bpel,dc=us,dc=oracle,dc=com" -alias bpel -keypass mypassword -keystore bpel.jks -storepass mypassword -validity 360 keytool -exportcert -v -alias bpel -keystore bpel.jks -storepass mypassword -rfc -file bpel.cer keytool -importcert -alias bpel -file bpel.cer -keystore webcenter.jks -storepass mypasswordSee "Creating the SOA Domain Keystore" in the Oracle Fusion Middleware Administrator's Guide for Oracle WebCenter Portal.
-
Configure role members for the
BPMWorkflowAdminapplication role in Oracle SOA server (soa-infra).When associating the domain with an identity store that does not contain the user
weblogic, you must assign some other valid user to the application roleBPMWorkflowAdmin. Use WLST commands to do this from the SOA Oracle home, for example, to assign a user named "monty" that exists in LDAP:cd $SOA_ORACLE_HOME/common/bin/ wlst.sh connect('<admin username>','<admin password>', 'mysoahost.example.com:7001') revokeAppRole(appStripe="soa-infra", appRoleName="BPMWorkflowAdmin", principalClass="oracle.security.jps.service.policystore.ApplicationRole", principalName="SOAAdmin") grantAppRole(appStripe="soa-infra", appRoleName="BPMWorkflowAdmin", principalClass="weblogic.security.principal.WLSUserImpl", principalName="monty")See "Security Commands" in the Oracle Fusion Middleware WebLogic Scripting Tool Command Reference.
-
55.6.2 Troubleshooting WebCenter Service Issues
When you create a space, an error similar to the following may display if enabling a service exceeds the time allowed:
Space created with the following warning(s) : Issues were faced while
provisioning the service(s) - List Service. Check the space services
settings page if these services have been provisioned.
When a space is created, services are enabled in parallel in multiple threads. If provisioning a service exceeds the specified timeout, the thread is interrupted. The timeout may be exceeded due to time needed to copy the metadata when the latency between the midtier and the database is too high, network issues, database performance issues, and so on.
To check if the issue is due to exceeding the timeout, search the log file for a message similar to the following:
[2009-10-19T08:43:22.659+00:00] [WC_Spaces] [WARNING] []
[oracle.webcenter.webcenterapp] [tid: [ACTIVE].ExecuteThread: '0' for queue:
'weblogic.kernel.Default (self-tuning)'] [userId: weblogic] [ecid:
0000IHfxTHMDScX_TtCCyc1Ar22000002f,0] [APP: webcenter] Concurr: The thread is
timed out in 5000 milisec. for oracle.webcenter.list:Execution timedout[[
    queued :   13 ms
    suspended :    0 ms
    running : 5787 ms
    timeout : 5000 ms
    service : oracle.webcenter.community
    resource : oracle.webcenter.list
    source : oracle.webcenter.concurrent.RunnableTask@43c4d1
             (oracle.webcenter.concurrent.RunnableTask)
    submission : 3
]]
In this case, the running time of 5787 ms exceeded the timeout of 5000 ms.
If possible, the root cause of the timeout should be addressed; for example, resolve networking or database performance issues. Once this is done, the space can be created again and the error should not be encountered. If the performance cannot be improved and the error persists, the timeout value may be increased for the service encountering the error. Refer to the chapter "Oracle WebCenter Portal Performance Tuning" in the Oracle Fusion Middleware Performance and Tuning Guide for more information on setting concurrency management parameters in adf-config.xml.
55.6.3 Troubleshooting Issues with Space Import and Export
This section contains the following subsections:
-
Section 55.6.3.1, "Space Blocked After Unsuccessful Export or Import"
-
Section 55.6.3.2, "Page or Space Not Found Message After Import"
-
Section 55.6.3.3, "Space Import Archive Exceeds Maximum Upload File Size"
-
Section 55.6.3.4, "Maximum Number of Spaces Exceeded on Export"
55.6.3.1 Space Blocked After Unsuccessful Export or Import
If an error occurs during a space export/import operation, some space(s) may appear blocked. To unblock a space, bring the space back online temporarily, and then take the space offline again to complete the export/import operation. Switching between the online and offline modes will unblock the space.
55.6.3.2 Page or Space Not Found Message After Import
When users first log in to Spaces after an import operation, they may see a "Page not found" or "Space not found" message if the page or space they last visited no longer exists. Last accessed page information is retained during import operations which is why these messages display sometimes.
55.6.3.3 Space Import Archive Exceeds Maximum Upload File Size
There is a file size limitation uploading content to Spaces. If your export archive exceeds the maximum upload size, the import operation through Spaces Administration will fail.
Ask your system administrator to import the space archive using WLST. For details, see "Importing Individual Spaces Using WLST" in Oracle Fusion Middleware Administrator's Guide for Oracle WebCenter Portal.
Alternatively, modify the maximum upload size in webcenter-config.xml. The default maximum upload size is 2 MB. See also "Changing the Maximum File Upload Size" in Oracle Fusion Middleware Administrator's Guide for Oracle WebCenter Portal.
55.6.3.4 Maximum Number of Spaces Exceeded on Export
The maximum number of spaces that you can export must be less than or equal to 80% of the connection pool size specified for the MDS Data Source. If you try to export too many spaces you might see a ResourceLimitException error:
Weblogic.common.resourcepool.ResourceLimitException
Export fewer spaces. Alternatively, ask your system administrator to modify the connection pool setting. For details, see "Setting JDBC Data Source" in Oracle Fusion Middleware Performance and Tuning Guide.
55.6.3.5 Lists Not Imported Properly
Lists are not importing properly due to list definition differences in the source and target systems.
Consider exporting and importing list data. This ensures that list data is consistent with the list definitions being imported.
If you choose to import without data, the list data in the target system is migrated to be consistent with the imported list definitions. If a list column data type is changed, the column values are converted from the target data type to the imported data type, if possible, otherwise the value is deleted. If a list column is removed during import, the column values are deleted.
55.6.3.6 Importing from the Subspaces Page
When you import a space from the Spaces Administration-Spaces page, the imported space does not automatically become a subspace of the current space. The newly imported space displays in the Spaces switcher menu, Spaces Browser task flow, or the Spaces page, which display all the spaces that are available to you.
You can import a space as a subspace by selecting the parent space on the Spaces page before you import the archive.
55.6.3.7 Unable to Import a Space If the Source and Target Applications Share the Same Content Server
You cannot export/import spaces or space templates between two different Spaces applications that share the same Content Server.
Similarly, you cannot use the Document Migration Utility to migrate space documents between two different Spaces applications that share the same Content Server.
