 Understanding Refunds
This chapter provides an overview of refunds and discusses how to:
Create batch refunds.
Create online refunds.
Approve refunds.
Complete batch payroll refunds.
Complete online payroll refunds.
Distribute payroll refunds through direct deposit.
Print checks and direct deposit advice slips.
Complete accounts payable (AP) refunds.
Review data for AP refunds.
Revoke direct deposits for AP refunding.
Distribute refunds to ePayment accounts.
Cancel refunds.
Reverse refunds.
Renumber refund checks for reprinting.
Delete paysheets.
View refunding information.
Understanding Refunds
This section discusses:
Refund methods.
Refund processes.
Refund recipients.
Refund format.
Refund process flow.
 Refunding Methods
You can use three refunding methods to create and distribute refunds:
The payroll method involves creating and distributing refunds using PeopleSoft Payroll for North America that treats your students like employees. The payroll method can only create and distribute student refunds, not organization refunds.
The accounts payable method involves creating and distributing refunds through an interface with PeopleSoft Payables.
Other
The other method is a catchall method used by institutions that create and distribute refunds through an interface with an application other than Payroll for North America or Payables.
Refunding Processes
You can use two types of processes to create and distribute refunds:
Online
Processing a refund online involves creating and distributing a refund for one recipient in real time.
Batch
Processing refunds in batch involves creating and distributing refunds for one or more recipients on a scheduled basis using a batch process.
Refunding Recipients
Two types of recipients can receive refunds: students and organizations. In Student Financials, the recipient refers to the type of account being refunded and does not necessarily indicate the person or organization that actually receives the refund. For example, a student withdraws from a class and is due to receive a refund. However, a nonstudent sponsor originally paid the student's tuition fees and should therefore receive the refunded money. Although the sponsor receives the actual refund, it is still considered a student refund in terms of how you create and distribute it.
Refunding Formats
You can use several types of formats to distribute refunds:
Check
Using the check format, you refund customers by sending them a check for the refund amount.
Credit card
Using the credit card format, you directly refund a customer's credit card for the refund amount.
Electronic check
Using the electronic check format, you directly refund a customer's eCheck account for the refund amount.
Direct deposit
Using the direct deposit format, you automatically deposit the refund amount into a predetermined direct deposit account. The direct deposit format is available for the accounts payable and payroll refunding methods.
Refunding Process FlowThe following diagrams display the decisions and processes involved with creating and distributing payroll and AP refunds.
The following diagram outlines payroll refund processing:
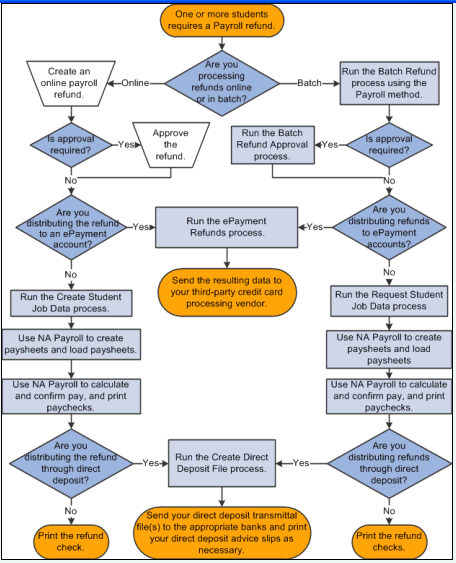
Payroll refund process flow
The following diagram outlines AP refund processing:
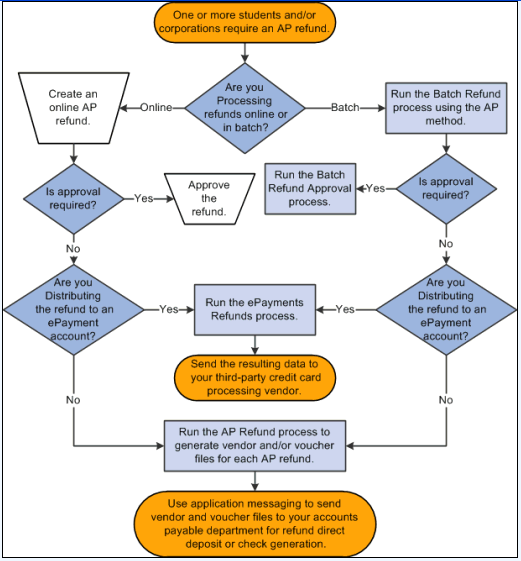
AP refund process flow
Creating Batch Refunds
This section discusses how to:
Define general parameters.
Select academic programs.
Select account types and terms.
Select item types.
Note. You cannot refund unsettled credit card payments using the Batch Refund (SFPREFND) process. The process ignores any unsettled credit card payments.
See Also
Processing ePayment Transactions
Pages Used to Create Batch Refunds|
Page Name |
Definition Name |
Navigation |
Usage |
|
RUNCTL_SFPREFND |
Student Financials, Refunds, Process Batch Refunds, Create Refunds, Batch Refund |
Define general parameters of the Batch Refund process. |
|
|
RUNCTL_SFPREFND_2 |
Student Financials, Refunds, Process Batch Refunds, Academic Programs |
Specify academic programs to include in the batch refund process. |
|
|
RUNCTL_SFPREFND_3 |
Student Financials, Refunds, Process Batch Refunds, Accounts / Terms |
Select account types and academic terms to include in the batch refund process. |
|
|
RUNCTL_SFPREFND_4 |
Student Financials, Refunds, Process Batch Refunds, Item Types |
Select item types to include in the batch refund process. |
|
|
REFUND_LINES |
Student Financials, Refunds, Process Batch Refunds, Review Batch Refunds |
View results of the Batch Refund process. |
|
|
REFUND_MESSAGES |
Student Financials, Refunds, Process Batch Refunds, Review Batch Messages |
View warnings or errors generated during the Batch Refund process. |
Defining General Parameters
Access the Batch Refund page (Student Financials, Refunds, Process Batch Refunds, Create Refunds, Batch Refund).
|
Batch ID |
Displays the unique ID assigned after you save your batch refund parameters. |
|
Check Batch Refunds |
After you run the process, click to access the Batch Refund Lines page and view created refunds. |
|
Batch Refund Messages |
After you run the process, click to access the Review Batch Messages page and view warnings or errors that the system encountered during the process. |
|
Refund Method |
Select a refund method. The value in the Refund Method field on the Refund Setup page (SF Business Unit component) appears here by default. If you select the Allow Changes in Refund Method check box on the Refund Setup page, you can change the value in the Refund Method field here. |
|
Run Option 1 |
Select the type of recipients to create refunds for. Values are: Individual Only, Organization Only, or Individual and Organization. |
|
Run Option 2 |
Select the types of credits to create refunds for. You can create refunds for financial aid credits (credits with an item type classification of Financial Aid), nonfinancial aid credits (credits with an item type classification other than Financial Aid), or both. |
|
Report Only |
Select to generate a report listing what refunds the system would create. When selected, the process does not actually create the refunds listed in the report. |
|
Calc Tuition if Required (calculate tuition if required) |
Select to calculate tuition for students who have not already had their tuition calculated or who need tuition recalculated. |
|
Select whether you want to include sponsors in the process, and if so, what types of sponsors. |
|
|
Refund Item Type |
Select the item type to assign to the refunds that the Batch Refund process creates. |
|
Address Usage |
Enter how the system chooses the proper address for each refund. |
|
External Org Contact Type (external organization contact type) |
Displays the contact type that you specified on the Refund Setup page of the SF Business Unit component. The system uses this contact type to determine the recipient of any organization refunds generated by the batch process. |
|
Refund Service Impact |
Displays the refund service impact that you specified on the Refund Setup page of the SF Business Unit component. The system uses this service impact during the batch process to identify any students who should be prevented from receiving a refund. |
|
Event ID |
This field is available only if:
The value that appears in this field by default is based on the Event ID field value on the Refund Setup page in the SF Business Unit component. The batch refunding process stamps the refund data with the event ID that you select here and the 3C engine uses the value when it generates email notifications. See Setting Up Refunding. |
Selecting Academic Programs
Access the Academic Programs page (Student Financials, Refunds, Process Batch Refunds, Academic Programs).
Required Parameters
|
All Programs |
Select to include all academic programs in the batch process. |
Academic Programs
This group box is available only if you clear the All Programs check box.
|
Academic Program |
Select the academic program to include in the process. |
Program Status
|
All Statuses |
Expand this scroll area to select academic program statuses to include in the batch refund process. The system creates refunds only for those students with the statuses you select. Alternatively, you can click the All Statuses button to populate all the statuses in the grid. This should be used with caution because statuses included are Deceased, Dismissed, and other statuses for which you may not want refunds processed. You can click the button and then delete the status rows that you do not want included for refund processing. |
Selecting Account Types and Terms
Access the Accounts/Terms page (Student Financials, Refunds, Process Batch Refunds, Accounts / Terms).
|
All Accounts and All Terms |
Select to include all account types and academic terms in the batch refund process. If you clear either check box and click Refresh, a scroll area appears. Add the accounts and terms to process. |
Selecting Item Types
Access the Item Types page (Student Financials, Refunds, Process Batch Refunds, Item Types).
|
All Item Types |
Select to include all item types in the batch refund process. If you clear the check box, use the Item Type From and Item Type To fields to define the range of item types to include in the batch refund process. |
Creating Online Refunds
This section discusses how to:
Create student refunds.
Create organization refunds.
Create student refunds with an extra amount.
Specify the account and term associated with an extra refunded amount.
Create sponsor refunds.
Create corporate sponsor refunds.
Pages Used to Create Online Refunds|
Page Name |
Definition Name |
Navigation |
Usage |
|
REFUND_SF |
Student Financials, Refunds, Student Refund |
Create an online refund for a student. |
|
|
SF_STUDENT_SP |
Click the Academic Information link on the Student Refund page. |
View enrollment and personal information for a given student. |
|
|
ACCOUNT_SF_SP |
Click the Student Accounts link on the Student Refund page. |
View account activity information for a given student. |
|
|
REFUND_ORG_SF |
Student Financials, Refunds, Corporate Refund |
Create an online refund for an organization. You can use this page in conjunction with the A/P refund method only. |
|
|
ACCOUNT_ORG_SF_SP |
Click the Get Account link on the Corporate Refund page. |
View account activity for a given corporation. |
|
|
REFUND_SF |
Student Financials, Refunds, Refund with Extra Amount |
Create a refund for an amount greater than the refundable balance. |
|
|
EXTRA_REFUND_AMT |
Click the Extra Amount Info link on the Refund with Extra Amount page |
Specify account and term information associated with the extra amount refunded. |
|
|
REFUND_SF_OLD |
Student Financials, Refunds, Sponsor Refund |
Create a refund for a designated sponsor. |
|
|
SSF_REFUND_ORG_OTH |
Student Financials, Refunds, Corporate Sponsor Refund |
Create a refund for a designated corporate sponsor. |
Creating Student RefundsAccess the Student Refund page (Student Financials, Refunds, Student Refund).
Depending on the type of refund method that you select, the fields described below will differ.
|
ID |
Enter the ID of the student for whom you want to create a refund. |
|
Balance and Anticipated Aid |
Displays the account balance and any anticipated aid of the selected student. |
|
Academic Information |
Click to access the Academic Information page. |
|
Student Accounts |
Click to access the Student Accounts page. |
|
Refund Method |
Select the refund method that you want to use to create this refund. The possible values for this field are Payroll, A/P, and Other. The value in the Refund Method field on the Refund Setup page (SF Business Unit component) appears here by default. If you select the Allow Changes in Refund Method check box on the Refund Setup page, you can change the value in the Refund Method field here. |
Refund Selection
Select the check box next to each credit line item to include in the refund. This group box displays the account type, academic term, item type description, original monetary amount, and balance of each line item.
Note. If you pay multiple targets by the same transaction, each target appears as a separate line item on the Student Refund page. When you refund multiple targets from the same transaction, however, the system combines the targets into a single refund. For example, if you are refunding a student 750.00 USD for tuition and 125.00 USD for housing, and both targets were part of the same credit card payment, the system combines the target refunds into a single credit card refund of 875.00 USD. It does not issue two separate refunds to the same credit card.
See Accepting Student Payments.
|
Refund Amount |
The system automatically enters the total amount of the line item in this field. To include only a portion of the line item in the refund, decrease the amount. |
|
Format |
Select the format to distribute the refund. Values are: A (automatic check): Select if you have an interface to a specific check-writing application. C (credit card): Select to directly refund the student's credit card. This value is selected by default for all refunds originating from credit card payments. D (direct deposit):
E (electronic check): Select to directly refund the student's eCheck account. This value is selected by default for all refunds originating from eCheck payments. P (paper check): Select to distribute the refund by using a check generated according to the refund method that you selected.
Note. For ePayment transactions, you can change a default
format of C or E to A or P. If
you do this, the system processes the refund so that you can generate a paper
check instead of directly crediting the student's credit card or eCheck account.
If you change the format to A or P for
more than one ePayment transaction, the system combines the transactions into
one lump refund so that you issue only one check to the student. You cannot
change a default format of A or P to C or E.
|
|
Address Type |
Select the type of address that you want printed on the check. Only address types for which an active address exists are available for selection. You must select a value in this field. |
|
Event ID |
This field is available only if:
The value that appears in this field by default is based on the Event ID field value on the Refund Setup page in the SF Business Unit component. The 3C engine uses the Event ID value when it generates email notifications. |
See Setting Up Refunding.
Note. You can only refund one ePayment at a time using the Student Refund page. Even if there are multiple ePayments on a student's account, you can select only one at a time. In addition, the system does not allow you to post a refund for eCheck payments that have not been debited or credit card payments that have not been settled. If you click the Post Refund button after selecting a refund for an ePayment that has not been debited/settled, you receive an error message.
Student Refund Buttons and Links
|
Post Refund |
Click to post the refund to the student's account. If you selected Payroll in the Refund Method field, the Produce Check link becomes available when you click this button. If you set up your business unit to require refund approval, the system alerts you to the approval requirement when you click Post Refund. |
|
Produce Check |
If you are creating the refund using the payroll refund method, click to create the payroll interface for the refund. This link opens the Produce Student Refund Check page (SSF_REF_STU_CNTRL). Note. For refunds using the payroll method, the Create Student Job Data step must be completed before moving onto the Produce Student Refund Check. (You need to run the Create Student Job Data process if a student has never had a refund before and there is no "employee" data.) The Produce Check is the first process for interfacing to payroll. Once there, you enter the pay period end date and click Process Check. That step creates the paysheet data. A paysheet serves as a repository for the data required for Payroll for North America to calculate a refund. After creating the paysheet, (click Process Check) the system populates the paysheet data. The Print Check button appears, enabling you to print a check (or direct deposit advice) on your printer. |
|
Calculate Tuition |
Click to calculate tuition for the selected student. This button is available only if you selected the Auto Calculate Tuition check box on the Tuition Calculation Controls page, there is a term listed for any of the refunds listed, and tuition is required. |
View Refund Check
Expand this group box to view a simulation of a refund check for the amount that you are refunding.
See Also
Processing ePayment Transactions
Creating Organization Refunds
Access the Corporate Refund page (Student Financials, Refunds, Corporate Refund).
Note. Except for the fields documented here, the fields on this page are identical to their counterparts on the Student Refund page.
|
External Org ID (external organization ID) |
Enter the ID of the organization for which you want to create a refund. |
|
Get Account |
Click to access the Corp Accounts secondary page. |
|
Contact Type |
Enter the organization's contact type to determine the address to print on the check. The address associated with the contact type appears at the bottom of the page, to the right of any image that you have inserted. The value in the Contact Type field appears by default from the Refund Setup on the SF Business Unit, but can be changed. |
View Refund Check
Expand this group box to view a simulation of a refund check for the amount that you are refunding.
The address that appears here is the address that is set up for the Contact on the Organization Table.
See Also
Creating Student Refunds with an Extra Amount
Access the Refund with Extra Amount page (Student Financials, Refunds, Refund with Extra Amount).
Note. You cannot use the Refund with Extra Amount page to create a refund for an organization.
Use this page to create a refund for more than the refundable balance or in the absence of a refundable balance. For example, you can disburse anticipated aid to a student before the actual receipt of funds. The refund becomes a charge on the student's account that is later credited when your institution actually receives the financial aid.
Note. By default, the value in the Format field
for Extra Amount is the same as the value in the Format field
for Refund Selection.
If you enter values that do not match, you receive an error message
when you click the Post Refund button.
If at least one direct deposit distribution exists, a value of D appears
in the Format field by default.
Note. Except for the fields documented here, the fields on this page are identical to their counterparts on the Student Refund page.
|
Method |
Enter the format to distribute any extra amount added to the refund. |
|
Extra Amount |
Enter the extra amount that you are adding to the refund. |
|
Extra Refund Info |
Click to access the Refund with Extra Amount Information page. |
Note. You can create a refund for more than the refundable balance only if you select the Refund Debit Balances check box on the Refund Setup page. If you do not select this check box, you can create a refund for an extra amount, but not for an extra amount and a credit at the same time.
See Also
Setting Up Your Business Unit to Refund Customers
Specifying the Account and Term Associated with an Extra Refunded Amount
Access the Extra Refund Amount page (click the Extra Amount Info link on the Refund with Extra Amount page).
|
Extra Account Nbr (extra account number) |
Specify the account to charge the extra refund amount to. |
|
Extra Account Term |
If the account that you select in the Extra Account Nbr field is set up by term, select a term. |
|
Extra Item Term |
Enter the academic term to assign to the extra refunded amount. |
Creating Sponsor Refunds
Access the Sponsor Refund page (Student Financials, Refunds, Sponsor Refunds).
If you have designated an individual as a sponsor for credits on a student's account, use the Sponsor Refund page to create refunds for those credits, to be distributed to the sponsor.
Note. You can create a refund for a sponsor only if you have associated the sponsor with a student using the Designate Individual Sponsor page.
Note. Except for the fields documented here, the fields on this page are identical to their counterparts on the Student Refund page.
|
ID |
Enter the ID of the sponsor for whom you are creating a refund. If the sponsor that you select sponsors only one student, the ID of that student appears in the For ID field. |
|
For ID |
If the sponsor that you select in the ID field sponsors more than one student, select the student whose refund you are creating. |
Note. By default, the value in the Format field
for Extra Amount is the same as the value in the Format field
for Refund Selection.
If you enter values that do not match, you receive an error message
when you click the Post Refund button.
If at least one direct deposit distribution exists, a value of D appears
in the Format field by default.
See Also
Creating Student Refunds with an Extra Amount
Creating Corporate Sponsor Refunds
Access the Corporate Sponsor Refund page (Student Financials, Refunds, Corporate Sponsor Refund).
Refer to the documentation for the Corporate Refund page and the Sponsor Refund page.
Approving Refunds
Depending on your business unit setup, a refund might require approval by up to three separate approvers. When approval is required, you cannot create a paysheet for a refund (payroll method only), complete a refund, or print a refund until it has been approved. This section discusses how to:
Route batch refunds to worklists.
Approve refunds.
Pages Used to Approve Refunds|
Page Name |
Definition Name |
Navigation |
Usage |
|
RUNCTL_RFND_APPR |
Student Financials, Refunds, Approve Refunds, Process Refund Approval, Process Refund Approval |
Route batch refunds requiring approval to appropriate worklists. |
|
|
REFUND_SF_APPR |
Student Financials, Refunds, Approve Refunds, Approve Student Note: This page can only be accessed through the worklist. From the worklist, click a refund for a student requiring approval. |
Approve student refunds. |
|
|
REFUND_ORG_APPR |
Student Financials, Refunds, Approve Refunds, Approve Corporate Note: This page can only be accessed through the worklist. From the worklist, click a refund for an organization requiring approval. |
Approve corporate refunds. |
|
|
REFUND_SF_APPR_INQ |
Student Financials, Refunds, Approve Refunds, Verify Student Approvals |
View the progress of a student refund requiring approval. |
|
|
REFUND_ORG_APP_INQ |
Student Financials, Refunds, Approve Refunds, Verify Corporate Approvals, Corp Refund Approval |
View the progress of an organization refund requiring approval. |
Routing Batch Refunds to Worklists
Access the Batch Refund Approval page (Student Financials, Refunds, Approve Refunds, Process Refund Approval, Process Refund Approval).
Before batch refunds can be approved, they must be routed to worklists.
|
Business Unit |
Select the business unit of the batch refunds to approve. |
|
Refund Batch ID |
Enter the batch ID of the group of refunds to approve. |
Approving Refunds
Access the Corp Refund Approval page through the worklist (Student Financials, Refunds, Approve Refunds, Approve Corporate).
|
ID |
Displays the ID, name, and address of the entity (student or corporation) receiving the refund. |
|
Academic Information |
Click to access the Academic Information page. |
|
Refund Detail |
Click to access details about the refund. |
|
Student Accounts or Corp Accounts |
Click to access the Student Accounts or the Corp Accounts page. |
|
View Anticipated Aid |
Click to access the Anticipated Aid Details page. |
|
User ID |
Displays the user ID of the person who created the refund. |
|
Date/Time |
Displays the date and time that the refund was created. When you approve a refund, a date and time appear under the original date and time to indicate when the refund was approved for a given level. |
|
Level 1, Level 2, and Level 3 |
Change the approval status from Pending to either Denied or Approved. If a certain level of approval is not required, that field has a value of N/A. |
|
Approved By |
When you approve the refund and save the page, the user ID of the approver appears here. |
See Also
Viewing Refund Information in Student Financials
Completing Batch Payroll Refunds
This section discusses how to:
Create job data by batch.
Request a payroll interface.
Create and load paysheets.
Calculate refunds.
Confirm refunds.
Pages Used to Complete Batch Payroll Refunds|
Page Name |
Definition Name |
Navigation |
Usage |
|
Request Student Job Data |
SSF_RUN_POIJOB |
Student Financials, Refunds, Process Batch Refunds, Request Student Job Data |
Create student job data in batch. |
|
Request Payroll Interface |
SSF_RUN_PAYINTFC |
Student Financials, Refunds, Process Batch Refunds, Request Payroll Interface |
The Request Payroll Interface page acts in the same way as the Produce Check link on the individual refund page. Instead of taking you to the Produce Student Refund Check page, it does essentially the same thing for a refund batch. |
|
RUNCTL_PSHUP |
Payroll for North America, Payroll Processing USA, Create and Load Paysheets, Load Paysheet Transactions |
Create and load paysheets using Payroll for North America. |
|
|
RUNCTL_PAY_CALC |
Payroll for North America, Payroll Processing USA, Produce Payroll, Calculate Pay |
Calculate using Payroll for North America. |
|
|
RUNCTL_PAY_CONF |
Payroll for North America, Payroll Processing USA, Produce Payroll, Confirm Pay |
Confirm using Payroll for North America. |
Creating Job Data by BatchAccess the Request Student Job Data page (Student Financials, Refunds, Process Batch Refunds, Request Student Job Data).
See Also
Creating Job Data for Payroll Refunds
Requesting a Payroll Interface
Access the Request Payroll Interface page (Student Financials, Refunds, Process Batch Refunds, Request Payroll Interface).
|
Batch ID |
Select the batch ID of the refunds you want to process. |
|
Pay Period End Date |
Select the pay period end date. |
Creating and Loading Paysheets
Access the Refund Paysheet Creation page.
You must create a paysheet for each batch refund created using the payroll refund method. Payroll for North America uses these paysheets to calculate refund checks.
See PeopleSoft Payroll for North America PeopleBook, Working with Paysheets
Calculating Refunds
Access the Refund Calculation page.
See Also
PeopleSoft Payroll for North America PeopleBook, Calculating Pay
Confirming Refunds
Access the Refund Confirmation page (Payroll for North America, Payroll Processing USA, Produce Payroll, Confirm Pay, Refund Confirmation).
After you have completed your refund calculations, run the Refund Confirmation (PSPCNFRM) process to finalize refund earnings, create check records, and update period-to-date earnings balances within Payroll for North America.
See Also
PeopleSoft Payroll for North America PeopleBook, Confirming Pay
Distributing Payroll Refunds Through Direct Deposit
If you created any batch or online refunds with a direct deposit format, you must create a transmittal file with all the information that your institution must provide to student banks, so that the refunds can be transferred directly into the students' bank accounts. This section discusses how to run the Create Direct Deposit File process.
Note. The system includes a student's direct deposit refund in the transmittal file only if you set up the student's direct deposit parameters using the Direct Deposit or Direct Deposit Canada pages (through Payroll for North America).
See Also
Setting Up Direct Deposit for Payroll Refunding
Page Used to Distribute Payroll Refunds Through Direct Deposit|
Page Name |
Definition Name |
Navigation |
Usage |
|
RUNCTL_DDP001 |
Payroll for North America, Payroll Processing USA, Create Direct Deposits, Create Direct Deposit File, Direct Deposit Create File |
Create an electronic transmittal file to transfer refunds directly into a student's bank account. |
Running the Create Direct Deposit File Process
Access the Direct Deposit Create File page (Payroll for North America, Payroll Processing USA, Create Direct Deposits, Create Direct Deposit File, Direct Deposit Create File).
See Also
PeopleSoft Payroll for North America PeopleBook, Working with Checks and Direct Deposit
Printing Checks and Direct Deposit Advice Slips
Payroll for North America provides reports that enable you to print out refund checks or direct deposit advice slips for a given pay end date. This section discusses how to run the Refund Check and Advice Slip Printing processes.
Pages Used to Print Checks and Direct Deposit Advice Slips|
Page Name |
Definition Name |
Navigation |
Usage |
|
RUNCTL_CHK_ADV1 |
Payroll for North America, Payroll Processing USA, Produce Checks, Print Checks, Refund Check Print |
Print confirmed payroll refund checks for U.S. students. |
|
|
RUNCTL_CHK_ADV1 |
Payroll for North America, Payroll Processing CAN, Produce Cheques, Print Cheques |
Print confirmed payroll refund checks for Canadian students. |
|
|
RUNCTL_CHK_ADV1 |
Payroll for North America, Payroll Processing USA, Create Direct Deposits, Print Advice Forms |
Print direct deposit advice slips for U.S. students. |
|
|
RUNCTL_CHK_ADV1 |
Payroll for North America, Payroll Processing CAN, Create Direct Deposits, Print Advice Forms |
Print direct deposit advice slips for Canadian students. |
Running the Refund Check and Advice Slip Printing Processes
Access the Refund Check Print Payroll for North America, Payroll Processing USA, Produce Checks, Print Checks, Refund Check Print, DDP Advice Print Payroll for North America, Payroll Processing USA, Create Direct Deposits, Print Advice Forms, DDP Advice Print) or DDP Advice Print Canada (Payroll for North America, Payroll Processing CAN, Create Direct Deposits, Print Advice Forms) page.
Note. The Refund Cheque Print, DDP Advice Print, and DDP Advice Print Canada pages are identical to the Refund Check Print page except for the page labels, checks, and advice slips that they generate.
See PeopleSoft Payroll for North America PeopleBook, Working with Checks and Direct Deposit
Completing AP Refunds
This section provides an overview of AP refund completion and discusses how to:
Run the Create Vendors and Vouchers process.
Run the Create Refund Voucher process.
See Also
PeopleSoft Payables PeopleBook
Understanding AP Refund Completion
When you create refunds using the accounts payable method, you must interface with PeopleSoft Payables to complete your refunds. If your system interfaces with PeopleSoft Financials the AP Refund process publishes messages to which PeopleSoft Payables subscribes through PeopleSoft Application Messaging.
The Create Vendors and Voucher process generates a vendor ID for each student or organization using VOUCHER_BUILD VERSION_1 message.
The Create Refund Voucher process generates a single payment voucher for each refund using VOUCHER_BUILD VERSION_2 message. No vendor ID is created either for student or organization—instead a single payment vendor, set up on the AP Business Unit Options page, is used.
Note. To understand AP refunding, you must also read the Addendum: Direct Deposit Through AP Refunding chapter.
See: Addendum: Direct Deposit Through AP Refunding. This document is posted to My Oracle Support for Additional Features January 2011 as part of the AP Direct Deposit Refunds Documentation Package.
The following diagram illustrates how AP refund messages travel between Student Financials and PeopleSoft Financials:
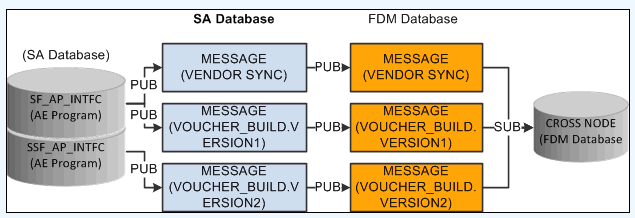
Student Financials to PeopleSoft Financials AP refund messaging process
During the AP refund messaging process, Student Financials delivers queues and messages using Service Operations to the PeopleSoft Financials database:
|
Queue |
Message |
Service Operation |
Description |
|
VENDOR |
VENDOR_SYNC |
VENDOR_SYNC |
Publishes all vendor information (address, location, and contact) in a message to the PeopleSoft Financials database, one vendor at a time. Also allows changes to vendor data to be published iteratively. |
|
VOUCHER |
VOUCHER_BUILD.VERSION_1 |
VOUCHER_BUILD.VERSION_1 |
Sends voucher header, line, and distribution information in the message to be processed by PeopleSoft Payables. The system populates staging tables with the message data. The Voucher Build (AP_VCHRBLD) process then processes these staging tables. |
|
VOUCHER |
VOUCHER_BUILD.VERSION_2 |
SSF_VOUCHER_BUILD_V2 |
For Direct Deposit only Sends refund as a Single Payment Voucher (SGLP) to the PeopleSoft Financials database. In addition to sending the voucher header, line, and distribution information, voucher vendor details and voucher bank details are also included. The system populates staging tables with the message data. The Voucher Build (AP_VCHRBLD) process then processes these staging tables. |
See: Addendum: Direct Deposit Through AP Refunding. This document is posted to My Oracle Support for Additional Features January 2011 as part of the AP Direct Deposit Refunds Documentation Package.
Pages Used to Complete AP Refunds|
Page Name |
Definition Name |
Navigation |
Usage |
|
RUNCTL_AP_REFUND |
Student Financials, Refunds, AP Refunding, Create Vendors and Vouchers |
Run the Create Vendors and Voucher process to create vendor and voucher files or publish vendor and voucher information. Use this process only if you selected the Use Voucher/Vendor Sync option on the SF Installation page. Direct Deposit refunding is not available with this option. |
|
|
PERS_SF_VENDOR |
Student Financials, Refunds, AP Refunding, Student Vendor IDs, Pers Sf Vendor |
Maintain or delete student vendor IDs after refunds have been processed to AP. This page is used only if you run the Create Vendors and Vouchers process. |
|
|
RUNCTL_REFUND_VCHR |
Student Financials, Refunds, AP Direct Deposit, Create Refund Vouchers, Create Refund Voucher |
Run the Create Refund Voucher process to generate a single payment voucher and send to AP with bank account details. Use this process only if you selected the Use Single Payment Voucher option on the SF Installation page. Direct Deposit refunding is available with this option. |
Running the Create Vendors and Vouchers Process
Access the Create Vendors and Vouchers page (Student Financials, Refunds, AP Refunding, Create Vendors and Vouchers).
Note. You can run this process only if the Use
Voucher/Vendor Sync option is selected in the AP
Refunding Option group box on the SF Installation page.
Direct Deposit refunding is not available with
this option.
If the SF Installation is incorrect, when you run the process, an error
message appears in the log file.
|
Run Option |
Select the type of recipient for whom you are running the process. Values are: Individual Only, Organization Only, or Individual and Organization. |
|
Run |
Click to access the Process Scheduler page. If your system integrates with PeopleSoft Financials, select the check box next to the SF to Payables Interface (SF_AP_INTFC) process. This process looks at AP setup data and refund data to build and generate messages. It publishes a message for each vendor that it creates or changes, and it also publishes one single message containing all processed vouchers. In addition, if a student or corporate address changes in Student Financials, the system sends a message to PeopleSoft Payables indicating the change. PeopleSoft Payables subscribes to this message and updates the corresponding vendor address accordingly. |
Running the Create Refund Voucher ProcessAccess the Create Refund Voucher page (Student Financials, Refunds, AP Direct Deposit, Create Refund Vouchers, Create Refund Voucher).
Note. You can run this process only if the Use
Single Payment Voucher option is selected in the AP
Refunding Option group box on the SF Installation page.
Direct Deposit refunding is available with this option.
If the SF Installation is incorrect, when you run the process, an error
message appears in the log file.
|
Run Option |
Select the type of recipient for whom you are running the process. Values are: Individual Only, Organization Only, or Individual and Organization. |
|
Run |
Click to access the Process Scheduler page. Select the SSF_AP_INTFC process. This process creates a single payment voucher in AP using the bank account and direct deposit details that are set up in the Manage Bank Details and Manage Direct Deposit components. |
See: Addendum: Direct Deposit Through AP Refunding. This document is posted to My Oracle Support for Additional Features January 2011 as part of the AP Direct Deposit Refunds Documentation Package.
See Setting Up Installation Parameters and Keywords.
See Setting Up Accounts Payable Options.
Direct Deposit Refunds
If a Direct Deposit agreement exists for a student, the Create Refund Voucher process uses the value in the Direct Deposit Vendor ID field on the AP Business Unit Options page to send direct deposit details to AP for the refund amount. The process:
Generates/fetches all required data—voucher, bank, distribution details.
Retrieves the DFI Qualifier from the AP Business Unit setup and derives the DFI ID. This is inserted into the relevant tables and passed to AP.
If the DFI Qualifier is 01: Transit Number, the DFI ID should be 9 characters, cannot be all zeros, and the value is similar to the Bank Code/Routing Number (BNK_ID_NBR). Check digit validation occurs.
If the DFI Qualifier is 02: Swift ID, the DFI ID must be 8 to 11 characters, the Swift number must have a valid two character country code beginning in position 5, and the value is similar to the BIC Code (BIC_ID).
Generates refund vouchers based on the distribution:
Generates voucher ID.
Sorts active distribution data based on Eff.Dt, Eff.Seq and priority in ascending order with Eff.Dt <=SYSDATE.
Calculates refund amount for each distribution using the priority.
Logs relevant messages.
Note. If a Direct Deposit Agreement does not exist for a student, the refund is sent as a check. The Create Refund Voucher process uses the value in the Check Vendor ID field on the AP Business Unit Options page to send the refund details to AP to produce a check for the refund amount. No bank details are sent. Such refunds still appear as direct deposit refunds in the Refund Inquiry pages because the refund was originally processed for direct deposit.
Check Refunds
The Create Refund Voucher process skips the bank and direct deposit setup details and generates the check with the fetched data.
Final Steps in the Create Refund Voucher Process
The process:
Publishes data to AP—it updates the refund tables with the appropriate status.
Pushes all data into the interface tables.
If an Event ID is present on the refund header, the process inserts data in the 3C related trigger table with the Event ID and Institution associated with the SF Business unit passed on the run control page.
If an Event ID is not present, an error message appears in the log file and data is not inserted in the 3C trigger table.
Updates the refund header with the Voucher ID so that voucher details can be viewed on the inquiry pages.
Logs messages with details:
Total refunds processed.
Number of Direct Deposit refunds.
Number of Check refunds.
Examples
Here are some examples of how a refund amount is distributed based on the direct deposit account distribution setup. Deposit Types are A: Amount, P: Percent, and B: Balance. For further information about setting up direct deposit distributions:
See Setting Up and Managing Direct Deposit Distributions for AP Refunding.
Example 1: A student is to receive a $100.00 refund. The direct deposit distribution for the student is:
|
PRIORITY |
ACCOUNT |
DEPOSIT TYPE |
DEPOSIT AMT |
AMOUNT_PCT |
|
1 |
My-1234 |
A |
$40.00 |
|
|
2 |
Mom-5678 |
P |
30 |
|
|
999 |
Father-6789 |
B |
The process calculates the first voucher as $40.00 ($40.00 flat amount) and associates bank details for the My-1234 account.
The process calculates the second voucher as $30.00 (30 percent of $100.00) and associates bank details for the Mom-5678 account.
The process calculates the third voucher as $30.00 ($100.00 minus $40.00 minus $30.00) and associates bank details for the Father-6789 account.
Example 2: A student is to receive a $75.00 refund. The direct deposit distribution for the student is:
|
PRIORITY |
ACCOUNT |
DEPOSIT TYPE |
DEPOSIT AMT |
AMOUNT_PCT |
|
1 |
My-1234 |
P |
60 |
|
|
2 |
Mom-5678 |
A |
$50.00 |
|
|
999 |
Father-6789 |
B |
The process calculates the first voucher as $45.00 (60 percent of $75.00) and associates bank details for the My-1234 account.
The process calculates the second voucher as $30.00 ($75.00 minus $45.00) which is less than $50.00—therefore $30.00 is used and the process associates bank details for the Mom-5678 account.
The process does not calculate a third voucher because no amount remains on the refund.
Example 3: A student is to receive a $250.00 refund. The direct deposit distribution for the student is:
|
PRIORITY |
ACCOUNT |
DEPOSIT TYPE |
DEPOSIT AMT |
AMOUNT_PCT |
|
1 |
My-1234 |
P |
50 |
|
|
2 |
Father-6789 |
B |
The process calculates the first voucher as $125.00 (50 percent of $250.00) and associates bank details for the My-1234 account.
The process calculates the second voucher as $125.00 ($250.00 minus $125.00) and associates bank details for the Father-6789 account.
Example 4: A student is to receive a $250.00 refund. The direct deposit distribution for the student is:
|
PRIORITY |
ACCOUNT |
DEPOSIT TYPE |
DEPOSIT AMT |
AMOUNT_PCT |
|
1 |
My-1234 |
A |
100.00 |
|
|
2 |
Mom-5678 |
B |
The process calculates the first voucher as $100.00 ($100.00 flat amount) and associates bank details for the My-1234 account.
The process calculates the second voucher as $150.00 ($250.00 minus $100.00) and associates bank details for the Mom-4567 account.
Example 5: A student is to receive a $250.00 refund. The direct deposit distribution for the student is:
|
PRIORITY |
ACCOUNT |
DEPOSIT TYPE |
DEPOSIT AMT |
AMOUNT_PCT |
|
1 |
My-1234 |
A |
500.00 |
|
|
2 |
Mom-5678 |
B |
The process calculates the first voucher as $250.00 which is less than the $500.00 flat amount— therefore $250.00 is used and the process associates bank details for the My-1234 account.
The process does not calculate a second voucher because no amount remains on the refund.
Example 6: A student is to receive a $250 refund. The direct deposit distribution for the student is:
|
PRIORITY |
ACCOUNT |
DEPOSIT TYPE |
DEPOSIT AMT |
AMOUNT_PCT |
|
1 |
Father-6789 |
B |
The process calculates the only voucher as $250.00 and associates bank details for the Father-6789 account.
Reviewing Data for AP RefundsThis section discusses how to:
Review data from the Create Vendors and Vouchers process.
Review data from the Create Refund Voucher process.
Pages Used to Review Data for AP Refunds|
Page Name |
Definition Name |
Navigation |
Usage |
|
SF_EMP_VNDR_INQ |
Student Financials, Refunds, AP Refunding, Review Student Vendors, Vendor Information - SA Student Vendor |
View vendor details for a student refund processed through Accounts Payable. The data on this page relates only to the Create Vendors and Vouchers process. |
|
|
SF_ORG_VNDR_INQ |
Student Financials, Refunds, AP Refunding, Review Corporate Vendors, Vendor Information - SA Corp Vendor |
View vendor details for an organization refund processed through Accounts Payable. The data on this page relates only to the Create Vendors and Vouchers process. |
|
|
SF_VCHR_INQ |
Student Financials, Refunds, AP Refunding, Review Student Vendors, Voucher Data - Vouchers Student Financials, Refunds, AP Refunding, Review Corporate Vendors, Voucher Data - Vouchers |
View voucher details for student or organization refunds processed through Accounts Payable. |
|
|
SF_VCHR_DTL_INQ |
Student Financials, Refunds, AP Refunding, Review Voucher Data, SA Voucher Detail |
View voucher data by Accounts Payable business unit. The data on this page relates only to the Create Vendors and Vouchers process. |
|
|
SSF_VCHR_REVIEW |
Student Financials, Refunds, AP Direct Deposit, Review Vouchers, Voucher Details |
View voucher details sent to AP by the Create Refund Voucher process. |
Reviewing Data from the Create Vendors and Vouchers ProcessIf you use the Create Vendors and Vouchers process, use the Vendor Information - SA Student Vendor, Vendor Information - SA Corp Vendor, Voucher Data - Vouchers, and SA Voucher Detail pages to review data.
Reviewing Data from the Create Refund Voucher ProcessAccess the Voucher Details page (Student Financials, Refunds, AP Direct Deposit, Review Vouchers, Voucher Details).
The data on this page relates only to the Create Refund Voucher process.
After you run the Create Refund Voucher process, use this page to review details of refunds interfaced to AP.
The values in the SetID, Control Group, Vendor ID, Origin, DFI Qualifier, and DFI ID field are based on the setup on the AP Business Unit Options page.
The Vendor ID, DFI Qualifier, and DFI ID values are required by AP to process a single payment voucher.
|
Vendor ID |
If the refund is a direct deposit, this value is based on the Direct Deposit Vendor ID value on the AP Business Unit Options page. If the refund is a check, the value is based on the Check Vendor ID value. |
|
DFI Qualifier |
This value is based on the option that is selected in the DFI Qualifier group box on the AP Business Unit Options page: Transit Number or Swift ID. |
|
DFI ID |
This value is derived by the Create Refund Voucher process. If the DFI Qualifier is Transit Number, the DFI ID is similar to the routing number. If the DFI Qualifier is Swift ID, the DFI ID is similar to the BIC code. |
|
Refund Address |
Click this link to view Student Name, Email, and Refund address details. |
|
Voucher Distribution |
Click this link to view the GL Business Unit and Chartfields information. |
|
Bank Address |
Click this link to view the bank/branch address details (from the bank/branch setup in HR). |
For information about the setup for other fields on this page,
See Setting Up Refunding.
Revoking Direct Deposits for AP Refunding
Use the Direct Deposit Revocation page to revoke a direct deposit agreement for a student or organization—the student or organization then receives refunds by check instead of direct deposit.
This section discusses how to revoke direct deposits for AP refunding.
Page Used to Revoke Direct Deposits for AP Refunding|
Page Name |
Definition Name |
Navigation |
Usage |
|
SSF_DDENRL_REVOKE |
Student Financials, Refunds, AP Direct Deposit, Revoke Direct Deposit, Direct Deposit Revocation |
Revoke direct deposit agreements. |
Revoking Direct Deposits for AP RefundingAccess the Direct Deposit Revocation page (Student Financials, Refunds, AP Direct Deposit, Revoke Direct Deposit, Direct Deposit Revocation).
|
Agreement Text |
The text that appears here is the original agreement text that was viewed by the student or organization when the direct deposit distribution was signed or created. |
|
Revoke Consent |
If you select the Revoke Consent check box, the direct deposit agreement for the student or organization is revoked and the status of all existing direct deposit distributions is changed to inactive. The student or organization receives refunds by check. To create distributions after an agreement is revoked, the student or organization must sign a new agreement and re-enter all required information. In Self Service, the student is taken to Enroll in Direct Deposit and not to Modify Direct Deposit. The student cannot view previous distributions. Note. No email notification is sent when a direct deposit agreement is revoked. After you select the check box and save the page, the Revoke Consent check box is no longer available for edit. |
|
Date Revoked |
The current date appears by default when the Revoke Consent check box is selected. |
Distributing Refunds to ePayment Accounts
This section provides an overview of ePayment refunds and discusses how to distribute refunds for ePayment transactions.
See Also
Processing Refunds for ePayments
Understanding ePayment RefundsStudent Financials handles refunds to credit cards and eChecks (ePayments) differently than check and direct deposit refunds.
When you refund ePayments using the Batch Refund process, the system creates a separate refund for each credit card payment, even if there are multiple credit card payments on one student's account. The system rolls any cash or check credits on the student's account into one lump sum refund that is separate from any credit card refunds.
In addition, unlike refunds created using the check or direct deposit format, you do not use your Payroll for North America or Payables interface to complete the refunds. The system ignores ePayment refunds when you run the Refund Sheet Creation, Refund Calculation, Refund Confirmation, and AP Refunds batch processes. Instead, you run ePayment-specific batch processes that enable you to interface with your third-party credit card vendor to directly refund student ePayments.
Page Used to Distribute ePayment Refunds|
Page Name |
Definition Name |
Navigation |
Usage |
|
RUNCTL_SFPCCBAT |
Student Financials, Refunds, Electronic Payment Refunds, Process ePayment Refunds, ePayment Refunds |
Generate refund credits in preparation of transmission to your third-party ePayment processor. |
Distributing Refunds for ePayment Transactions
Access the ePayment Refunds page Student Financials, Refunds, Electronic Payment Refunds, Process ePayment Refunds, ePayment Refunds).
The ePayment Refunds page (SFPCCBAT) process logs any refunded web credit card payments for a given business unit and generates the credits that you send to your third-party credit card processing vendor. Run this process prior to running the Credit Card Processing (SF_CRCRD) process.
See Also
Processing ePayment Transactions
Canceling Refunds
If the system generates an error during the posting of a refund, you cannot continue processing the refund, and you cannot reverse it because the posting process did not finish. You must cancel the refund and post it again. This section discusses how to:
Cancel student refunds.
Cancel organization refunds.
Note. You may never have to use the cancellation pages. They are designed solely as a safety measure for quick recovery.
Pages Used to Cancel Refunds|
Page Name |
Definition Name |
Navigation |
Usage |
|
REFUND_HDR_CAN_SF |
Student Financials, Refunds, Reverse and Cancel Refunds, Cancel Student Refund, Student Refund Cancellation |
Cancel a student refund and begin again if you encounter a problem during the posting process. |
|
|
REFUND_ORG_CAN_SF |
Student Financials, Refunds, Reverse and Cancel Refunds, Cancel Corporate Refund, Corp Refund Cancellation |
Cancel an organization refund and begin again if you encounter a problem during the posting process. |
Canceling Student Refunds
Access the Student Refund Cancellation page (Student Financials, Refunds, Reverse and Cancel Refunds, Cancel Student Refund, Student Refund Cancellation).
|
Cancel |
Select this check box next to the refund to cancel. When you save the page, the system cancels each selected refund and makes the Cancel check box unavailable. |
Canceling Organization Refunds
Access the Corp Refund Cancellation page (Student Financials, Refunds, Reverse and Cancel Refunds, Cancel Corporate Refund, Corp Refund Cancellation).
This page is identical to the Student Refund Cancellation page.
See Also
Reversing Refunds
This section provides an overview of refund reversals and discusses how to:
Reverse student refunds by ID.
Reverse student refunds by date.
Reverse organization refunds by ID.
Reverse organization refunds by date.
Reverse refunds within Payroll for North America.
Understanding Refund Reversals
First, you reverse the refund within Student Financials, effectively unposting the refund from the recipient's account.
Next, if you originally created the reversed refund using the payroll method, you run a process that reverses the associated refund check within Payroll for North America. If you reverse a direct deposit refund for which you have already created a transmittal file, the system includes the reversal in the next transmittal file that you create.
If you originally created the reversed refund using the accounts payable method, you must notify your accounts payable department so they can reverse the associated refund record within PeopleSoft Payables.
Credit card refund reversals are possible only during certain stages of the refunding process. You can reverse a credit card refund after its original creation and after you run the ePayment Refunds process. When reversing a credit card refund, you need only reverse it within Student Financials. However, after you submit the credit to the third-party credit card processing vendor, you can no longer reverse the credit card refund.
See Also
PeopleSoft Payroll for North America PeopleBook, Working with Checks and Direct Deposit
Pages Used to Reverse Refunds|
Page Name |
Definition Name |
Navigation |
Usage |
|
REFUND_REV_STU_SF |
Student Financials, Refunds, Reverse and Cancel Refunds, Student Refunds by ID |
Reverse refunds for a specific student. |
|
|
REFUND_REVERSE_SF |
Student Financials, Refunds, Reverse and Cancel Refunds, Student Refunds by Date |
Reverse student refunds for a specific date. |
|
|
REFUND_REV_ORG |
Student Financials, Refunds, Reverse and Cancel Refunds, Corporate Refunds by ID |
Reverse refunds for a specific organization. |
|
|
REFUND_REV_ORG_SF |
Student Financials, Refunds, Reverse and Cancel Refunds, Corporate Refunds by Date |
Reverse organization refunds for a specific organization. |
|
|
RUNCTL_PAY_REV |
|
Reverse a check within Payroll for North America. |
Reversing Student Refunds by ID
Access the Student Refunds by ID page (Student Financials, Refunds, Reverse and Cancel Refunds, Student Refunds by ID).
|
Academic Information |
Click to access the Academic Information page. |
|
Status |
The values that appear on this page are AP Interface Created, Credit Pending, Confirmed, Declined, Posted, and Interfaced to Payroll. |
|
Check/Voucher Info |
Click to view information regarding the check or voucher associated with this refund. If you completed this refund using the Payroll for North America interface, this link accesses the Detail Check Information page. If you completed this refund using the PeopleSoft Payables interface, this link accesses the Detail Refund AP Information page. |
|
Refund Detail |
Click to access the Detail Refund Information by Student page. |
|
Reverse |
Click this button next to the refund that you want to reverse. |
Reversing Student Refunds by Date
Access the Student Refunds by Date page (Student Financials, Refunds, Reverse and Cancel Refunds, Student Refunds by Date).
Aside from displaying refunds by date instead of student ID, this page is identical to the Student Refunds by ID page.
See Also
Reversing Student Refunds by ID
Reversing Organization Refunds by ID
Access the Corporate Refunds by ID page (Student Financials, Refunds, Reverse and Cancel Refunds, Corporate Refunds by ID).
Aside from displaying organization refunds instead of student refunds, this page is identical to the Student Refunds By ID page.
See Also
Reversing Student Refunds by ID
Reversing Organization Refunds by Date
Access the Corporate Refunds by Date page (Student Financials, Refunds, Reverse and Cancel Refunds, Corporate Refunds by Date).
Aside from displaying organization refunds by date instead of by ID, this page is identical to the Student Refunds By ID page.
See Also
Reversing Student Refunds by ID
Reversing Refunds Within Payroll for North America
Access the Paycheck Reversal/Adjustment page.
Note. If a refund calendar is not set up as off-cycle, you may encounter processing problems.
Renumbering Refund Checks for Reprinting
During your refunding process, you may have to reprint a range of checks. For example, if a group of physical checks were damaged during printing, you would need to renumber the checks stored in the system to match the replacement checks that you actually issue. This section discusses how to renumber checks.
Page Used to Renumber Refund Checks for Reprinting|
Page Name |
Definition Name |
Navigation |
Usage |
|
RUNCTL_PAY_REPRINT |
|
Renumber checks for reprinting. |
Renumbering Checks
Access the Refund Check Reprint page (Payroll for North America, Payroll Processing USA, Produce Checks, Reprint Checks, Refund Check Reprint).
See Also
PeopleSoft Payroll for North America PeopleBook, Working with Checks and Direct Deposit
Deleting Paysheets
While generating refund checks using Payroll for North America, you may encounter problems during the paysheet creation or refund calculation steps. This results in an uncalculated refund check or an incomplete paysheet, both of which cannot be completed. You must delete the paysheet and start the process over again. This section discusses how to delete paysheets.
Page Used to Delete Paysheets|
Page Name |
Definition Name |
Navigation |
Usage |
|
RUNCTL_PAY_USHT_SF |
Payroll for North America, Payroll Processing USA, Update Paysheets, Pay Unsheet, Refund Unsheet |
Delete paysheets. |
Deleting Paysheets
Access the Refund Unsheet page (Payroll for North America, Payroll Processing USA, Update Paysheets, Pay Unsheet, Refund Unsheet).
The options in the Payroll Cycle group box are unavailable.
See Also
PeopleSoft Payroll for North America PeopleBook, Working with Paysheets
Viewing Refund Information in Student Financials
Throughout your refunding process, you may want to view information about the refunds that you are creating and distributing. The following table lists information for Student Financials. Other reports are available in Payroll for North America. This section lists the pages used to view refund information.
For information about the pages used to review data for AP refunds, refer to the Reviewing Data for AP Refunds section earlier in this chapter.
Pages Used to View Refund Information