36 Working with Workflow-Enabled Content
This chapter describes how to work with workflows on content in a portal.
This chapter includes the following topics:
-
Section 36.2, "Assigning a Workflow to a Folder in a Portal"
-
Section 36.4, "Viewing Workflow Status and File Information"
Permissions:
To perform the tasks in this chapter, you must be a portal moderator or a portal member with the portal-level permissions Basic Services: Edit Page Access and Structure, Documents: Administration, Documents: Create and Edit Documents, and Documents: View Documents (standard permissions) or Pages: Edit Pages, Documents: Administration, Documents: Create and Edit Documents, and Documents: View Documents (advanced permissions).
For more information about permissions, see Section 29.1, "About Roles and Permissions for a Portal."
36.1 About Content Workflows
Workflows on content in WebCenter Portal are available only when the connected content repository is Content Server and your system administrator has completed the prerequisite configuration.
See Also:
-
"Configuring a Content Server Repository" in Oracle Fusion Middleware Administering Oracle WebCenter Portal
-
"Creating a Content Repository Connection Based on the Oracle Content Server Adapter" in Oracle Fusion Middleware Developing Portals with Oracle WebCenter Portal and Oracle JDeveloper
A workflow provides for review and approval of a file before it is released to the system. The workflow notifies approvers through mail messages when they have a file to review and approve.
WebCenter Portal includes the following types of workflows:
-
Internally-defined workflows (discussed in Chapter 57, "Adding Worklists to a Portal"). For example, portal moderators receive a workflow notification in their worklists for portal subscription requests, or when a new file is checked in or uploaded to the portal. The Oracle Fusion Middleware Installation Guide for Oracle WebCenter Portal describes how to install and configure internally-defined workflows for WebCenter Portal.
-
Externally-defined workflows enabled in a Workflow server that comes with Oracle SOA Suite (discussed in Chapter 57, "Adding Worklists to a Portal"). The definition of these workflows is an administrative or development task in Oracle SOA Suite.
-
Workflows defined on portal folders that reside in Content Server. When a folder is assigned a workflow, any file (including wiki documents and blog posts) checked in or uploaded to that folder must be approved or rejected by one or more assigned approvers. Document task flows, Content Presenter, and the Oracle Workflow Queue portlet from the Universal Content Management Portlet Suite provide access to the workflow-enabled content. This chapter discusses this type of workflow.
See Also:
For more information about working with workflows in the Content Server user interface, see the "Working with Workflows" chapter in Oracle Fusion Middleware User's Guide for Oracle Content Server.
In WebCenter Portal, you can define workflows by assigning a workflow to a folder in a document task flow. Out-of-the-box, WebCenter Portal includes three workflow types that you can assign to portal folders (see Section 36.1.1, "Understanding Workflow Types"). These seeded workflows are available only to a folder in a portal. They are not available to your personal folders in the Home portal.
Once you assign a workflow to a folder in a portal, WebCenter Portal automatically assigns the workflow to every file subsequently checked in or uploaded to the folder. Document task flows, the Content Presenter task flow, and the Oracle Workflow Queue portlet from the Universal Content Management Portlet Suite provide access to the workflow-enabled content.
In all document task flows, any user with privileges to view the contents of a folder that is assigned a workflow can view the files while they are in a workflow, showing the pending changes. Content Presenter allows you to view both the published version of a content item (not showing the pending changes), and the pending changed version while it is in workflow. REST APIs, on the other hand, show only the published version of a file, and do not show the pending changes in unreleased versions of files that are in workflow.
Only workflow approvers can perform actions on a file in workflow (such as upload new version, edit, rename, delete, copy/cut/paste). Non-approvers can view the file, but cannot perform any actions on the file.
The following sections provide conceptual information about workflow on files in WebCenter Portal:
36.1.1 Understanding Workflow Types
WebCenter Portal provides three built-in workflows for content in a portal. These are single-step workflows that allow one or more approvers to approve, reject, or edit a file in workflow:
-
AllApprover: A single-step workflow that requires all assigned approvers to approve the document to release it from workflow. Approvers of this workflow type are not able to edit the file while it is in worfklow. -
AllReviewer: A single-step workflow that requires all assigned approvers to approve the document to release it from workflow. Approvers of this workflow type may optionally edit the file.Note:
If an assigned approver in an AllReviewer workflow uploads a new version of the document or edits the document, it is automatically approved by that approver.
-
SingleApprover: A single-step workflow that requires only one assigned approver to approve the document to release it from workflow. Approvers of this workflow type are not able to edit the file while it is in workflow.
Note:
The seeded workflows are available only to a folder in a portal. They are not available to your personal folders in the Home portal.
For more information about configuring Content Server to enable the built-in workflows, see the "Enabling the WebCenterConfigure Component" section in Oracle Fusion Middleware Administering Oracle WebCenter Portal.
36.1.2 Understanding Workflow Steps
The three workflows provided with WebCenter Portal (AllApprover, AllReviewer, and SingleApprover) each contain a workflow contribution step and an approval step. Typically, different users will participate in each of the steps.
| Step Type | Description |
|---|---|
|
|
This is the initial step of a workflow. In this step, the user who participates as the contributor is the WebCenter Portal user who submits the document or edits an existing document in a folder that has workflow enabled on it. |
|
|
In this step, approvers can approve or reject the file. Editing is allowed by an approver during this step only if the workflow contains the step |
36.1.3 Understanding Workflow Process
The workflow process is as follows:
-
A document enters the workflow approval step by exiting the initial
contributionstep as a result of a new document upload or editing an existing document that was previously uploaded into a workflow-enabled folder. See Section 36.1.2, "Understanding Workflow Steps." -
If any approver rejects a revision, it goes back to the most recent
contributionstep for editing. -
When approvers approve a revision in the workflow, the content item is released to the system.
36.2 Assigning a Workflow to a Folder in a Portal
With appropriate permissions (the portal moderator, or portal members with Manage Configuration permissions), you can assign a workflow to a folder in a portal when the connected content repository is Content Server. Once you assign a workflow to a portal folder, WebCenter Portal automatically assigns the workflow to every file subsequently checked in or uploaded to the folder.
Out-of-the-box, WebCenter Portal includes three workflow types that you can assign to portal folders (see Section 36.1.1, "Understanding Workflow Types"). These seeded workflows are available only to a folder in a portal. They are not available to your personal folders in the Home portal.
If you create a subfolder in a parent folder that is assigned a workflow, the subfolder automatically inherits the workflow assignment of the parent folder.
To assign a workflow to a folder:
-
On the Documents page or in a Document Explorer, Document Manager, or Folder Viewer task flow, create a new folder, or click in the row of an existing folder.
-
Click the View menu, and select Details, or right-click to display the folder's context menu, and select Details.
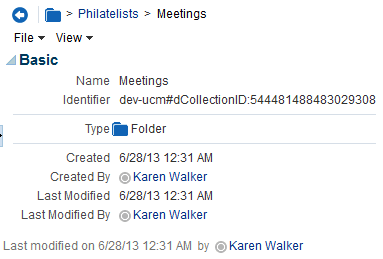
The Basic properties pane for the folder opens (Figure 36-1).
-
From the File menu, select Workflow Settings.
-
In the Workflow Settings dialog, select from the Workflow Name list (Figure 36-2) to apply a workflow to the folder.
Note:
The selections in the Workflow Name list are preceded with the WebCenter Portal installation name used during the installation procedure.
For information about the out-of-the-box workflows, see Section 36.1.1, "Understanding Workflow Types." Additional workflows may be listed if they have been defined in Content Server and added by the system administrator. For more information about defining workflows, see the "Working with Workflows" chapter in Oracle Fusion Middleware User's Guide for Oracle Content Server.
-
After selecting a workflow name, click Add Approvers (Figure 36-3).
Note:
WebCenter Portal does not support group names as approvers.
-
In the Select User dialog, search for and select a user to whom to assign the workflow.
Note:
To select multiple users in the Select User dialog, your search result must include all users that you want to select, then you can use Ctrl+click to selectively create the list of approvers. To list all users in one search result, use a generic search string. If you enter a second search string and select users in that search result, your existing list of approvers in the Select User dialog is replaced.
Click OK.
-
In the Workflow Settings dialog, optionally click Add Approvers again to add more approvers, then click OK to save the workflow.
Every assigned approver receives a mail message to notify them that they are assigned to the workflow as document approvers. The format and contents of the mail message are controlled by how the system administrator installed and configured the Content Server (see the "Managing Mail" chapter in Oracle Fusion Middleware Administering Oracle WebCenter Portal).
With a workflow established on a folder in a portal, WebCenter Portal automatically enters every file that is subsequently checked in or uploaded to the folder into workflow. If you want to assign the workflow to a file that was already in the folder prior to the workflow being defined, you can save the file to your local file system, delete the file from the portal, then upload the file into the folder again so that the file can inherit the workflow properties of the folder.
A workflow icon alongside a file in a document task flow indicates that the file is assigned to a workflow (Figure 36-4). For more information, see Section 36.3, "Viewing Files in Workflow." Note that the only way to determine if a folder has a workflow defined on it is to view its workflow settings, as described in the steps above.
36.3 Viewing Files in Workflow
You can view files in workflow and view workflow details in a document task flow, Content Presenter task flow, or in an Oracle Workflow Queue portlet:
-
Section 36.3.1, "Viewing Workflow Files in a Document Task Flow"
-
Section 36.3.2, "Viewing Workflow Files in a Content Presenter Task Flow"
-
Section 36.3.3, "Viewing Workflow Files in a Workflow Queue"
Note:
Only workflow approvers can perform actions on a file in workflow (such as upload new version, edit, rename, delete, copy/cut/paste). Non-approvers can view the file, but cannot perform any actions on the file.
36.3.1 Viewing Workflow Files in a Document Task Flow
On the Documents page or in a document task flow in a portal, a workflow icon alongside a file in a document task flow indicates that the file is assigned to a workflow (Figure 36-5).
Figure 36-5 File in Workflow Showing Workflow Icon
Description of "Figure 36-5 File in Workflow Showing Workflow Icon"
Note:
The Documents page is exposed in a portal only with Content Server 11g. If the connected content repository is Content Server 10g, you can create a page in a portal and add document task flows to the page (see Section 34.4, "Adding a Document Task Flow to a Page").
To view a file that is in workflow:
-
Click the file name to open the file in the Document Viewer.
The Document Viewer displays a notification that the file is in workflow. If you are assigned as an approver of the workflow, you will see controls that allow you to approve, reject, or view details of the file (Figure 36-6). The preview of the file shows the pending changes.
Figure 36-6 Document Viewer Showing File in Workflow

Description of "Figure 36-6 Document Viewer Showing File in Workflow"
-
To view further details about the workflow, if you are an approver, click Details to display the workflow information in Content Server (Figure 36-7).
Figure 36-7 Workflow Information in Content Server
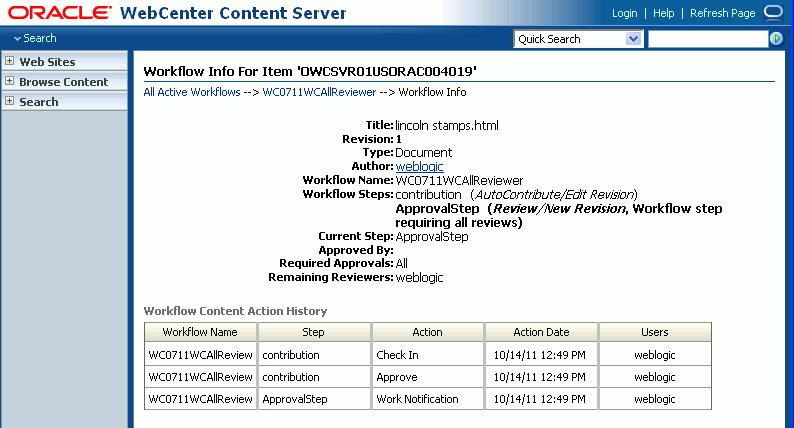
Description of "Figure 36-7 Workflow Information in Content Server"
Note:
To enable the availability of the workflow Details link in the Document Viewer preview pane, both of the following two requirements must be met:
-
You must access the WebCenter Portal application through Oracle HTTP Server (OHS) to expose Content Server and the WebCenter Portal application under the same host and port. For information about setting up OHS as the front-end to WebCenter Portal, see the "Configuring Content Server" section in Oracle Fusion Middleware Administering Oracle WebCenter Portal.
-
WebCenter Portal must be connected to a Content Server repository, with the
webContextRootparameter set to a Content Server host name. For information on settingwebContextRoot, see the "Registering Content Repositories" section in Oracle Fusion Middleware Administering Oracle WebCenter Portal. To setwebContextRootthrough WLST, see the "createJCRContentServerConnection" and "setJCRContentServerConnection" sections in the Oracle Fusion Middleware WebLogic Scripting Tool Command Reference.
-
-
If you are an approver or reviewer for the file, click Approve or Reject to indicate the result of your review of the file. These links are active only when the file is pending approval. If you reject the file, enter the justification for your rejection. For other ways to approve or reject a file, see Section 36.6.1, "Approving or Rejecting a File in Workflow."
Notes:
-
If the file is configured in Content Server to require an esignature, you will not be able to approve it in WebCenter Portal. To provide an esignature with approval, you must approve using Content Server. For more information, see the "Working with Workflows" chapter in the Oracle Fusion Middleware User's Guide for Oracle Content Server.
-
To edit a file in workflow, the file must be associated with a workflow that contains the step
review the current revision or create new revisionsand you must be an approver for the workflow. The seeded workflow that meets these requirements isAllReviewer.
-
When a file in workflow is approved, it is released from workflow, and the workflow icon no longer displays for the file (Figure 36-8). If you edit the file and make further changes, it will return to workflow.
Figure 36-8 File Released From Workflow Showing No Workflow Icon
Description of "Figure 36-8 File Released From Workflow Showing No Workflow Icon"
When a file in workflow is rejected, it remains in workflow, returning to the contribution step. It must be updated by the file owner for the Approve and Reject controls to display.
36.3.2 Viewing Workflow Files in a Content Presenter Task Flow
You can view content items displayed in Content Presenter while they are in a workflow, including Site Studio contributor data files displayed in a Site Studio region template. As long as the content item has at some point had Released status in Content Server, you can display the content item in Content Presenter. Then, if a revision of the content item is pending in workflow, Content Presenter allows approvers for the content item to toggle between the published version and the version in workflow in the page editor or in-context edit (contributor) mode, and also provides links to approve or reject the item in workflow, and view additional details about the item.
To view a file in workflow in Content Presenter:
-
Add a Content Presenter task flow to a page (see Section 33.2, "Adding a Content Presenter Task Flow to a Page"), selecting the file that is in workflow.
-
To view the current workflow state of the file in Content Presenter, view the page in edit mode (Figure 36-9), or view the file in in-context edit (contributor) mode (Figure 36-10).
Content Presenter displays workflow controls to show that the file is in workflow. The initial view of the file shows the published version of the file.
See Also:
To view the page in edit mode, or view the file in in-context edit (contributor) mode, respectively, see:
Figure 36-9 Page Editor: Workflow Controls in Content Presenter

Description of "Figure 36-9 Page Editor: Workflow Controls in Content Presenter"
Figure 36-10 In-Context Edit (Contributor) Mode: Workflow Controls in Content Presenter

Description of "Figure 36-10 In-Context Edit (Contributor) Mode: Workflow Controls in Content Presenter"
-
To view further details about the workflow, click Details to display the workflow information in Content Server (including workflow name, steps performed, action performed, date of action, and who performed the action).
Note:
To enable the availability of the workflow Details link in the Document Viewer preview pane, both of the following two requirements must be met:
-
You must access the WebCenter Portal application through Oracle HTTP Server (OHS) to expose Content Server and the WebCenter Portal application under the same host and port. For information about setting up OHS as the front-end to WebCenter Portal, see the "Configuring Content Server" section in Oracle Fusion Middleware Administering Oracle WebCenter Portal.
-
WebCenter Portal must be connected to a Content Server repository, with the
webContextRootparameter set to a Content Server host name. For information on settingwebContextRoot, see the "Registering Content Repositories" section in Oracle Fusion Middleware Administering Oracle WebCenter Portal. To setwebContextRootthrough WLST, see the "createJCRContentServerConnection" and "setJCRContentServerConnection" sections in the Oracle Fusion Middleware WebLogic Scripting Tool Command Reference.
-
-
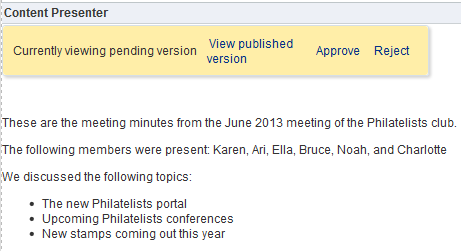
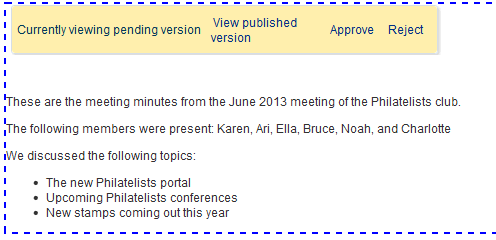
If you are a workflow approver, click Preview pending changes to preview the changes to the file, then Approve or Reject the changes in either the page editor (Figure 36-11), or in-context edit (contributor) mode (Figure 36-12). These links are active only when the file is pending approval. If you reject the file, enter the justification for your rejection. For other ways to approve or reject a file, see Section 36.6.1, "Approving or Rejecting a File in Workflow."
Note:
If the file is configured in Content Server to require an esignature, you will not be able to approve it in WebCenter Portal. To provide an esignature with approval, you must approve using Content Server. For more information, see the "Working with Workflows" chapter in the Oracle Fusion Middleware User's Guide for Oracle Content Server.
Figure 36-11 Page Editor: Preview File in Workflow to Approve or Reject in Content Presenter
Description of "Figure 36-11 Page Editor: Preview File in Workflow to Approve or Reject in Content Presenter"
Figure 36-12 In-Context Edit (Contributor) Mode: Preview File in Workflow to Approve or Reject in Content Presenter
Description of "Figure 36-12 In-Context Edit (Contributor) Mode: Preview File in Workflow to Approve or Reject in Content Presenter"
When a file in workflow is approved, it is released from workflow, and the workflow controls no longer display in Content Presenter. If you edit the file and make further changes, it will return to workflow and the workflow controls will display again.
When a file in workflow is rejected, it remains in workflow, returning to the contribution step. It must be updated by the file owner for the Approve and Reject controls to display.
36.3.3 Viewing Workflow Files in a Workflow Queue
If you have Content Portlet Suite installed, you can add the Oracle Workflow Queue portlet to a page to list the files in workflow, along with details about each workflow. For information about how to deploy Content Portlet Suite, see the Oracle WebCenter Content Deployment Guide for Content Portlet Suite.
To add the Oracle Workflow Queue portlet to a page:
-
Open the page in edit mode (see Section 12.4.3, "Opening a Page in the Page Editor (Composer)").
-
Click the view switcher to
 and click the Design tab to display the page in Design view. showing the inline resource catalog.
 -
Locate the Oracle Workflow Queue portlet in the resource catalog.
Tip:
The presence or location of the Oracle Workflow Queue portlet depends on how the resource catalog is configured. For example, in the default resource catalog, click Portlets, then <Host> Portlets to locate the Oracle Workflow Queue portlet.
-
Click Add next to the Oracle Workflow Queue portlet to add it to the page, then Close the resource catalog.
On the page, the Oracle Workflow Queue portlet (Figure 36-13) displays a list of all the files in workflow assigned to you to approve or reject.
Figure 36-13 Oracle Workflow Queue Portlet

Description of "Figure 36-13 Oracle Workflow Queue Portlet"
In the Oracle Workflow Queue portlet, you can perform the following actions if you have appropriate permissions:
-
In the Title column, click a file name to open it in its native application.
-
In the Workflow Info column, click a link to display the Workflow Step Information pane, which provides steps required to complete the workflow, the current step, the number of approvals required, and the remaining reviewers. For more information, see Section 36.4.1, "Viewing Detailed Workflow Status."
-
In the Actions column, click Approve or Reject to indicate the result of your review of the file. These links are active only when the file is pending approval. If you reject the file, enter the justification for your rejection. For other ways to approve or reject a file, see Section 36.6.1, "Approving or Rejecting a File in Workflow."
Note:
If the file is configured in Content Server to require an esignature, you will not be able to approve it in WebCenter Portal. To provide an esignature with approval, you must approve using Content Server. For more information, see the "Working with Workflows" chapter in the Oracle Fusion Middleware User's Guide for Oracle Content Server.
-
In the Info column, click the Content Information icon to display the Content Info pane, which provides access to actions you can perform, file metadata information, and revision history. For more information, see Section 36.4.2, "Viewing Content Information and Actions."
36.4 Viewing Workflow Status and File Information
As an approver or owner of a file in workflow, you may want to get more information about the current state of the workflow, details about the file itself, or perform file management actions to update or share the file to advance its approval:
36.4.1 Viewing Detailed Workflow Status
To view the details of the workflow status of a file:
-
Go to the Oracle Workflow Queue portlet that lists the file.
To add an Oracle Workflow Queue portlet to a page, see Section 36.3.3, "Viewing Workflow Files in a Workflow Queue."
-
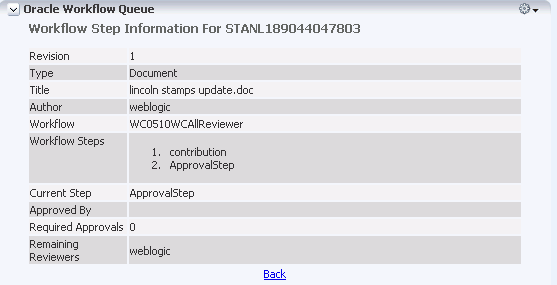
In the Workflow Info column, click the workflow step link to display the Workflow Step Information pane (Figure 36-14), which includes the steps required to complete the workflow, the current step, the number of approvals required, and the remaining reviewers. For information about workflow steps, see Section 36.1.2, "Understanding Workflow Steps."
-
Click Back to return to the Oracle Workflow Queue portlet.
36.4.2 Viewing Content Information and Actions
To display a Content Info pane that provides details about a file in workflow and perform file management actions to update or share the file to advance its approval:
-
Go to the Oracle Workflow Queue portlet that lists the file.
To add an Oracle Workflow Queue portlet to a page, see Section 36.3.3, "Viewing Workflow Files in a Workflow Queue."
-
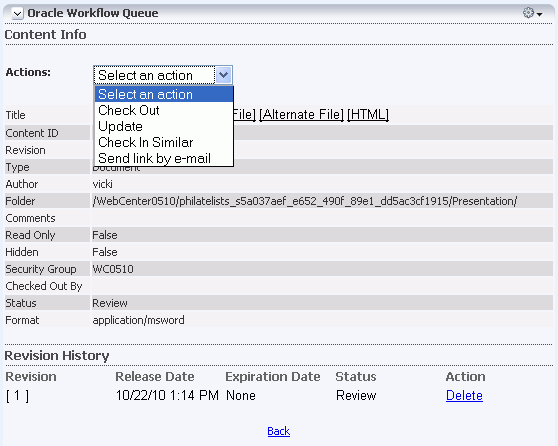
In the Info column, click the Content Information icon to display the Content Info pane (Figure 36-15), which provides access to actions you can perform, file metadata information, and revision history. For more information, see the "Content Information Page" section in the Oracle Fusion Middleware User's Guide for Oracle Content Server.
-
Optionally, from the Actions list, select any of the following actions:
-
Check Out to check the file out so that you can lock it from changes by other contributors while you are making updates.
-
Update to display the Info Update Form, where you can update editable metadata of the file without creating a new revision of the file. Only the portal moderator, portal members with
Manage Configurationpermissions, or file owners can edit the file properties. For more information, see the "Info Update Form" section in the Oracle Fusion Middleware User's Guide for Oracle Content Server. -
Check in Similar to display the Content Check In Form, where you can update editable metadata of the file and check the file in to Content Server. Only the portal moderator, portal members with
Manage Configurationpermissions, or file owners can edit the metadata properties. For more information, see the "Content Check-In Form" section in the Oracle Fusion Middleware User's Guide for Oracle Content Server. -
Send link by e-mail to open your e-mail application with a new message that contains a link to the URL of the web-viewable file, which you can mail to other users with requests for input or review to further the approval of the file.
-
-
Click Back to return to the Oracle Workflow Queue portlet.
36.5 Changing or Deleting a Workflow
With appropriate permissions (the portal moderator, or portal members with Manage Configuration permissions), you can change or delete the workflow assigned to a folder in a document task flow when the connected content repository is Content Server.
To change or delete the workflow assigned to a folder:
-
On the Documents page or in a document task flow in a portal, click in the row of the folder.
Note:
The Documents page is exposed in a portal only with Content Server 11g. If the connected content repository is Content Server 10g, you can create a page in a portal and add document task flows to the page (see Section 34.4, "Adding a Document Task Flow to a Page").
-
Follow the steps in Section 36.2, "Assigning a Workflow to a Folder in a Portal":
-
To change the workflow, select a different workflow from the Workflow Name list, and optionally add or delete approvers.
-
To delete the workflow, select <None> from the Workflow Name list.
Note:
If you change or delete the workflow assigned to a folder, the files that were previously in that folder remain assigned to the prior workflow. Only files that are subsequently checked in or uploaded to the folder inherit the new workflow settings.
-
36.6 Participating in a Workflow
The following sections describe how to work with a file through the workflow process:
36.6.1 Approving or Rejecting a File in Workflow
As an assigned approver for a workflow, you will need to review and either approve or reject a file to which you are assigned. A file is released from workflow when it is approved in accordance with its workflow type (see Section 36.1.1, "Understanding Workflow Types").
To approve or reject a file in workflow:
-
View the files for which you are an assigned approver in either of the following ways:
-
In the Document Viewer preview pane, as described in Section 36.3.1, "Viewing Workflow Files in a Document Task Flow."
-
In a Content Presenter task flow, as described in Section 36.3.2, "Viewing Workflow Files in a Content Presenter Task Flow."
-
In an Oracle Workflow Queue portlet, as described in Section 36.3.3, "Viewing Workflow Files in a Workflow Queue."
-
-
Click Approve or Reject to indicate the result of your review of the file. These links are active only when the file is pending approval. If you reject the file, enter the justification for your rejection.
Note:
If the file is configured in Content Server to require an esignature, you will not be able to approve it in WebCenter Portal. To provide an esignature with approval, you must approve using Content Server. For more information, see the "Working with Workflows" chapter in the Oracle Fusion Middleware User's Guide for Oracle Content Server.
When a file in workflow is approved, it is released from workflow, and the workflow icon no longer displays for the file (Figure 36-16). If you edit the file and make further changes, it will return to workflow.
Figure 36-16 File Released From Workflow Showing No Workflow Icon
Description of "Figure 36-16 File Released From Workflow Showing No Workflow Icon"
When a file in workflow is rejected, it remains in workflow, but must be updated by the file owner for the Approve and Reject controls to display.
36.6.2 Working with a Rejected Revision
If a file in workflow is rejected, it remains in workflow and returns to the original submitter in the contribution workflow step. The contributor can then revise the file and save it. After saving, the file automatically moves back into the workflow approval step again to be approved or rejected by assigned approvers.
