18 Grouping Visitors into Segments with Engage
Segments are assets that categorize visitors into groups on the basis of visitor data that you gather. You build segments by determining which kinds of visitor data to use as filtering criteria and then setting values that qualify or disqualify a visitor for the segment.
This chapter describes segments and presents procedures for creating them. It includes the following sections:
18.1 About Segments
Segments are used to create recommendations and promotions. The segments determine which content in the recommendations and promotions visitors qualify for and display that content to the visitors.
Segments are the key to personalization and marketing with Engage. You, as a marketer, create the visitor segments that the site pages depend on because you know which marketing messages should be associated with specific visitor segments.
When you create a segment, you specify filtering criteria that a visitor must match in order to be included as a member of that segment. This is comparable to when database or site administrators create a database query, and they specify parameters that a database record must match in order to be included in the results of the query.
This section contains the following topics:
18.1.1 Segments and Visitor Data Assets
You build segments by using the visitor data assets as filtering criteria. There are three kinds of visitor data assets: visitor attributes, history attributes, and history definitions.
-
Visitor attributes hold types of information that specify one characteristic only. For example, there can be attributes named years of experience, job description, or number of children.
When visitors change the data, the new data overwrites the old. For example, if a visitor changes her job description from analyst to marketing specialist, there is no record of the fact that the visitor used to be an analyst.
-
History attributes are individual information types that you group together to create a single type of historical record.
-
This historical record is a history definition. For example, a history definition called purchases could be made up of the history attributes SKU #, itemname, quantity, and price.
Engage treats the data recorded as a history definition as a whole unit of information. It assigns a timestamp to and stores each instance of the data, which means that you can create segments based on counts or sums of history definitions.
Developers create the visitor data assets based on the kinds of information that the marketing and design teams want to collect and analyze. You and the other marketers can use those assets to create segments that categorize your visitors, and the developers program your site pages to collect and store visitor information.
18.1.2 Developing Segments: Process Overview
There are five general steps for creating segments:
-
Planning. A cross-functional design team including developers and marketers determines the data you want to gather about your site visitors.
-
Creating visitor data assets. The developers create and define the necessary visitor attributes, history attributes, and history definitions using the forms in Engage.
-
Creating segments. You (the marketers) use the "Segment" forms in Engage to categorize visitors on the basis of visitor attributes, history attributes, and history definitions.
-
Collecting visitor data. The developers program the appropriate site pages to collect and store visitor data. For example, they might create an online registration form for visitors to fill out with information that qualifies them for segments. When visitors browse your site, the information they submit is stored in the Sites database.
-
Segmenting visitors. Now when visitors browse your site, the information they submit is used to qualify them for segment membership. The promotional messages and recommended products are personalized based on the segments that visitors qualify for.
18.2 About the Segment Forms
You will use forms on two when creating segments, the Content tab and the Detail tab. This section describes these tabs.
This section contains the following topics:
18.2.1 Segment Content Tab
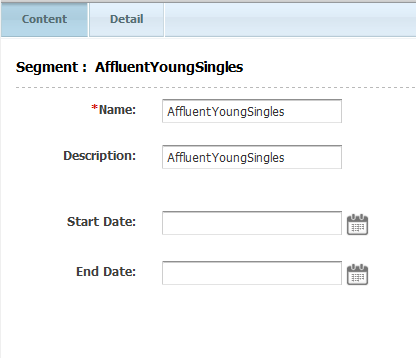
The Segment Filtering Criteria Content tab displays the visitor data assets that you can use to create segments. In this form you select the criteria that will define your segment.
Figure 18-1 Content Tab of New Segment Asset
Description of "Figure 18-1 Content Tab of New Segment Asset"
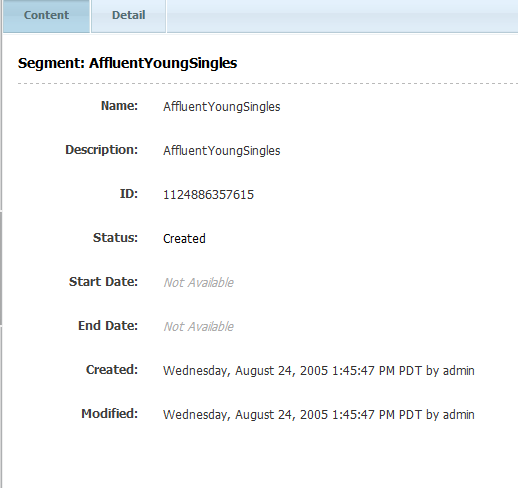
When viewing an existing segment, the stored information is displayed:
Existing segments are easily modified. From the menu bar select Edit, then from the menu select Edit. The form as shown in Figure 18-1 is shown in the tab, but populated with the segment's stored data:
18.2.2 The Segment Detail Tab
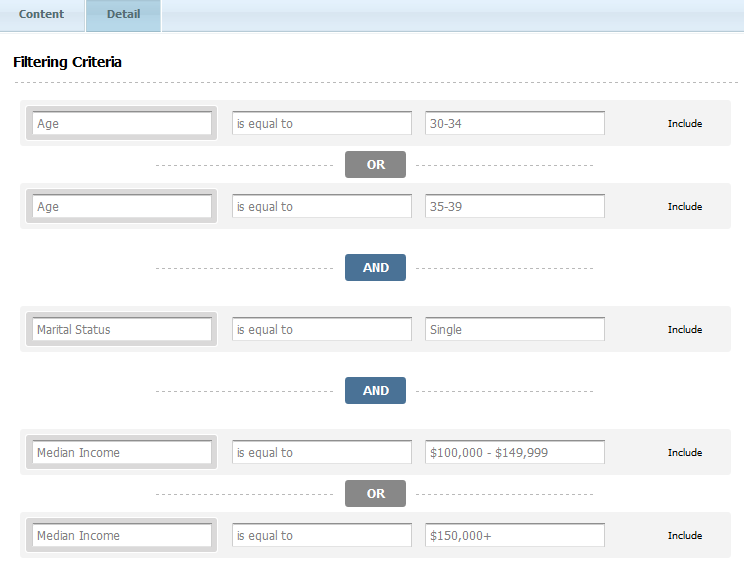
While you're creating a segment, Engage displays each condition (criterion) that you add to the segment in a form similar to the following:
Figure 18-4 Detail Tab of Existing Segment Asset
Description of "Figure 18-4 Detail Tab of Existing Segment Asset"
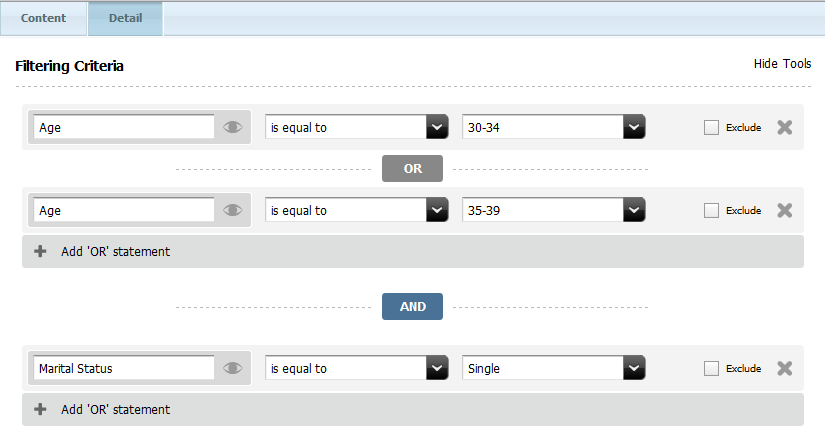
As you add criteria to a row, you create a more inclusive segment. In the preceding form, the visitor can be one who is aged 30 to 39 and has an income of over $100,000. In other words, you add more factors that can qualify a visitor for a segment by working across the table, adding criteria to the same row.
As you add criteria to a column, you create a more restrictive segment. In the following example, a visitor belongs to the segment only if both the criteria are true:
Add restrictions to a segment by working down the form, adding them to the criteria. In the above image, the filter is for people who are aged 30 to 39, and are single.
In summary, segments broaden as you add OR criteria and narrow as you add AND criteria.
This section contains the following topics:
18.2.2.1 Categories
The visitor data assets in the Segment Filtering Criteria form are organized within categories which are viewable in the mega menu by clicking the eye icon.
You can start typing a criteria in the field (for example, typing S suggests "Street Address," "State or province name," and "Shopping Cart." Typing Sh suggests only "Shopping Cart." Additionally, the mega menu is available by selecting the eye icon. The mega menu displays all visitor data assets grouped into categories.
Because visitor data assets are so varied, developers assign them to categories to organize them. (Developers create categories when they define visitor data assets.) The Profile category, for example, details visitor attributes such as age and income, that are related to personal information about the visitors. For more information on the mega menu, see the different steps in Section 18.3, "Creating Segments."
Note:
The actual categories of visitor data assets will likely differ for your installation, depending on the installation options and what your developers have defined. See your developers if you need information about categories or visitor data assets.
18.2.2.2 The Shopping Cart Criterion
Shopping Cart is listed with the categories on the segment filter forms but the shopping cart is a special, default feature rather than a category of attributes.
Figure 18-6 Shopping Cart Criterion in Filtering Criteria

Description of "Figure 18-6 Shopping Cart Criterion in Filtering Criteria"
You can use the Shopping Cart criterion to create segments based on the following kinds of conditions:
-
The total value of all the products in the shopping cart
-
Whether a specific product is in the shopping cart
-
Whether a certain number of products are in the shopping cart
-
Whether a certain number of specific products is in the shopping cart
If you want to implement a promotion based on the current state of a visitor's shopping cart, use this form to build a segment and then use the segment in the promotion.
The Shopping Cart is always available for defining your segments. Therefore, even before your site developers create visitor attributes or history definitions, you can create segments defined by shopping cart information.
18.3 Creating Segments
Before you create segments, be sure the following tasks have been completed:
-
The marketing, design, and development teams met to determine the kinds of data that you want to collect about your visitors.
-
The developers created the visitor attributes, history attributes, and history definitions that the cross-functional team decided are necessary.
-
You (the marketers) obtained a list or overview of the visitor data assets that were created and you understand what they mean and how they are categorized.
This section contains the following topics:
-
Section 18.3.2, "Step 2: Create Segment Filtering Criteria with Visitor Attributes"
-
Section 18.3.3, "Step 3: Create Segment Filtering Criteria with History Definitions"
-
Section 18.3.4, "Step 4: Define the Segment with Shopping Cart Criteria"
18.3.1 Step 1: Name and Define the Segment
-
Log in to WebCenter Sites, select the site you want to work with (FirstSite II in this example) and the icon for the WebCenter Sites Contributor interface.
-
In the menu bar, select Content, then select New, and then select New Segment.
Note:
If New Segment does not appear in the New menu, stop here. You do not have the permissions to create segments. Consult your administrator for more information on your permissions.
-
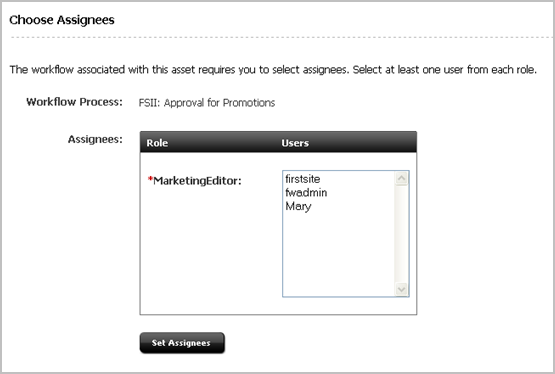
If the administrator configured the asset type such that all new assets of that type are placed into workflow upon creation, a tab opens displaying the Choose Assignees form.
Select at least one user for each required role and click Set Assignees. Any of these users can complete the next step in the workflow process. For more information, see Chapter 16, "Workflow."
-
Once the users are selected as assignees, add the general information regarding the segment.
The tab displays the segment asset's Content tab:
Figure 18-8 Content Tab of New Segment Asset

Description of "Figure 18-8 Content Tab of New Segment Asset"
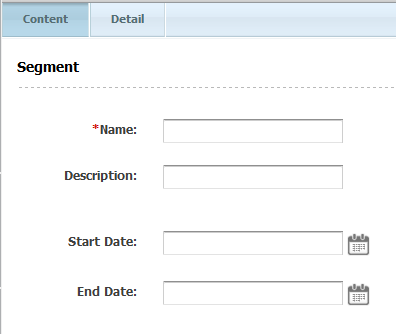
In the Name field, enter a unique, descriptive name for the segment. You can enter up to 64 alphanumeric characters, including spaces. The first character must be a letter.
In the Description field, enter a brief description of the segment. You can enter up to 128 alphanumeric characters.
(Optional) Assign a start and/or end date to the segment asset. For more information about start and end dates, see Section 7.3.2, "About Future Preview."
-
Click the Detail tab.
The tab displays the Filtering Criteria form. The categories of visitor attributes and history definitions you can use to build your segment are listed in the drop-down menu, and also in the mega-menu opened by clicking the mega menu icon (Figure 18-10).
Figure 18-9 Filtering Criteria Form on the Detail Tab

Description of "Figure 18-9 Filtering Criteria Form on the Detail Tab"
Note that filtering on text strings is case-sensitive unless it is explicitly set not to be so.
Do one of the following:
-
If you want to create a segment based on buyer contact information, go to Section 18.3.2, "Step 2: Create Segment Filtering Criteria with Visitor Attributes."
-
If you want to create a segment based on the user profile, go to Section 18.3.2, "Step 2: Create Segment Filtering Criteria with Visitor Attributes."
-
If you want to create a segment based on buyer history, go to Section 18.3.3, "Step 3: Create Segment Filtering Criteria with History Definitions."
-
If you want to create a segment based on a history definition, go to Section 18.3.3, "Step 3: Create Segment Filtering Criteria with History Definitions."
-
If you want to create a segment based on the shopping cart, go to Section 18.3.4, "Step 4: Define the Segment with Shopping Cart Criteria."
-
18.3.2 Step 2: Create Segment Filtering Criteria with Visitor Attributes
-
In the Filtering Criteria form on the Detail tab, click the icon for the mega menu for the attributes.
Engage displays a list of the attributes in the category.
-
Click the name of the attribute that you want to use to define the segment.
The form displays constraint fields that are meaningful for that attribute.
-
Use the form to set the attribute values that include a visitor in the segment or exclude a visitor from the segment.
For example, if the attribute is Age and you want to include people between the ages of 20 and 24, set the values as follows:
Figure 18-12 Age Attribute and Values as a Filter

Description of "Figure 18-12 Age Attribute and Values as a Filter"
Note that certain attributes have pre-determined ranges. In this case, the age ranges available are already set.
To exclude people who are in that age range, select the Exclude checkbox. Alternately, you can set the values as follows:
Figure 18-13 Age Attribute and Values as a Filter

Description of "Figure 18-13 Age Attribute and Values as a Filter"
-
Add other criteria as needed. From the menu bar, select Content, then select Save. The criterion is added to the segment and the segment is saved.
18.3.3 Step 3: Create Segment Filtering Criteria with History Definitions
-
In the Filtering Criteria form, open the mega menu and select Purchase summary from the Buyer History section.
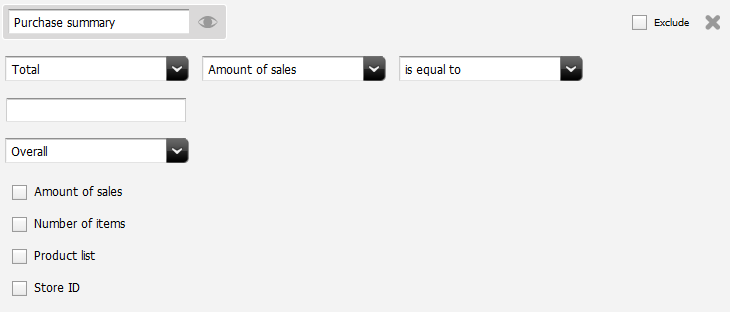
The Filtering Criteria form for the purchase is displayed. It shows the first history definition in the category. For example:
Figure 18-14 Purchase Summary Filtering Fields
Description of "Figure 18-14 Purchase Summary Filtering Fields"
It has three general areas that you use to restrict or filter items:
-
The first row allows a filter the number of items purchased or total value of items purchased.
-
The second row allows you to select the overall purchases, the most recent purchase, or a purchase within a certain time period.
-
The checkboxes allow you to filter based on certain items, certain store IDs, certain quantities, or specific amount of sales.
-
-
Use one or more of the following options to create simple or complex criteria by using all three areas in the Filtering Criteria form to restrict or filter one item.
This section contains the following topics:
-
Section 18.3.3.3, "Filtering Based on the First Time a History Definition Was Recorded"
-
Section 18.3.3.4, "Filtering Based on the Most Recent Time a History Definition Was Recorded"
-
Section 18.3.3.5, "Adding a History Attribute to Further Define the Segment"
-
Section 18.3.3.6, "Adding Products to Further Define the Segment"
18.3.3.1 Filtering Based on a Total
You can define the segment based on a total, such as the total amount spent, a total price, or a total number of items.
For example, a site developer could create a history definition named Purchase History, which would be a historical record of purchases made by site visitors. One of the history attributes in this definition could be number of items. Using this history definition, a marketer could create a segment based on the total number of items purchased by site visitors.
To define a segment based on a total, complete the following steps:
-
At the top of the form, select the Total option, and set the values that include a visitor in the segment or exclude a visitor from the segment.
For instance, the example history definition could be set to include visitors who have purchased 10 items or more:
Figure 18-15 First Row of Purchase Summary

Description of "Figure 18-15 First Row of Purchase Summary"
-
In the next row, select A specific time period. Two date fields will appear. Specify the time period to use for the total.
For example, to include visitors who bought the specified number of items during the first six months of the year, the time option values for the Purchase history history definition could be set as follows:
Figure 18-16 Specific Time Period Entry for Purchase Summary

Description of "Figure 18-16 Specific Time Period Entry for Purchase Summary"
-
(Optional) To further restrict this criterion by adding a history attribute to it, go to Section 18.3.3.5, "Adding a History Attribute to Further Define the Segment".
-
Add other criteria as needed. From the menu bar, select Content, then select Save. The criterion is added to the segment and the segment is saved.
18.3.3.2 Filtering Based on a Count
You can define the segment based on the total number of times this history definition was recorded for a visitor.
For instance, using the Purchase history history definition described in Section 18.3.3.1, "Filtering Based on a Total," a marketer could define a segment based on the number of times Purchase history was recorded for a visitor. The effect of this criterion is that Engage would consider how many times a visitor purchased anything instead of considering what they bought or how much they spent.
To define a segment based on a count, complete the following steps:
-
Select the Count option at the top of the form and then set the values that include a visitor in the segment or exclude a visitor from the segment.
For example, the Purchase history history definition could be set to include visitors who have purchased something (anything) at least five times:

Description of the illustration item_count.png
-
In the next row, select A specific time period. Two date fields will appear. Specify the time period to use for the total.
For example, to include visitors who bought the specified number of items during the first six months of the year, the time option values for the Purchase history history definition could be set as follows:
Figure 18-17 Specific Time Period Entry for Purchase Summary

Description of "Figure 18-17 Specific Time Period Entry for Purchase Summary"
-
(Optional) If you want to further restrict this criterion by adding a history attribute to it, go to Section 18.3.3.5, "Adding a History Attribute to Further Define the Segment."
-
Add other criteria as needed. From the menu bar, select Content, then select Save. The criterion is added to the segment and the segment is saved.
-
Do one of the following:
-
If you selected a visitor attribute category, go to Section 18.3.2, "Step 2: Create Segment Filtering Criteria with Visitor Attributes."
-
If you selected a history definition category, go to Section 18.3.3, "Step 3: Create Segment Filtering Criteria with History Definitions."
-
If you selected Shopping Cart, go to Section 18.3.4, "Step 4: Define the Segment with Shopping Cart Criteria."
-
18.3.3.3 Filtering Based on the First Time a History Definition Was Recorded
You can define the segment based on the first time the history record was recorded for visitors.
For instance, using the Purchase history history definition described in Section 18.3.3.1, "Filtering Based on a Total" a marketer could define a segment based on the first time the visitor purchased something—in other words, the first time a Purchase history record was recorded for the visitor.
To define the segment based on the first time the definition was recorded, complete the following steps:
-
Select the Earliest date recorded option at the top of the form and then set the values that include a visitor in the segment or exclude a visitor from the segment.
For example, the Purchase history history definition could be set to include visitors who purchased something on or before January 1, 2012:
-
Use the Calendar icon to select a date. The default time added is 01:00; this value can be changed by typing it in the field.
-
(Optional) If you want to further restrict this criterion by adding a history attribute to it, go to Section 18.3.3.5, "Adding a History Attribute to Further Define the Segment."
-
Add other criteria as needed. From the menu bar, select Content, then select Save. The criterion is added to the segment and the segment is saved.
-
Do one of the following:
-
If you selected a visitor attribute category, go to Section 18.3.2, "Step 2: Create Segment Filtering Criteria with Visitor Attributes."
-
If you selected a history definition category, go to Section 18.3.3, "Step 3: Create Segment Filtering Criteria with History Definitions."
-
If you selected Shopping Cart, go to Section 18.3.4, "Step 4: Define the Segment with Shopping Cart Criteria."
-
18.3.3.4 Filtering Based on the Most Recent Time a History Definition Was Recorded
You can define the segment based on the last time (the most recent time) the history definition was recorded for a visitor.
For instance, using the Purchase history history definition described in Section 18.3.3.1, "Filtering Based on a Total" a marketer could define a segment based on the most recent time the visitor purchased something—in other words, the last time a Purchase history record was recorded for the visitor.
To define the segment based on the last time the history definition was recorded, complete the following steps:
-
Select the Latest date recorded option at the top of the form and then set the values that include a visitor in the segment or exclude a visitor from the segment.
For example, to include visitors who have purchased something since January 1, 2012, the Purchase history values could be set as follows:
-
Use the Calendar icon to select a date. The default time added is 01:00; this value can be changed by typing it in the field.
-
(Optional) If you want to further restrict this criterion by adding a history attribute to it, go to Section 18.3.3.5, "Adding a History Attribute to Further Define the Segment."
-
Add other criteria as needed. From the menu bar, select Content, then select Save. The criterion is added to the segment and the segment is saved.
-
Do one of the following:
-
If you selected a visitor attribute category, go to Section 18.3.2, "Step 2: Create Segment Filtering Criteria with Visitor Attributes."
-
If you selected a history definition category, go to Section 18.3.3, "Step 3: Create Segment Filtering Criteria with History Definitions."
-
If you selected Shopping Cart, go to Section 18.3.4, "Step 4: Define the Segment with Shopping Cart Criteria."
-
18.3.3.5 Adding a History Attribute to Further Define the Segment
You can add a history attribute to create a more complex segment—one that further restricts the count, total, first, or last record by taking a specific attribute into consideration.
To add a history attribute to further define the segment, complete the following steps:
-
Select and configure one of the four options in the first line of the form (Total, Count, Earliest date recorded, or Latest date recorded). If you need help with this step, go to one of the following procedures:
-
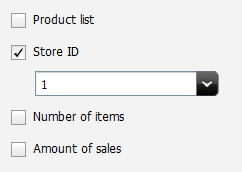
Under the attribute list for this criterion, Product list, Store ID, Number of items, and Amount of sales each have a checkbox. click the history attribute that you want to use as a filter. Typically this list will include items such as Product list, Store ID, Number of items, and Amount of sales.
As a checkbox is selected, constraint fields that are meaningful for that attribute display. Clicking more than one attribute, or an attribute more than once, will display constraint fields for each time an attribute is clicked.
-
Use the constraint fields to set the attribute values that further constrain the criterion. For example:
-
Add other criteria as needed. From the menu bar, select Content, then select Save. The criterion is added to the segment and the segment is saved.
-
Do one of the following:
-
If you selected a visitor attribute category, go to Section 18.3.2, "Step 2: Create Segment Filtering Criteria with Visitor Attributes."
-
If you selected a history definition category, go to Section 18.3.3, "Step 3: Create Segment Filtering Criteria with History Definitions."
-
If you selected Shopping Cart, go to Section 18.3.4, "Step 4: Define the Segment with Shopping Cart Criteria."
-
18.3.3.6 Adding Products to Further Define the Segment
You can add products to create a more complex segment—one that further restricts the count, total, first, or last record by taking specific products into consideration—if the history definition that you use to define this segment has a product list history attribute.
To add a product to the segment definition, complete the following steps:
-
Select and configure one of the four options at the top of the form (Count, Total, Earliest, or Latest). If you need help with this step, go to one of the following procedures:
-
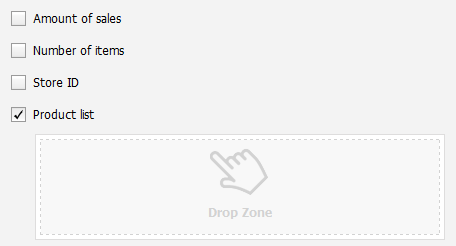
Under the attribute list, select Product list.
The form displays a drop zone.
Figure 18-21 Product List Displaying Drop Zone
Description of "Figure 18-21 Product List Displaying Drop Zone"
-
Use the Content Tree to select products and drag them to the drop zone.
Once the is added, the criterion will only select those purchases made that include the item in the list.
-
From the menu bar, select Content, then select Save. The criterion is added to the segment and the segment is saved.
-
Do one of the following:
-
If you selected a visitor attribute category, go to Section 18.3.2, "Step 2: Create Segment Filtering Criteria with Visitor Attributes."
-
If you selected a history definition category, go to Section 18.3.3, "Step 3: Create Segment Filtering Criteria with History Definitions."
-
If you selected Shopping Cart, go to Section 18.3.4, "Step 4: Define the Segment with Shopping Cart Criteria."
-
18.3.4 Step 4: Define the Segment with Shopping Cart Criteria
-
In the Filtering Criteria form, select the Shopping Cart category.
Engage displays the Shopping Cart criterion.
Figure 18-23 Specific Time Period Entry for Purchase Summary

Description of "Figure 18-23 Specific Time Period Entry for Purchase Summary"
-
To define this segment based on the total value of the items in a visitor's shopping cart, select the first option and then set the values. For example, to include visitors who have at least $50 worth of products in their carts, set the values as follows:
Figure 18-24 Total Value of Items In Shopping Cart

Description of "Figure 18-24 Total Value of Items In Shopping Cart"
To define this segment based on the total number of items in the visitor's shopping cart, select the second option and then set the values. For example, to include visitors who have three or more items in their carts, set the values as follows:
Figure 18-25 Total Count of Items in Shopping Cart

Description of "Figure 18-25 Total Count of Items in Shopping Cart"
-
To restrict the item count or cart value to specific products in the catalog, select Restrict to specific products in the pull-down menu on the next line.
The Drop Zone will appear. Drag and drop the product that you want from the Content Tree into the Drop Zone.
-
Add other criteria as needed. From the menu bar, select Content, then select Save. The criterion is added to the segment and the segment is saved.
-
Do one of the following:
-
If you selected a visitor attribute category, go to Section 18.3.2, "Step 2: Create Segment Filtering Criteria with Visitor Attributes."
-
If you selected a history definition category, go to Section 18.3.3, "Step 3: Create Segment Filtering Criteria with History Definitions."
-
18.4 Creating and Using the ContentQuery Asset
One asset that can make using multiple other assets together easier is the ContentQuery asset. This asset is the returned value of a search of assets that is defined within the ContentQuery asset. Using this, for instance, you can create an asset that only returns content items with a certain tag or certain asset type. There are many ways to write the search parameters, making it easy to use as a dynamic search of a certain type of content.
To create a ContentQuery asset
-
Log in to WebCenter Sites, select the site you want to work with (FirstSite II in this example) and the icon for the WebCenter Sites Contributor interface.
-
In the menu bar, select Content, then select New, and then select Content Query.
Note:
If New ContentQuery does not appear in the New menu, stop here. You do not have the permissions to create content queries. Consult your administrator for more information on your permissions.
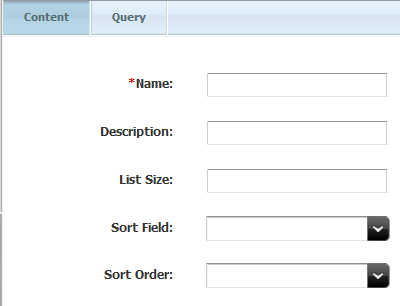
The Content tab of the ContentQuery asset is displayed.
Figure 18-26 Content Tab of ContentQuery Asset
Description of "Figure 18-26 Content Tab of ContentQuery Asset"
In the Name field, enter a unique, descriptive name for the segment. You can enter up to 64 alphanumeric characters, including spaces. The first character must be a letter.
In the Description field, enter a brief description of the segment. You can enter up to 128 alphanumeric characters. This is optional.
In the List Size field, enter the length of the list to return. This is optional.
In the Sort Field field, select the field (Name, Asset Type, Locale, Modified) that the returned assets are sorted on. This is optional.
In the Sort Order field, select the order (Ascending, Descending, or Random) to display the items. This is optional.
-
Click the Query tab.
The Query tab of the ContentQuery asset is displayed.
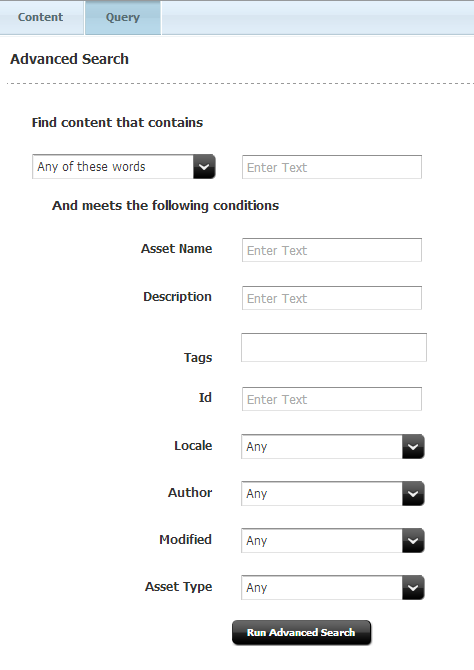
Figure 18-27 Advanced Search Fields for ContentQuery asset
Description of "Figure 18-27 Advanced Search Fields for ContentQuery asset"
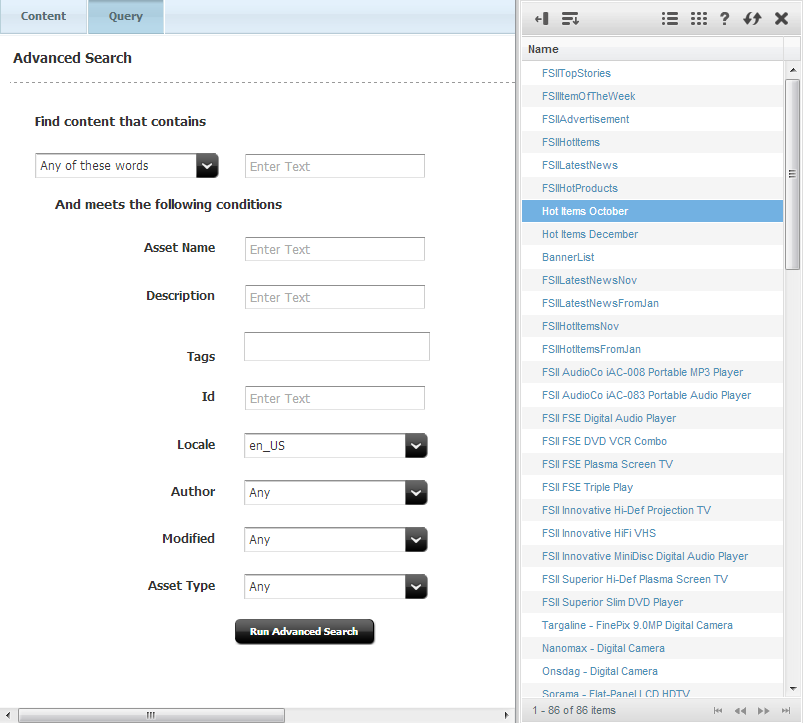
This is where the search parameters are created. Wild cards (* ?) are allowed as in any other asset search; no field is required.
At the top, select Any of these words or All of these words and enter the search text.
In Asset Name, enter a name (or partial name) of an asset.
In Description, enter a full or partial description.
In Tags, enter the tags assigned for assets.
In Id, enter the ID for assets.
In Locale, enter the location assigned to assets.
In Author, enter the person who created the asset.
In Modified, select the time frame that the asset was last modified.
In Asset Type, select the type of asset.
-
Once you have completed the search parameters, click Run Advanced Search. The results of the selected parameter search will appear in the docked panel to help you see that the parameters are correct for your needs.
If necessary, modify the parameters of the advanced search.
The advanced search is available in both the Edit mode and Inspect mode of the content query asset.
-
Save the asset. This can be done either by clicking the Save icon, or selecting Content from the menu bar, then Save.
18.5 Sample Segment Assets
If you have installed the sample sites, the FirstSite II sample site comes with one sample segment asset: AffluentYoungSingles. This segment is designed to work in concert with the sample Recommendation and Promotion assets. Use these sample segments as templates for creating segment assets for your site.
18.6 Previewing a Segment on a Web Page
Once a segment is created and incorporated into the web site, it can be useful to preview it. It is especially useful when the function of the segment is to display different assets depending on the visitor. This is done with the Preview with Segment button in Web mode.
To use Preview with Segment, perform these steps:
-
View the web site or an appropriate asset containing the segment to preview in Web mode.
-
Click the Preview icon.
The page will display in preview. The toolbar will change and different icons will appear.
-
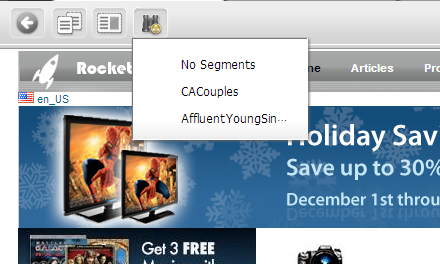
Click the Preview with Segment icon.
-
When clicked, a menu displaying the available segments displays. The first entry will be No Segments, an option to preview with no segments.
-
Select a segment. The preview will refresh to display with the selected segment in place.
18.7 Publishing Segments
When your segments are ready, you must approve them so they can be published to your delivery system. Engage can then use the segments to assess visitors and recommend the appropriate items to them.
Be sure to examine or inspect your segments to verify that you configured them correctly before approving them for publishing.
For more information about approving and publishing assets, see Chapter 14, "Approval for Publishing."
18.8 After You Publish
After you have created, verified, and published the segments, you must assign ratings to the products and content that are significant to members of each segment. For details, see Chapter 19, "Creating and Configuring Recommendations with Engage."
You can also create promotions after you have created segments. For more information, see Chapter 20, "Creating Promotions with Engage."
