46 Enabling Blog Components
This chapter provides instructions for enabling the blog components your content providers will need to access in order to create blog content. It also provides instructions for creating author assets.
This chapter contains the following sections:
46.1 Enabling Blog Asset Types
If you wish to use the Community Blogs module on different CM sites you must enable the blog asset types on those sites. When you enable the blog asset types you can also enable their start menu items. Start menu items allow content providers to create and search for assets of the types that you enable.
-
Log in to the WebCenter Sites Admin interface as a general administrator.
-
Select a site.
-
In the tree, select the Admin tab, expand the Sites node, expand the node of the site for which you wish to enable the blog asset types, and expand the Asset Types node.
-
Double-click Enable.
-
In the Enable Asset Types form, select the check boxes of the blog asset types. For descriptions of the blog asset types, refer to the Oracle Fusion Middleware WebCenter Sites Developer's Guide.
-
Click Enable Asset Types.
-
In the start menu selection form, click Enable Asset Types.
-
Authorize users to access the start menu items. For instructions, see Chapter 9, "Managing Access to Content Management Site Components."
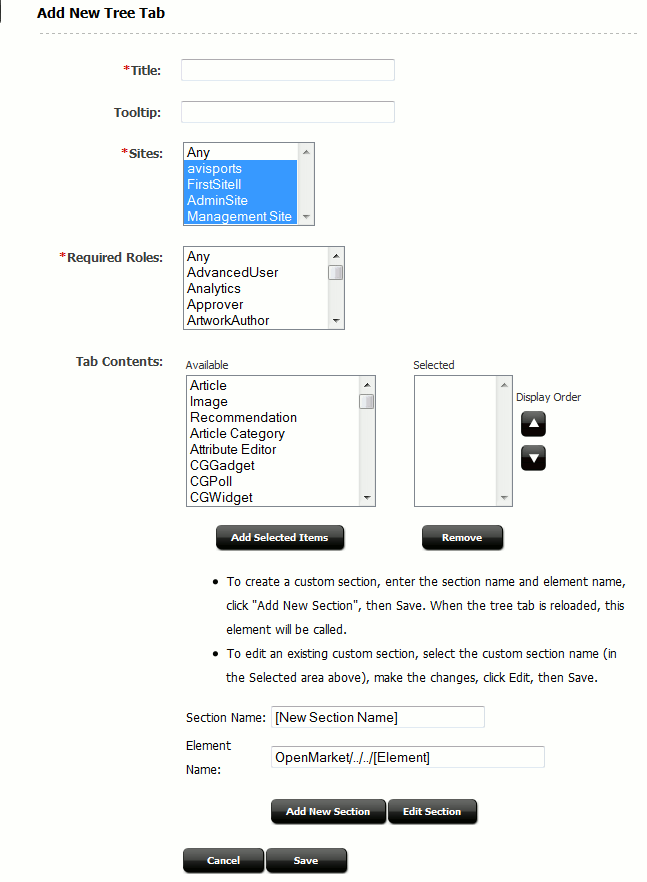
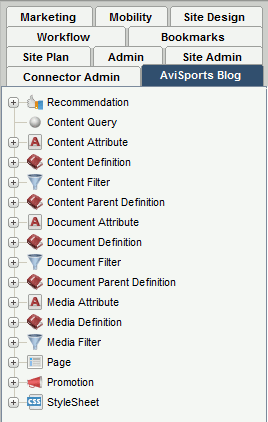
46.2 Creating a Blog Tree Tab
A tree tab can be configured to display the hierarchy of blog categories and their assets.
-
Log in to the WebCenter Sites Admin interface as a general administrator.
-
Select a site.
-
In the Admin tab, double click the Tree node.
-
Click Add New Tree Tab.
The Add New Tree Tab form appears.
-
In the Add New Tree Tab form, fill in the fields:
-
Title - Enter a short, descriptive name, of up to 64 characters.
-
Tooltip - Enter a short, informative description of the tab, up to 255 characters. This description is displayed when a user mouses over the tab.
-
Site - Select the sites that will display this tab. The blog asset types must be enabled on these sites. For instructions, see Section 46.1, "Enabling Blog Asset Types."
-
Required Roles - Select the roles a user must be assigned to access this tab.
-
Tab Contents - Select the asset types that will be displayed on the tab and then click Add Selected Items.
-
(Optional) If you want to add custom functionality to this tab, use the Section Name and Element Name fields. For more information, see the Oracle Fusion Middleware WebCenter Sites Developer's Guide.
-
-
Click Save.
The Information page for the newly created blog is displayed.
Additionally, the new blog tab is displayed in the tree (refresh your browser, if necessary).
46.3 Sharing Blog Assets
You can share blog flex assets with other sites. All types of blog assets must be shared.
Note:
The blog asset definition is required to define the attributes that make up the blog asset form.-
Log in to the WebCenter Sites Advanced interface as a general administrator.
-
Select a site.
-
Locate the asset you wish to share:
-
In the menu bar, click Search.
-
Click Find or Advanced Search for the asset type.
-
Fill the fields as appropriate, and click Search.
-
-
In the search results list, click the asset you wish to share.
-
At the top of the form in the button bar, click the Share element button.
The Share element page displays.
-
In the Share to: field, select the site(s) with which you wish to share the blog asset you selected.
-
Click Save Changes.
The blog asset you selected to share is now available on the site(s) with which you shared it.
For detailed information about sharing assets, see Section 11.2.2.1, "Copying vs. Sharing."
46.4 Creating Workflows for Blog Assets
Workflows can be used if you wish to manage the work on a blog asset. Before a blog asset can be published, it must be approved for publishing. The workflow feature routes blog assets through the steps that you determine as necessary, from creation to approval.
For example, if a blog asset must be reviewed by an editor before it can be approved for publishing, the WebCenter Sites' workflow feature can route that blog asset to the appropriate user at the appropriate time. For more information about workflow processes, see Chapter 10, "Creating and Managing Workflow Processes."
46.5 Working with Blog Authors
On the sample blog pages, the author's full name and image are displayed next to the author's blog posts. This section provides instructions for creating blog author assets, which contain author information. This section also provides instructions for granting users access to their own blog author assets.
This section contains the following topics:
46.5.1 Creating Author Assets
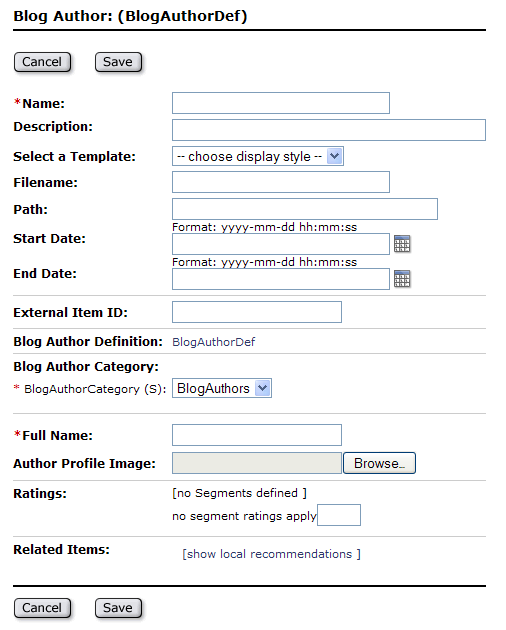
To display a blog author's full name and image next to the author's blog posts, you must create an author asset in which you specify that user's full name and optionally, an image.
-
Log in to the WebCenter Sites Advanced interface as a general administrator.
-
Select the site on which the blog asset types are enabled.
-
In the button bar, click New.
-
Click New Blog Author.
-
In the Blog Author form, fill in the fields:
-
Name - Enter a name for the blog author asset.
Note:
When the author creates a blog asset, she must enter the same name into the blog asset's Author field. Otherwise, the author asset you have created will not be published to its allocated space -
Description - Enter a short, descriptive summary about the author asset (for example, the author's full name).
-
Blog Author Category - By default, this field is single-valued. The only available value for this field is BlogAuthors.
-
Full Name - Enter the blog author's full name. This name will be displayed on the blogs that this author creates.
-
Author Profile Image - Click Browse , and select an image for the content provider.
-
-
Click Save.
46.5.2 Setting Access Permissions to a Blog Author Asset
A blog author asset contains the profile of the content provider who creates blog content for the website. Setting access permissions for a blog author asset entails the following steps:
-
Create a unique role for the blog author.
-
Assign the new role to the blog author.
-
Grant the blog author access to the blog author asset.
The same steps are presented in detail below.
To create a unique role for the blog author
-
Log in to the WebCenter Sites Admin interface as a general administrator, and select a site.
-
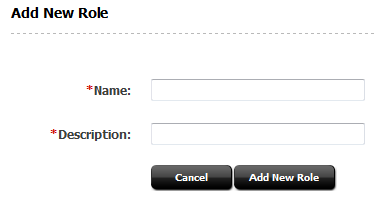
In the tree, select the Admin tab, expand the User Access Management node, then expand the Roles node, and double-click Add New.
The Add New Role form opens:
-
Name - Enter a unique name for the role.
-
Description - Enter a short, descriptive sentence explaining what the role will do.
-
-
Click Add New Role.
Now you must assign the role to the content provider who requires access permissions to the blog author asset.
To assign the role to the blog author
-
Select the Admin tab, expand the Sites node, and then expand the node of the author's site. Double-click Users.
-
In the Username field, enter the name of the user to which you wish to assign the role, and click Select.
-
Click the edit (pencil) icon.
-
In the Edit Roles for User form, select the role you created in steps 2 -3.
-
Click Save.
To set access permissions to a blog author asset
-
Access the blog author asset to which you want to set permissions:
-
In the button bar, click Search.
-
Click Find Blog Author.
-
Click Search.
-
-
Select the blog author asset.
-
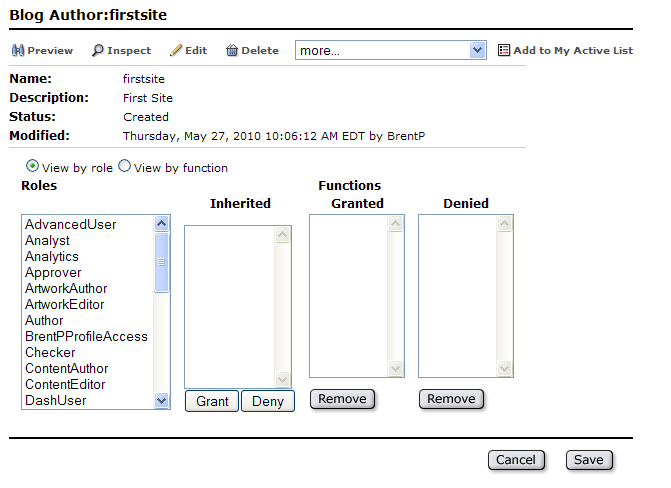
In the blog author's Inspect form, select the more... drop-down menu, and click Access Permissions.
-
Select the View by role radio button.
-
In the Roles list box, select the role you created in steps 2-3 of the section "To assign the role to the blog author".
-
In the Inherited list box, select all the functions (Shift+click the first and last functions), and click Grant.
All the functions in the Inherited list box move to the Granted list box.
-
Click Save.
The only user who can work with this blog author asset, besides the administrator, is the blog author who was assigned the selected role.
46.6 Publishing Blog Assets
If you are planning to publish a blog asset, you must pre-approve its author asset. This is to ensure that the author's profile is published with the blog asset.
46.7 Next Steps
This chapter provides administrators with instructions for enabling content providers to create and publish blog assets. For more information on testing and further developing the blog data model, to create blog pages for publication, and to work with the Community application's functionality on blog pages, see the Oracle Fusion Middleware WebCenter Sites User's Guide.