| Skip Navigation Links | |
| Exit Print View | |

|
Oracle SuperCluster M6-32 Zones With Oracle Database on Database Domains Configuration Guide |
| Skip Navigation Links | |
| Exit Print View | |

|
Oracle SuperCluster M6-32 Zones With Oracle Database on Database Domains Configuration Guide |
Planning to Set Up Zones on Database Domains
Extended Configuration PDomain Overview
Understanding Extended Configuration PDomains
Understanding Base Configuration PDomains
Understanding LDom Configurations for Extended Configuration PDomains
Understanding LDom Configurations for Base Configuration PDomains
Determining the Cores Available for LDoms and Zones
Cores Available for Domains and Zones
Zones and Cluster Planning for Database Domains
Guidelines for Planning the Number of Zones and Clusters
Guidelines for Planning the Storage Server Disk Group Layout
Planning the Storage Server Disk Group Layout
Understanding an Example Scenario
Recording Your Existing and Planned Configuration Information
Recording Your Zone Configuration Information
Recording Your Cluster Configuration Information
Recording Your Storage Server Disk Group Layout
Preparing to Configure Zones on Database Domains
Determine the Repository Location
Install or Update Packages From the Remote Repository
Install or Update Files From the Local Repository
Verify Configuration Tool Installation
Creating Configuration Files (OEDA)
Verify Storage Server Disk Space for Additional Zones
Locate the Necessary Files to Set Up Zones
Import the Most Recent OEDA Configuration File
Review Existing Configuration Information
Review the Information in the Identify Compute Node Operating System Page
Review the Information in the Management and Private Networks Page
Complete the Define Clusters Page
Complete the Cluster Review and Edit SCAN, Client, VIP, and Optional Backup Networks Page
Verify Remaining Configuration Information
Generate the Configuration Files
Creating the Template Zone on Each Database Domain
Create a Template Zone on a Database Domain
Delete a Template Zone From a Database Domain
Determining if Additional VNETs Are Needed for a Database Domain
Determine if Additional VNETs Are Needed (Using Specific LDom Information)
Determine if Additional VNETs Are Needed (Using Software Commands)
Set Up Public Key Authentication for ZFS Storage Controllers
Creating Additional Links on the IB Storage Network for Zones
Create Additional Links on the IB Storage Network for Zones
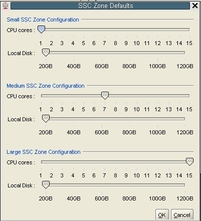
Before you begin to enter information about each cluster that you want to create, you must first assign values to the default zone configurations that you use when setting up the clusters.
There are three choices for the zone configurations (small, medium, or large) when you begin entering information for each of the clusters that you are creating. Each of these choices assigns a different number of CPU cores and local disk size to the zones in a particular cluster. This section describes how you can change the number of CPU cores and the size of the local disk to the value that you want for each of these zone configuration choices.
The SSC Zone Defaults page appears.

The following default values are used for the zone configurations:
Small zone configuration:
1 core
20 GB of disk space
Medium zone configuration:
7 cores
20 GB of disk space
Large zone configuration:
12 cores
20 GB of disk space
For each of the zone configuration sizes, move the slider to set the appropriate value for the number of CPU cores and the amount of disk space to be allocated for zones in a cluster with this configuration size.
Note the following important points when deciding the values to assign to these options:
The following values are available for both options:
Number of CPU cores: Between 1 and 12 cores
Amount of disk space: Between 20 GB and 120 GB of disk space
When deciding on the number of cores to be allocated, keep in mind that two to four cores will be reserved for the global zone (the Database Domain) and the remaining cores are available for the zones in that Database Domain. See Determining the Cores Available for LDoms and Zones for more information.
When deciding on the amount of disk space to be allocated, the amount you select defines the disk size only for the Oracle Home directory. Select an amount greater than 20 GB, because that amount of disk space is typically not sufficient for the Oracle Home directory.
In addition, keep in mind that an additional 45 GB of disk space is automatically allocated for the root file system, so the actual size of the disk space being used is the amount you select plus the additional 45 GB allocated for the root file system.
So, for example, if you select 100 GB of disk space, the zone LUN is 145 GB (100 GB of disk space for the Oracle Home directory and Oracle binaries, and 45 GB of space for the root file system).
Use the options in this window to define your own small, medium, and large zone configurations, which are used as individual templates when you assign values to zones within the clusters in the Cluster page for each cluster in the section Complete the Cluster Page. The values you assign to each of these types of zone configurations are completely user-definable, so you could assign the same values to all three types of zone configurations if you wish.
For example, assume that you want the following values for clusters with a medium-sized zone configuration:
8 CPU cores
80 GB of disk space, where:
80 GB of disk space will be used for the Oracle Home directory
An additional 45 GB of disk space will be automatically assigned to the root file system
In the Medium SSC Zone Configuration section, move the slider to assign those values in the CPU cores and Local Disk areas. Doing so means that these values are used whenever you select the medium-sized zone configuration for any cluster that you enter information for in subsequent screens.
Go to Complete the Cluster Page.