
Creating a Work Order
To create a work order use either the:
Work Order (WM_WO) component.
Express Work Order (WM_WO_WR) component.
This section discusses how to:
Define work order header information.
Search for an asset.
Add notes to work orders.
Create attachments.
Search for job templates.
Copy to a new work order
Pages Used To Create a Work Order
|
Page Name |
Definition Name |
Navigation |
Usage |
|---|---|---|---|
|
Express Work Order |
WM_WO_WR |
|
Create an very basic work order quickly. |
|
Work Order |
WM_WO_HDR |
|
Identify the key information describing what is to be done with which resources, to which asset, when, why, and how. |
|
Mobile Tasks Pending |
WM_EIP_STAT_SEC |
Click the Mobile Updates Pending link on the Work Order page. (This link only appears if PeopleSoft Maintenance Management is integrated with a third-party mobile device.) |
Update work order task data that is retrieved from third-party mobile devices that are integrated with PeopleSoft Maintenance Management Web Services. |
|
Work Order Status History |
WM_WOSTATUS_SEC |
Click the As of date link on the Work Order page. |
Display the status history of the work order, the date that the status was updated, and the user who created a change in the work order that resulted in the work order header status change. |
|
Work Order Approval |
WM_WO_APPR |
Click the Preview for Approval button in the work order. |
Once you submit a work order for approval, click the Approval History link to view the status of the approval process. |
|
Work Order Attachments |
WM_WO_ATTACH |
|
Attach a document to a work order or work order task. |
|
Work Order Supplemental Data |
WM_WOHDR_SD_SEC |
|
Enter values for supplemental data fields that the organization has created for use on work orders. |
|
Notes |
WM_WO_NOTES |
Click the Notes link on the Work Order page. |
Add notes about the work order. |
|
Notes |
WM_TSK_NOTES |
|
Add notes about the work order task. |
|
Work Order History for Asset |
WM_ASSETWO_SEC |
|
View a history of the work order created, completed, and closed for the specified asset. |
|
Asset Search |
WM_ASSET_SRCH_SEC |
Click the Asset Advanced Search icon next to the Asset ID. |
Enter search criteria and click the Search button to display a list of assets that fall within the entered criteria. |
|
Asset Information |
WM_WO_ASSET_SEC |
Click the Search button on the Asset Search page. Click the Asset Details link on the Work Order page. |
Displays detailed asset information such as the asset type, asset subtype, manufacturer ID, and model. |
|
Classification and Status |
WM_WO_ASSET_SEC |
Click the Search button on the Asset Search page and select the Classification and Status tab. |
Displays the asset classification characteristics, status, and criticality based on the criteria entered on the Asset Search page. |
|
Asset Component Hierarchy |
WM_AM_HGRID |
|
View the asset component hierarchy. |
|
ESRI Map |
ESRI_MAP_PG |
|
Locates selected work order tasks on an ESRI map. |
|
Maintenance History by Type |
ASSET_MAINT_SUM_01 |
|
View the asset maintenance history based on the type of maintenance performed on the asset. |
|
Asset Warranties |
ASSET_WARRANTY |
|
Display the asset warranties associated with an asset specified in the work order. If a warranty does not exist, users with update access to the page can create an asset warranty for this asset, using a warranty template if desired. |
|
Search for Asset Warranty Templates |
AM_WTMPL_SRH |
Click the Apply Warranties from Template link on the Asset Warranties page. |
Search and select an asset warranty template to apply to the Asset Warranties page to create a new warranty for an asset. |
|
Job Template Search |
WM_JRL_JT_SRCH_SEC |
|
Search for a job template to associate with this work order. |
|
Personal Data |
WM_PERSON_DATA_SEC |
|
Enables a user to view a selected employee's contact information. |
|
Scheduler Information |
WM_SCHEDULER_SEC |
|
Enables a user to view the selected scheduler's shop, employee ID, and shift information. |
|
Copy Work Order |
WM_WO_COPY_SEC |
Click the Copy to New Work Order button on the Work Order page. |
Copy existing work order data to a new work order. |
|
Work Order Failure Tracking |
WM_WO_FAIL_TRACK |
|
Define failure information for an asset selected for a work order task You must select an asset for this link to appear. |
|
Task Status History |
WM_TASKSTATUS_SEC |
Click the Task Status link on the Work Order Failure Tracking page to review the Task Status History page. |
Review the status history of a specific work order task. |
|
Failure Causal Parts |
WM_WO_FAILCAUS_SEC |
Click the Add link in the Causal Parts grid on the Work Order Failure Tracking page. |
Add comments concerning the parts or assets that caused the failure. |
|
Enter Meter Reading |
WM_FTRK_METER_ADD |
Click the Add link on the Meter Reading grid on the Work Order Failure Tracking page. |
Enter the current meter reading to display any change from the last meter reading for the failed asset. |
|
Prior Meter Reading |
WM_FTRK_METER_ADD2 |
Click the Add link on the Meter Reading grid on the Work Order Failure Tracking page. |
Review any prior meter readings of the meter associated with the selected asset. |
|
Meter Reading Comments |
AM_MTR_RD_CMT2 |
Click the Comments link in the Meter Readings grid of the Work Order Failure Tracking page. |
Review any comments concerning the meter readings. |
Work Order Page
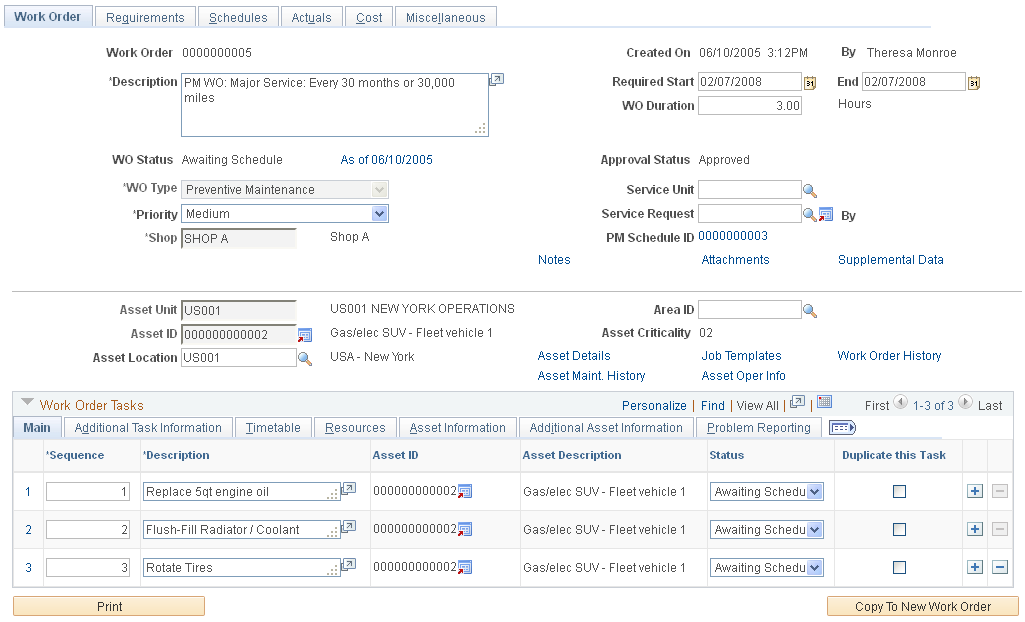
Use the Work Order page (WM_WO_HDR) to identify the key information describing what is to be done with which resources, to which asset, when, why, and how.
Image: Work Order page
This example illustrates the fields and controls on the Work Order page. You can find definitions for the fields and controls later on this page.
Approval Preview and Submit for Approval
Click the Approval Preview button and the Submit for Approval button to access the Work Order Approval page.
Asset Information
This asset information is applicable to the entire work order and is optional.


See Understanding Service Request and Work Order Statuses.
See Work Order Business Unit Defaults and Default Hierarchies.
See Understanding Service Request Creation and Use.
See Understanding Labor and Tools Resource Setup and Maintenance.
See Understanding the Work Order Approval Workflow Architecture.
See Understanding the Work Order Approval Process.
Work Order Tasks
When a work order is created, one task is automatically created. This grid displays all the tasks and their details associated with this work order. If you copy a job template to a work order, the tasks copied from the template are listed here. You can add a task to this grid by adding a new row, however, you can access the Requirements page to define resources for each task, and access the Schedules page to schedule the resources for the task.
The Asset Description hyperlink allows you to view the outstanding work orders for the Asset ID. If you click on the link, a new window for the work order or technician workbench is displayed. You can then use the search functionality on this page to see if duplicate work orders exist.
When you select and save an asset for a work order or work order task, you can click the Failure ID Add link to access the Work Order Failure Tracking page and describe the detail failure information concerning the asset. This activity is optional.
Note: Typically, if you are going to define resource requirements for one or more tasks, you set up the task and define the requirements on the Requirements page. If you are not going to define requirements, you can set up one or more tasks on the Schedules page and schedule the resources. You can also add tasks from the Actuals page. If the work order requires approval, the Schedules and Actuals tabs do not display.
The fields used to create a work order task, which appear on the tabs of this Work Order Tasks grid, are defined in detail in the section Creating Work Order tasks. The fields used to define labor, inventory, purchase/on-hand, and tool resources are described in detail in the Defining Work Order Task Requirements set of topics.
Asset Search Page
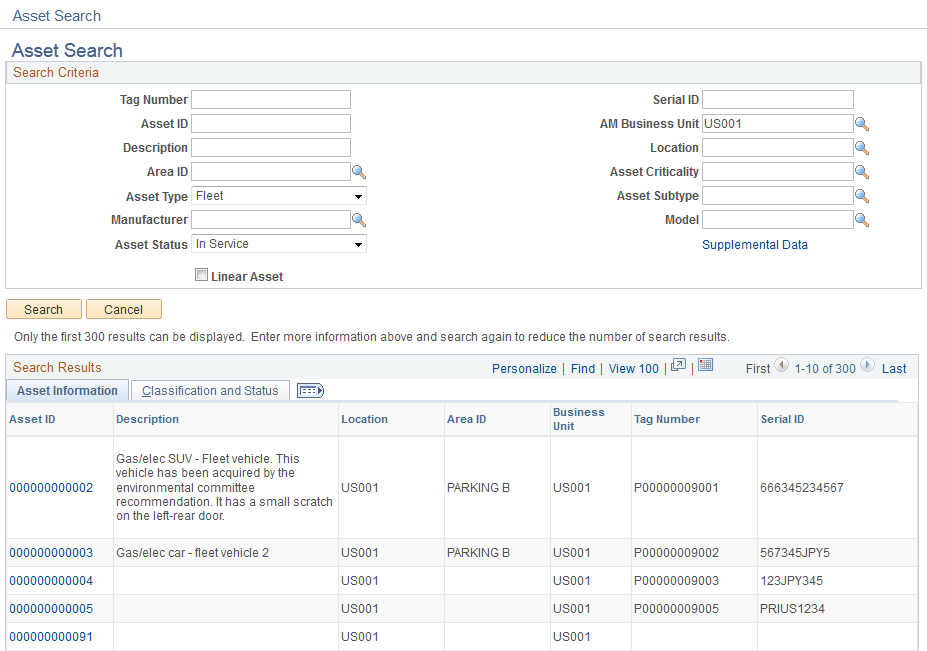
Use the Asset Search page (WM_ASSET_SRCH_SEC) to enter search criteria and click the Search button to display a list of assets that fall within the entered criteria.
Image: Asset Search page
This example illustrates the fields and controls on the Asset Search page. You can find definitions for the fields and controls later on this page.
Work Order Attachments Page
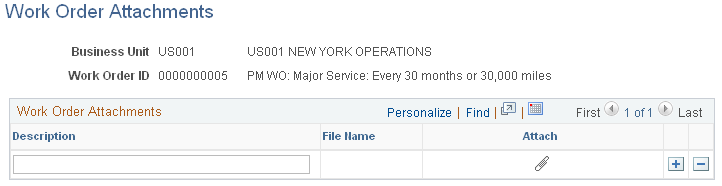
Use the Work Order Attachments page (WM_WO_ATTACH) to attach a document to a work order or work order task.
Click the Attachments link on the Work Order page.
Click the Attachments link on the Requirements page.
Click the Attachments link on the Schedules page.
Image: Work Order Attachments page
This example illustrates the fields and controls on the Work Order Attachments page. You can find definitions for the fields and controls later on this page.

Work Order Notes Page
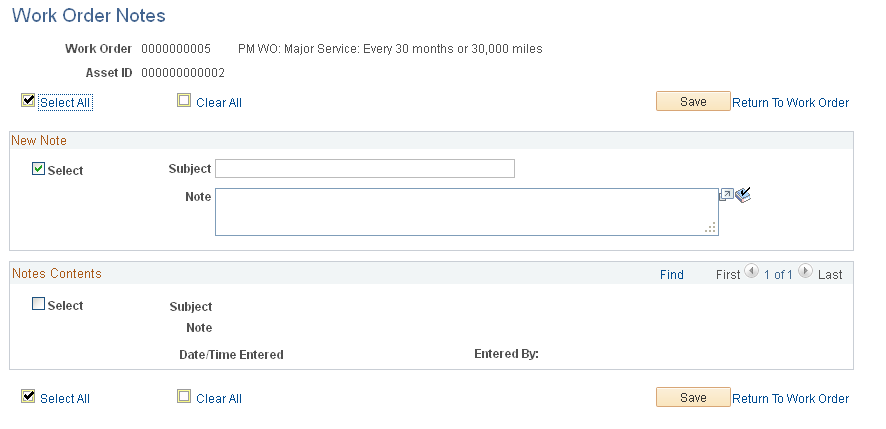
Use the Notes page (WM_WO_NOTES) to add notes about the work order.
Image: Work Order Notes page
This example illustrates the fields and controls on the Work Order Notes page. You can find definitions for the fields and controls later on this page.
New Note
Enter a subject for the note and then the note. Click the Save button to save the note.
The check boxes on the left of the notes are used for selecting which notes are sent when you click the Send to Scheduler button on the page. The note is available in the Work Order Workbench for the scheduler identified in the work order.
Note: You must set up an email address in the selected scheduler's user profile for the Send to Scheduler button to display on the page.
Notes Contents
When you save a note, it displays the note in the Note Contents group box, along with the date and time the note was entered, and by whom. As notes are added, this enables you to keep track of the note history.
Job Template Search Page
Use the Job Template Search page (WM_JRL_JT_SRCH_SEC) to search for a job template to associate with this work order.
Image: Job Template Search page
This example illustrates the fields and controls on the Job Template Search page. You can find definitions for the fields and controls later on this page.
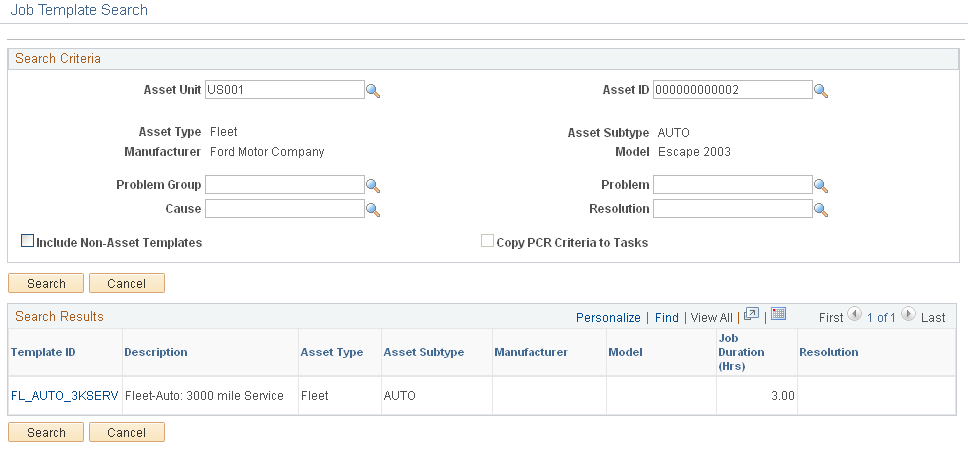
Important! When you select a job template to apply to this work order, it copies the associated task template information to the work order tasks. The system only copies task template lines to a work order task line that does not contain any default values or values entered by a user. Usually, once a user enters a task line, a new line is triggered into which the system can copy a task line associated with work order job template.
Copy to Work Order Page
Use the Copy Work Order page (WM_WO_COPY_SEC) to copy existing work order data to a new work order.
Image: Copy Work Order page
This example illustrates the fields and controls on the Copy Work Order page. You can find definitions for the fields and controls later on this page.
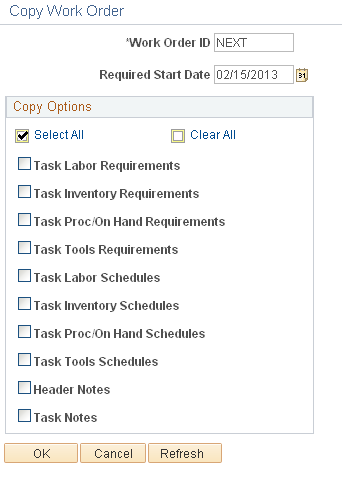
Click the Copy To New Work Order button to access the Copy to Work Order page.
Note: This button displays only if this option is selected for this user in User Preferences.
| Work Order ID (new work order number) |
Enter a combination of letters and/or numbers for this new work order. Leave this field unchanged if you want the system to generate a new work order number for you. |
| Required Start Date |
Change the date or leave as today's date for the new work order. |
| Copy Options |
To copy one or more of the following values to the new work order, click the corresponding check box for:
Note: The scheduling options do not appear until the work order is approved. See Understanding Overall System Setup Parameters for PeopleSoft Maintenance Management. |
| OK |
Click this button to access the new work order. |
See Work Order Copy.
Work Order Failure Tracking Page
Use the Work Order Failure Tracking page (WM_WO_FAIL_TRACK) to .
Click the Failure ID – Add link on the Work Order Tasks – Problem Reporting grid on the Work Order page.
Maintenance Management, Work Order Management, Work Order Failure Tracking, Work Order Failure Tracking
Image: Work Order Failure Tracking page
This example illustrates the fields and controls on the Work Order Failure Tracking page. You can find definitions for the fields and controls later on this page.
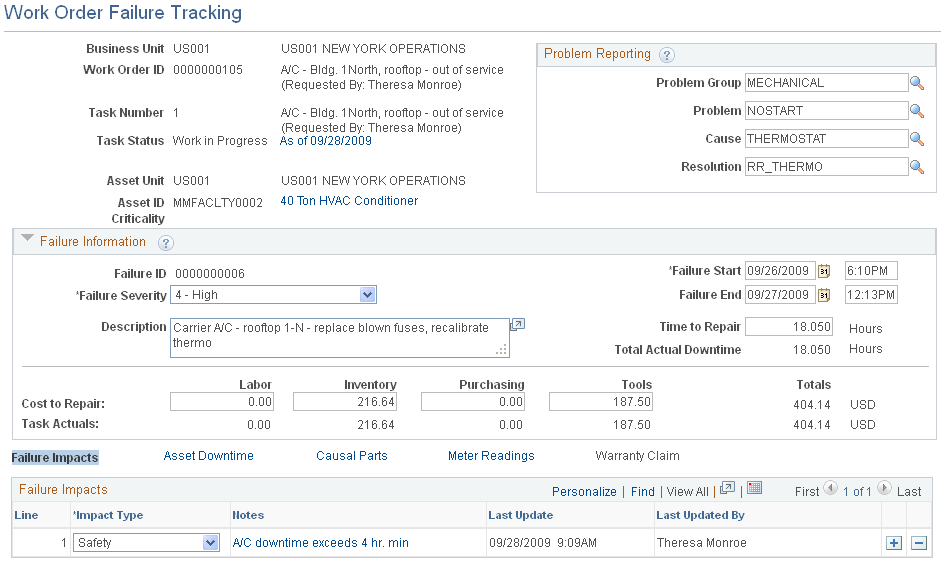
Additional Failure Event Information
Depending on the work order task and asset, these links appear on the Work Order Tracking Failure page:
Failure Impacts
Asset Downtime
Causal Parts
Meter Readings
Warranty Claim
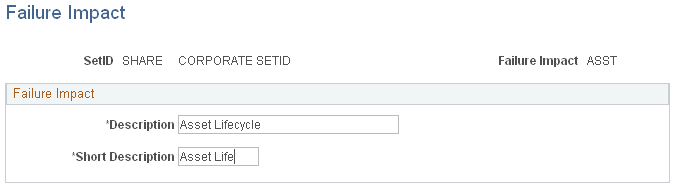
Failure Impacts Page
Use the Failure Impacts Grid page to display the Failure Impacts
Image: Failure Impacts grid
This example illustrates the fields and controls on the Failure Impacts grid. You can find definitions for the fields and controls later on this page.
Asset Downtime
Use the Actual Downtime grid. to display the asset downtime.
Click the Asset Downtime link on the Work Order Failure Tracking page and select the Actual Downtime tab
Image: Asset Downtime grid
This example illustrates the fields and controls on the Asset Downtime grid. You can find definitions for the fields and controls later on this page.
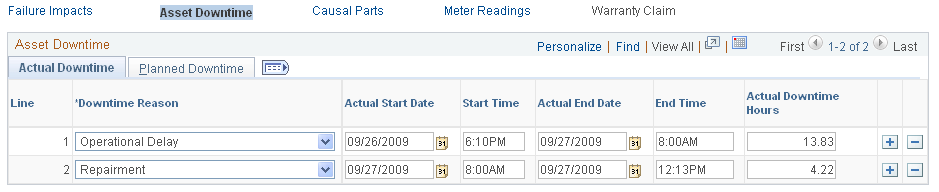
You normally enter planned and actual asset downtime information for an asset associated with a work order task in the Work Order, Technician Workbench, or Downtime Entry components. When you create a failure event for a work order task that has some or all of asset downtime defined, the system updates the Asset Downtime grid on the Work Order Failure Tracking page with this downtime information. Planned downtime is optional for tracking failure events.
If you have not entered any asset downtime prior to creating a failure event, you can enter the information in the Asset Downtime grids on this page. The system will update the Asset Downtime grids associated with the Work Order, Technician Workbench, and Downtime Entry components with the asset downtime information that you enter in the grids on the Work Order Failure Tracking page.
If you have not entered any asset downtime from the Work Order, Technician Workbench, or the Downtime Entry components, the Asset Downtime grid on the Work Order Failure Tracking page will be blank and no figure will appear in the Total Actual Downtime field or the Hours to Repair field. If this is the case, you can enter the actual downtime data on the Work Order Failure Tracking page or enter it in the Work Order, Technician Workbench, or Downtime Entry components. When the data is saved, the Total Actual Downtime and Hours to Repair fields are updated.
When you enter the actual downtime for the asset associated with this failure event and save the page, the system calculates the Planned Actual Variance, updates the Time to Repair and Total Asset Downtime fields on this Work Order Failure Tracking page, and updates the asset downtime for this asset and task in the Work Order, Technician Workbench, and Downtime Entry components.
If the Failure Start and Failure End date and time fields are blank on the Work Order Failure Tracking page, and the Actual Start Date and Start Time and Actual End Date and End Time on the Actual Downtime grid contain values, the system updates the most recent of these values in the Failure Start and Failure End date and time fields. You can override these values.
Note: The Actual Downtime grid may already contain data that was entered in the Work Order, Technician Workbench, or Downtime Entry components for this work order task.
See Downtime Entry Page.
Causal Parts
The Causal Parts grid enables you to select and enter the quantity of part or assets that were responsible for the failure of the asset associated with this failure event. This data is used to add information about a failure event, but it does not affect any costs or quantities for the failure event or the work order task associated with it. You can use causal parts as search criteria to locate specific failure events for analysis.
Use the Failure Causal Parts page (WM_WO_FAILCAUS_SEC) to add comments concerning the parts or assets that caused the failure.
Image: Causal Parts grid
This example illustrates the fields and controls on the Causal Parts grid. You can find definitions for the fields and controls later on this page.

Meter Readings
Use the Meter Reading Comments page (AM_MTR_RD_CMT2) to review any comments concerning the meter readings.
Click the Comments link in the Meter Readings grid of the Work Order Failure Tracking page.
The Meter Readings link is only enabled if the asset has one or more meters associated with it. The system calculates the mean meter reading metric for an asset to use for analysis.
Warranty Claim
The Warranty Claim link is only enabled if the asset has warranties associated with it. This grid displays the warranty associated with the failure event's asset.
Image: Warranty Claim grid
This example illustrates the fields and controls on the Warranty Claim grid. You can find definitions for the fields and controls later on this page.
