
Creating Work Order Tasks
To create a work order task, use the Work Order (WM_WO) component.
This section discusses how to:
Create work order tasks.
Enter asset downtime.
Set up work order task accounting.
Pages Used To Create Work Order Tasks
|
Page Name |
Definition Name |
Navigation |
Usage |
|---|---|---|---|
|
Work Order |
WM_WO_HDR |
|
Select, enter, or view data in the Work Order Tasks grid. |
|
Requirements |
WM_WO_TASK_RQMT |
Select the Requirements tab. |
Create and update work order tasks and task requirements. |
|
Task Status History |
WM_TASKSTATUS_SEC |
Click the As of xx/xx/xxxx date link on the Requirements page. |
Review the history of work order task status changes for the selected task. |
|
Work Order Task Accounting |
WM_WO_TSK_ACCTG |
|
Set up asset capitalization and chargeback information. |
|
Personal Data |
WM_PERSON_DATA_SEC |
Click the link associated with a selected supervisor's name or the link associated with a selected contact's name. |
Review additional personal information, such as the telephone number, of the selected individual. |
|
Scheduler Information |
WM_SCHEDULER_SEC |
|
View specific information about the scheduler. |
|
Change Shop to Identify Crew |
WM_CREW_BUSHOP_SEC |
Click the Change Shop for Crew link. |
Change the shop for a selected crew. |
|
Work Order History for Asset |
WM_ASSETWO_SEC |
|
View a history of the work order created, completed, and closed for the specified asset. |
|
Maintenance History by Type |
ASSET_MAINT_SUM_01 |
|
Review the maintenance history based on the type of maintenance performed. |
|
Asset Information |
WM_WO_ASSET_SEC |
|
Displays detailed asset information such as the asset type, asset subtype, manufacturer ID, and model. |
|
Downtime Entry |
WM_WO_DOWNTIME |
|
Enter the start and end dates and times that the asset will be unavailable for use. |
|
Asset Calendar |
RS_ASSET_MONTH |
Maintenance Management, Work Order Management, Work Order. Click the Asset Calendar link in the Work Order Tasks - Asset Information grid. |
Access and review the Asset Calendar. This link displays only if you select an asset for the task. |
|
Task Details |
RS_SCHED_APPT |
Click the day link in the Asset Calendar. |
Review the task details for an asset on a specific day. |
|
Asset Daily Schedule |
RS_ASSET_DAILY |
Click the Return to Asset Daily Schedule link on the Task Details page. |
Displays the asset's schedule per day hour by hour. |
|
Task Template Search |
WM_JRL_TT_SRCH_SEC |
|
Search for a work order task template to copy to the work order. |
|
Task Cost Recovery |
WM_WO_TSK_CLAIM |
Maintenance Management, Work Order Management, Work Order. Click the Warranty Claim link in the Work Order Tasks - Asset Information grid. |
Enter warranty claim information to begin the process of attempting to recover costs from a supplier based on an asset's warranty. |
|
Meter Reading History |
AM_MTR_RD_HIS |
|
Review the meter reading history of the meter associated with the selected asset. |
Requirements Page
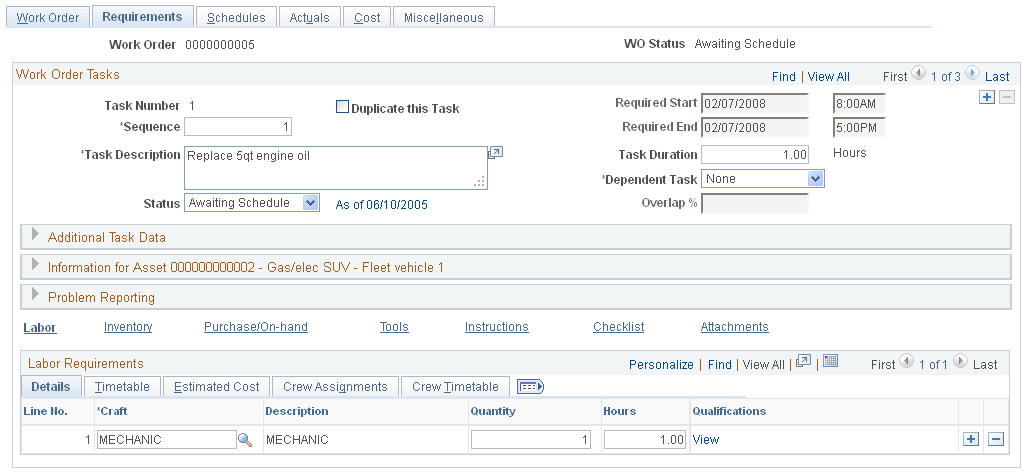
Use the Requirements page (WM_WO_TASK_RQMT) to create and update work order tasks and task requirements.
Image: Requirements page
This example illustrates the fields and controls on the Requirements page. You can find definitions for the fields and controls later on this page.
Additional Task Information
The Additional Task Information group box contains these fields:
Task Asset Information
If you identify an asset in the work order header, it can apply to all the work order tasks. However, you can also identify different assets for each work order task. To use more than one asset in a work order, you must select the Multiple Assets Per Work Order option in the work order business unit. If you do not select this option, the asset fields for a task are not available for selection and the tasks use the asset selected in the work order header.
Note: The principles of selecting an asset for a task are the same as selecting an asset in the work order header.
| AM Bus Unit (Asset Management business unit) |
The default value is derived from the page. |
| Asset Location |
Select the current location of the selected asset. Important! When you enter the asset business unit and ID, the default location is derived from the asset repository. However, you can change the location to indicate that the asset is currently in a different location. For this reason the location is not validated against the asset when the work order is saved. |
| Map It |
Click this button to access the location of this work order on an ESRI map. Once you access the map, the work order business unit, work order ID, and work order task ID appear on the map as a marker. You click the marker and a window appears, which contains a list of these work order characteristics:
Note: This button does not appear on the page unless you set up Installation Options and the work order business unit to enable ESRI integration. |
| Asset ID (Serial ID, Tag Number, Vehicle ID Number) |
Select a value to more specifically identify the asset or click the Advanced Search icon to access the Asset Search page, where you can select search criteria to narrow your search. The Search Results contain an Asset Component Hierarchy link, which enables you to view the Asset Component Hierarchy page. This page displays the selected asset in a hierarchical relationship with any asset components. The field name that appears on the page depends on the field name (Asset ID, Serial ID, Tag Number, or Vehicle ID Number) that you select in the work order business unit that was used to create the work order. |
| Area ID |
Select the specific area in which the asset is located. |
| Asset Action |
Select one of these actions to affect this task's asset: Note: This option only appears on the page if the work order type for capital work orders and is used primarily for the retirement and removal of assets and component changeouts.
Note: You must select No Change for non-financial assets. All other values involve the installation, removal, or retirement of a financial asset. |
| Parent Component |
Displays the parent component of this asset, if it is part of another component. For example, the selected asset for this task is part of a component that consists of two or more assets, such as a truck's engine and all of the parts (assets) that compose the engine (parent component). |
| Work Order History |
Click this link to access the Work Order History page for this asset. This page lists the work orders and tasks that are associated with this asset, along with the start and end dates and when they were completed and closed. |
| Asset Maint. History asset maintenance history |
Click this link to access the Review Maintenance History component in PeopleSoft Asset Management. |
| Asset Details |
Click this link to access the Asset Information page, which lists details about this asset, such as the asset characteristics, asset ID and more. The Asset Information page also contains an Asset Component Hierarchy icon that links to the Asset Component Hierarchy page, where you can view the selected asset's hierarchical relationship with other asset components. |
| Asset Downtime |
Click this link to access the Downtime Entry page. See Downtime Entry Page. |
| Asset Calendar |
Click this link to access the Asset Monthly Schedule for this asset. You can drill down to the daily schedule and add task details. This schedule indicates when the asset is available for maintenance or repair. |
 |
Click this button to access the Asset Warranties page in PeopleSoft Asset Management and view any warranties associated with this asset. |
 |
Displays this icon when the asset is hazardous. |
| Warranty Claim |
Click this link to access the Task Cost Recovery page, which enables you to create a warranty claim. |
| Meter History |
Click this link to access the Meter Reading History component in PeopleSoft Asset Management. |
Problem, Cause, and Resolution Data
You can optionally associate a problem group, problem, cause, and resolution with a work order task. Specifying these values enable you to search for a work order job or task template, which already has requirements defined for this type of problem. In addition, specifying these values enables you to categorize this task in order to later search for this task or other work orders and tasks associated with the PCR data specified for this task.
Resource Requirement and Associated Task Data Links
Click the Labor, Inventory, Purchase/On-Hand, and Tools links to set up resource requirements for a work order task. This is described in detail in the Defining Work Order Task Requirements topics.
See Defining Resource Requirements for a Work Order Task.
Downtime Entry Page
Use the Downtime Entry page (WM_WO_DOWNTIME) to enter the start and end dates and times that the asset will be unavailable for use.
Click the Asset Downtime link on the Requirements page of the Work Order component.
Click the Asset Downtime link on the Schedules page of the Work Order component.
Maintenance Management, Work Order Processing, Downtime Entry
Click the Downtime link on the Task Actual Dates/Time tab of the Work Order Tasks grid in the Technician Workbench
Image: Downtime Entry page
This example illustrates the fields and controls on the Downtime Entry page. You can find definitions for the fields and controls later on this page.
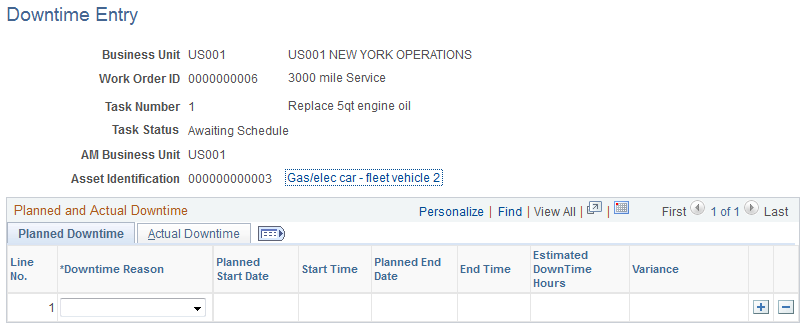
The Downtime Entry page header information is derived from the asset description in the work order task.
Planned Downtime
Select a reason for the downtime and then select the proposed start and end downtime dates and times, and enter the number of yours that you think the asset will be down. When you save the page, the variance field initially displays the hours of proposed downtime.
Actual Downtime
You can modify the Downtime Reason if necessary. Enter the actual dates and times that the asset was down and the number of hours that it was down. When you save the page, the variance on the Planned Downtime tab displays any difference. For example, if you planned for the asset to be down for repair for 4 hours and it only took two hours to repair it, then the Variance field will display – 2.000.
Work Order - Task Accounting Page
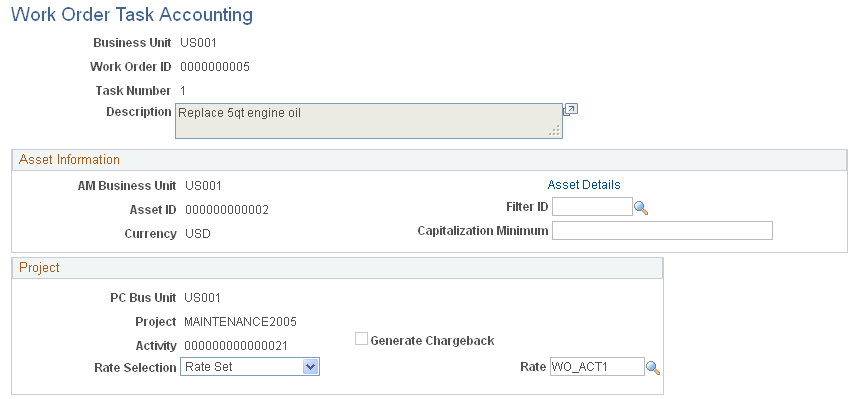
Click the Set Accounts link on the Requirements page to access the Work Order Task Accounting page.
Image: Work Order - Task Accounting page
This example illustrates the fields and controls on the Work Order - Task Accounting page. You can find definitions for the fields and controls later on this page.
Asset Information
Project