 To enter an assumption:
Select a cell or a range of cells. The cells can be blank or have numeric values, but they cannot have formulas or text (Defining Assumptions).
Click the upper half of the Define Assumption icon,
 .
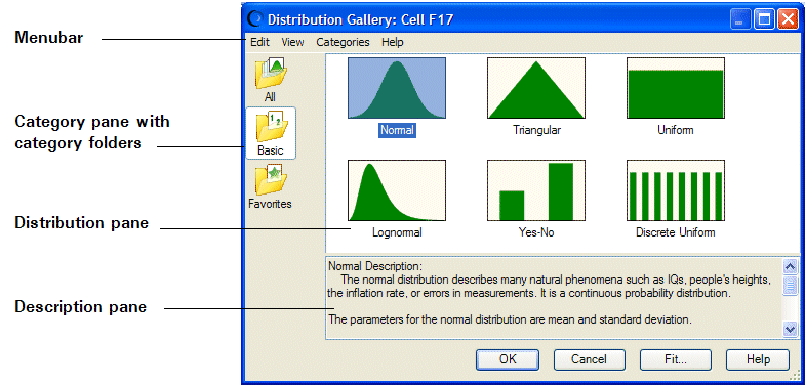
.For each selected cell or cells in the selected range, Crystal Ball displays the Distribution Gallery dialog (Figure 6, Distribution Gallery with the Basic Category Selected).
In the Distribution Gallery, select the distribution you want from the gallery. The Basic category contains several frequently used distributions. Click All to view all distributions shipped with Crystal Ball. For details, see Using the Crystal Ball Distribution Gallery.
Alternately, click the Fit button to fit a distribution to historical data, as described in Fitting Distributions to Historical Data.
For more information on the Distribution Gallery, see Distribution Gallery Window.
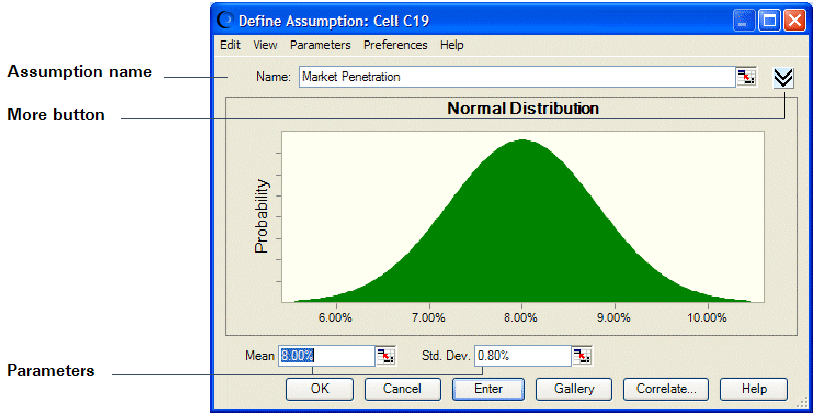
When the Define Assumption dialog opens (Figure 7, Normal Distribution), type in a title and the parameters for the distribution. The parameters can be either numeric values or cell references ( Entering Cell References and Formulas). For most distributions, you can use alternate parameters (Using Alternate Parameter Sets).
To change the distribution type, click Gallery to return to the Distribution Gallery and then select another distribution.
To see more information, click the More button,
 , near the Name text box.
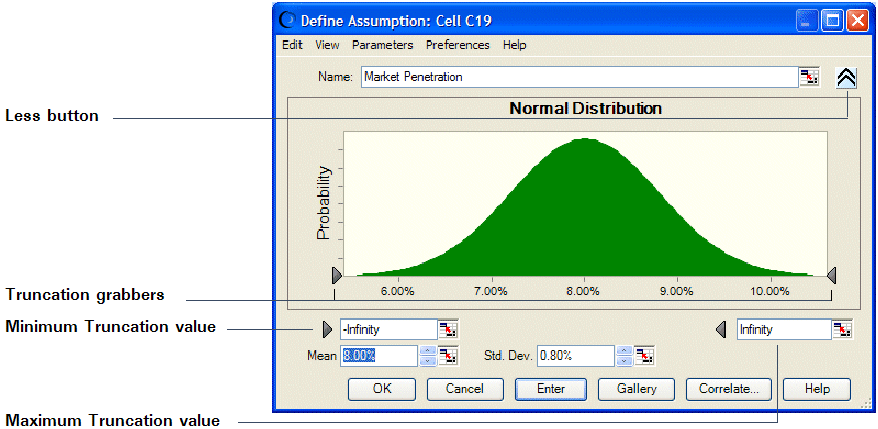
More information is displayed in the Define Assumption dialog as shown in Figure 8, Define Assumption Dialog, Expanded.
In the expanded Define Assumption dialog, you can:
Enter truncation minimum and maximum values in the minimum and maximum truncation text boxes (just below the distribution, accessible by tabbing).
Use the truncation grabbers to truncate the value range.
Use numeric spinners (arrows beside the text box) to adjust parameter settings.
Click the Less button,
 , to hide the minimum and maximum value text boxes and truncation grabbers. (For more information about truncating distributions, see Truncating Distributions.)
You can perform the following activities in both the standard and expanded Define Assumption dialog:
Click the Gallery button to display the Distribution Gallery window and select another distribution.
Click the Correlate button to define correlations between assumptions (Defining Correlations Between Assumptions).
Select Edit, and then Add in the menu bar to add the currently defined assumption distribution to the Favorites category or a user-defined category in the Distribution Gallery.
Use other menu commands to copy the chart, paste it into Microsoft Excel or another application, print data, change the view, use alternate parameters, set assumption and chart preferences, and display help as described in Additional Assumption Features.
When you have finished entering parameters to define the assumption, click Enter.
The distribution changes to reflect the values you entered. If you click OK instead of Enter, Crystal Ball accepts the parameters and closes the dialog.
If you selected a range of cells, repeat these steps to define the assumption for each cell.
For more information about assumptions, see Additional Assumption Features.