50.7 Linking Social Identity Provider Accounts
Social Identity Account Linking allows users to link several Internet identities together with an existing or new local user account.
The following sections contain information about how to enable and use this feature.
50.7.1 Social Identity Provider Account Linking Flow
When a user logs in successfully as a local user using an Identity Provider, the Linked Accounts page is displayed. The user can link the Identity Provider to this local account from the Linked Accounts page.
The following sequence documents the steps in the Account Linking Flow.
-
The user lands at the Mobile and Social Login Page.
-
The user is prompted to log in locally or with an Identity Provider.
-
The user selects Identity Provider Login (for example, Google) and enters password credentials.
Once authenticated (and if determined that the user is already registered with a local account), the user is automatically logged in as the local user and then presented with a Linked Accounts page that has the option to link the Identity Provider to this local account.
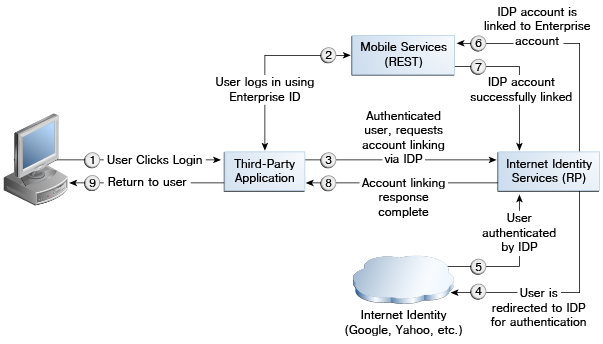
By clicking the link next to Google, the user will link the local account to the Google Identity Provider account. The user may choose to link and unlink additional Identity Providers from this page. Figure 50-1 illustrates this scenario.
Figure 50-1 Social Identity Account Linking

Additional scenarios include:
-
If the user logs into an Identity Provider account without having a local account and selects the Register option after Identity Provider authentication, an enterprise ID will be created and the Identity Provider account will be automatically associated with this enterprise ID. In other words, the user logs in with the Identity Provider Login ID and Mobile and Social creates a local account with the same user name as the Identity Provider Login ID. The user is then redirected to the linked accounts page associated with the newly created local account. From this page, the user may choose to link or unlink Identity Provider accounts or return back to the application.
-
If the user logs in using the local account only, in the app the user has to choose the linked accounts page displaying Identity Providers. From this page, the user may choose to link (or unlink) Identity Provider accounts or return back to the app. When the accounts are linked, Social Identity will detect that the user is linked to a local account even when the user logs in using Identity Provider credentials.
Note:
The linked accounts page can be provided by the relying party (by way of Social Identity) or a third-party application that hosts the options for linking accounts. In either case, the following items will need to be provided:
-
An API call (for example,
AccountLinkingHelper.getProviders ()) listing the various Identity Providers that can be linked. This will include linkage status and IDs. -
An RP-specific account linking page (for example,
linkedAccounts.jsp) that will display the various Identity Providers that can be linked. This will include linkage status and IDs.
50.7.2 Social Identity Provider Account Linking Configuration
You can configure Social Identity Provider Account Linking properties and enable account linking.
The properties documented in Table 50-8 need to be configured to use Account Linking. They are set in the Application Profile Properties table.
Table 50-8 Account Linking Properties
| Property | Details |
|---|---|
|
|
This configuration property is set to true to enable Account Linking. |
|
|
Specify the OAM entity attribute name that corresponds to the LDAP attribute where the multi-valued account linking information is to be stored. Use the OAM entity attribute name defined in the IDS Profile. To look up this name in the OAM console, choose Configuration > User Identity Stores > IDS Profiles. Select the identity profile and click edit, then click Entity Attributes. The Entity Attributes page lists both the entity attribute names defined by OAM, and the corresponding LDAP physical attributes. Use the OAM name listed in the first column. Note: This value is case-sensitive. |
The following should also be taken into account when enabling Account Linking.
-
Ensure the proxy setting is correct. This setting can be found by navigating the Oracle Access Management Console: System Configuration > Mobile & Social > Mobile & Social Settings.
-
Images for Identity Provider icons or logos can only be specified using WLST. If the image path starts with
http, the image is retrieved from the location using theimgtag. Otherwise, it uses the internal references that come with Social Identity. -
Ensure that the
usernameattribute and the account linking attribute are different. If they are the same then it can cause inconsistent behavior. For example, you can set theusernameattribute touidand the linking attribute tomail. -
Set the Shared Secret for the application. Set the Auth Scheme on the authentication policy to point to OICScheme and ensure that the settings are correct. For example, the
MatchLDAPAttributeshould match theusernameattribute set in the relying party Application Profile, typicallyuid.