
|
|
|
Folio Options
The Folio Options screen allows you to specify customizing options when you are printing or previewing a folio or folios. This screen is available from several locations in OPERA, (for example from the Billing screen and from the Folio History screen) when you select the Folio button.
Note: When the Cashiering>Permanent Folio Storage application parameter is set to Y, the Cashiering>Folio Printing application setting is set to ALWAYS, and a folio is generated, an exact copy of the folio that is generated is stored in a subfolder of the Export folder at a location, for example D:\micros\opera\export\<schema_name>\<resort>\folios\<business date>, and will be titled by either the business date or the file name convention that was configured by the Cashiering>Permanent Folio Storage File Name Format application setting when the folio was generated and an internally generated FOLIO_ATTACHMENT_LINK_ID will always be added to the end of the file name to ensure that the file name is unique. But if the Cashiering>Folio Printing application is set to YES, then when the folio is printed, emailed or faxed at the time of generation it will be stored. If the Cashiering>Folio Printing application is set to NO, then the folio will not be stored.
The following options are available:
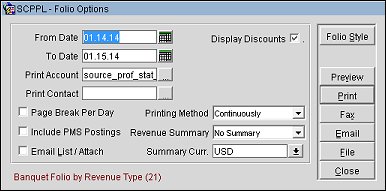
From Date/To Date. Enter the start and end dates for the range of dates you wish to include in the folio. The default From Date is the guest's arrival date; the default To Date is the guest's departure date. Alternatively, you may use the calendar tool to choose dates.
Display Discounts. (Displays only when Folio Style 21 or 22 is selected in the Folio Style screen - see Folio Style button.) Select this check box to display the discounted percentage and discounted price of a Resource: Space, Menu, or Item. The original price also displays for comparison. A summary at the end of the folio displays the 'Total Discount xxx.xx' for all resources. This informs guests of how much they saved.
Folio Text 1, Folio Text 2. Additional lines of text that will appear on the folio. (The placement of the additional text on the folio is determined by the position of the Folio Text merge codes.) Folio Text 1 and Folio Text 2 fields may also be made available on the Reservation screen More Fields tab. When this is the case, any additional folio text from the More Fields tab will pre-fill the Folio Text 1 and Folio Text 2 fields on the Folio Options screen. The additional folio text lines are available if the CASHIERING > ADDITIONAL FOLIO TEXT application parameter is set to Y.
Note: When an active S&C or SFA license is present, and the folio style selected is 21 (Banquet Folio by Revenue Type) or 22 (Banquet Folio by Event [Time]) the fields 'Print Account' and 'Print Contact' are visible and will default to the Account/Contact selected for the Business Block from the Name Select screen. If no 'Print Account' or 'Print Contact' has been selected for a booking, the default hierarchy is used. Additionally, when no relationship exists between the 'Print Account', and the 'Print Contact' the Print Contact will display in red.
For folios created in AR, Folio Text 1 and Folio Text 2 information is stored in the AR invoice header table in the OPERA database rather than on the reservation. When the Folio Options screen is called from the Folio History screen in order to reprint a folio created in AR, the Folio Text 1 and Folio Text 2 information (if any already exists) is pulled from the AR invoice header table; Folio Text information may be added and edited as when it is associated with a reservation. When multiple folios are selected for reprint from the Folio History screen, the Folio Text fields are not available.
When creating or reprinting a passerby folio from the Folio History screen, the Folio Text fields are not available; this information is not currently stored for passerby folios. If a passerby folio is settled to an AR account, and the user accesses AR > Account Maintenance > Invoice > Folio, then the Folio Text 1 and Folio Text 2 fields are available and the information is stored in the AR invoice header table. Folio Text 1 and Folio Text 2 fields are also available when the Folio History screen is accessed from the AR Account Maintenance screen Options menu.
When more than one folio is selected on the Folio History screen, the Folio Text 1 and Folio Text 2 fields are not available on the Folio Options form and the user cannot enter new folio text information; if any of the selected folios already has Folio Text 1 and Folio Text 2 information entered/stored earlier, then that will appear on the folio.
Print Phone Details. Select this check box to print a report of the phone details for the current reservation. See Print Phone Details, below, for details.
Print Check Number. Available for folio styles 1, 9, and 14. Select this check box to have the check number printed on the folio for those transactions having an associated check number.
Email List/Attach. Available when the GENERAL > FILE ATTACHMENTS application function is set to Y and a value has been defined for the GENERAL > EMAIL ATTACHMENT DIRECTORY NAME application setting, select this check box to email the selected Folio as an attached file to one or multiple email addresses. When this check box is selected and the Email button is chosen, then the Email/Fax Destination screen is displayed to select the email addresses. See Email/Fax Destinations for details.
Summary Curr. Select the down arrow to choose the Summary currency to be applied to the folio. Available when the GENERAL > MULTI CURRENCY application function is set to Y. Select a currency option to print charges and credits on folios in another currency (called the summary currency), in addition to printing the charges and credits in the property base currency. The currency exchange rate used to convert the base currency to the summary currency is the exchange rate in effect on the date the folio is printed. The exchange rate used is shown on the last line of the folio. The Summary Currency reflects the Currency Code field that is defined on the Guest Profile for a given reservation. If the Currency Code field is blank, then the value from the CASHIERING > REFERENCE CURRENCY CODE application setting is used. If the application setting is blank, then the Summary Currency will be blank.
Folio Style. Open the Folio Style screen to select the style in which you wish to print and display the selected folio. By default, folios will be printed in the style set by the CASHIERING > FOLIO STYLE application setting. The currently selected style is shown above the Folio Style button. The folio style currently in effect is shown in the lower left corner of the screen.
Note: This button is available when the CASHIERING > FOLIO STYLE application parameter is set to Y. If this parameter is set to N, the Folio Styles button is not available and the default folio style set by the CASHIERING > FOLIO STYLE application setting may not be changed by the cashier when printing folios.
Note: If you are printing or previewing a folio from the Folio History screen, the default style will be the style in which the folio was originally printed.
Note: When generating the Banquet Check (Folio Style 21 and 22) from within the Billing Screen, and the banquet charges have been distributed across multiple windows, the banquet check will be generated only for the billing window that has the active cursor.
Preview. Display the selected folio on screen. Once the folio is displayed, you may print the folio from the preview screen. This button is unavailable if more than one folio has been selected on the Folio History screen.
Note: Prior to printing or previewing folios, you are prompted to select a summary currency for the folios if the GENERAL > MULTI-CURRENCY application parameter is set to Y.
Print. Print the selected folio(s).
Note: The number of copies of the folio automatically printed at checkout, when generating an advance bill or an interim bill, for an early departure, or for a passerby bill is determined by the number of copies configured for the folio in Report Setup/Customizing Reports. For example, if the value defined is 2, 1 original and 1 copy of the folio are printed when a guest is checking out. If a folio is printed at other times, for example by selecting the Folio button on the Billing screen or Folio History screen, only a single copy is printed.
Fax. Send the folio as a fax. When this option is selected, the Delivery Information screen appears. See Delivery Information below for details. This button is unavailable if more than one folio has been selected on the Folio History screen.
Email. Send the folio as an email PDF attachment. When this option is selected, the Delivery Information screen appears. See Delivery Information below for details. When this button is selected and the Email List/Attach check box is selected, then the Email/Fax Destination screen is displayed to select the email addresses. See Email/Fax Destinations for details. This button is unavailable if more than one folio has been selected on the Folio History screen.
File. Generate a PDF file that can be displayed or saved locally or to the network. This button is unavailable if more than one folio has been selected on the Folio History screen.
Typewriter. Available when the Folio button is selected from the Invoice Details screen. Generate an RTF file that can be edited in your word processor. Any changes you make do not affect the actual invoice data or the invoice report file. The file is stored in a location specified by the AR > TYPEWRITER application setting.
When you select the Fax button or the Email button to send the folio as a fax or as an email, the Delivery Information screen appears.
This screen may also be accessed from the Payment screen (see Payment screen for details) at settlement when the Email Folio check box is flagged. Select the down arrow on the email address field to display the Delivery Information screen. (The availability of the Email Folio option is controlled by the CASHIERING > FOLIO EMAILING (1-8) application setting.)
The Delivery Information screen allows you to select the fax number or email address for the recipient.
If a primary fax address or a primary email address, as appropriate, is configured for the profile that is the payee (person or organization responsible for paying the bill) for the current Billing screen window, or the profile that is the payee for the folio displayed from the Folio History screen, that information appears in this screen by default. If the profile has no primary email address or fax number, as appropriate, you may enter that information using the Delivery Information screen. The new fax number or email address will automatically be designated the primary email or fax address for the profile.
Provide the following information and then select the OK button.
Type. Communication type for this delivery. The default is FAX. The type cannot be changed here if the primary fax number has been auto-populated from the recipient's profile. See Communications Information for details.
Fax. Fax number for this recipient. If a primary fax number was specified for the recipient's profile, it automatically appears in this field. Select the down arrow and choose from any other fax numbers configured for this profile, or choose New Fax to configure a new fax number for the recipient. You may select a new Type from the configured fax delivery communication methods by selecting the down arrow on the Type field. To make the new fax address the primary fax address for the profile, select the Primary check box.
Primary. If this check box is selected, the fax address shown in the Fax field is the profile's primary fax address. If the fax number was designated as the primary fax number from the profile's communications information setup, the primary designation may not be changed here. For new fax numbers added from this screen, you may designate that the new fax number is to be the profile's primary fax number by selecting this check box.
Type. Communication type for this delivery. The default is EMAIL. The type cannot be changed here if the primary email address has been auto-populated from the recipient's profile. See Communications Information for details.
Note: When the Delivery Information screen is accessed via the Email Folio feature (see Payment screen for details), the Type field LOV will only display EMAIL address types. The availability of the Email Folio option on the Payment screen is controlled by the CASHIERING > FOLIO EMAILING (1-8) application setting.
Email. Email address for this recipient. If a primary email address was specified for the recipient's profile, it automatically appears in this field. Select the down arrow and choose from any other email addresses configured for this profile, or choose New Email to configure a new email address for the recipient. You may select a new communication type from the configured email delivery communication methods by selecting the down arrow on the Type field. To make the new email address the primary email address for the profile, select the Primary check box.
Primary. If this check box is selected, the email address shown in the Email field is the profile's primary email address. If the email address was designated as the primary email address from the profile's communications information setup, the primary designation may not be changed here. For new email addresses added from this screen, you may designate that the new email address is to be the profile's primary email address by selecting this check box.
From Email. The e-mail address of the user, department, or other entity that sent the e-mail. To determine which e-mail address populates in this field, the system will use the following sources and priorities:
Note: After a confirmation has been e-mailed, if the confirmation needs to be re-sent and the e-mail address that was used in the 'From Email' field has since been deleted from the system, you must select a new e-mail address from the 'From Email' field list of values.
When the GENERAL > PROFILE LANGUAGE application function is set to Y, stationery such as the folio is printed in the language specified in the Language field on the guest's Profile screen. If, however, transactions are billed to a Billing screen window having a payer other than the guest, the payer's profile language determines the language used for the folio, without regard to the language on the guest's profile.
When the GENERAL > MULTI-CURRENCY application function is set to Y, the following logic controls the reference currency used when printing folios:
If prior to printing the guest folio you have not changed the Summary Currency setting, OPERA prints reference currency information on the folio using the window payer’s reference currency. (The payer’s reference currency is set using the Reference Currency field on the Profile screen.) If no reference currency is available for the payer, the reference currency is taken from the CASHIERING > REFERENCE CURRENCY CODE application setting.
If the Summary Currency is changed, any profile reference currency is overridden and the selected summary currency is used. Once a folio is previewed or printed using the selected summary currency, OPERA will continue to use that currency as the reference currency until it is cleared or changed by the user, or until the Billing screen is closed.
When the CASHIERING > FOLIO COPY LEGEND application parameter is set to Y, you may use the FOLIO_COPY_LEGEND merge code to automatically place a default "legend" on the guest's folio at settlement. Up to 10 copies of the folio can each have its own legend associated with it. The default English text (which is translatable) that will replace the FOLIO_COPY_LEGEND merge code on each copy of the folio is as follows:
Default Text |
|
Copy 1 |
1st Copy of Invoice |
Copy 2 |
2nd Copy of Invoice |
Copy 3 |
3rd Copy of Invoice |
Copy 4 |
4th Copy of Invoice |
Copy5 |
5th Copy of Invoice |
Copy 6 |
6th Copy of Invoice |
Copy 7 |
7th Copy of Invoice |
Copy 8 |
8th Copy of Invoice |
Copy 9 |
9th Copy of Invoice |
Copy 10 |
10th Copy of Invoice |
Depending on the size of the folio, approximately 6 to 8 seconds will be added to the folio generation time for each copy when using the Folio Copy Legend feature.
Note: Use the Oracle Report Writer to create the customized folio and incorporate the FOLIO_COPY_LEGEND merge code into the folio layout. When you add the FOLIO_COPY_LEGEND merge field into the layout you may specify the default message texts for each copy.
Note: The Folio Copy Legend feature applies only to folios printed through the Billing screen. When reprinting a folio through Folio History or video check-out, this feature is not active.
The Print Phone Details check box may be used to enable or disable display of telephone numbers and associated prices for each call on the guest's folio.
Note: The default setting for this check box is controlled by the CASHIERING > PHONE DETAILS application parameter.
If your property generally does not print telephone numbers on the folio, but a particular guest asks for them, select the Print Phone Details check box for the guest. From now on, for this guest, OPERA will print telephone numbers on the folio. If by default your property always prints telephone numbers on the folio, but a particular guest asks you to remove them, then un-select this check box. From now on, for this guest, OPERA will not print telephone numbers on the folio.
To include phone details, be sure that the folio style you have selected displays transaction details. The Detailed Folio (Standard), or the Detailed Folio Sorted Chronologically are good options. (See Folio Styles for details.)
See Also