
|
|
|
Group Profile
Group profiles are created to handle group events (for example, conventions, meetings, parties, or weddings). A group profile is distinguished from a company profile in that groups usually book for a specific time period and do not have an ongoing (year to year) relationship with the property or chain.
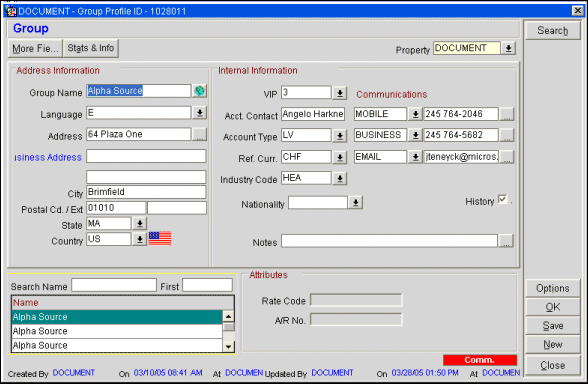
Use the Profile screen to enter demographic information about the group. To create a profile you need, at a minimum, the group name. Gather as much other information as possible or as directed by management. Note that you can enter multiple addresses, telephone numbers, and notes.
Note: When creating a new Group Profile, the system automatically generates Group Profile Client IDs if these application settings are activated: Global>Profiles>Parameters>Auto Generate Client ID> = Y and Global>Profiles>Settings>Generate ID for Profile Types: G – Group. After a new Group Profile is created, you may scroll to the right on the Profile Search Screen to view the new Client ID.
Property. Select the down arrow to choose the property for which you wish to see this profile's property-specific information. Property-specific information may include Owner, Rate Code and AR Number. Your login property is displayed by default. (This feature is available if the OPP MHOT Multi-property add-on license or if OPR<version number>ORS license code is active.)
Group Name. Enter the name of the group. It can be any name. A shortened version of the full name is popular.
Language. Select the down arrow and choose the group's preferred correspondence language. A default correspondence language was established for your property during set up.
Address Information. Enter the group's address (mailing address, city, postal code and extension, country, and state). You may select the ellipsis button to open the Address list to create multiple addresses. (See Addresses for details.) If multiple addresses are created, select one as the primary address. The primary address displays on the Profile screen with the address type (shown in blue: for example, Home Address, Business Address) next to it. The default primary address type is set by the Profiles>Company Address Type application setting.
Address. Enter the street address.
City. Enter the city portion of the address.
Postal Code. Postal code portion of the address.
State/Province. Select the down arrow to choose the state or province portion of the address, if applicable.
Country. Select the down arrow to choose the country portion of the address. If an ISO country code is associated with the country code you select here, the appropriate national flag image will appear next to the Country field and list of values down arrow, if this option has been configured (see Countries for details).
Note: If the Profiles >Quick Address application function is set to Y, entering the Country and the Postal Code information will auto-fill the State and City fields for US and selected other addresses.
Replace Address. This check box is screen painted in PMS. When a user adds or modifies an address or communication type on an existing profile, selecting this check box indicates to the system that the user made intentional changes. This check box transfers to and from external systems such as PMS and ORS, via OXI-HUB, indicating on various screens that the user made address or communication changes to the profile. For example, if a profile had an address modified in PMS and the user selected the Replace Address check box, when uploaded to ORS the Profile Screen in ORS would also have this check box marked. (Once the address and/or communication type has been transferred, the check box no longer remains flagged at the originating Profile Screen.) This check box can also display on the first panel of the Suspended Profiles - Three Panel Merge Screen.
The resulting profile address/communication type changes depend upon the OXI-Profiles Interface parameter of Update Primary - whether it is set for ENABLED, DISABLED, or REPLACE (see OXI_PROFILE Parameters in OXI_HUB). This parameter allows you to decide what address and communication type will be designated as Primary upon sending a profile to ORS.
Cleansed. Available if an external address cleansing interface is licensed (e.g., the OPP_ADDO Address Doctor Interface) and the Profile>Address Cleansing application parameter is set to Y. Address validation may be applied to the profile address information when the profile is created or when the address is edited. This check box is automatically selected once the address has been validated. To re-validate an address change, edit the appropriate address elements and un-check the Cleansed check box. The address will be validated when you select the Save or OK button. See Address Doctor Setup and Address Cleansing Result for details.
Protected. This field is screen painted and is available when the OPR<version number>ORS license code is active. Select CENTRAL from the LOV if you want to protect this profile from changes made at the PMS property level (details are explained below). When this profile is saved after CENTRAL Protect has been selected, the profile is identified with a green label "Protected." This green Protected label also appears on the PMS Profile screen.
VIP. Select the down arrow to open the VIP list of values and select a VIP status level, if any. (This feature is available if the Profiles>VIP application function is set to Y.)
Account Contact. The person designated as a contact for this group. (This feature is available if the Profiles>Contacts application function is set to Y.)
Account Type. Account types may be used to classify statistical information such as revenue and room nights by the type of business (for example, local or international). Select the down arrow to choose an account type. Account type codes are defined by each property or property chain. See Account Types for details. When an X displays next to the Account Type in the LOV, that code is inactive and cannot be selected.
Ref. Curr. Currency that will be used to produce the group's billings and statements. The property's local currency is the default currency. If the group prefers billing and invoicing in another currency, select the down arrow and choose that currency from the list of values. (This feature is available when the General>Multicurrency application function is set to Y.)
Industry Code. Select the down arrow to choose the industry classification to which this group belongs. Industry codes are defined by each property or property chain. See Industry Codes for details. (This feature is available when the OPS <version number> Sales & Catering license code is active.) When an X displays next to the Industry Code in the LOV, that code is inactive and cannot be selected.
Owner. Sales manager responsible for this account. Open the sales manager drop down list and select a sales manager code. Sales manager codes are defined by each property or property chain. The description of the code appears to the right of the field. See Ownership for details. (This feature is available when the General>Owner application parameter is set to Y.)
Notes. Select the ellipsis button to add notes to the profile. Notes can be of any of several kinds (e.g., General, Reservation, Background, Employee, etc.). The newest General- type note to be added is displayed on the Profile screen. See Profile Notes for details. (Profile note types are configured in System Configuration>Setup>Note Types.) Should notes/comments be added to an existing reservation through Reservation>Update Reservation>Profile>Options>Notes, the notes/comments added for the existing reservation will not be seen when returning to the Reservation screen.
Use these fields to enter telephone numbers, email addresses and/or web addresses for the profile. Select the down arrow to choose the type of communication (e.g., Home Phone, Business Phone, Cell Phone, Fax, Email, Web, etc.). Then type the address in the field to the right. To add multiple communication addresses of a type (e.g., two business phone numbers or two email addresses), select the ellipsis button. Only one communication address belonging to each communication role (i.e., phone, fax, email and web page) may be designated as a primary communication address. For example, even though there are three business and home voice phone numbers for an individual, only one can be the primary phone number if all are assigned to the phone role. (See Communication Information for details on roles and primary communication addresses.)
Phone Number. Enter the phone number for the profile. When the OPR<version number>ORS license code and OPI<version number>OCIS license code is active, you have the option to define the minimum amount of digits that will be allowed for the phone number in PMS before it will be uploaded to ORS/OCIS. If the minimum amount of digits is not met when adding/modifying a phone number in PMS, the phone number will not be transferred to ORS/OCIS. If the minimum amount of digits is met, the phone number will be transferred from PMS to ORS/OCIS. The minimum phone length is set up in OXI-HUB (Interface Configuration>Interface Parameters>OXI_PROFILES>MIN PHONE LENGTH). The default value is 6 digits. If the value is set for less than 5, more matches will result during the ORS Match & Merge process. See OXI_PROFILE Parameters in OXI-HUB for more information.
History. Select this check box to save this profile from being purged according to the criteria used by the purge routine to remove inactive profiles from the database. By default, this checkbox is not selected when creating a new profile.
Note: To make this check box selected by default, select Configuration>Setup>Screen Design>Field Defaults to access the Field Defaults Maintenance screen. In the Screen Name field, select Individual/Group, and then select the New button to access the Field Maintenance Details screen. Select "Keep History" in the Field Name field, select "Y" in the Field Value field, and select the OK button to make the History checkbox selected by default.
See Group Profile Screen Painting Elements for details.
Addr. Language. Select the language for the address information.
Address Type. Select the type of address being used for the profile.
Alt. Language. Select an alternate language to use with the profile.
Alt. Name. Enter an alternate name to use for the group profile.
Note: When the OPR_<version number> OPERA Reservation System license is active, the General>Alternate Name application function is set to Y, and the General>Auto Alternate Name Translate application parameter is set to Y, when creating a new profile the cursor is automatically defaulted to the Alt. Name field. When editing a profile, alternate names will automatically be translated into English and auto-populated into the First and Name fields. For translating from double byte characters to English, this feature requires all the expected characters to have an accurate translation in configuration (Setup>System Configuration>Profile>External IFC>Character Conversion). If the character conversion is not properly configured or does not exist or the alternate name lacks special characters, English will be copied to English.
Birth Country. Select the country of birth for the profile.
Birth Place. Enter the place of birth for the profile.
Central A/R No. Accounts receivable number assigned to this profile at the CRO level. (This feature is available if the OPR <version number> ORS license code is active.)
Country. Select the country for the profile.
Credit Rating. (ORS Only) Select the Credit Rating to attach to the profile. When a credit rating is selected for a profile, a credit rating deposit and cancellation rule will now apply anytime that this guest makes a reservation. See Credit Ratings for details.
CRS ID. Identification number for the central reservation system.
Direct Bill Batch Type. Available when the Cashiering>Direct Bill Batch Folios function is set to Y, select the batch type to be associated with a profile to allow batch printing of folios for direct bill guests based on the type assigned to the profile and on when the direct bill batch folios were last printed.
IATA Corp. ID. When the Profiles>IATA YN application parameter is set to Y, this field displays the IATA corporate ID number for the group.
Internal Information. Label for the Internal Information section of the screen.
Legal Company. Enter the legal company for the group profile.
Nationality. Select the nationality code for the group.
Passport. Enter any passport information.
Note: By default, Passport Number and ID Number information is masked with X's except for the last two characters. If you have Profiles>View Sensitive Information on Profile permission, you may double-click on the field to see this information in clear text. When updating ID and Passport numbers with masked values, the user is expected to replace the entire string rather than parts and pieces of the masked value. This is because these fields accommodate alphanumeric characters and therefore, if the string is not replaced in its entirety, the masked values will be saved as X's.
PMT. Due Days. Enter the number of days before the payment is due.
Profession. Enter the profession to associate to the group profile.
Tax Category. Select an acceptable tax category for the individual.
Tax Office. Select the tax office location for the profile.
Tax Perc1 - Tax Perc5. Enter the tax percentage in the appropriate field.
Tax Type. Select the appropriate tax type to attach to the profile.
URL Button 1 - URL Button 2. When selecting this button, the user is taken to the URL address that has been configured for the button.
Rate Code. Negotiated rate code, if any applies to this group. This information comes directly from the negotiated rate codes entered using the Neg. Rates option from the Profile screen Options menu and a maximum of 150 active negotiated rates can be assigned to a profile per property.
AR Number. When the Cashiering>Account Receivables application function is set to Y, displayed is the accounts receivable number, if one has been assigned to this individual. (Select AR>Account Maintenance to add an AR account to a profile, or use the Stats & Info tab.
Central AR No. Accounts receivable number assigned to this profile at the CRO level. (This feature is available if the OPR <version number> ORS license code is active.)
The search grid only shows profiles of the profile type currently displayed. To search for another profile of the same profile type, enter the last name or the first part of the last name in the Search Name field and select the tab key.
Options. Open the Profile Options menu.
Note: When the General> Enhanced Options Management application parameter is set to Y, you have another way of quickly accessing options without selecting the Options button to open the Options menu itself. You can press Ctrl+T to display the blue Option field. ![]()
To view all the available options in alphabetical order, scroll through the options list by selecting the Up and Down arrow keys. Press Enter to select the displayed option and open the corresponding option screen. Or, instead of scrolling through the options list, type the first three letters of the desired option. The corresponding options screen appears. (For example, type c-a-n for Cancel.)
You may also enter the first letter of the desired option and all options beginning with that letter will appear in alphabetical order as you scroll. To scroll, use the arrow keys or repeatedly press the beginning letter key. For example, if you typed a-a-a-a you might scroll through the options of Accompanying, Add on, Agent/Company, Alerts. Press Enter to open the desired option.
New. Create a new profile. The default profile type is the current profile type.
Save/OK. Select the Save button to save your changes without leaving the Profile screen. Select OK to save your changes and go to one of the following:
Search. Display the Profile Search screen to search for another profile of the same profile type as the profile displayed.
-----------------
Group profiles are created to handle group events (conventions, meetings, parties, and weddings). A group profile is distinguished from a company profile in that groups usually book for a specific time period, do not have standing rates, and do not have an ongoing relationship with the property or chain.
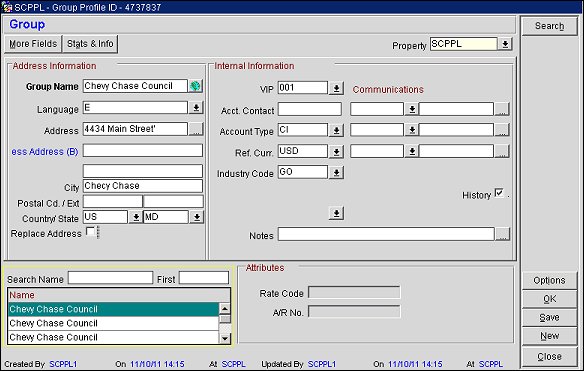
Enter demographic information about the group. You can enter multiple addresses, telephone numbers, and notes, as needed.
Group Name. Required. Enter the name of the group.
Language. Select the group's preferred correspondence language if it differs from the default language established during setup.
Address. Enter the group's address (mailing address, city, postal code, state, and country). If the group offers two or more addresses, select the Address drop down list to create multiple addresses. If multiple addresses are created you must select one as the primary. The primary address type will be displayed in parentheses below the Address label.
Telephone. Enter the group's primary telephone number. Select the Telephone drop down list to enter multiple telephone numbers. If multiple phone numbers are created, select one as the primary. The primary phone number will be displayed in this field.
Facsimile. Enter the group's fax number, if applicable.
VIP. Select a VIP code, if applicable.
Notes. Open the Comments drop down arrow to enter a comment pertaining to this group. Comments entered here are only visible when viewing the group's profile. You can enter as many notes as needed.
Ref. Curr. This signifies the currency that will be used to produce the group's billings and statements. By default, the property's default currency is initially inserted. Select an alternate currency as needed.
Acct. Contact. Enter the group's contact person.
Rate Code. Displays a negotiated rate code, if any. This information comes directly from the negotiated rate codes entered in the Rate Codes page under the Guest Info button.
A/R No. Displays the accounts receivable account number, if applicable.
Sales Mgr. Code. Open the sales manager drop down list and select a sales manager code. Sales manager codes are defined by each property or property chain.
Industry Code. Open the industry code drop down list and select an industry code. Industry codes are defined by each property or property chain.
Account Type. Open the account type drop down list and select an account code indicating the type of account this is, for example, Local Vendor, Corporate Domestic, Corporate International, etc. Account codes are defined by each property or property chain. (Account Type options are configured using Configuration>Profile>Account Types.)
Relationship Block. The relationship block is located in the center of the main Group page. This is where all relationships for this group are created and maintained.
Search Name Feature. The Search Name feature (lower left-hand side of window) is used to select other profiles within current profile type.
In the Relationships section of the main profile page, press the New button. A list of established relationships to and from the current profile type will display. If no list displays, there are no relationships setup to or from the current profile type.
In the Relationship Type box, highlight the relationship type you wish to create and press the OK button. A profile search screen will display.
The Description column describes the relationship from the perspective of the current profile type (Employer). The Relation column describes the relationship (Employee) from the opposite perspective.
Use the Profile Search screen to find the profile with whom you want to establish the relationship. OPERA automatically switches to the appropriate corresponding profile type setup when the relationship was created.
Highlight the profile and press the OK button. You will return to the main profile page from which you started and the relationship will be displayed in the Relationships section.
There is no editing of a relationship, nor do you specifically add a relationship to a relationship type (Employer - Employee). If a relationship type exists, each time you create a new Employer - Employee relationship the new profile is added to the existing Employer - Employee relationship type. A relationship type with two or more relationships has multiple relationships and is signified by a plus (+) sign next to the primary (top) relationship profile.
In the Relationships section, highlight the relationship you want to delete.
Press the Delete button. The relationship will be deleted. You will not be prompted to confirm your decision to delete the relationship.