
|
|
|
Basic Info
The first step in creating a new campaign is to enter the basic information for the campaign. This information includes the campaign code, name, begin/end date, description, target source type, category, owner and export file.
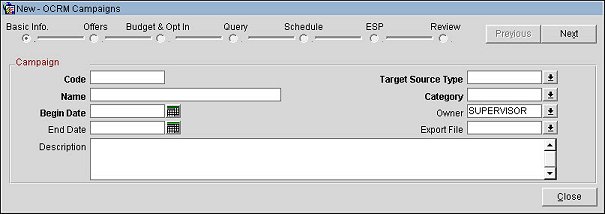
Complete the fields below and select the Next button.
Code. (read-only when editing) Enter a unique code to identify your campaign.
Name. (read-only when editing) Enter a name for the campaign.
Begin Date. (read-only when editing) Select the calendar button and choose a begin date for the campaign.
End Date. Select the calendar button and choose an end date for the campaign.
Description. Enter a description for the campaign.
Target Source Type. (read-only when editing) Select the down arrow and choose a target source type for the campaign. This is the segment or target list the campaign will target.
The following target source types are available: Segmentation (utilizes preexisting segments or ad hoc segments), Business Event (business event triggered campaigns, e.g., check in, check out, membership upgrade) and None (not targeted towards a specific segment).
Category. (read-only when editing) Select the down arrow and choose a category for the campaign. Campaign categories are user defined values that allow you to segregate campaign types into a group. See Campaign Category Configuration for information on how to configure these values.
Owner. (read-only when editing) Select the down arrow and choose an owner for the campaign. This is the OPERA user or user group who will have permission to make edits to the campaign.
Export File. (read-only when editing) Select the down arrow and choose a communication method or file format for the campaign export to the ESP. This can include the following formats: flat file, XML or CSV. See Export Files Configuration for more information on configuring export files.
Next. Select to move to the next step in the wizard.
Close. Select to exit the wizard.