
|
|
|
Routing Transactions
The routing instructions feature lets you automatically forward charges for specific transaction codes (or defined groups of transaction codes) incurred by one or more guests to another guest's bill at the time of posting. You can also automatically route a guest's charges to a specific Billing screen window, based on transaction codes (or defined groups of transaction codes). In addition, the routing instructions feature allows you to route a limited amount of the guest's charges or a percentage of the guest's charges, and to define a routing period if you would like to restrict the routing of postings to a given time-frame.
When the CASHIERING > POST STAY CHARGES application function and CASHIERING > OPEN FOLIO application parameter are set to Y, room routings and routing instructions can be set/edited to Open Folio reservations. The end date on the routing instruction for the entire stay on open folio reservations will be equal to the departure date, or if the open folio reservation was checked out before the current business date, then it will keep changing / moving to the current business date until the folio is closed. The end date for routing instructions for other dates will not move/change.
Note: For reservations that check out on the current business date and have Post-Stay Privilege selected, these reservations will appear when setting up the routing. These reservations do not need to be Open Folio reservations, as just having the Post-Stay Privilege selected will include them in the list of reservations for routing.
ORS also has routing instructions functionality, refer to ORS Routing Instructions.
Note: In a PMS and ORS environment (when the OPR<version number>ORS license code is active) routing codes can be transferred between the two programs for shared contact, company, travel agent, source, or vendor profiles (this does not apply to transaction codes - only routing codes). When a routing code is added to a profile in PMS, in ORS that same profile is updated with the routing code. Likewise, in ORS when a routing code is set for the profile, that profile in PMS will update and contain the routing code from ORS. For this process to occur, either a) identical routing codes must already be configured in both programs or b) routing code conversion codes must be set up between the two systems in OXI-HUB (Interface Conversion > Conversion Codes). If identical routing codes do not exist in both programs, or if conversion codes have not been set up, the profile will stage when the system validates the routing codes during the transfer. The profiles can be matched and merged through Profile Merge (Options > Merge) or in ORS > Suspended Profiles. When routing codes are removed from one profile (in ORS or PMS), the codes will be removed from the other profile. When routing codes are removed, the system makes them inactive and they are not visible to the user anywhere in the application.
Note: For information about manually moving transactions between Billing screen windows, see Managing the Billing Screen. For information about manually moving transactions between guest bills, see Transfer Transactions.
OPERA offers some special routing applications that are described separately in this topic:
The Routing Instructions screen is available when you select the Options button on either the guest's Reservation screen or the guest's Billing screen. From the Options menu, select the Routing button.
Note: For checked in or due in reservations that do not have any routing instructions already set up, instead of immediately displaying the Routing Instructions screen, the Routing Instructions - New screen appears, allowing you to enter new routing instructions.
If routing instructions have already been assigned to a guest, the Routing lamp displays in the lower part of the guest's Reservation screen and Billing screen. (See Indicator Lamps for details.) You may click on the Routing lamp to quickly view the Routing Instructions screen for the guest whose Reservation screen or Billing screen is currently displayed.
The Routing Instructions screen title bar shows the guest's name
Note: If the OPP_GCA Comp Accounting license is active, the guest's membership number follows the name if the guest has a membership in the membership program defined by the PROFILES > DEFAULT MEMBERSHIP TYPE application setting.
Each record in the grid describes a separate routing instruction.
![]()
You may use this screen to create new routing instructions, or to edit or delete existing routing instructions. All user activity involving routing instructions is recorded in the User Activity Log.
When the OPP_GCA Comp Accounting license is active, this screen also allows authorizers to process requests for comp routing.
Following is a description of the fields and buttons on the Routing screen.
Route to Name. The name of the guest to whom the transactions specified by this instruction are to be routed. (This is the guest's name as it appears on the reservation.) For window routing, this will be the current guest's name. For room routing, this will be the name of the guest to whom the current guest's charges are being routed.
When the OPP_GCA Comp Accounting license is active, the following information may be shown in this field:
Routing Instructions. Transaction codes and/or routing codes for the transactions to be routed by this routing instruction.
Note: Transaction Codes and Routing Codes are discussed in detail under OPERA Configuration. Routing codes simplify designating a group of transaction codes to be routed. For example, a routing code called RT might represents the transaction code for the room charge, plus the transaction code for state tax, plus the transaction code for city occupancy tax. Instead of having to select the three separate transaction codes for room and tax, you can just pick RT. You may use both routing codes and transaction codes even if some transaction codes might happen to belong to both categories. (Routing codes are set up in Configuration > Cashiering > Routing Codes for the most commonly used groups of transaction codes. When the Comp Accounting license [OPP GCA] is active, Comp Routing Codes are set up in Configuration > Comp Accounting > Comp Routing Codes.)
When the OPP_GCA Comp Accounting license is active, this field will be blank for a comp routing request ("Request" appears in the Window column). When the request is approved (window 101 through 108 is shown in the Window column), the transaction codes and/or routing codes for the comp routing instruction will appear here.
Begin Date. Begin date of the routing instruction. This routing instruction will not be effective before this date.
End Date. End date of the routing instruction. This routing instruction will not be effective after this date.
Room. Room number of the guest identified in the Route To Name field, if this is a Room routing instruction.
Win. Window number of the Billing screen belonging to the guest identified in the Route To Name field, if this is a Window routing instruction.
When the OPP_GCA Comp Accounting add-on license is active, authorized comp routing instructions show the comp window number (101 through 108) assigned by the authorizer identified in the Route To Name field. If the comp routing request has not been authorized, "Request" appears in this field.
Limit. Available when the CASHIERING > ROUTING LIMITS application function is set to Y. The maximum that can be routed by this routing instruction.
When the OPP_GCA Comp Accounting add-on license is active, this field shows the total amount that can be comped by this routing instruction. If "Request" appears in the Window column, this is a comp routing request and the Limit field will be blank. See Routing Limits for details.
Used. Amount routed by this routing instruction.
Note: A value will appear in this column only if a Limit, a Percent, or Covers has been specified for the routing instruction.
Pct. Available when the CASHIERING > ROUTING LIMITS application function is set to Y. The percentage of each transaction that will be routed by this routing instruction.
Payment. When the RESERVATIONS > PAYMENT TYPES PER WINDOW application function is set to Y, the payment types column is displayed to let the user know what payment method type is assigned to each folio window (See Multi Methods of Payment Per Reservation for details).
Payment. When the RESERVATIONS > PAYMENT TYPES PER WINDOW application function is set to Y, select this button to add/edit the payment methods for the reservation (See Multi Methods of Payment Per Reservation for details).
From. Open the Charge Routing From screen. This screen identifies guests whose charges are being routed to this guest's bill. (See Charge Routing From). This button is only available if transactions are being routed to the current guest's Billing screen from one or more other rooms.
Detail. Display the complete billing name and address associated with the target window for the selected routing instruction. This button is only available if transactions are being routed to a specific window of the current guest's Billing screen.
Delete. Delete the selected routing instruction from the existing routing instructions.
Note: When deleting or changing a window routing instruction, affected transactions will move to window 1 unless a bill that includes the transactions has already been generated for the original window.
When the OPP_GCA Comp Accounting add-on license is active, only the authorizer of a comp routing instruction may delete that routing instruction unless the COMP ROUTING OVERRIDE user permission is granted to a user. COMP ROUTING OVERRIDE permission permits the user to delete routing instructions set up by other users.
New. Display the Routing Instructions screen so that you can enter a new routing instruction. The New button is available for reserved and checked in status reservations, and for reservations that are checked out with an open folio (available when the CASHIERING > OPEN FOLIO application parameter is set to Y.) Not available for cancelled and no show reservations.
Edit. Display the Routing - Edit screen so that you can change the selected routing instructions. Since routings can only be made to checked in or reserved guests, a message prompt is displayed notifying the user that routing can't be made or edited for a reservation that has checked out.
When the OPP_GCA Comp Accounting add-on license is active, only the authorizer of a comp routing instruction may edit that routing instruction.
Close. Close the Routing screen. If you have made changes that will result in a folio being changed (for example, if you delete a window routing instruction that results in a charge being moved from window 2 to window 1) you are prompted, "Refresh folios?" Select Yes to route any existing postings according to the current routing instructions. Select No to leave existing postings as-is until the next time you respond Yes to the prompt, or until the Billing screen is re-opened.
Note: The "Refresh folios?" prompt will not appear when routing instructions are configured for room-to-room routing. A Covers routing instruction will not affect previous postings received from a POS; therefore, a refresh will not route these postings.
Note: Any postings that have been manually moved to a specific window (i.e., postings that have been moved by using drag-and-drop or by using the Transfer to Window Quick Menu option from the Billing screen) will not be automatically routed to another window when you refresh. Similarly, postings manually moved to this guest's bill (by using the Transfer button) from another guest's Billing screen will not be automatically routed when you refresh. OPERA assumes manual moves are the result of a conscious decision.
Note: If a reservation is canceled or is a no show, any routing instructions established for that reservation remain associated to it when reinstated. If the end date of any routing instructions falls outside the reservation date range, the routing instruction will be removed. But if the routing instruction is setup for the entire stay or the end date of the routing instruction falls within the date range, then the routing instruction's begin date is moved to match the new arrival date of the reservation.
The Routing Instructions screen is the starting point for creating a new routing instruction, or editing or deleting an existing routing instruction. To set up a new instruction, select the New button on the Routing screen. The Routing Instructions screen appears. In ORS, you can use routing instructions from one reservation to another reservation. These routing instructions will be transferred between ORS and OPMS through the OXI interface.
Following is a description of the fields and buttons on the Routing Instructions screen.
Room Routing/Window Routing/Request/Comp. When you set up transaction routing instructions you will be starting from a particular guest's Billing screen or Reservation screen (the screen from which you double-clicked on the Routing lamp or from which you selected the Options button). This is the "current" guest and it is your frame of reference for the routing.
You may set up one of the following kinds of routing for the current guest:
Room. Specific transactions for the current guest will be automatically routed to another guest's bill. (See Room Routing Example, below, for details.) If the guest to whom the posting is routed also has room routing instructions for that type of transaction, the posting will not be automatically routed to yet another guest.
If transactions already exist on the initial folio before the room routing was setup, only the transactions that were posted after the routing was setup will be routed. The initial transactions will remain on the initial folio.
Note: Transactions cannot be routed to a guest whose reservation status is other than CHECKED IN or DUE OUT.
Note: If a transaction is routed from one room to another room, the transaction will be recorded under the receiving room (target room). One exception to this rule is if the transaction is routed from a non-PM room to a PM room, then the transaction will be recorded under the source reservation (source room). This applies to all statistic types that are reservation specific, which is market code, source code, and rate code statistics.
Window. By default, all transactions are posted to window 1 on the guest's Billing screen. With window routing, specific transactions for the current guest will be automatically routed to a particular window within the guest's Billing screen. Up to 8 windows are available for each guest. (See Window Routing Example, below, for details.)
Note: When CASHIERING > AUTO TRANSFER GENERATES WITH MAIN and CASHIERING > ALLOW ROUTING OF TAX TRANSACTIONS application parameters are set to Y, for example if a charge is posted manually or via EOD on transaction code 1000 that has a generate on transaction code 8000, and if this reservation has a window routing only for transaction code 8000 to window 2, still the postings on 1000 and 8000 will remain together. The posting on transaction code 8000 will NOT be routed to window 2 at this time. The reason being the posting activity takes place on the main / parent transaction code 1000 and due to this the CASHIERING > AUTO TRANSFER GENERATES WITH MAIN parameter is applicable which keeps the main/ parent transactions and generates together.
If this window routing instruction is later modified and folios are refreshed, then the posting on transaction code 8000 will be routed to window 2 since now there is NO posting/ transfer/ routing activity taking place on the main / parent transaction code 1000 and due to this the CASHIERING > AUTO TRANSFER GENERATES WITH MAIN parameter is NOT applicable and only the CASHIERING > ALLOW ROUTING OF TAX TRANSACTIONS is applicable.
If later on user selects either the main / parent posting or the generate posting and transfers / drags & drop etc to another window, then again the main / parent posting and the generate postings come together since CASHIERING > AUTO TRANSFER GENERATES WITH MAIN is set to Y.
This behavior is applicable irrespective of the TAX TYPE CALCULATION setting set to PROFILE or RESERVATION.
Request. If the OPP_GCA Comp Accounting add-on license is active, this radio button is available. Select this radio button to enter a request for comp routing. (See Comp Request Routing Example, below, for details.)
Comp. If the OPP_GCA Comp Accounting add-on license is active, this radio button is available. Select this radio button to set up comp transaction routing for the guest. (See Comp Routing Example, below, for details.)
Select the radio button that corresponds to your choice.
Entire Stay/Other Dates. Specify the period during which this routing instruction will be in-effect. The default radio button selection (Entire Stay or Other Dates) is set by the CASHIERING > DEFAULT ROUTING DATES application setting (available when the CASHIERING > ROUTING LIMITS application function is set to Y). Entire Stay is the application setting default.
Days of the Week. Select the check boxes for the days of the week on which the routing instruction should be active. The default is all days of the week.
Note: Only one routing limit feature may be set up for a given date or range of dates: either a routing limit amount (entered in the Limit field), or a routing percentage (entered in the Percent field), or a number of covers (entered in the Covers field).
Routing Instructions per Day. Select this check box to generate a separate routing instruction for each day of the stay. This may be useful, for example, when you want the routing limit to apply to each day of the stay rather than to the entire stay or to a range of dates. See Routing Instructions Per Day, below, for more information. This option is available when the CASHIERING > ROUTING LIMITS application function is set to Y. The check box is selected by default if the CASHIERING > DEFAULT ROUTING INSTRUCTIONS PER DAY application setting is set to Y.
Note: If the CASHIERING > DEFAULT ROUTING INSTRUCTIONS PER DAY application setting is set to N and when setting up routing instructions you select the routing codes that are designated as Routing Instructions per Day, the Routing Instructions per Day check box on the Routing Instructions screen will automatically change from unchecked to checked because the default configuration of the routing codes has the Routing Instructions per Day check box checked. You can uncheck this check box on the Routing Instructions screen in which case only 1 routing instruction will be created.
If the CASHIERING > DEFAULT ROUTING INSTRUCTIONS PER DAY application setting is set to Y and when setting up routing instructions you select the routing codes that are not designated as Routing Instructions per Day, the Routing Instructions per Day check box on the Routing Instructions screen will not change from checked to unchecked because the CASHIERING > DEFAULT ROUTING INSTRUCTIONS PER DAY application setting is set to Y. You can still uncheck this check box on the Routing Instructions screen in which case only 1 routing instruction will be created.
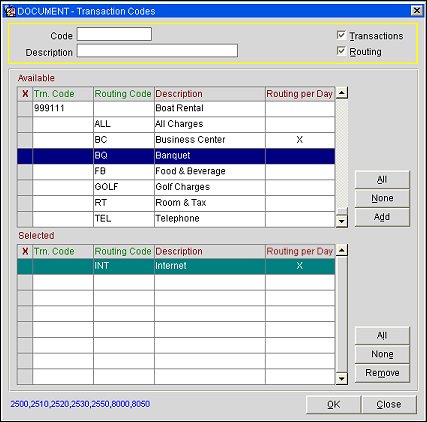
Transactions. Select the down arrow on the left side of the field or press the [F9] key to display the Transaction Codes screen. From this screen you may choose all appropriate transaction codes and/or routing codes that are to be routed. (See Transaction Code Selection for details.) If you know the transaction codes or routing codes you wish to select, you may enter a comma separated list directly into the Transactions field.
Note: The number of transaction codes that can be selected can't exceed a total of 32767 total characters.
When you select a routing code, all transaction codes (and/or other routing codes) within that routing code are chosen. When you select an individual transaction code, only that specific transaction code is chosen.
When selecting the kinds of transactions to be routed, you may use both routing codes and transaction codes even if some transaction codes might happen to belong to both categories.
Note: Only one routing instruction for any transaction code or routing code is permitted to a guest during a given time period.
When you have made your choices, select OK to return to the Routing Instructions screen.
Note: If you select all transaction codes or all routing codes by choosing the All button on the Transaction Code selection screen, or if you select all transaction codes by entering the asterisk (*) routing code in the Transactions field on the Routing Instructions screen or by selecting the asterisk (*) routing code on the Transaction Code selection screen, you may not use the routing limits feature. The Limit, Percent, and Covers fields will be unavailable on the Routing Instructions screen. (For information on setting up the asterisk (*) routing code, see Routing Codes.)
Limit/Used. (This field is available when the CASHIERING > ROUTING LIMITS application function is set to Y. See Routing Limits for details.) In the Limit field, enter the maximum amount you wish to allow to be routed. Leaving this field blank allows unlimited routing. The Used field (view only) will show the actual amount routed by this instruction.
Note: If the guest already has charges posted against one or more of the transaction codes being routed, the limit may not be set lower than the total amount of those charges. If a lower amount is specified in the Limit field, it will automatically be set to the amount of the existing charges.
Note: Routing limits do not consider generates (e.g., taxes, service charges). The routing limit applies only to the specified transaction codes.
Note: Routing limits may not be specified for "wrapper" transaction codes, or package transaction codes. The package transaction code is used at the rate code level to "hold" the room revenue transaction code plus one or more packages, which themselves may be comprised of one or more transaction codes representing the goods and services included in the package. The total amount of a transaction included in a wrapper will be routed, regardless of the limit. The amount transferred will not be considered in the Used total.
If a posting exceeds the remaining approved limit for a routing instruction, OPERA splits the posting. The portion of the transaction covered by the limit is sent to the window identified in the routing instruction, while the overage is posted to the originating charge window. This applies to manual postings, end-of-day postings, and advance bill postings.
For example, assume a routing instruction for routing code RM (transaction codes 1000, 1010, 1020), with a limit of 500, to window 2. A posting is made to transaction code 1010 in window 1 for 600. In this case, 500 goes to window 2, and 100 goes to window 1.
Note: When the CASHIERING > ROUTING LIMITS application function is set to Y, and existing routing instructions are modified (e.g., the limit is increased or decreased), OPERA will not refresh/move any new transactions to the target windows identified by the routing instructions.
For example, assume window 2 has a limit of 500 for transaction code 2000. Also assume that 500 is already posted for transaction code 2000 to window 2. If another 200 is posted to transaction code 2000 for this guest, it is sent to window 1 because the routing limit has been reached for window 2.
If you subsequently edit the Routing Instruction to increase the routing limit to 600, OPERA will not automatically move 100 more to window 2 when the folios are refreshed. You can, however, manually transfer 100 to window 2.
Percent/Used. This field is available when the CASHIERING > ROUTING LIMITS application function is set to Y. Use this field to route a percentage of the transactions associated with this routing instruction. For example, enter 10 in this field to route 10% of each transaction. Generates such as taxes and service charges are also split by the designated percentage. The Used view-only field shows the amount (if any) the guest has already charged that is associated with the transaction codes and/or routing codes you have selected for this instruction.
Covers/Used. This field is available when the CASHIERING > ROUTING LIMITS application function is set to Y. For interface (e.g., POS) postings only. Specify the number of covers the value of which is to be routed by this routing instruction.
When charges are made via an interface against any of the transaction codes included by the routing instruction, OPERA divides each charge by the number of covers specified by the interface. If the number of POS covers is greater than or equal to the number of covers specified here on the routing instruction, the per-cover charge is multiplied by the number of covers on the routing instruction and that amount is routed. If the number of POS covers is less than the number of covers on the routing instruction, the charge will not be routed. See Routing Limits for details.
A "wrapper transaction code" is a transaction code that belongs to a transaction group/subgroup which has a Wrapper designation (see Transaction Groups for details). The wrapper transaction code may then be chosen during rate setup to represent any packages that are included in the room rate. Because the room rate may include a variety of packages and package groups, each having their own transaction codes, the Wrapper transaction code may come to represent a number of different transaction codes.
Because of this complexity, you are not allowed to set routing limits on a routing instruction that involves a wrapper transaction code. If you select a wrapper transaction code when setting up a routing instruction, the Limits, Percent, Covers and Used fields become unavailable. In addition, a message appears when you tab from the Transactions field if you have selected a Wrapper transaction code, even if there are other standard transaction codes selected as well. The message informs you: "Routing Limit is not allowed for Wrapper transaction codes."
Which other fields appear on the Routing Instructions screen depends on the type of routing (Room, Window, Request, or Comp) as indicated by the radio button selected at the top of the screen. These variable fields are described in the examples that follow.
Note: When you edit a routing instruction (for example, by highlighting a routing instruction on the Routing screen and selecting the Edit button), you will notice that the Routing Instructions screen appears, but with a new title that reflects the type of routing instruction. For room routing instructions, the title will be Room Routing - Edit; for window routing instructions, the screen will be titled Window Routing - Edit; and so on.
Rob Stinson wants to route all his phone (TEL routing code) charges and fax (transaction code 3000) charges to Russell Peters in Room 109, up to a limit of 300.
To set up this routing, access Rob Stinson's Billing screen and select Routing from the Options button menu. The Routing screen appears. Select the New button to set up a new routing instruction for Stinson. The Routing Instructions screen appears. Select the Room radio button.
The following fields appear on the Routing Instructions screen when you have chosen to set up room routing.
Route to Room. Select the down arrow or press the [F9] key to display the Charge Routing Select Guest screen. Select the guest bill to which you want to route charges. See Charge Routing Select Guest for details on using this screen.
Status. Charges can be routed only to guests whose reservation status is Reserved, Checked In or Due Out. The reservation status of the target room appears in this field.
Edit this screen as follows:
Select the OK button to save your changes.
When you return to the Routing Instructions screen, the routing instructions look like this:
![]()
Now all Rob Stinson's transactions belonging to the TEL routing code and to transaction code 3000 will be automatically routed to Russell Peters.
When the OPP_GCA OPERA Gaming license is active, the situation might exist where charges are routed from one room to another and the target room has comp routing set up for it (see Routing Comp Transactions, below). If any of the routed transactions are authorized comp transactions for the target room, the COMP ACCOUNTING > AUTOMATE COMP ROUTING FOR ROOM ROUTED CHARGES application parameter determines whether the transactions will go to a comp window for the receiving room. If the parameter is set to N (the default), the charge will not be routed to a comp window; if the parameter is set to Y, charges from another room will automatically go to a comp window for the target room when comp routing instructions exist for these transactions.
Russell Peters wants all phone (TEL routing code) charges to go to his window 2.
To set up this routing, access Russell Peters' Billing screen and select Routing from the Options button menu. The Routing screen appears. Select the New button to set up a new routing instruction for Peters. The Routing Instructions screen appears. Select the Window radio button.
The following new fields appear on the Routing Instructions screen when you have chosen to set up window routing.
Name. By default, the name of the current guest appears in this field. To change the Route To Name, select the down arrow or press the [F9] key to display the Profile Search screen. (See Profile Search for details.) You may also type the name directly into the field, last name first. You might, for example, select the travel agent or company associated with this guest profile. This name shows as the payer above the window and OPERA prints this name on the folio when you print this window.
Note: If the profile selected has multiple addresses, the following prompt appears: "Multiple addresses exist for the profile selected. Please select an address." The Address Details screen appears, allowing you to choose the address you wish to use.
Address. The billing address for the guest selected in the Name field. Multiple addresses may be available for a guest profile. If only a single address is available for the guest, that address will appear in the Address field by default when you tab to the field. If multiple addresses exist for the guest you selected in the Name field, a message will prompt you to choose a billing address. To choose an address, select the down arrow or press the [F9] key to display the Address Details screen. Use the Address Details screen to select the address to be associated with the window to which transactions are being routed. (See Address Details for further information.) OPERA prints this address on the folio when you print this window.
Window No. From the LOV, choose the number of the window to route charges to for the selected transactions. If the window you select does not already exist, it will be added to the guest's Billing screen. (Window 1 is not shown because it is the default. All transactions routed to the current guest go to window 1 unless routing instructions have been set up to change this.) When a reservation has a room routing for all charges to go to another room and the user is positioned and posts on window 2 of the room where the routing is set up, the charge is routed and posted on window 2 of the room routed.
Account Number. If an AR Account Number exists for the Name/Address that is being routed to, then this number will automatically be populated in this field. If the correct AR Account Address is not displayed in the Address field, the select the down arrow by the address field and drill down to the correct address.
Edit this screen as follows:
Select the OK button to save your changes.
When you return to the Routing Instructions screen, the routing instructions look like this:
![]()
A telephone posting to Rob Stinson is automatically routed to Russell Peters, where it is placed in window 2. The Reference notation reads: "Routed From Stinson, Rob of Room #107".
![]()
All Guests in Group Routing for Business Blocks and Component Groups
When setting up routing for reservations belonging to business blocks or component groups, the Apply Changes screen prompts you to indicate how you wish to apply the routing you have configured (e.g., to This Guest Only, to All Guests in the Group, to Selected Guests, etc.). Should you apply the routing to All Guests in the Group, the following describes the result:
If the default name in the Name field on the Routing Instructions screen (the name on the current reservation) is not changed to the name of another guest: Each of the reservations to which the window routing is copied will show the name of the guest to whom the reservation belongs as the payer of the window. For example, if routing to window 2 is set up for the reservation belonging to John Doe, and the default name DOE, JOHN is not changed in the Name field on the Routing Instructions screen, the reservation for John Doe will show John Doe as the payer for Billing screen window 2. The reservation for Jane Smith, which also belongs to the block, will show Jane Smith as the payer for Billing screen window 2, and so forth. Be aware that future reservations for the block will show the PM reservation as the payer for window 2 because the PM reservation is used as the template for new reservations.
If the name in the Name field on the Routing Instructions screen is changed to the name of another guest: Each of the reservations to which the window routing is copied will show the name of the guest selected in the Name field as the payer of the window. For example, if routing to window 2 is set up for the reservation belonging to John Doe, and the name SMITH, JANE is selected in the Name field on the Routing Instructions screen, the reservation for John Doe will show Jane Smith as the payer for Billing screen window 2. The reservation for Jane Smith, which also belongs to the block, will show Jane Smith as the payer for Billing screen window 2, and so forth. Be aware that future reservations for the block will show Jane Smith as the payer for window 2 because the PM reservation is used as the template for new reservations.
Room routing instructions are copied to all reservations belonging to the block or group (excluding the target reservation selected in the Route To Room field on the Routing Instructions screen). For example, if routing to room 300 DOE, JOHN, is set up from any block or group reservation, the room routing is set up for all other reservations, except John Doe's. Because the PM reservation is used as the template for new reservations, the room routing will be automatically copied to new reservations.
If routing to the PM room is set up from any block or group reservation, the room routing is set up for all other reservations, except the PM room. Because the PM reservation is used as the template for new reservations, the room routing will not be automatically copied to new reservations. If there are two PM rooms, you may set up routing to the secondary PM room in which case the room routing is copied to the primary PM reservation and will be automatically copied to new reservations.
Routing instructions may be associated with a company profile, source profile, agent profile, or contact profile. When any of these profiles is attached to a reservation, any charges posted to the transaction codes covered by the selected company, agent, source, or contact routing instructions can be automatically routed to a separate Billing screen window and printed on a separate folio. This feature is often used when the company, agent, source, or contact routinely pays for certain kinds of guest charges. (See Profile Screen More Fields Tab for details on setting up default routing instructions for a company, agent, contact, or source.)
Note: In a PMS and ORS environment (when the OPR<version number>ORS license code is active) routing codes can be transferred between the two programs for shared contact, company, travel agent, source, or vendor profiles (this does not apply to transaction codes - only routing codes).
When a routing code is added to a profile in PMS, in ORS that same profile is updated with the routing code. Likewise, in ORS when a routing code is set for the profile, that profile in PMS will update and contain the routing code from ORS. For this process to occur, either a) identical routing codes must already be configured in both programs or b) routing code conversion codes must be set up between the two systems in OXI-HUB (Interface Conversion > Conversion Codes).
If identical routing codes do not exist in both programs, or if conversion codes have not been set up, the profile will stage when the system validates the routing codes during the transfer. The profiles can be matched and merged through Profile Merge (Options > Merge) or in ORS > Suspended Profiles. When routing codes are removed from one profile (in ORS or PMS), the codes will be removed from the other profile. When routing codes are removed, the system makes them inactive and they are not visible to the user anywhere in the application.
When default routing instructions are associated with a company, source, agent or billing contact profile, you are given an opportunity to accept the default routing instructions when the profile is attached to the reservation. (See Reservations - Attaching Default Routing Instructions for details.)
When the company, agent, source, or contact routing instructions are accepted for the guest, the routing codes or transaction codes associated with the routing instructions will be displayed on the guest's Routing Instructions screen (assigned to window 2 by default). To access the Routing screen, select the Routing button from the Billing screen Billing Options menu. You may edit these routing instructions as necessary.
![]()
When a posting is made to any of the transaction codes covered by the company, contact, agent, or source routing instructions, those postings will be automatically routed to the payer's window on the guest's Billing screen.
![]()
When shares are established (see Shares for details), one of the sharing guests may be designated as the "primary" sharer. This arrangement is sometimes described as a "perfect" share. (The primary sharer is identified by a (P) in front of his or her name on the In House Search screen, the Billing screen, and the Reservation Search screen.)
All POS charges and all automatic charges posted during Night Audit (for example, room and tax, fixed charges such as a parking fee, and package charges included in the room rate) are routed to the Billing screen of the primary sharer. The primary sharer is the only guest to whom charges may be manually posted. (The Post button on the Billing screen is grayed out for all sharers except the primary.) Routing instructions defined on the non-primary sharers' Setup Routing Code screens cannot be edited or deleted.
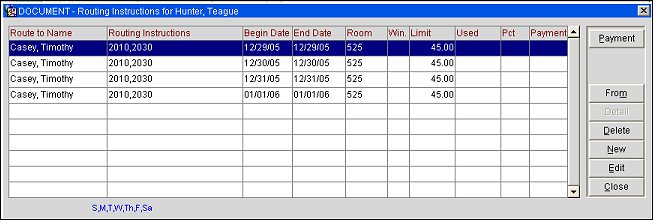
It is sometimes desirable to apply routing limits to a reservation so that the limit is applied to each day individually, rather than to the stay as a whole or to a range of stay dates. The Routing Instructions per Day feature provides an easy way to do this. (This feature is available when the CASHIERING > ROUTING LIMITS application function is set to Y.)
For example, assume a guest will be with the hotel 4 days and you wish to set up a routing limit of 45.00 per day. You could do this by manually setting up 4 separate routing instructions — one for each day. The Routing Instructions per Day feature, however, saves you a lot of work.
Select the Routing Instructions per Day check box on the Routing Instructions screen.
On the Routing Instructions list screen for the guest a separate routing instruction entry automatically appears for each day of the guest's stay. Each day of the stay has a 45.00 routing limit.
When configuring routing instructions using this feature, keep the following in mind when choosing the transaction codes and routing codes to be routed:
If you attempt either of the above, you will be prompted: "Routing code(s) marked as 'Routing Instructions per Day' cannot be combined with other routing code(s) not marked as 'Routing Instructions per Day' or other transaction code(s)."
The Routing Per Day column on the Transactions Codes selection screen will display an X if the routing code has the Routing Instructions per Day option selected (see Routing Codes for details on routing code configuration).
Note: Comp transaction routing is available if the OPP_GCA Comp Accounting add-on license is active.
Comp Accounting allows the property to provide complimentary goods and services (called "comps" or "comp transactions") to guests by routing selected transaction codes to special Billing screen windows called "comp windows." There are 8 comp windows available on the Billing screen (101 through 108); they are accessible only when the Comp Accounting add-on license is active. Designated staff members called "authorizers" can OK comps by transferring or routing the selected transactions to the comp windows on a guest's Billing screen. (See Setting Up Authorizers for details on configuring employees as authorizers.) When routing charges to a comp window, for example, the user will be prompted with the following screen to validate the authorizer:
Authorizer. Based on the transaction code or routing code that is being turned over to a comp, only authorizers that have been configured to authorize that specific code are displayed here. Select the down arrow to choose a different authorizer from a list of values.
Member No. Displayed only when the COMP ACCOUNTING > GENERIC COMP MEMBER NO application parameter is active, select the ellipsis button to change this number to a generic member number. Defaulted to the member number that is attached to the reservation, only generic profiles that have a member number equal to the member type defined in the COMP ACCOUNTING > PTS MEMBERSHIP TYPE can be used as generic.
Upon guest check out, comp transactions that have been posted to any of the comp windows and approved by the PTS if the OPERA Gaming Interface is active can be automatically transferred to special AR accounts which are attached to the profiles of the authorizers. Thereafter, the AR accounts are handled using OPERA AR features according to the procedures the property has established. Authorizers may set up comp routing by selecting the Comp radio button on the Routing Instructions screen. (See Comp Routing Example, below.)
OPERA users who are not themselves authorizers can create requests that comp routing be set up for guests. They can also enter requests for comp routing that have been received from other staff members such as managers or hosts who may not necessarily be OPERA users. Such comp requests are entered via the Routing Instructions screen by selecting the Request radio button. (See Comp Routing Request Example, below.) Requests for comp routing can be turned into routing instructions in either of two ways, both of which require authorizer permission.
OPERA users who are designated as authorizers may set up comp routing instructions for guests by using the Routing Instructions screen. (Authorizers may also use this screen to approve comp routing requests that have been input by other OPERA users. See Comp Routing Request Example, below.)
Note: Authorizers are designated using Configuration > Comp Accounting > Authorizers (see Configuring Authorizers). Prior to being designated as an authorizer, the OPERA user may have a comp transaction AR account attached to their profile (AR > ACCOUNT MAINTENANCE); or, a comp transaction AR account may be created during authorizer configuration. The comp transaction AR account must have the account type specified by the COMP ACCOUNTING > AUTHORIZER AR TYPE application setting. Authorizers will also need user permissions appropriate to the Comp Accounting features to which they are granted access.
In this example, you wish to set up a comp routing instruction for guest Jason McCord to include greens fees and cart charges (transaction codes 5000 and 5010).
From McCord's Billing screen Options menu, select the Routing button. The Routing screen appears. Select the New button to display the Routing Instructions screen. Select the Comp button on the Routing Instructions screen.
The following new fields appear on the Routing Instructions screen when you have chosen to set up Comp routing.
Entire Stay/Other Dates/Days of Week. Specify the dates during which this routing instruction will be in-effect.
Entire Stay. By default, the Entire Stay radio button is selected and the routing instruction will be in-effect for the entire stay of the current guest. The start date and end date of the guest's stay are shown in the Begin Date and End Date fields. These fields cannot be edited.
Other Dates. To restrict the transaction routing to a certain range of dates during the guest's stay, select the Other Dates radio button. The Begin Date and End Date fields are now editable. Use the calendar tools to select the begin date and end date for the effective date range. The dates you select must be within the range of dates for the guest's entire stay. Also, use the Other Dates option to setup daily routing instructions and routing limits for a reservation.
Days of the Week. Select the check boxes for the days of the week on which the routing instruction should be active. The default is all days of the week.
Note: Only one routing limit feature may be set up for a given date or range of dates: either a routing limit amount (entered in the Limit field), or a routing percentage (entered in the Percent field), or a number of covers (entered in the Covers field).
Authorizer. Select the down arrow to display a list of Authorizers. Choose the authorizer who is creating or approving this Routing Instruction.
Note: Once you OK this comp routing instruction, it will be possible to change the authorizer on the routing instruction only for dates on which no transactions were routed using this instruction.
Account Number. The AR account number attached to the authorizer selected in the Authorizer field appears here. This field may not be edited.
Membership No. Displayed only when the COMP ACCOUNTING > GENERIC COMP MEMBER NO application parameter is active, select the ellipsis button to change this number to a generic member number. Defaulted to the member number that is attached to the reservation, only generic profiles that have a member number equal to the member type defined in the COMP ACCOUNTING > PTS MEMBERSHIP TYPE can be used as generic. If charges already exist on the comp window, then no modifications can be made to the membership number/player card number. This is also true for the business event that is sent to the gaming system in that the generic member number that is attached to the window is sent and if a generic member number does not exist, then the reservation number is sent.
Transactions. Select the down arrow or press the [F9] key to display the Transaction Codes screen. From this screen you may choose all appropriate transaction codes and/or comp routing codes that are to be routed by this instruction. In ORS, only routing instructions will be available for selection from the list of values.
Note: The Transaction Codes screen shows only comp routing codes, and transaction codes that are linked to comp transaction codes . Furthermore, only comp routing codes and transaction codes associated with the authorizer identified in the Authorizer field are listed.
When you select a routing code, all transaction codes within that routing code are chosen. When you select an individual transaction code, only that specific transaction code is chosen. When you have made your choices, select OK to return to the Routing Instructions screen.
Note: When selecting the kinds of transactions to be routed, you may use both routing codes and transaction codes even if some transaction codes might happen to belong to both categories. However, only one routing instruction for any given transaction code or routing code is permitted to a guest during a particular time period.
Note: When a comp routing instruction is set up using a comp routing code that is flagged as Inherit Authorizer Rate Code to Reservation (see Comp Routing Codes for details), and the authorizer has a default rate code selected in his or her configuration (see Authorizers for details), the authorizer's rate code may be propagated to the reservation. If the authorizer's rate code is different from the rate code already attached to the reservation (or if the reservation has no rate code attached), a message asks if you want to attach the authorizer's rate code to the reservation. Select Yes to attach the authorizer's rate code to the reservation for all days of the stay. Select No to leave the rate code as is.
Window No. Select the down arrow to choose the comp window to which the transactions will be routed.
Comp window 101 is designated as a "default" comp window and it cannot be deleted if at least one charge has been routed or transferred to any of the comp windows.
Example 1
Create a reservation with comp routing for transaction code 1000 to comp window 101. Manually post a charge to transaction code 1000. The charge is automatically routed to window 101. Manually move this charge to window 1 (internally this creates a negative charge on window 101). Now focus on window 101 where there are no longer any charges shown. Right click and notice that the Delete window option is not available. Window 101 cannot be deleted because of the negative internal charge associated with it.
Example 2
Create a reservation with comp routing for transaction code 1000 to comp window 102. Manually post a charge to transaction code 1000. The charge is automatically routed to window 102. (This action automatically creates window 101 as well.) Manually move this charge to window 1 (internally this creates a negative charge on window 102) although there will no longer be a charge showing in this window because it has been moved to window 1. Now focus on window 102; right click and delete the window by selecting the Delete window option. Window 102 will be deleted and the internal negative charge on window 102 is moved to window 101. Window 101 cannot be deleted because of the negative internal charge now associated with it.
Comp/Coupon No. Enter an identifying number for comps or coupons; when a charge is posted for this routing instruction, the number can be used to identify the charge on the guest's folio. In addition, the patron tracking system (PTS) can post against this number if the OPERA Gaming Interface license (e.g., OPX_BALL, OPX_ACRS, and others) is active.
Note: Only one routing limit feature may be set up for a given date or range of dates: either a routing limit amount (entered in the Limit field), or a routing percentage (entered in the Percent field), or a number of covers (entered in the Covers field).
Limit/Used. Available when the CASHIERING > ROUTING LIMITS application function is set to Y (the default when the Comp Accounting OPP_GCA license code is active). In the Limit field enter the total amount that you wish to comp for the transaction codes and/or routing codes selected in the Transactions field. The Used view-only field shows the amount (if any) the guest has already charged that is associated with the transaction codes and/or routing codes you have selected for this comp instruction.
The amount entered in the Limit field may not exceed the per-instance credit limit on the transaction code or codes configured for the authorizer who is approving this routing instruction. The authorizers limit for the selected transaction codes appears in this field by default. The Limit amount may be set lower than the authorizers per instance credit limit, but may not go over it. (See Configuring Authorizers.)
When charges for which a comp routing instruction applies are made to the guests bill, the comped amount is automatically transferred to the comp window identified by the comp routing instruction. Should the charge exceed the amount specified by the Limit field on the Routing Instructions screen, the overage will automatically be routed to the guests window 1 (also called the cash window).
See Auto-Splitting of Comp Charges, below, for additional details.
Percent/Used. Available when the CASHIERING > ROUTING LIMITS application function is set to Y (the default when the Comp Accounting OPP_GCA license code is active). Use this field to comp a percentage of the transactions associated with this routing instruction. For example, enter 10 in this field to comp 10% of each transaction. Generates such as taxes and service charges are also split by the designated percentage. The Used view-only field shows the amount (if any) the guest has already charged that is associated with the transaction codes and/or routing codes you have selected for this comp instruction.
Note: If a routing Percent is entered (rather than a Limit amount), the authorizer's per-instance limit is ignored. For example, assume comp routing is set up for transaction code 2000 and that the authorizer's limit for this transaction code is $100. Also assume that the routing Percent is set at 50%. If $400 is posted to the guest's bill, $200 will be sent to the comp window specified by the routing instruction.
Covers/Used. This field is available when the CASHIERING > ROUTING LIMITS application function is set to Y. For interface (e.g., POS) postings only. Specify the number of covers the value of which is to be routed by this routing instruction.
When charges are made via an interface against any of the transaction codes included by the routing instruction, OPERA divides each charge by the number of covers specified by the interface. If the number of POS covers is greater than or equal to the number of covers specified here on the routing instruction, the per-cover charge is multiplied by the number of covers on the routing instruction and that amount is routed. If the number of POS covers is less than the number of covers on the routing instruction, the charge will not be routed.
Requested. When converting a comp request to a comp instruction, the requester's name appears here. If the authorizer has initiated the comp instruction, this field is not available.
Comp Type. Available when the COMP ACCOUNTING > COMP TYPES application function is set to Y. Select the down arrow to choose a comp type. The comp type may be used to rank guests, for example on gaming expertise. Once a comp type has been associated with a comp window, the comp type displays as a tool tip when the cursor is passed over the comp window tab.
Comments. When converting a comp request to a comp instruction, the requester's comments appear here. If the authorizer has initiated the comp instruction, this field is not available.
Edit this screen as follows:
Select the OK button to save your changes. You are prompted to enter your authorizer password. Enter the password and select OK to create the comp routing instruction.
Note: An authorizer password is not required if the COMP ACCOUNTING > AUTHORIZER PASSWORD REQUIRED application parameter is set to N.
When you return to the Routing Instructions screen, the routing instructions look like this:
![]()
Note: When the OPP_GCA Comp Accounting license is active, the guest's membership number follows the name if the guest has a membership in the membership program defined by the PROFILES > DEFAULT MEMBERSHIP TYPE application setting.
Note: For properties where the COMP ACCOUNTING > GENERIC COMP MEMBER NO application parameter is set to Y, membership numbers that are not equal to that of the reservation may be added to the Routing Instructions. When this is done, the Routing Instructions screen will display the membership number that is attached to the routing instruction in the bottom left corner in blue. This will only be displayed for comp routing instructions.
If a comp posting exceeds the remaining approved limit for a routing instruction, OPERA splits the posting. The portion of the transaction covered by the limit is sent to the comp window identified in the routing instruction, while the overage is posted to the originating charge window. This applies to manual postings, end-of-day postings, and advance bill postings.
For example, assume a routing instruction for routing code RM (transaction codes 1000, 1010, 1020) with a limit of 500 to window 101. A posting is made to transaction code 1010 in window 1 for 600. In this case, 500 goes to window 101, and 100 goes to window 1.
Note: When the CASHIERING > ROUTING LIMITS application function is set to Y, and existing routing instructions are modified (e.g., the limit is increased or decreased), OPERA will not refresh/move any new transactions to the comp window or vice versa.
For example, assume window 101 has a limit of 500 for transaction code 2000. Also assume that 500 is already posted for transaction code 2000 to window 101. If another 200 is posted to transaction code 2000 for this guest, it is sent to window 1 because the routing limit has been reached for window 101. If you subsequently edit the Routing Instruction to increase the routing limit to 600, OPERA will not automatically move 100 more to window 101 when the folios are refreshed. You can, however, manually transfer 100 to window 101.
The comp routing request feature allows staff members who are not themselves authorizers to request comp routing for guests. The request can then be evaluated by an authorizer who may implement the requested comp routing.
Property Host Patrick Ross wishes to request a comp for Jason McCord, a regular guest who is celebrating a birthday. (The requester may or may not be an OPERA user. In this case, OPERA user Patrick Ross is inputting the request for himself. He is an OPERA user but is not designated as an authorizer.)
From the main OPERA menu bar, Patrick Ross selects COMP ACCOUNTING > COMP ROUTING. The Comp Routing screen appears. He highlights guest McCord's record and selects the Edit button to display the Routing Instructions for McCord. Then he selects the New button to display the Routing Instructions - New screen for Jason McCord. To make a comp request, he selects the Request button on the Routing Instructions screen.
The following new fields appear on the Routing Instructions - New screen when you have chosen to request comp routing.
User. The name of the currently logged in OPERA user. This is a view-only field provided for your information.
Requested. Enter the name of the person requesting the comp. The requester may or may not be the user.
Comments. Enter any relevant comments here. For example, you may wish to enter the phone number, department, or other information for the person requesting the comp. The requesting person may also wish to suggest the type of comp. The comments entered here will be displayed on the Comp Routing screen when this request is highlighted on that screen.
The user edits this screen as follows:
Ross selects the OK button to save his changes.
When he returns to the Routing Instructions screen, the routing request looks like this:
![]()
The request has a REQ in the Code field on the Comp Routing screen (COMP ACCOUNTING > COMP ROUTING). (Notice that the Request check box must be selected to display comp requests.)
![]()
Now assume that you are the authorizer who evaluates comp routing requests. From the Comp Routing screen (COMP ACCOUNTING > COMP ROUTING) you highlight Patrick's request and select the Edit button. The Routing Instructions screen for guest McCord appears. Highlight the request and select Edit to display the Routing Request - Edit screen.
The authorizer may create a routing instruction for the request, or decline the routing request. After reviewing the request you decide to approve it and create the routing instruction. To do so, select the Comp radio button. When you do so, the Decline button disappears; several new fields appear, prompting you for additional information. (See Comp Routing Example, above, for an explanation of these fields.)
Edit this screen as follows:
Select the OK button to save your changes. You are prompted to enter your authorizer password. Enter the password and select OK to create the comp routing instruction.
Note: An authorizer password is not required if the COMP ACCOUNTING > AUTHORIZER PASSWORD REQUIRED application parameter is set to N.
To decline a comp routing request, select the Decline button on the Routing Request - Edit screen. This action is not reversible.
Show Me
See Also
|