
|
|
|
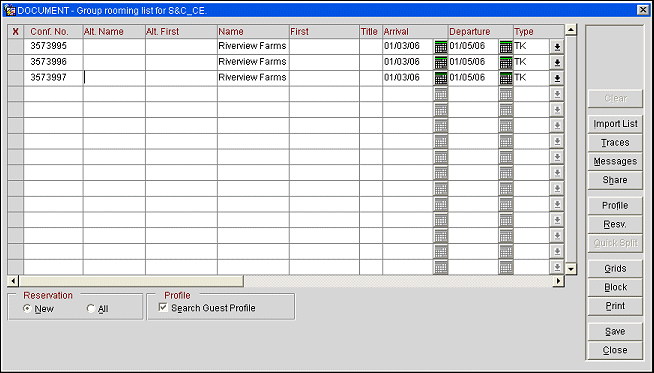
Group Rooming List
The Reservations>Component Groups>Group Options>Rooming List option is used to split the posting master (PM) reservation into individual reservations, to make changes to individual reservations, to apply messages for group members, and adjust necessary share-with changes required by a group. The Group Rooming List option is also available via Reservations>Business Blocks>Edit>Resv.>Group Options.
Note: When the Group Rooming List screen is accessed via the Rooming List button from the Quick Business Block screen, an abbreviated version of the screen appears. See Quick Business Block Family Block, below.
New and All Views
The Group Rooming List has two "views" — New and All — which are controlled by the New and All radio buttons in the lower screen. New is used for creating new reservations for the booking by either splitting the posting master or by creating new individual reservations. You can also create shares while you are making new reservations for the booking. All allows you to see all reservations that have been made for the booking.
Note: When the All radio button is selected on Past Blocks the following message displays:
Search Guest Profile Option
Select the Search Guest Profile check box to validate that each reservation that is made from this screen (either manually entered or created through Quick Split) has an existing profile prior to the reservation details being entered.
The following fields are shown on this screen.
X. An X in this field indicates that the reservation has been selected for some action, such as when you create a share.
Conf. No. Confirmation number.
Name. Group or block name, or guest last name.
Note: When profiles in a rooming list block are processed, the profiles are usually staged (Suspended Profiles) in ORS, caused by the profiles not having an Address or Phone Number. To identify the new profile created through the Block Rooming List, the profile is automatically flagged with a 'Y' in the PSEUDO_PROFILE_YN column in the Name Table. These profiles are called Pseudo Profiles. The PSEUDO PROFILE check box is selected by default when the profile is viewed on the Suspended Profiles screen in ORS. Users in ORS have the option to unselect the PSEUDO PROFILE check box and add additional profile information Centrally.
First. Reservation first name.
Alt Name and Alt First. The guest's alternate (extended-byte) last and first names. Available if the General>Alternate Name application function is set to Y.
If the General>Alternate Name application function is set to Y, multiple-byte character sets may be used to enter names in languages that require extended-byte (for example, Chinese). The Alt. Name and Alt. First fields appear if the General>Alternate Name application function is set to Y. If the General>Auto Alternate Name Translate application parameter is also set to Y, the Alt. Name and Alt. First fields will appear immediately following the Conf. No. field and before the Name and First Name fields. In addition, the corresponding Name and First fields will autopopulate with the guest's last name and first name in English characters as defined using character conversion (Configuration>Profiles>External IFC>Character Conversion). If character conversion has not been properly configured, when entering the Alt. Name and Alt. First fields, the Name and First fields will not automatically populate.
When using the Import List button option, if names were entered into the list using the guestLastAlternateName and guestFirstAlternateName fields, saving the list will autopopulate the names in English characters in the Name and First fields.
If the General>Auto Alternate Name Translate application parameter is set to N, the Name and First fields will appear immediately following the Conf. No. field and before the Alt. Name and Alt. First fields.
Title. Guest title.
Arrival. Guest arrival date. The block start date is shown by default.
Departure. Guest departure date. The block end date is shown by default.
Note: When changing the dates/rates of a block reservation that does not have a rate code defined, the message prompt "Rate for reservation should be XXX. You are charging XXX. Do you want to update the rate to XXX?" Answering No does not update the rate for the block reservation and the rate amount on the reservation remains the same and does not repopulate from the rate amount defined on the block grid. But answering Yes will update the rate for the reservation.
Type. Select the down arrow to choose a room type from the Room Grid screen.
Note: When the Reservations>Do Not Move Room application function is set to Y, changing the room number for reservations that have not yet checked in can be prevented by selecting the DNM check box on the Reservation screen. If this is the case for the reservation, the Room field and the Type field are disabled.
Change of Room Type to Charge. When the Reservation>Room Type to Charge application parameter is set to Y, OPERA implements the addition of the RTC field on the Reservation screen. By using this field it is possible to have the reservation be inventoried on one room type, but charged as if it was another room type (the room type specified in the RTC field). When you move a guest's reservation to a room which has a different room type, a prompt appears: "Room type has been changed to <new_room_type>. Do you want to change RTC to <new_room_type>?" Respond Yes to continue with the move and change the RTC to the new room type (Yes is the default). Respond No to continue with the move without changing the RTC from what appears on the Reservation screen. This feature is available only if the RTC on the Reservation screen matches the room type shown on the reservation prior to the move.
Rms. Number of rooms. This column will not display when the Reservations>Room Limit Per Reservation application setting is set to 1 and the Reservation>Shares application function is set to N.
Adult. Number of adults attached to the reservation.
Child. Number of children attached to the reservation. If child age rate buckets are defined, you may select the ellipsis button to designate age rate buckets for the children attached to the reservation.
Room. Select the Ellipsis button to go to the Available Room Search screen to choose a room. The Room field is also available in ORS/SFA when the property is live in the ORS/SFA environment with an active PMS license. The logged in user must have the permission Blocks>ROOM ASSIGN.
Note: When the Reservations>Do Not Move Room application function is set to Y, changing the room number for reservations that have not yet checked in can be prevented by selecting the DNM check box on the Reservation screen. If this is the case for the reservation, the Room field and the Room Type field are disabled.
Rate Code. Select the down arrow to choose the rate code for this reservation.
Comments. Select the ellipsis button to add Reservation Comments to this reservation.
Specials. Select the down arrow to choose the specials to be attached to this reservation.
Packages. Select the down arrow to display the Packages screen. This screen lists any packages associated with the reservation, either attributable to the rate code that has been selected or added separately to the reservation. When a package is configured as part of the rate code, the rate is inclusive the package price is included in the rate. Only the packages that cover the dates of the reservation are displayed in the Packages list of values.
When a Package is attached to a reservation and the stay dates are updated and fall outside of the start and end dates of the Package, then a message is displayed stating "An attached package does not have package details associated for this time period." After closing the message, the cursor is taken back to the Nights field and the number of nights is changed back to the reservations original amount.
Features. Select the down arrow to choose the room features to be attached to this reservation.
Payment. If the Reservations>Payment Types Per Window application function is set to Y, select the ellipsis button to open the Payment Methods screen where you may specify payment methods per window for this reservation. If the application function is set to N, select the down arrow to choose the payment method for this reservation.
Note: When you select a payment method or authorization rule for one guest that differs from the group payment method, you are prompted to decide whether the new payment method and/or authorization rule will apply to one guest, all guests or a select number of guests.
CC No. For credit card payment methods, the credit card number. When the Profiles>Profile Credit Card application function is set to Y and the credit card being used for the payment is not attached to the profile, then a message prompt is displayed asking if the credit card should be attached to the profile or not. When the ![]() icon is displayed at the end of the field, this means the Credit Card Vault functionality is active. See Credit Card Vault for details.
icon is displayed at the end of the field, this means the Credit Card Vault functionality is active. See Credit Card Vault for details.
Note: When the user permission, Reservations>Credit Card Information View, is granted to a user and the credit card has not been purged, the user will see the Expiration Date and can view the credit card numbers by double-clicking on the credit number in the CC No. column.
Exp. Date. For credit card payment methods, the credit card expiration date.
VIP. Select the down arrow to choose the guest's VIP status. Available when the Profiles>VIP application function is set to Y.
Note: When a group profile has a VIP status selected and the reservations are created through the Rooming List, the VIP status is auto populated to the individual profile of each guest; but only if the VIP status is set on the Group profile prior to the reservation being created. However should you choose to change the VIP status of a guest, you are prompted to apply the changes to only the selected guest, all guests or a designated selection of guests within the Block.
TA Rec. Loc. Travel agent record locator on the reservation. Available when the Reservations>TA Record Locator application parameter is set to Y.
Language. Select the down arrow to choose the primary language used for the profile.
Nationality. Select the down arrow to choose the nationality of the individual.
Date of Birth. Select the calendar button and choose the date of birth of the individual profile.
Passport. Enter the passport number for the profile.
Users will need to configure the UDFs that they wish to display on the Group Rooming List screen by creating a UDF Display Set and selecting UDF fields under Setup>System Configuration>Reservations>Business Blocks>Rooming List Screen Design screen. These display sets are available as values in the Blocks>GROUP ROOMING LIST DISPLAYSET application setting.
When the Blocks>GROUP ROOMING LIST EXTEND parameter is set to Y, the display set selected for a property's Blocks>GROUP ROOMING LIST DISPLAYSET application setting will be displayed on the Group Rooming List screen for the property.
When the Blocks>GROUP ROOMING LIST EXTEND parameter is set to Y, the below fields can be screen painted on the Reservation screen and will be available on the Group Rooming List screen (see Screen Painting for details). The below fields will also be available in the Rooming List Import when the Import List button is selected. Although these fields will be available in the import, they will not be encrypted.
ETA (ARRIVAL_TIME)
C/O Time (DEPARTURE_TIME)
Arrival Carrier (ARRIVAL_CARRIER_CODE)
Arrival Station Code (ARRIVAL_STATION_CODE)
Arrival Transport No (ARRIVAL_TRANSPORT_CODE)
Arrival Transport Type (ARRIVAL_TRANSPORT_TYPE)
Pick Up Reqd (ARRIVAL_TRANSPORTATION_YN)
Pick Up Time (PU_ARRIVAL_TIME)
Departure Carrier (DEPARTURE_CARRIER_CODE)
Departure Station Code (DEPARTURE_STATION_CODE)
Departure Transport No (DEPARTURE_TRANSPORT_CODE)
Departure Transport Type (DEPARTURE_TRANSPORT_TYPE)
Drop Off Reqd (DEPARTURE_TRANSPORT_YN)
Drop Off Time (DO_DEPARTURE_TIME)
RES SEND (UDFN35)
REC COMMENT (UDFC36)
C/S CODE (UDFC37)
Keyword Type (KEYWORD_TYPE)
Keyword Value (KEYWORD)
The following options are available on the Group Rooming List screen.
Clear. When entering group rooming list reservations you may use the down arrow on your keyboard to add new reservations to the end of the list. If you inadvertently arrow down one row too many and begin a reservation that you do not need, use the Clear button to remove the record.
Import List. This button opens the File Upload screen where you can select the .xml file containing the rooming list you want to import. See Rooming List Imports for more information.
Traces. When the Reservations>Reservation Traces application function is set to Y, this function is similar to Messages in that you can create a message and attach it to a guest reservation. However, the difference is that a Trace is a message not to the guest, but to your colleagues and it requires an action and a specific action date.
Messages. When the Front Desk>Messages application function is set to Y, you can leave a message for the guest with this option. When you check in the guest, OPERA automatically shows you the message. You can keep an unlimited number of messages for every guest, you can mark the messages as received or not received, and you can print the messages in a user-definable format. Enter the given defaults. Select New to enter free form text. You can also create specific group messages by pressing the Telephone Operator (Ctrl+F7) quick key.
Share. Go to the Shares screen where you may set up and manage shares for the highlighted reservation. See Shares for details.
Profile. Create or edit the profile for the highlighted group member. From here it is possible to define personal information, contact information, assign preferences and membership information, etc. for a member of the group; all of which is accessible from the Reservation Screen. See Profiles for more details.
Reservation. View or modify the reservation for the highlighted group member.
Note: If multiple payment methods are setup for a reservation and a Rule Detail is added or modified for a credit card payment method, an Apply These Changes To window will display. While applying payment types to other reservations, the rules that are currently in place must be maintained. As always, only apply changes to reservations having the same reservation details. When applying credit card payments to different windows, an additional prompt is displayed that allows the user to Apply the changes to other group members. The user is then asked if they need to copy that payment details. If Yes button is selected, the credit card details are copied to all reservations and if No button is selected, then only the payment type is copied.
Quick Split. Enter the number of rooms to split (maximum availability). The Quick Split button is active, assuming that rooms have been allocated for the block. Please see Quick Split Reservations below for details.
Grids. View the grid of rooms available for the group (only for standard groups linked to a block). This is especially useful when you start borrowing room types when entering the group rooming list.
Block. Assuming that you have the appropriate user rights, you can select Block to access the Business Block screen directly from the Group Rooming List screen. This can be very helpful as it enables you to make required changes to the block, such as adding rooms, changing room types or changing the date range for the block, without having to backtrack out of the group.
Print. Print the Group Rooming List report (grprmlist) for the selected group. The Group Rooming List report provides a list of all reservations associated with a specific block for the date range selected. This report can assist with managing room shares associated with a block, and may also be prepared when group leaders request a rooming list for their group. The Print button becomes disabled when a new record is being entered, but once it has been saved, then the button is enabled.
Note: When making certain changes on the Rooming List such as changing the room type to one that does not exist on the block, or extending a reservation to departure after the block end date, this message displays: "Changes to the rooming list will be saved up to this reservation." Select OK to proceed. This message can be hidden with the Popup Blocker functionality.
When the New radio button is selected on the Group Rooming List screen, the new reservation "template" appears. You can use the Quick Split option to split the template into as many separate single-room reservations as are available in the room block, or you can create individual reservations one at a time.
Search Guest Profile Check Box
When reservations are being created, the Search Guest Profile check box can be used to automatically validate profiles in the OPERA database and create new ones if a profile does not exist. Two parameter settings affect how this check box works.
When Reservations>Rooming List/Combine Share Profile Search application setting is set to C, a check mark appears by default in the Search Guest Profile check box. When you create a new reservation the Profile Search screen appears and you are prompted to search for and select an existing profile or create a new one in order to proceed. When this check box is selected, the Quick Split option is not active.
When Reservations>Rooming List/Combine Share Profile Search application setting is set to U, the Search Guest Profile check box is un-selected by default, but you may select it. When the Search Guest Profile box is unselected, you can enter any name for the reservation in the Name and First fields on the Group Rooming List screen. If a profile match is not found, a new profile is automatically created. If a profile match is found, it is used.
Note: Existing profiles that are used to create reservations from the Group Rooming List screen automatically populate the reservation with any information stored in the profile, such as preferences and profile notes. Memberships however, will only display when they are configured to auto populate to reservations from the Membership Types Configuration screen.
The Quick Split button is available only if the Check Guest Profile check box is not selected on the Group Rooming List screen.
Select the Quick Split button from the Group Rooming List screen to display the Rooming List Split screen. Use this feature to automatically create a series of reservations that all have the name of group (by default) or whichever default profile name you select in the Default Name field. Each reservation name will have a sequential suffix (e.g., Smith_1, Smith_2, etc.) to make it unique.
The split reservations you create can then be edited as required for individual guests. You may create any number of reservations, up to the number of available rooms remaining in the room block.
When you select this option, a prompt appears allowing you to select the number of reservations you wish to make. The maximum number of reservations you can make, based on the available number of rooms, is shown.
For example, ABC group is coming in and the property has placed 5 DLX room types in the block’s grid. Coming into the Rooming List screen, the Quick Split button can then be selected, and users will then see a screen like the following:

Number of Rooms. Default number is automatically pulled from the Room Grid for the block, enter the number of reservations you wish to make and select the Split button. The number of reservations the user specifies will be made. New reservations have the same arrival and departure dates, room type, and number of adults as the highlighted reservation. Reservations do not "inherit" profile attributes such as VIP status. You may edit the reservation name and other details as necessary. By default, reservations will be made for one room; however, the Rms. field may be edited directly to create multi-room reservations, depending on availability and the Reservations>Room Limit Per Reservation application setting.
Note: The number OPERA displays for the maximum number of rooms to split (maximum availability) depends on the reservation highlighted by the cursor. If you have positioned the cursor on the group master reservation, the number of rooms displayed will reflect the size of the group (or the block). If you start the split from a group member's reservation, OPERA will warn you that you are not on the group master record and ask whether you wish to continue. When you select Yes the maximum number of rooms to split is the actual Number of Rooms on the group member reservation minus one. Therefore, if the reservation is for only one room, you cannot split off any rooms and an appropriate warning message will be displayed.
Default Name. Select the down arrow to choose a profile that will be used as the basis for creating profiles for the split reservations. TBA (standing for "To Be Announced") is used in the screen above. Using a virtual profile like TBA for all your split reservations helps prevent the proliferation of "junk" profiles in the OPERA database.
Note: When Quick Splitting a reservation, a check is done for existing reservations with the same name and overlapping stay dates. When a match is found, a pop-up displays with the message: "There is a duplicate reservation with the same guest name and overlapping stay dates." Select OK to proceed. This message can be hidden with the Popup Blocker functionality.
To create single reservations, highlight any reservation and select the down arrow. Provided there are available rooms in the block, a new reservation appears with the same arrival and departure dates, room type, and number of adults as the highlighted reservation. Reservations do not "inherit" profile attributes such as VIP Status. You may edit the reservation name and other details as necessary. By default, reservations will be made for one room; however, the Rms. field may be edited directly to create multi-room reservations, depending on availability and the Reservations>Room Limit Per Reservation application setting.
If a deposit and/or cancellation rule is set directly for a block and an applicable rule also exists for the block on the property level in configuration, when creating a new reservation through Rate Query, Group Rooming List or Reservation List, the block deposit and/or cancellation rules are inherited from the block or from the rules set at the property level, depending on how the reservation is created.
Assume that the following deposit and cancellation rules, set up in configuration (Configuration>Reservations>Codes>Deposit/Cancellation Rules Schedules), are associated with a block code.
Also assume that the following deposit and cancellation rules are set up directly on the block itself:
As soon as the deposit and cancellation rules are setup directly on the block, the PM is created. Therefore, the PM inherits the deposit and cancellation rules set up directly on the block itself (i.e., Deposit Rule = FULL and Cancellation Rule = 100%).
When creating a new block reservation from INSIDE the block (i.e., from the Reservation List - GRRSLIST or Rooming List - GRRMLIST), if the PM reservation is highlighted, the new block reservation will take the deposit and cancellation rules which are on the PM (i.e., Deposit Rule = FULL and Cancellation Rule = 100%).
When creating a new block reservation OUTSIDE of the block (i.e., via F5 Rate Query - RQSCOP00), the new block reservation will take the deposit and cancellation rules from configuration (i.e., Deposit Rule = 7 DAY and Cancellation Rule = 7 NIGHT).
If, however, you are creating a new block reservation from INSIDE the block, BUT you have highlighted a block reservation that was made OUTSIDE of the block and has deposit and cancellation rules from configuration (i.e. Deposit Rule = 7 DAY and Cancellation Rule = 7 NIGHT), selecting New from Reservation List (GRRSLIST) or going into Rooming List (GRRMLIST) from here, will copy those configuration deposit and cancellation rules directly from the highlighted reservation (i.e. Deposit Rule = 7 DAY and Cancellation Rule = 7 NIGHT).
Note: When a new reservation is made from the Group Rooming List or the Reservation List, Catering type deposit rules remain on the PM reservation but are not copied to the new reservations. Only deposit rules of the Room or All types are inherited from the PM reservation.
When a new reservation is made from the Group Rooming List screen, the following types of information, as applicable, are carried over from the posting master reservation (or the reservation that is highlighted when you click on the Group Options button from the Reservation List screen).
Note: if the down arrow key is used to create a new record, the values will be copied from the previous record.
Should fixed charges be applied to the PM and the user selects to Apply this change to all of the reservations in the group, then all of the groups' reservations will be updated with the fixed charge. But, should a fixed charge be applied to any other reservation in the group besides the PM reservation and the change is selected to be applied to all, then the fixed charge is only applied to those reservations in the group with matching arrival and departure dates as the reservation the fixed charge is being applied to.
The Group Rooming List screen allows to set up shares at the same time you create reservations (when the New button is selected) or after the reservations have been made (when the All radio button is selected).
Shares may be set up among consecutively listed reservations when in the New view of the Group Rooming List (when the New radio button is selected). To set up shares while you are creating new reservations, identify the first sharer, then select one or more consecutive reservations immediately following the first sharer.
Note: When the Reservations>Fixed Rates application function is active and the field default for the Fixed Rate field is set to Yes for the Reservation screen, shares created automatically inherit the full amount and are marked a Fixed Rate Reservation, without having to go to the Share Options screen. But when the Fixed Rate default is set to No for the Reservation screen, then the Share Options screen is displayed for the share reservation created.

The share is created when you select the Save button. A window prompts you to select the appropriate type of share (Entire Rate for One Sharer (default), Split Rate Evenly for All Sharers, or Full Rate for All Sharers). If multiple shares are being saved at the same time, the type selected applies to all the shares being saved. Once the OK button is selected on the Share Options, the Shares screen automatically displays to make further modifications to the share.
Note: Comments from one share reservation do not overwrite the comments saved to another share reservation when the Entire Rate for One Sharer option is selected.
Asterisks precede the names of the sharers, and a Share lamp (See Indicator Lamps for complete list and details) appears at the bottom of the screen when one of the sharers names is highlighted. The Share lamp shows the names of the sharers and their individual rates.

When the All radio button is selected on the Group rooming List, all reservations belonging to the block are displayed. You may set up shares by marking an X in the X column and selecting the Save button.
If one or more of the reservations is already sharing, you are prompted whether one or more of the other members of the already-existing share should be moved to the new share as well.
In the following example, two reservations are being combined into a share.

A window may prompt you to select the appropriate type of share amounts (Entire Rate for One Sharer (default), Split Rate Evenly for All Sharers, or Full Rate for All Sharers). Once the OK button is selected on the Share Options, the Shares screen automatically displays to make further modifications to the share. The prompt may not appear if there are different rate codes, currencies, etc.
Note: When the business block includes multiple room types, the situation may arise where you wish to combine reservations having different room types into a share. Once you have selected the first reservation for the share (the primary sharer), a message appears if the room type of any subsequent reservation you select differs from the room type of the first reservation you chose: "Guest room type does not match the room type of other sharing guest(s). Change will occur upon Save." When you select the Save button to create the share, the room type on the reservation being added to the share will change to match the room type of the primary sharer's reservation.
An abbreviated version of the Group Rooming List is available when you select the Rooming List button from the Quick Business Block screen. (This button appears when the Blocks>Family Block application parameter is set to Y, and the quick business block has a Definite status.)
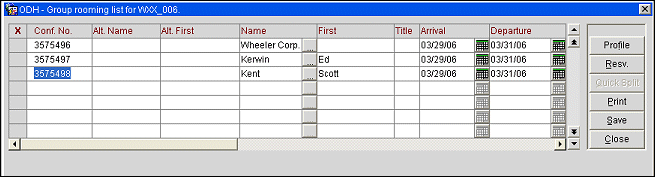
You may make reservations for the business block directly from this grid. When you make reservations using this Group Rooming List, a posting master (PM) reservation is automatically created in the background.
To make a reservation from the Group Rooming List, enter the details directly into the Group Rooming List grid. You may enter the guest's name in the Name field, or select the ellipsis button to choose a name from the Profile Search screen. If you do not choose an existing name from the Profile Search screen, a new profile is created for the guest using the name you enter. If you do not enter a name or select a name from the Profile Search screen, the block name is used by default. Double click on the reservation entry to display the Reservation screen where you may provide any details you wish to add.
When the Family Block application parameter is active OPERA automatically assumes that the quick business block is elastic. This means that you may make reservations without being limited to a room allotment. If you have entered a room allotment for a specific room type on the Rooms Grid and the room type is unavailable when you make reservations, OPERA pulls rooms from house availability. OPERA first picks from the allocated room type, but once all rooms of that type have been picked up, OPERA will start to pick up from house level. (Of course, you will receive the usual OPERA messages if you attempt to overbook and you will be limited by any rate restrictions that are in place.) Reservations made using this Group Rooming List will be shown as picked up on the Rooms Grid screen for this quick business block.
Reservations that are associated with a block code are eligible for the upsell rather they have a rate code attached or not. But for blocks with no rate code associated, upsell based on formula % of difference added to original rate, may not be offered, if there is no rate defined in the Block Rate Grid for the room types involved in the upsell. Also, when applying an upsell to a reservation that is part of a block, the user will be prompted with the Apply To and the user can then apply the upsell, based on the permissions granted, to the Guest Only, All Guests in the Group' Selected Guests, Only Guests with Same Arrival Date, All Checked In Guests, or Guests in House Between. See Reservation Upsell for details.
See Also