
|
|
|
BI Publisher Contract Merge based on SAMPLE_CONT_MERGE.RTF with REP_CONT_MERGE.FMX; Contract Merge based on REP_CONT_MERGE.DOC with REP_CONT_MERGE.FMX
This topic includes 1) Contract Merge based on REP_CONT_MERGE.DOC with REP_CONT_MERGE.FMX and 2) BI Publisher Contract Merge based on SAMPLE_CONT_MERGE.RTF with REP_CONT_MERGE.FMX.
Contract Merge (Immediately below)
Click to go to BI Publisher Contract Merge
Contract Merge
The Sales & Catering Contract Merge report is a sophisticated tool used to communicate group booking and catering details to customers. Even though Contract Merge is mainly used to produce group contracts, there is a much wider scope of possibilities related to this tool. It is possible to link multiple letter templates to the order form and select which template to merge to on a case-by-case basis. The additional options that define which room grid and event template merge into the document, and include the possibility to merge deposit information and billing instructions, make this a truly flexible communication tool.
Note: When printing this Report help topic, we recommend printing with Portrait page orientation.
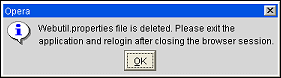
Note: If there is an issue generating this report (i.e. Word opens to a blank gray screen), use the hidden option on the report parameter screen to delete the webutil.properties file from the local workstation. This will force a download of this file from the app server to the workstation. To delete the webutil.properties file, select Ctrl+Shift+Double Click on the bottom left-hand corner of the parameter screen. A message will notify you that the webutil.properties file has been deleted. You must then log out of OPERA, close ALL browser sessions, and relaunch OPERA S&C. Once you access rep_cont_merge, the required files will download so that the report will successfully generate.
Note: When merging the Contract Merge Report (rep_cont_merge) from the main Reports screen, the merged document in MS Word will be named based on the OPERA Template Name. For instance, for a document in OPERA named 'Rooms Contract', the merged document in MS Word will also be named 'Rooms Contract'.
Unless noted, these parameters apply to both Contract Merge and BI Publisher Contract Merge. (The BI Publisher Contract Merge parameters screen is displayed in the section REP_CONT_MERGE.FMX for BI Publisher Contract Merge.)
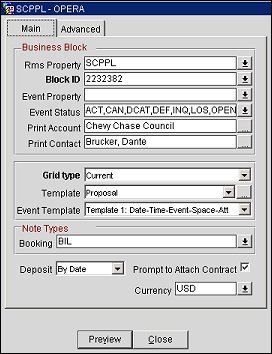
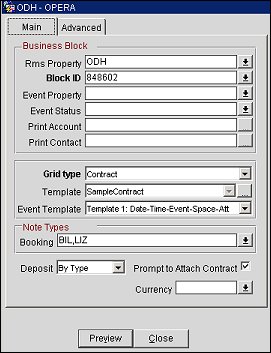
Rms Property. Select the business block property(s) by which the results should be filtered.
Block ID. Select the business blocks by which the report should be filtered.
Note: When filtering this report by Block ID and selecting a Master Block, all Sub-Block IDs for that Master will also display in this field; regardless if this report is initiated from this screen or from the Master Block directly.
Event Property. Select one or more event properties from the LOV.
Event Status. Select the event statuses by which the results should be filtered.
Print Account. Print Account will default to the Account marked as PT for the Business Block from the Name Select screen. If a different Account should be printed on the BEO, select the Print Account ellipsis and click the PT column to select another Account already linked to the business block.
Print Contact. Print Contact will default to the Contact marked as PT for the Business Block from the Name Select screen. If a different Contact should be printed on the BEO, select the Print Contact ellipsis to select another Contact already linked to the business block.
Note: When the Contract is printed for more than one Booking, the 'Print Account' and 'Print Contact' are pulled by default. No option will be provided to select a different Account or Contact for Printing. If no 'Print Account' or 'Print Contact' has been selected for a booking, the default hierarchy is used. Additionally, when no relationship exists between the 'Print Account' and the 'Print Contact', the Print Contact will display in red.
Grid Type. (Not available for BI Publisher Merge.) Select the grid type to print Current, Contract, or Pickup.
Template. (Available only for Contract Merge.) The arrow button allows the selection of an existing template. The ellipsis button allows access to template creation or modification if required. The Templates screen displays.
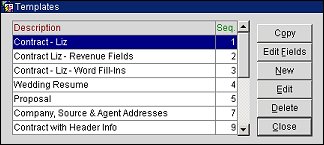
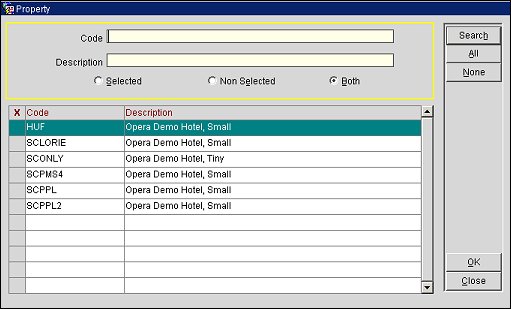
Copy. The Copy button allows you to copy the selected Contract Template and its field list from the current property to the selected properties for the Merge Contract (the Target properties must already have rep_cont_merge configured). When Copy is selected, the Properties screen appears displaying properties the current user has access to.
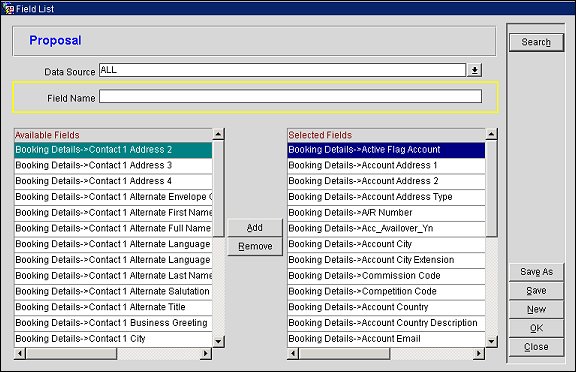
Edit Fields. Select the Edit Fields button from the Templates screen to add or remove fields from the Field List screen.
New or Edit. Please see the section on templates below in How to Create a New Contract Template (with new field list).
Delete. Highlight the template in the Templates screen you wish to delete and select the Delete button.
Event Template. Template 1 to template 8 can be selected. Please see an explanation below of the templates in Available Merge Grids and Fields.
Note: The Event Template LOV is hidden when the application function Catering>Catering Events is set to N. Also take note that Event Templates #7 and #8 are hidden when any of the following conditions are met:
- The S&C License OPL_<version number> is Active
- The S&C License OPM_<version number> is Active
- The application function Catering>Event Resources is set to N.
Deposit. Indicate if the deposit information should print sorted by deposit type or by due date.
Note Types
Currency. Select the currency in which the revenues on this report will display.
Prompt to Attach Contract. (Access to this option is controlled by the application function General>File Attachments. When set to N, this check box is NOT visible.) Select this check box to attach the contract to the originating \Business Block. Once the contract has been generated and all changes to the merged document have been saved (using the Save option and not Save As in MS Word, so that the document retains the same name and directory as when it was opened by OPERA.), answer Yes to the prompt to attach the document to the Business Block. Or, select No to continue without attaching the document. When the application parameter Blocks>Global Auto Attachments is active (Y), this report will be attached to the Business Block Globally to live properties in the same schema. When set to N, the report will be attached to the Business Block Locally and not be available to other properties in the schema.
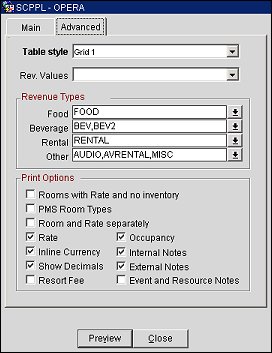
Table Style. (Available only for Contract Merge) A list of standard Microsoft table styles is available for selection. This determines the framework for all grids that are part of the contract merge.
Rev. Values. This LOV provides options to view and print Net Room Rate and Catering Prices, Gross Room Rate and Catering Prices, both the Net & Gross Room Rate and Catering Prices, or the amounts directly as they have been entered in OPERA.
Gross Room Rate is calculated as:
Gross Catering Price is calculated based on the Transaction Codes mapped in Revenue Type Cross Reference configuration (Configuration>Cashiering>Rev Type Cross Reference):
Net Room Rate is calculated as:
Net Catering Price is calculated based on the Transaction Codes mapped in Revenue Type Cross Reference configuration (Configuration>Cashiering>Rev Type Cross Reference):
 Click here for Rev. Values Calculation Examples.
Revenue Types. This is only necessary (and mandatory) to select if event template style 4 has been selected.
Note: The Revenue Type LOV is hidden when the application function Catering>Catering Events is set to N.
Print Options. Select the data you want printed on the report.
Additionally, when the Resort Fee check box is selected, the following conditions apply:
Preview. Use the preview option to view the generated output of this report in PDF format.
Note: When generating a contract with field lists that exceed the maximum length, the user will receive a message, 'The field list length has been exceeded.' In this case, remove some fields (see Edit Fields button description, above.)
Close. Closes this report screen.
Always use the contract_sample.doc of the current version as the basis for template creation to be able to utilize all features that might have been added to the merge document and macros. The contract_sample.doc is delivered with the runtimes of each new version / patch.
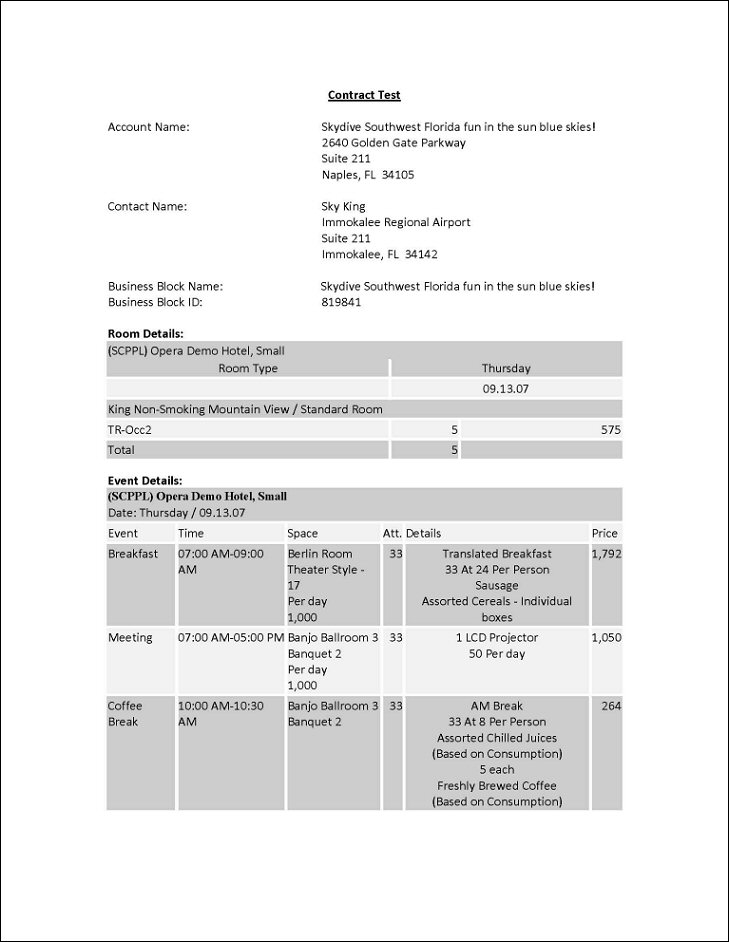
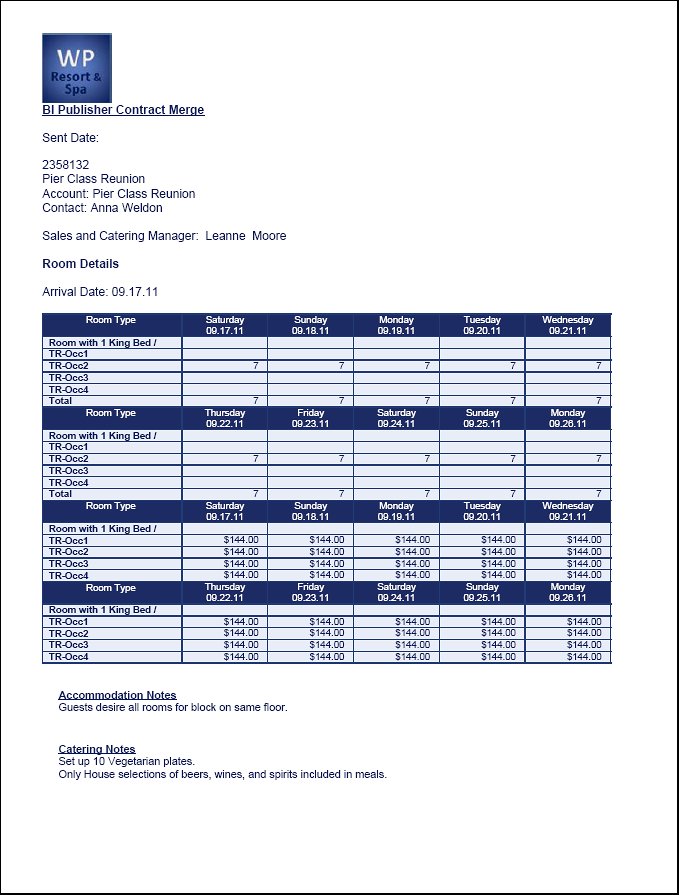
<<GRID>>. Will print the room grid. Depending on the check box setting on the screen, this can contain occupancy levels, rates, decimals in rates, currency symbol or code, or two grids can be printed separately for number of rooms and rates per room type per day.
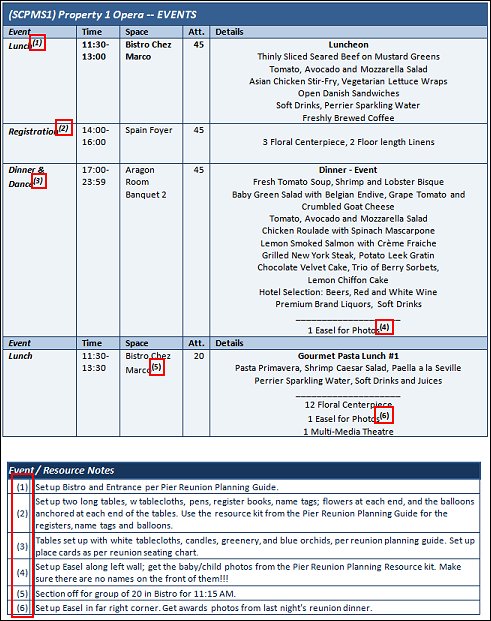
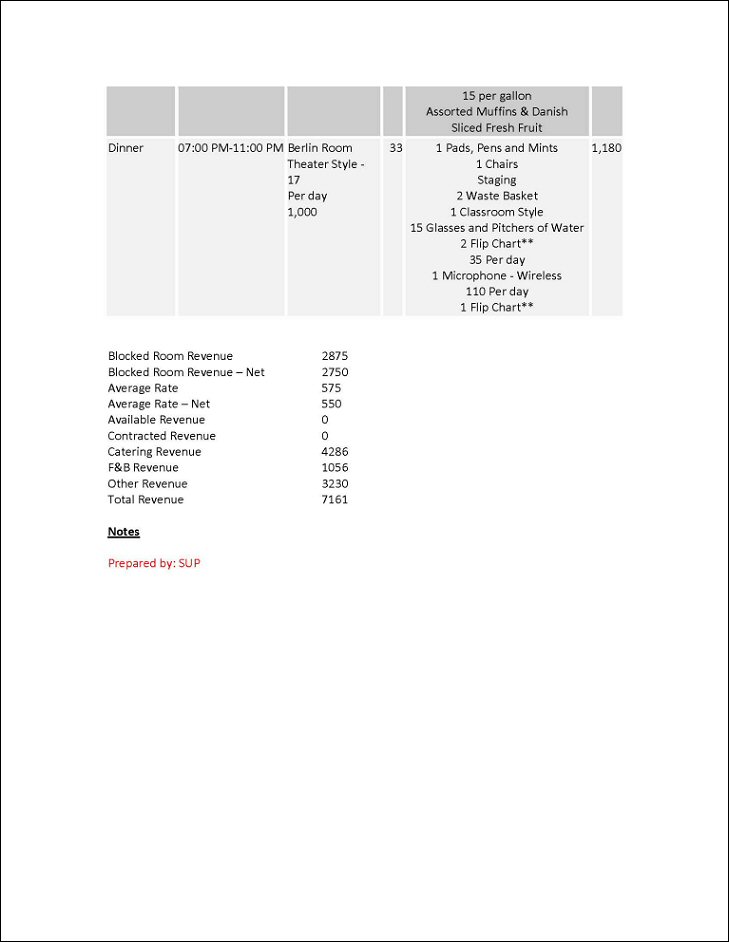
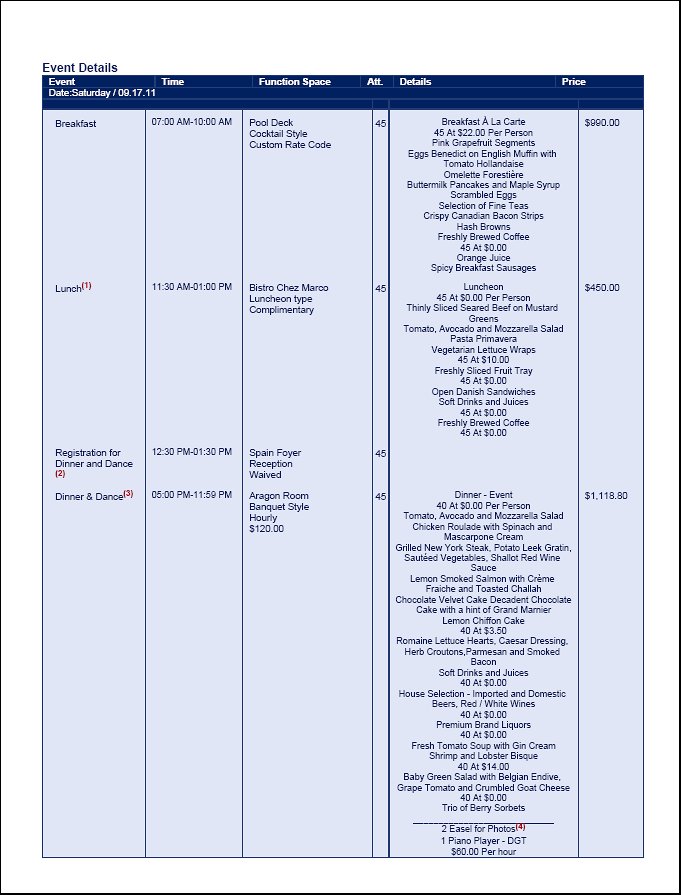
<<EVENTS>>. Will print the event details. A selection of 8 different template styles is available for selection on the report screen.
Note: When Events belonging to a Sub-Block are printed, all Events will print on one contract - as if they were one booking - not separate contracts.
Template1. Date, Time, Event Name, Space Name, Attendees
Template2. Date, Time, Event Name, Attendees, Function Space Rental
Template3. Date, Time, Event Name, Space Name, Attendees (Double Spaced)
Template4. Date, Time, Event Name, Space Name, Setup Style, Attendees, Food Revenue, Beverage Revenue, Rental Revenue, Other Revenue.
The amounts are calculated from the revenue types that have been selected on the report parameters for each column.
Template5. Date, Time, Event Name, Space Name, Setup Style, Attendees, Function Space Rental.
Template6. Date, Time, Event Name, Space Name, Setup Style, Attendees, F&B Minimum
Template7. Date, Time, Event Name, Space Name, Attendees, Resources, and Price. Price is based on the Total Expected Revenue, even if the Use Forecast Only check box is selected on the Event Search or Event screen (available when the application parameter Catering>Apply Use Forecast Rev Only Change From Event is active).
Template 8. Similar to Template #7, but with less resource details. This template includes the Date, Time, Event Name, Space Name, Attendees, Limited Resources, and Price. Price is based on the Total Expected Revenue, even if the Use Forecast Only check box is selected on the Event Search or Event screen (available when the application parameter Catering>Apply Use Forecast Rev Only Change From Event is active).
Catering Package Events in Template #8:
Non Catering Package Events in Template #8:
<<DEPOSIT>>. Will print deposit information. The sort order depends on the selection on the report parameters. If sorted by deposit type, a sub-total for each type will also print. Columns included in this grid are Deposit Type, Percentage, Deposit Amount Requested, Deposit Due Date, Deposit Amount Paid, Deposit Amount Still Due after Payment, Description.
<<BILLINGS>>. Billing Instructions: The information that is printed in this grid comes from the entries made in Business Block Options Contract Billing. The instruction type, instructions for, Routing Code, and Comments will print.
<<NOTE>>. Notes can be placed anywhere within the document. Their tags are <xxx> where xxx is the note code of the note that should print where the tag is placed.
D:\micros\opera\production\runtimes\contract_sample.doc. If you do not have access to the app server files, ask your system administrator to copy the file to one of your local directories and pick it up from there. Once you have found the file in your operating system search box, click on Open. This will transfer the file path into the Select File field.Note: When editing a contract with field lists that exceed the maximum length, the user will receive a message, 'The field list length has been exceeded.' In this case, remove some fields (see Edit Fields button description, above.)
BI Publisher Contract Merge based on SAMPLE_CONT_MERGE.RTF with REP_CONT_MERGE.FMX
The Contract Merge report is also available as a BI Publisher customizable report and uses the following:
Report Name = BI Publisher Contract Merge
File Name =sample_cont_merge (.rtf)
Form to run = rep_cont_merge (.fmx)
Data Template = sample_cont_merge (.odt)

For selection criteria descriptions, please see Contract Merge (above).
Note: When rep_cont_merge.fmx is configured with a BI Publisher report, the Templates LOV (Main tab) and the Table Grid LOV (Advanced tab) are no longer available, as those are configured in the customized report template. If different versions of the report are required, each should be created as a separate customized report.
Please see the BI Publisher / Stationery Editor topic for more information on customizing reports using the BI Publisher.
Show Me
![]() Creating a Contract Merge Report
Creating a Contract Merge Report
See Also