Install Oracle Linux 7.1 OS Manually Using Local or Remote Media
This procedure describes how to install the Oracle Linux OS 7.1 from local or remote media. The procedure assumes that you are booting the Oracle Linux installation media from one of the following sources:
-
Oracle Linux OS 7.1 ISO image on a DVD
-
Oracle Linux OS 7.1 ISO image in a network repository
If you are booting the installation media from a PXE environment, refer to Install Oracle Linux 6.6 or 7.1 Using PXE Network Boot for instructions.
-
Ensure that the installation media is available to boot.
-
For an ISO image on a DVD, insert the DVD into the local or remote DVD-ROM drive.
-
For an ISO image on the network, ensure that the ISO image is available and that the ISO image has been mounted in the Oracle ILOM Remote System Console Plus application using the KVMS menu.
For additional information about how to set up the installation media, see Local or Remote Installation Options.
-
-
Reset or power on the server.
For example, do one of the following:
-
From the local server, press the Power button (approximately 1 second) on the front panel of the server to power off the server, and then press the Power button again to power on the server.
-
From the Oracle ILOM web interface, click Host Management > Power Control , select Reset from the Select Action list box, and then click Save.
-
From the Oracle ILOM CLI, type: reset /System
The server begins the boot process and the BIOS screen appears.
Note - The next event occurs very quickly; therefore, attention is needed for the following steps. You might want to enlarge the size of your screen to eliminate scroll bars. -
-
In the BIOS screen, press the F8 key to specify a
temporary boot device for the Linux OS installation.
[Boot Pop Up Menu Selected] appears at the bottom of the BIOS screen, and then the Please Select Boot Device menu appears. The screen that appears might differ depending on whether you have the UEFI/BIOS Boot Mode configured for Legacy BIOS or UEFI.
Note - The Please Select Boot Device menu that appears in your installation might differ depending on the type of disk controller and other hardware, such as PCIe network cards, installed in your server. -
In the Please Select Boot Device menu, select the menu item according to
the Linux OS media installation method and the BIOS mode you elected to use,
and then press Enter.
For example:
- If you elected to use the Oracle ILOM Remote System Console Plus application delivery method in Legacy BIOS Boot Mode, select USB:SUN from the Legacy BIOS screen.
- If you elected to use the Oracle ILOM Remote System Console Plus application delivery method in UEFI Boot Mode, select [UEFI]USB:SUN from the UEFI screen.
-
The next screen displayed by the installation program depends on whether
you selected the Legacy BIOS Boot Mode or the UEFI Boot Mode.
-
If you selected Legacy BIOS Boot Mode, the Welcome to Oracle Linux Server boot screen appears.
-
If you selected UEFI Boot Mode, the Booting Oracle Linux Server boot screen appears.
-
-
For the purposes of this installation, do one of the following:
-
If you elected to do the installation in the Legacy BIOS Boot Mode, accept the default and press Enter.
-
If you elected to do the installation in the UEFI Boot Mode, press Enter or allow the screen to timeout.
The Disc Found screen appears. From this screen, you can choose whether to test the media before doing the install.
-
-
If this is the first time that you are doing an install from this media,
you should consider selecting OK to test the media;
otherwise, select Skip and press Enter.
Note - If you have used this disk to do installs before, select Skip; otherwise select OK and test the disk.The Oracle Linux 7.1 splash screen appears.
-
Proceed with Oracle Linux 7.1 installation instructions, which are located
at the Oracle Linux 7.1 Product Documentation Library: http://docs.oracle.com/cd/E52668_01.
Note - Oracle Linux 7.1 contains new features and functionality that produce behavior and results that vary from Oracle Linux 6.x. Please proceed carefully with your installation.When the installation is complete, the server reboots and the BIOS screen appears.
-
To access the BIOS Setup Utility so that you can set the server to boot
from the operating system you just installed, press the F2 key.
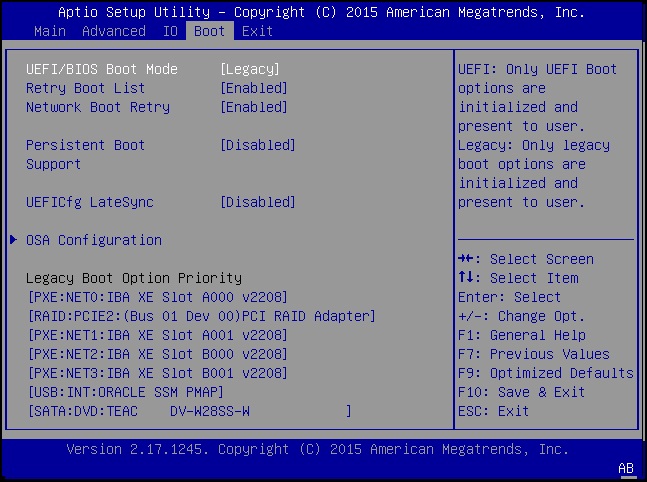
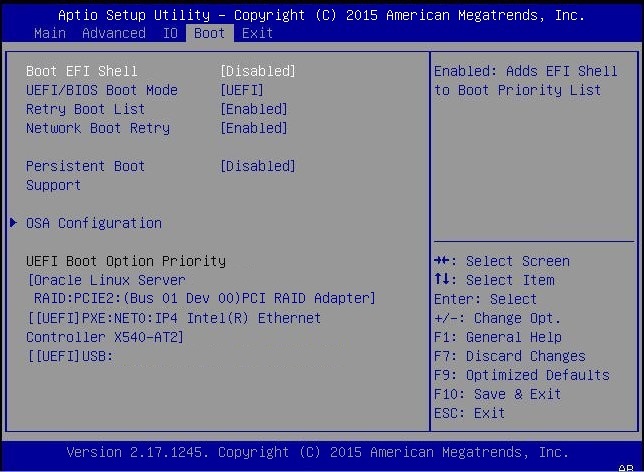
A BIOS Setup Utility screen appears with the Boot Menu selected. The BIOS screen displayed and the actions required to proceed with installation depend on the UEFI/BIOS Boot Mode you selected for installing the OS.
-
If you installed the OS in Legacy BIOS Boot Mode, perform these steps and
proceed to Step 12.
-
In the BIOS Setup Utility screen shown below, use the down arrow
key to select [USB:SUN] under the Legacy Boot Option Priority field,
and press Enter.

Note - The BIOS Boot screen that appears for your installation might differ depending on the type of disk controller and other hardware, such as PCIe network cards, installed in your server.The Boot Option #1 dialog appears.
-
Select [RAID: PCIE2: (...) PCI RAID Adapter], and press
Enter.
[RAID: PCIE2: (...) PCI RAID Adapter] moves to the top position.
- Press the F10 key to save the change and exit the BIOS Setup Utility, and then proceed to Step 12.
-
In the BIOS Setup Utility screen shown below, use the down arrow
key to select [USB:SUN] under the Legacy Boot Option Priority field,
and press Enter.
-
If you installed the OS in UEFI Boot Mode, perform these steps:
-
In the BIOS Setup Utility screen shown below, verify that [Oracle
Linux Server (RAID: PCIE2: (...) PCI RAID Adapter)] is listed as the
first option under UEFI Boot Option Priority field.

Note - The BIOS Boot screen that appears for your installation might differ depending on the type of disk controller and other hardware, such as PCIe network cards, installed in your server. - Press the F10 key to exit the BIOS Setup Utility.
-
In the BIOS Setup Utility screen shown below, verify that [Oracle
Linux Server (RAID: PCIE2: (...) PCI RAID Adapter)] is listed as the
first option under UEFI Boot Option Priority field.
-
Wait while the reboot continues.
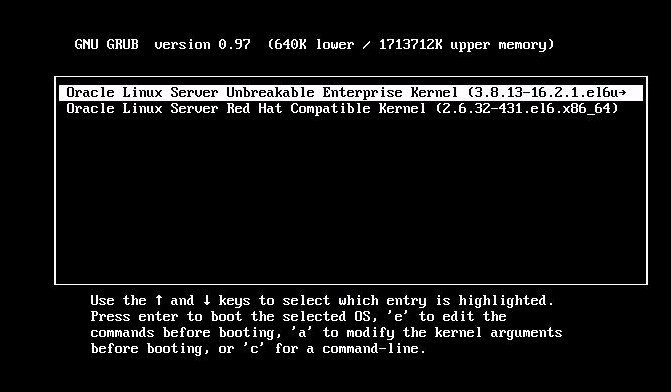
The following kernel screens appears.
Press any key to enter the menu
Booting Oracle Linux Server Unbreakable Enterprise Kernel (3.8.13-16.2.1.el6uek.x86_64) in 2 seconds...
The Oracle Unbreakable Enterprise Kernel Release 3 for Linux is the default kernel.
- If you do not want to change the default Kernel, proceed to Step 15; otherwise, proceed to Step 14.
-
(Optional) If you are installing Oracle Linux 7.1 and you want to switch
to the Red Hat compatible kernel, do the following.
-
Press any character key.
The GNU GRUB screen appears.

- For the Red Hat compatible kernel, select the second menu option, and then press Enter.
-
Press any character key.
- After completing the Oracle Linux installation and rebooting the server with the desired Linux kernel, proceed to Post Installation Tasks for Oracle Linux 6.6 or 7.1 OS.