Understanding Delegated Access
Delegation is when a person authorizes another to serve as his or her representative for a particular task. With the Delegated Access framework, a user can authorize another user to perform a task on their behalf by delegating access to perform a transaction.
Delegated Access is a framework owned by Campus Community that standardizes who can delegate what to whom. The framework enables you to define what components a delegator (for example, a student) can delegate to one or more proxies (for example, the parents). It integrates with the Constituent Transaction Management (CTM) framework, the New User Registration framework, the Notifications framework (email notification utility), and the PeopleTools security management to grant access to certain pages in your system.
The most common use for delegation in the Campus Solutions system is when students need to give access to a parent to view or update their personal, academic, or financial information. The parent may be unknown to the system and therefore needs to register and create a user profile to access your system.
Warning! Delegating a transaction is performed by a self-service user in a delivered self-service component called Share My Information (SS_CC_DA_SHAREINFO). Only a security administrator who is familiar with the Campus Solutions self-services components, PeopleSoft security, and how you manage your security must set up Delegated Access.
The following terms are important to the understanding of Delegated Access framework and are used throughout the documentation:
|
Term |
Definition |
|---|---|
|
Delegation |
The act of delegating one's access to another user. |
|
Delegator |
A person that delegates access to another user (for example, a student). |
|
Proxy |
A person granted access to act on behalf of another user (for example, a parent). |
|
Revoke |
When a delegated access is withdrawn. |
|
Delegation Transaction |
A set of one or more components and pages whose access a delegator can delegate to a proxy. Those components are contained in a security role associated to a transaction during setup. The role is provisioned to the proxy’s user profile for him or her to be allowed to perform the transaction. |
|
Delegated Access Components |
Self-service components that are configured for delegated access. |
|
New User Registration (NUR) framework |
Framework that enables the proxy to either create a user ID and password or reuse an existing user ID to sign into the Campus Solutions system and perform the delegated transaction. |
|
Notifications framework |
Framework that enables email notifications to be sent to the delegator and to the proxy when new transactions are delegated or revoked. |
Image: Delegated Access Process
This image shows the Delegated Access process.
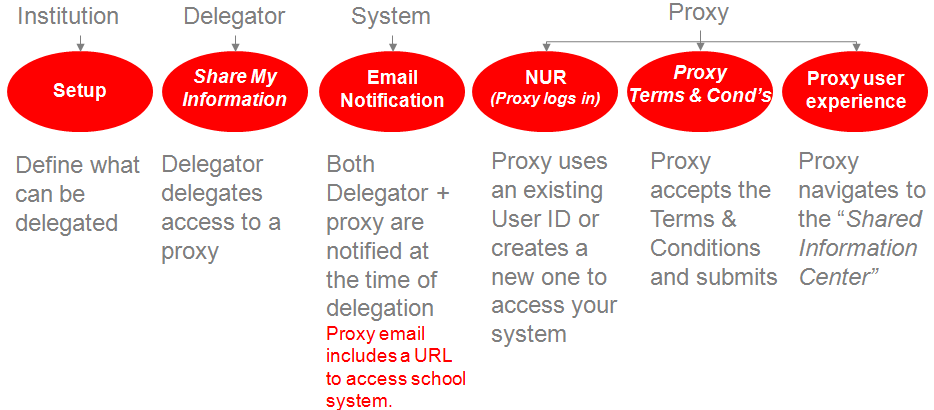
The following explains the Delegated Access (DA) process:
The Institution sets up the delegation transactions in the Delegation Transaction Setup page. On this page you set up a delegation transaction by listing a security role that contains one or more components that you want to delegate. These components must be configured for delegated access. The system then provisions this role to the proxies when access is delegated to them.
The Delegation Transaction Setup page also enables you to identify the security that the system requires to delegate the transaction. To identify the security, in the Delegation Transaction Setup page, select the component information that delegators must have in their user profiles in order to delegate the transaction.
The delegation process is always initiated by the delegator. Delegators can create proxies and delegate transactions to these proxies through the Share My Information self-service component. Each time a delegator creates a new proxy, the delegator must first accept the institution’s terms and conditions. Your institution can include their terms and conditions in the delivered Share My Information - Terms and Conditions page. For example, academic institutions in the United States can display their terms and conditions in the Share My Information - Terms and Conditions page to comply with the data privacy regulations under FERPA. Once the terms and conditions are accepted, the delegator enters the name, the relationship and the email address of the proxy to whom he or she wants to delegate access. The delegator then selects the delegation transactions that he or she wants the proxy to view or update. Examples of transactions can include transactions for self-service components such as View My Class Schedule, View My Grades and so on. The delegator can delegate a transaction to one or more proxies. For example, a student can delegate access to the Emergency Contacts transaction to his or her mother and father. Conversely, a proxy can be granted access by multiple delegators (for example, this applies to a case where the parent has more than one child in an academic institution and they all delegate him or her access to their data). The delegator only sees the transaction for which he or she is allowed to delegate.
When the delegator identifies a proxy and delegates access to one or more transactions, the system uses the Notifications framework to send a courtesy email notification to the delegator to inform him or her that access to his or her data has been delegated to a certain person and an action email notification is sent to the proxy’s email address. Both emails list the transactions that have been delegated. In addition, the email sent to the proxy also includes a security key that the proxy will later be required to enter at the time of accepting the proxy terms and conditions and a URL link that the proxy can click to access your Campus Solutions system.
If set up to use the New User Registration framework, the URL link is constructed with the information to access your New User Registration login page and a New User Registration Context ID value (configured for Delegated Access framework) that transfers the proxy directly to the Proxy Terms and Conditions page after the proxy successfully signs into the system. On your New User Registration login page, the proxy can either reuse an existing user ID (if the proxy already has one) or create a new one. The New User Registration framework enables the reuse or creation of a user ID. With the New User Registration Context ID value, the New User Registration framework, immediately after successfully registering and authenticating the proxy to your system, knows how to provision the proxy with proper security role to access the Proxy Terms and Conditions page and how to immediately transfer the proxy to this page.
On the Terms and Conditions for Accessing Somebody Else's Data page (this page is also known as the Proxy Terms and Conditions page), the proxy is asked to act responsibly with the delegator’s data. You can personalize the terms and conditions to fit your institution needs. On this page, the proxy is required to accept or decline the institution’s specific terms and conditions, enter the security key given in the received email notification and enter the email address where the email notification was sent. This information is the signature that proves the proxy is the right person wanting to access the delegator’s data. In addition, the proxy may be asked to enter some personal information. The proxy must accept the terms and conditions stipulated by the institution before accessing the delegator’s data. Once proxy submits the information, validation is in place to make sure the right person is trying to access the delegator’s information. The Delegated Access framework links the proxy’s user ID with the delegator's EMPLID after the system performs a successful validation. If the proxy accepted the terms and conditions, the framework updates the proxy’s user profile with the security roles associated with each of the delegated transactions (Proxy Role Name). If proxy declines, then the system does not perform the role provisioning and proxy cannot access any of the transactions delegated by the delegator.
A proxy can access data only for the delegators who granted the access.
The Delegated Access framework being integrated with CTM framework allows your system to optionally associate an EMPLID with the proxy. At the time of accepting the terms and conditions, if at least one of the transactions delegated to the proxy requires an EMPLID to be associated with the proxy, Delegated Access uses the proxy’s personal information entered at the time of accepting or declining the proxy terms and conditions to call the CTM framework and trigger Search/Match.
Once the proxy has accepted the terms and conditions and the system has validated the information and provisioned the proxy’s user profile with roles tied to the delegated transactions, the proxy can access the delegated information by navigating to Self Service, Shared Information Center. From there, the list of components that were delegated to the proxy by different delegators is displayed.
Image: Delegated Access Example of Information
This example illustrates a proxy that has been delegated access to three components.

When accessing any of these components, if multiple delegators delegated access to the proxy, then the system displays a search record and returns only the names of the delegators who delegated access to the component. The proxy selects the name of the delegator for whom the proxy wants to review or update the data. The search record is delivered with your system and should override the search record for the self-service components you make available for delegated access.
A delegator revokes proxy access by deselecting one or all of the transactions delegated to a proxy in the Share My Information - Details page. When the delegator revokes proxy access, the Notifications framework sends an email to the proxy that informs the proxy which transactions were revoked. On the other hand, when the delegator adds new transactions for delegation, the Notifications framework sends an email to the proxy and to the delegator to inform them which additional transactions were delegated. When the proxy accepts the terms and conditions for a specific delegator, additional delegations or revoked delegations are automatically provisioned or de-provisioned from the proxy’s user profile.
For a proxy to login to your system, you can either use your own login page (proxy will need to have a way to create a new User ID) or customize the New User Registration login sample page that comes with the New User Registration framework. Some self-service components configured for delegated access are delivered with the system as samples. The self-service components that are configured for delegated access are known as Delegated Access Components.
An administrative user can review the delegations made by a delegator from the Review Shared Information component. On behalf of the delegator, the administrative user can grant access to more transactions to an existing proxy and can also revoke access to already delegated transactions. The administrative user cannot create a new proxy on behalf of the delegator. Only updates to an existing proxy can be done.
Transactions delegated to a proxy can be manually revoked by a delegator, an administrative user, or by the Proxy Access Validation process. The Proxy Access Validation process ensures that a proxy still has access to a delegated component. Validation is performed in real time or through a batch process.