Viewing and Editing an Individual's Information
Use the Student Services Center component to view and access detailed information about a student or other individual.
Note: Only current and future-dated information appears in the Student Services Center component.
This section discusses how to:
View an individual's Student Center information.
View an individual's general information.
View a student's admissions information.
View a student's transfer credit information.
View a student's academics information.
View a student's self-service finances information.
View a student's self-service financial aid information.
|
Page Name |
Definition Name |
Navigation |
Usage |
|---|---|---|---|
|
Student Center |
SSS_STUDENT_CENTER |
|
Provides administrator ability to see what a specific individual, such as a student, sees on the Student Center self-service page. |
|
General Information |
SCC_SUM_PERSONAL |
|
Provides administrator at-a-glance overview of the individual's personal information with access to further detail such as initiated checklist items, service indicators and student groups. |
|
Admissions |
SCC_SUM_ADMISSIONS |
|
Provides administrator access to the student's self-service Admissions View with access to further detail. |
|
Transfer Credit |
SCC_SUM_TRNSFRCRDT |
|
Provides administrator overview of a specific student's transfer credit information with easy access to transfer credit transactions. |
|
Academics |
SCC_SUM_ACADEMICS |
|
Provides administrator overview of a specific student's academic information with easy access to academics transactions. |
|
Finances |
SCC_SUM_FINANCES |
|
Provides administrator overview of a specific student's financial information with easy access to finances transactions. |
|
Financial Aid |
SCC_SUM_FA |
|
Provides administrator overview of a specific student's financial aid information with easy access to financial aid transactions. |
Access the Student Center page ().
Image: Student Center page
This example illustrates the fields and controls on the Student Center page. You can find definitions for the fields and controls later on this page.
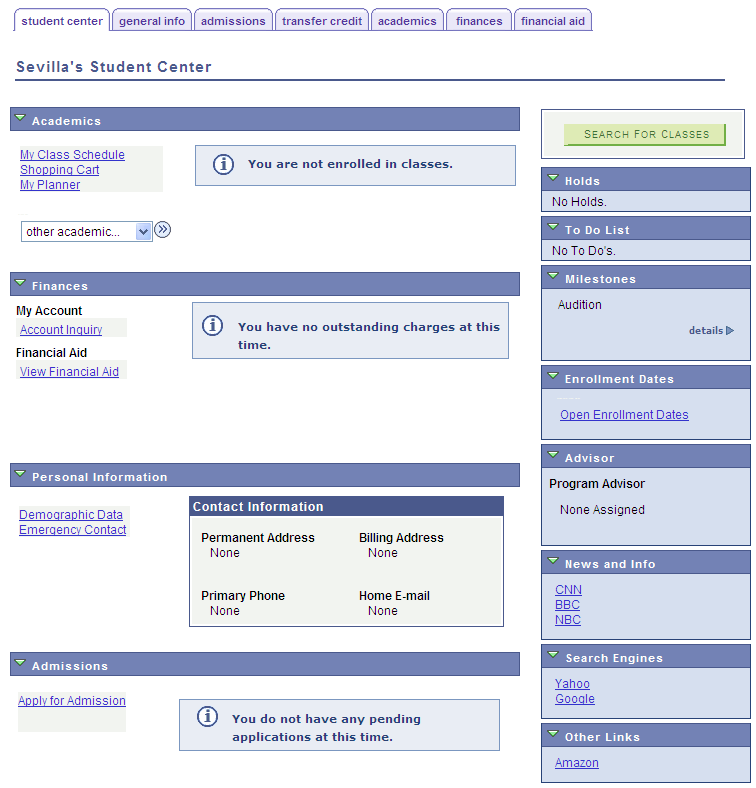
This page provides the same view of the self-service Student Center page as the self-service user sees. Clicking any of the buttons or links on this page takes the administrator to the same self-service destinations.
Enroll in Direct Deposit is available in the other financial field only if the Direct Deposit Enrollment check box is selected on the SF Institution Set - General Options page.
See Setting Up Installation Parameters and Keywords.
Note: When you click the Demographic Data link in the Personal Information section of the General Information page. DDA security (masking of the national ID or date of birth) is enforced. This way the administrative user will not see sensitive information that he or she is allowed to see from other pages or search records. The masking configuration applies for administrative users viewing the Student Center page from the Student Services Center.
Access the General Information page ().
Image: General Information page (1 of 4)
This example illustrates the fields and controls on the General Information page (1 of 4). You can find definitions for the fields and controls later on this page.

Image: General Information page (2 of 4)
This example illustrates the fields and controls on the General Information page (2 of 4). You can find definitions for the fields and controls later on this page.
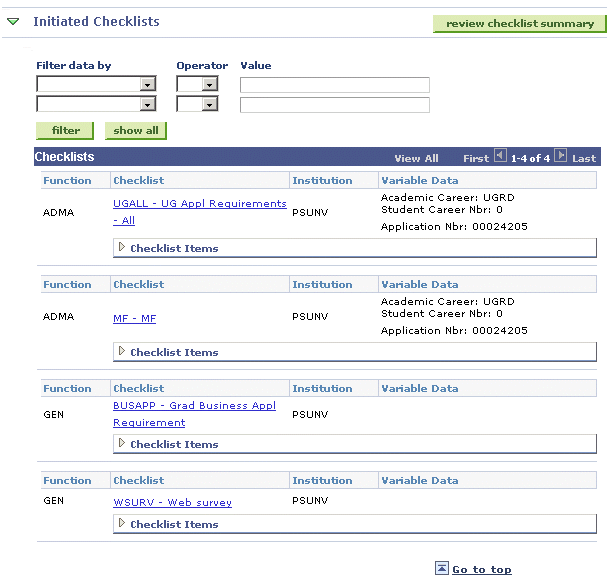
Image: General Information page (3 of 4)
This example illustrates the fields and controls on the General Information page (3 of 4). You can find definitions for the fields and controls later on this page.
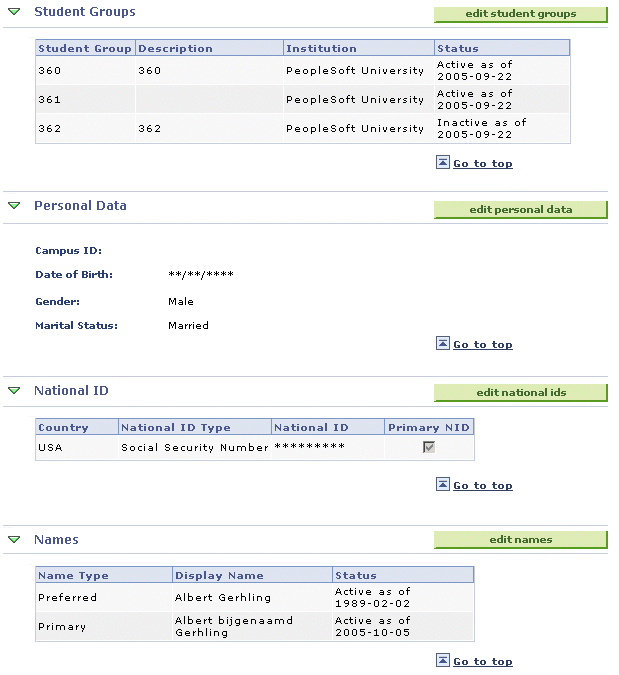
Image: General Information page (4 of 4)
This example illustrates the fields and controls on the General Information page (4 of 4). You can find definitions for the fields and controls later on this page.
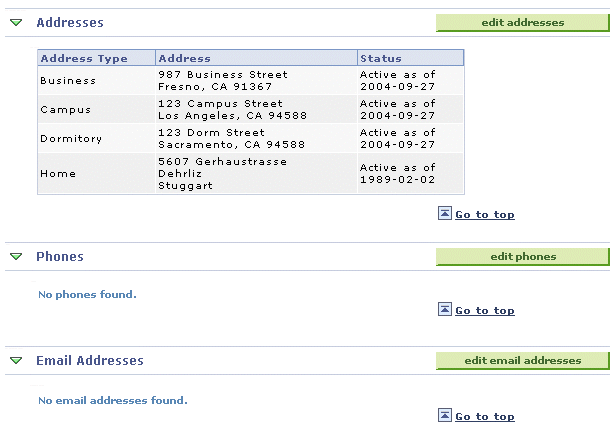
This page provides an overview of the individual's general information from components in the Campus Community menu and the Student Groups component available from Admissions, Student Records, and other menus.
Individuals can see some of the same information from the self-service Campus Personal Information menu.
Note: If an administrative user does not have security access to a feature on the General Information page, the action button related to that information is not available so that the user cannot see or update the information in the core component. For example, if an administrative user does not have access to the core Service Indicator Data page, the Edit Service Indicators button is not displayed.
This table lists the actions available on the General Information page and the core component to which the user is redirected for more detail:
|
Action Button |
Destination Component and 1st Page |
Core Navigation |
Self-Service Navigation |
|---|---|---|---|
|
Edit Service Indicators |
SERVICE_IND_PERS SRVC_IND_DATA1 |
|
|
|
Review Checklist Summary |
CHKLST_SUMM_PERS PERS_CHKLST_SUMM |
|
|
|
Edit Student Groups |
STDNT_GROUPS_PERS STDNT_GROUPS |
|
None |
|
Edit Personal Data |
SCC_BIO_DEMO SCC_BIO_DEMO_PERS |
|
|
|
Edit National IDs |
SCC_BIO_DEMO SCC_BIO_DEMO_PERS |
|
|
|
Edit Names |
NAMES_PERS SCC_NAMES_89 |
|
|
|
Edit Addresses |
ADDRESS_MAINT ADDRESSES_89 |
|
|
|
Edit Phones |
PHONE_PERS PHONE_PERS |
|
|
|
Edit Email Addresses |
E_MAIL_ADDR_PERS E_ADDR_PERS |
|
|
Access the Admissions page ().
Image: Admissions page (1 of 3)
This example illustrates the fields and controls on the Admissions page (1 of 3). You can find definitions for the fields and controls later on this page.
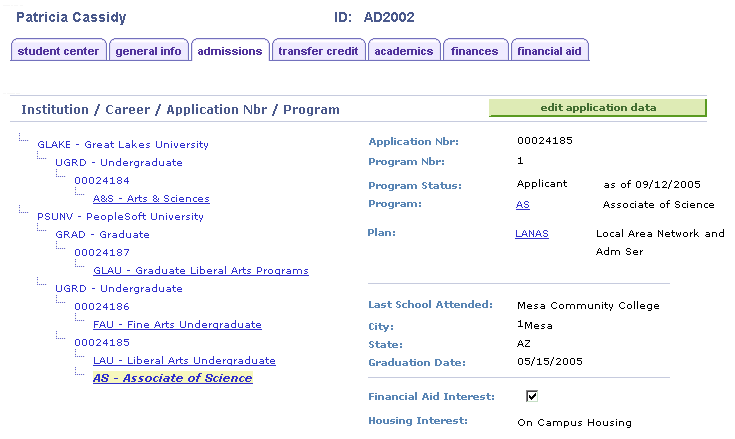
Image: Admissions page (2 of 3)
This example illustrates the fields and controls on the Admissions page (2 of 3). You can find definitions for the fields and controls later on this page.
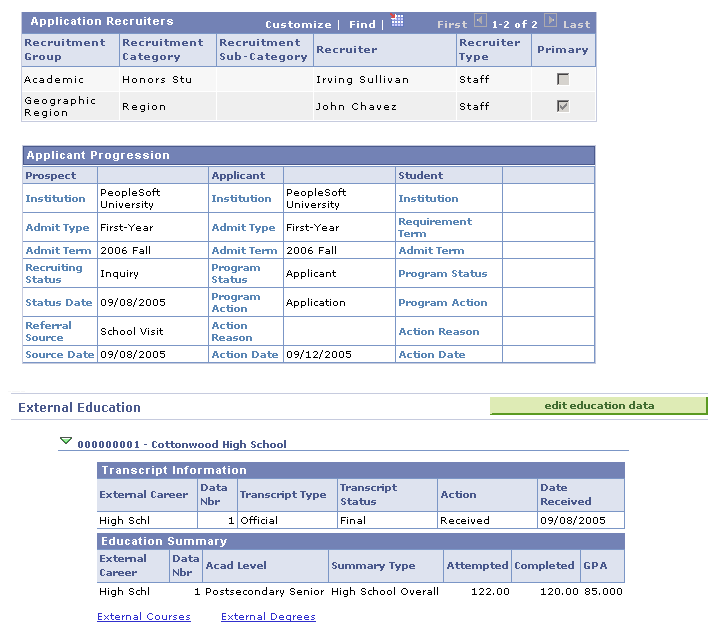
Image: Admissions page (3 of 3)
This example illustrates the fields and controls on the Admissions page (3 of 3). You can find definitions for the fields and controls later on this page.
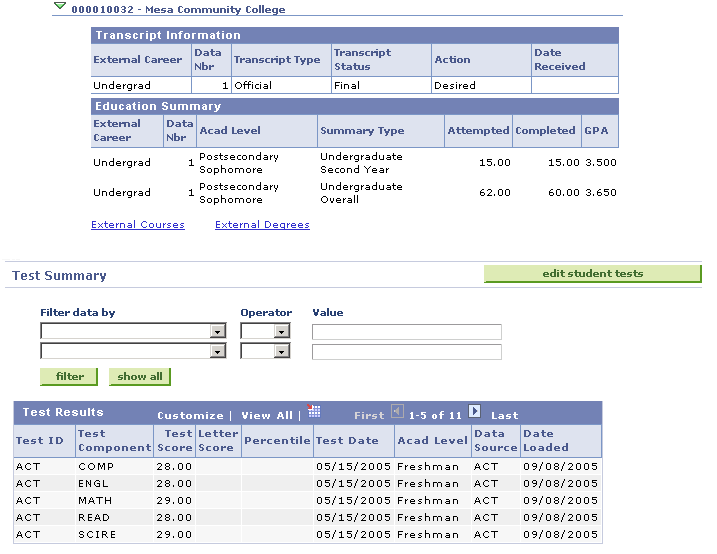
This page provides an overview of information from components in the Student Admissions menu. Students can see some of the same information from the self-service Student Admission Application status menu.
This table lists the actions available on the Admissions page and the core component to which the user is redirected for more detail:
|
Action Button |
Destination Component and 1st Page |
Core Navigation |
Self-Service Navigation |
|---|---|---|---|
|
Edit Application Data |
ACAD_HISTORY_PERS ADM_APPL_PROG_MNT |
|
|
|
Edit Education Data |
ACAD_HISTORY_PERS EXT_ACAD_DATA |
|
None |
|
Edit Student Tests |
ACAD_TST_RSLT_PERS STDNT_TEST_SCORE |
|
None |
Access the Transfer Credit page ().
Image: Transfer Credit page
This example illustrates the fields and controls on the Transfer Credit page. You can find definitions for the fields and controls later on this page.
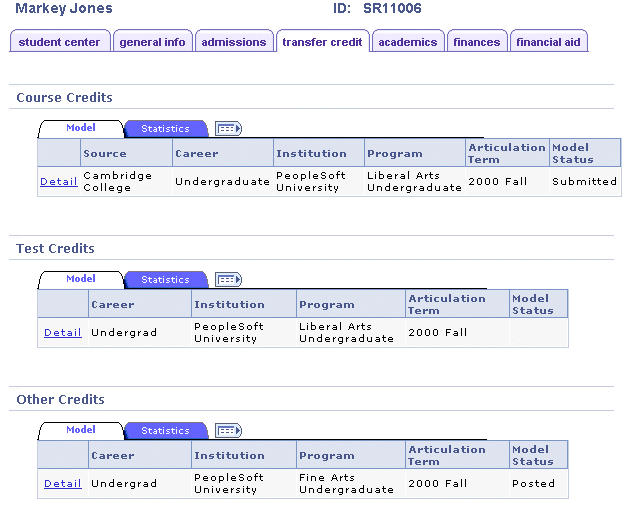
This page provides an overview of information from components in the Records and Enrollment menu. Students can also see some of the same information from the self-service View Transfer Credit Report menu.
Access the Academics page ().
Image: Academics page (1 of 3)
This example illustrates the fields and controls on the Academics page (1 of 3). You can find definitions for the fields and controls later on this page.
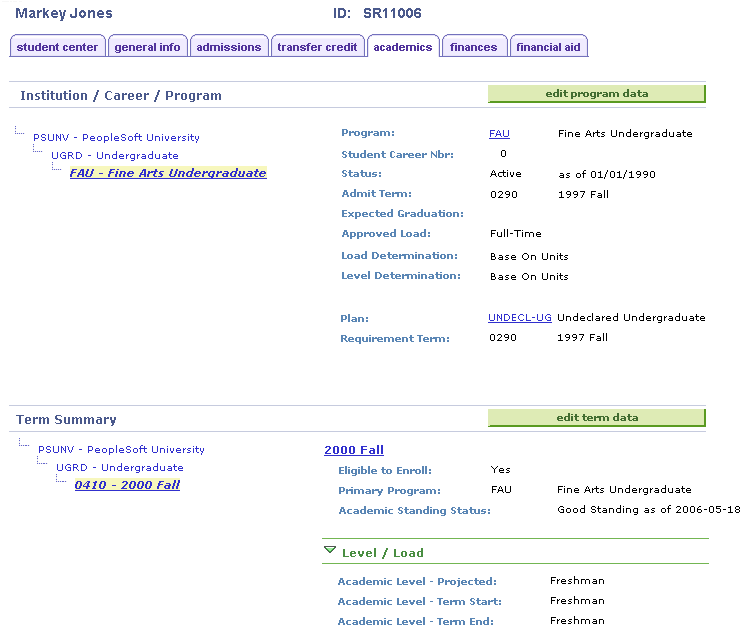
Image: Academics page (2 of 3)
This example illustrates the fields and controls on the Academics page (2 of 3). You can find definitions for the fields and controls later on this page.
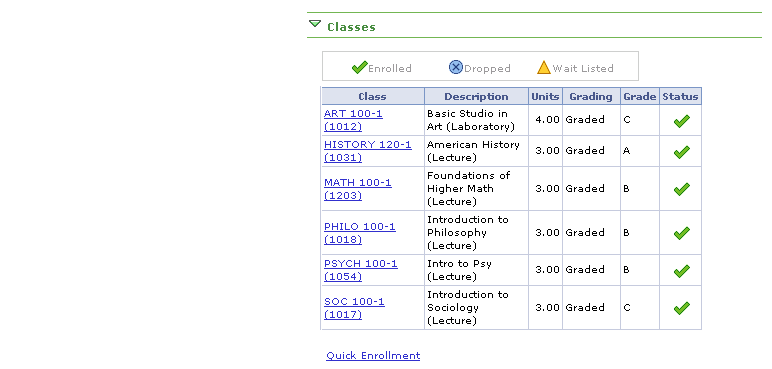
Image: Academics page (3 of 3)
This example illustrates the fields and controls on the Academics page (3 of 3). You can find definitions for the fields and controls later on this page.
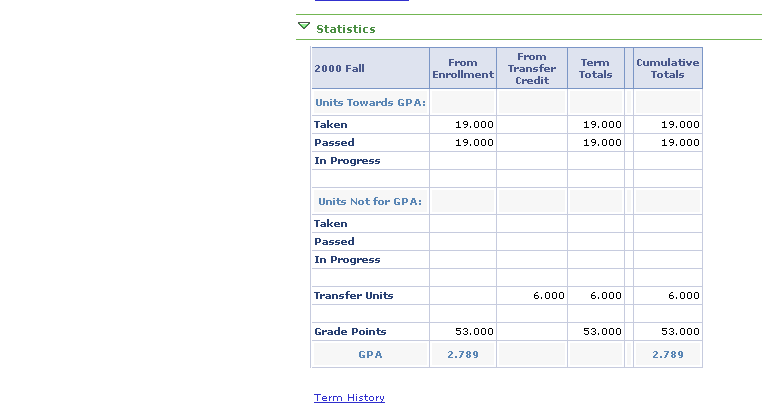
This page provides an overview of information from components in the Records and Enrollment menu. Students cannot see this information from PeopleSoft Campus Self Service.
This table lists the actions available on the Academics page and the core component to which the user is redirected for more detail:
|
Action Button |
Destination Component and 1st Page |
Core Navigation |
Self-Service Navigation |
|---|---|---|---|
|
Edit Student Program Data |
ACAD_PLAN STDNT_PROG |
|
None |
|
Edit Student Term Data |
STDNT_ACTIVATION STDNT_ACTIVATION |
|
None |
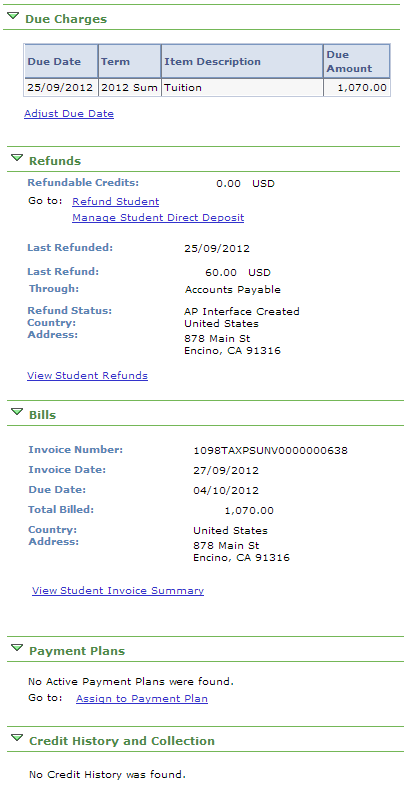
Access the Finances page ().
Image: finances page (1 of 2)
This example illustrates the fields and controls on the finances page (1 of 2). You can find definitions for the fields and controls later on this page.
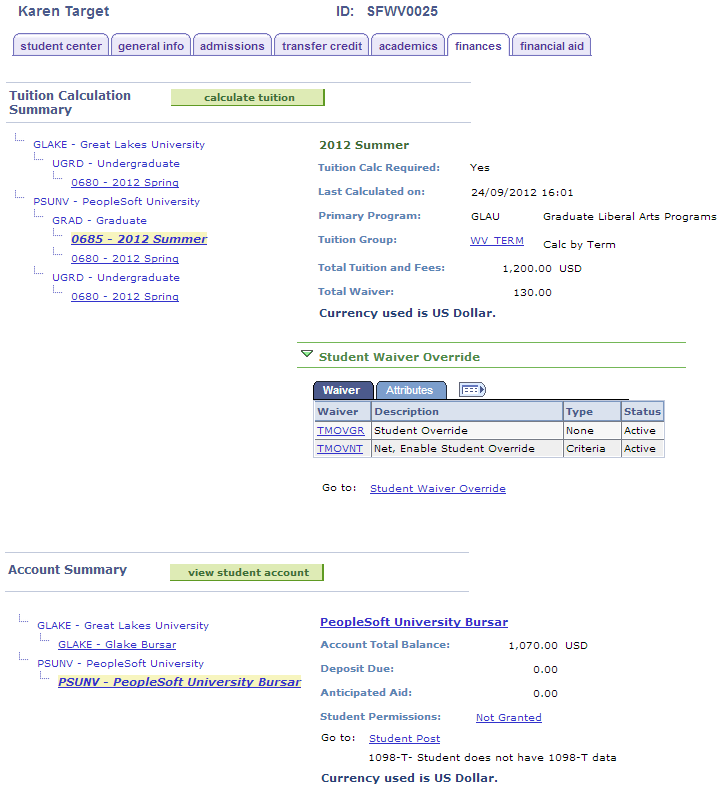
Image: finances page (2 of 2)
This example illustrates the fields and controls on the finances page (2 of 2). You can find definitions for the fields and controls later on this page.
Note: If you use a future date in the Assign Student Waiver page, the waiver does not appear in the Student Waiver Override region and the following message is displayed: This student has future-dated waiver overrides.
See Assigning Student Waivers.
Using the Finances Page
This page provides an overview of information from components in the Student Financials menu. Students cannot see this information from PeopleSoft Campus Self Service.
This table lists the actions available on the Finances page and the core component to which the user is redirected for more detail:
|
Action Button |
Destination Component and 1st Page |
Core Navigation |
Self-Service Navigation |
|---|---|---|---|
|
Calculate Tuition |
TUITION_CALC STDNT_TUITION_CALC |
|
None |
|
View Student Account |
ACCOUNT_VW ACCOUNT_SF |
|
None |
1098–T
The 1098–T link appears only for US institutions—the institution that appears in the Account Summary section of the finances page must have a value of USA in the Country field on the Academic Institution 1 page.
For US institutions, the link appears:
Only if the Use Electronic Statements check box on the 1098–T TIN Detail setup page is selected.
Only for students for whom 1098–T data has been generated.
If the Use Electronic Statements check box is not selected on the setup page, a message appears instead of the 1098–T link on the finances page: 1098-T- TIN is not set to Use Electronic Statement.
If 1098–T data is not available for a student, a message appears instead of the 1098–T link on the finances page: 1098-T- Student does not have 1098-T data.
Click the 1098–T link to access the (Review 1098–T Data) 1098–T Data page. The page displays the most recent 1098–T data for the student in context—that is, the maximum sequence number in the 1098–T Status group box.
On the 1098–T Data page, click the View 1098–T link to retrieve a 1098–T .pdf of the most recent 1098–T data.
The link is sensitive to the context in the 1098-T Status scroll area—that is, the .pdf is generated using the data in context.
Manage Student Direct Deposit
Click the Manage Student Direct Deposit link to access the Manage Student Direct Deposit page with the context of student.
Note: The Search page does not appear.
Use the Manage Student Direct Deposit page to set up and edit direct deposit distributions for AP refunding for a student.
The Manage Student Direct Deposit link appears only if the Refund Method value on the Refund Setup page is A/P and the Use Single Payment Voucher option is selected in the AP Refunding Option group box on the SF Installation page.
Unlike the Enroll in Direct Deposit link in Student Center, this link is not dependent on SF Institution Set setup.
See:
Access the Financial Aid page ().
Image: Financial Aid page (1 of 2)
This example illustrates the fields and controls on the Financial Aid page (1 of 2). You can find definitions for the fields and controls later on this page.
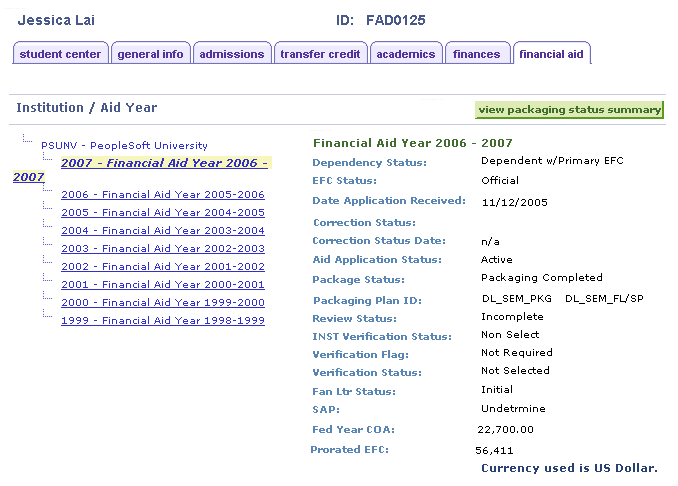
Image: Financial Aid page (2 of 2)
This example illustrates the fields and controls on the Financial Aid page (2 of 2). You can find definitions for the fields and controls later on this page.
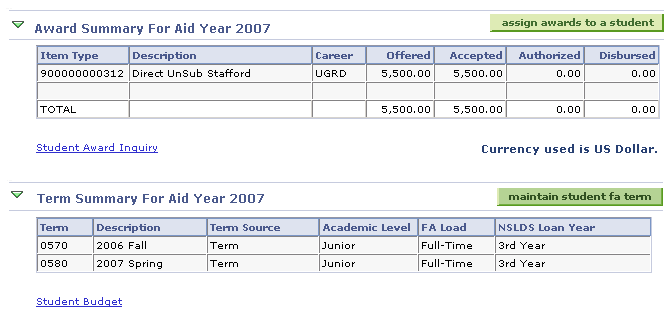
This page provides an overview of information from components in the Financial Aid menu. Students cannot see this information from PeopleSoft Campus Self Service.
This table lists the actions available on the Financial Aid page and the core component to which the user is redirected for more detail:
|
Action Button |
Destination Component and 1st Page |
Core Navigation |
Self-Service Navigation |
|---|---|---|---|
|
View Packaging Status Summary |
STDNT_AID_PACKAGE STDNT_AID_PACKAGE |
|
None |
|
Assign Awards to a Student |
AWARD_ENTRY_MC STDNT_AWARD_ENTRY3 |
|
None |
|
Maintain Student FA Term |
STDNT_FA_TERM STDNT_FA_TERM |
|
None |