Setting Up and Managing Student Bank Accounts
Access the Bank Accounts - Student page ().
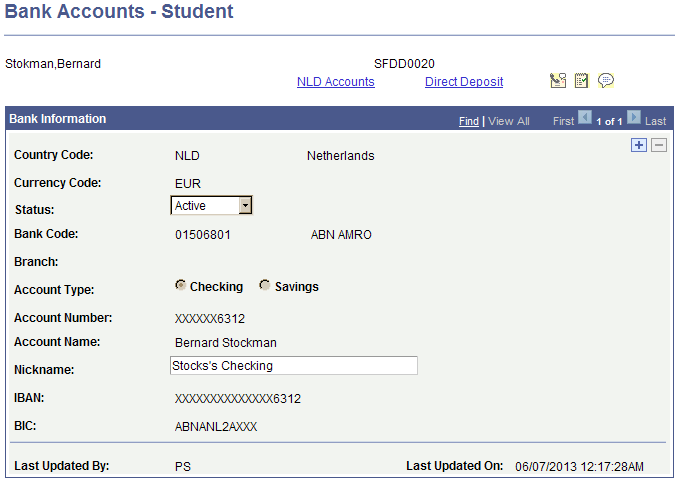
Image: Bank Accounts - Student page
This example illustrates the fields and controls on the Bank Accounts - Student page. You can find definitions for the fields and controls later on this page.
Use this page to:
Set up multiple bank accounts for a student.
View or edit bank accounts that have been created by students using Self Service.
Note: This page is available only to administrative users. Also, administrative users who are currently logged in will not be able to create nor update their own bank details.
When you set up a bank account for a student, an agreement type of Bank Account is inserted into the Agreement table (SSF_AGREE_TBL) when you save the page.
In update/edit mode, the only fields available are and Nickname. All other fields are view-only. In update/edit mode, you can add but not delete bank accounts.
When you set up or modify a bank account, data is inserted in the 3C trigger table with the Bank Event ID and institution to facilitate communication using 3C and the Comm Gen process. The Bank Event ID and institution are derived from the SF Installation setup only if the Bank Event ID is populated.
The bank details on this page are validated according to the validation procedures in HRMS. To prevent duplicate bank accounts, the system checks that the combination of EmplID, Routing Number, Branch, and Account Number is unique.
See Understanding Communications Setup.
If you click View All, data appears in descending order, that is, the most recent data is shown first.
|
Field or Control |
Definition |
|---|---|
| Country Code and |
Select a country code. Otherwise, the default value from your HRMS setup is retrieved. |
| Currency Code |
Select a currency code. Otherwise, the default value from your HRMS setup is retrieved. |
| Status |
Displays whether the bank account is active or inactive. By default, it is set to Active. This field is disabled when you are setting up a new bank account. If you want to deactivate a bank account, change its status to Inactive. However, if a bank account is used for direct deposit distribution, this field is disabled and the message “This account is in use.” is displayed. To change the status to Inactive for a bank account used in direct deposit distributions, you must first deactivate the direct deposit distribution. When a bank account is inactive, you can no longer make changes from the Bank Accounts - Student page nor the Self Service page. |
| Routing Number |
Select a routing number. The bank details record in HRMS controls which values are available. If you provide a BIC Code, this field displays the information derived from the BIC and appears as view-only. |
| Branch |
Select a branch ID. This field appears depending on the country code and routing number. If you provide a BIC Code, this field displays the information derived from the BIC and appears as view-only. |
| Account Type |
Select an account type. By default, Checking is selected. |
| Account Number |
Enter an account number. For security reasons, the account number is masked to show only the last 4 digits after you save the page. The account number is also encrypted and stored in the database. If you provide a value in the IBAN field, this field displays information derived from the IBAN and appears as view-only. |
| Confirm Account Number |
Enter the same value you entered in Account Number. This field is an added security measure and ensures that you provided the correct account number. |
| Check Digit |
This field is available only when the IBAN field is not used. If the IBAN field is used, the value is derived from the IBAN and appears as view-only. |
| Account Name |
Enter the name as it appears on the bank account. |
| Nickname |
(Optional) Enter an alias for the bank account. |
| IBAN and BIC Code |
If you provide the IBAN, you must also provide a BIC Code. Student Financials uses the information in the HRMS IBAN Country Setup page to perform the required validation and prompt for values in the lookups.
For security reasons, only the last four digits of the IBAN appear after you save the page. It is also encrypted and stored in the database. See PeopleSoft HRMS Application Fundamentals, ”Setting Up Banks and Bank Branches.” |
| Direct Deposit |
This link is available only after you save the page and only if you are authorized to access the Direct Deposit - Student page. Also, the AP Refunding Option must be set to Use Single Payment Voucher on the SF Installation page. Click to access the Direct Deposit - Student page to set up or view direct deposit distributions. |
| NLD Accounts |
This link is available only after you save the page and if you are authorized to access the NLD Student Accounts page. Click to access the NLD Student Accounts page for the student whose bank account you are creating or updating. See: |
| Last Updated By and Last Updated On |
Last Updated By shows the OPRID and Last Updated On shows the date and time that the past was last modified. |
See: