Non-volatile dual inline memory module (NV-DIMM) backs up data without a battery. In case of a power failure or system crash, the data in the NV-DIMM is securely preserved and available almost immediately upon power being restored to the Controller. A failed NV-DIMM can bring the Controller offline and must be restored as soon as possible.
- Prerequisites:
Ensure that you have a Phillips Number 2 screwdriver with at least a 4-inch shaft.
Before handling a component, touch a grounded surface to discharge any static electricity.
Attach an electrostatic discharge (ESD) wrist strap to your wrist, and stand on an ESD mat while replacing components.
- Ensure that all DIMM and NV-DIMM slots are filled with either filler panels or DIMMs or NV-DIMMs to ensure proper airflow.
- Ensure that the ESM type matches the NV-DIMM type. For example: ESM-A with NV-DIMM-A.
- Rotate the ESM drive cage and remove the air duct to access the NV-DIMMs for replacement.
Fail over the Controller before replacing the component using Guided Maintenance.
Note: The Controller must be failed over to prevent data loss or data corruption during the component replacement process.
An Oracle Flash Storage System with a basic configuration contains two NV-DIMMs. An Oracle FS System configured for performance contains four NV-DIMMS. Each NV-DIMM is connected to an energy storage module (ESM) through a cable. If the power to the Controller is lost, each NV-DIMM receives power from the ESM to preserve the data in the NV-DIMM until power is restored and the Controller software recovers the data. This prevents the data in the cache from being destabilized. An NV-DIMM is a field replaceable unit (FRU). Replacing an NV-DIMM requires you to bring the Controller offline. The following figure shows a close-up view of the NV-DIMM.
Figure 1 NV-DIMM 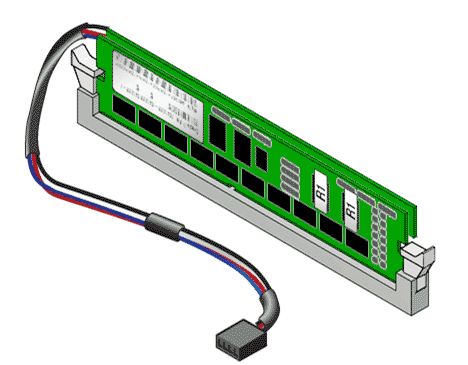
Note: The NV-DIMMs can be accessed only after removing the cover over the Controller chassis.
Note: Do not mix ESM and NVDIMM types. ESM type must match the NVDIMM type. For example, an ESM labelled A (ESM-A) must be paired with an NVDIMM labelled A (NVDIMM-A); The NVDIMM type is printed on a small label near the end of the NVDIMM cable.
Note: To replace an NV-DIMM, you do not need to remove the Controller from the rack but extend it along the Controller rails using the cable management arm (CMA).
Note: All NV-DIMM fault LEDs are located next to the NV-DIMM slots along with the NV-DIMM slot number.
Caution
Ensure that all power is removed from the Controller before removing or installing the NV-DIMM. Disconnect the power cables before performing the NV-DIMM replacement procedure.Procedure Overview