26 Add Costs to Work Orders
This chapter contains these topics:
26.1 Adding Costs to Work Orders
You add costs to a work order whenever you issue parts and materials to a work order or enter employee time on a work order. You can use any JD Edwards World system that creates transactions (journal entries) with a subledger type of W in the Account Ledger table (F0911) to add costs to a work order. Each transaction contains the work order number.
26.2 Issuing Parts to a Work Order
When the maintenance tasks associated with a work order require parts, you add the cost of the parts to the work order by issuing parts to the work order. Depending on the parts requirements of the maintenance tasks and how you have applied parts to a work order, you can choose from the following methods to issue parts to a work order:
| Method | Description |
|---|---|
| Issuing parts included on parts lists | Use this method if you have set up parts lists for your work orders. When you issue parts included on the work order parts list, the system reflects a reduction in available inventory for the parts by reducing the commitment for the parts.
See Section A.1.3, "Commitments" in Appendix A for more information about inventory commitments. |
| Issuing miscellaneous parts to a work order | Use this method if you need to assign different account numbers to parts issues than the account from the work order parts list. You can also use this method if you want to add parts costs directly to a piece of equipment without using a work order. |
Issuing parts to a work order consists of the following tasks:
-
Issuing parts included on the work order parts list
-
Issuing miscellaneous parts to a work order
-
Posting inventory issues to the G/L
26.2.1 Before You Begin
-
Verify that you have purchased and installed the following systems. You must have installed these systems to be able to issue parts to a work order:
-
· System 30 - Product Data Management
-
· System 31 - Shop Floor Control
-
· System 40 - Inventory Base and Order Processing
-
· System 41 - Inventory Management
-
-
Set up the 4122 and 4124 automatic accounting instructions in the Inventory Management system. See Understanding Automatic Accounting Instructions for the Inventory Management System in the JD Edwards World Inventory Management Guide.
-
Set up branch/plant constants in the Inventory Management system to specify how you want the system to display parts transactions in the G/L. You can specify either part numbers or part descriptions, but not both. See Defining Branch/Plant Constants in the JD Edwards World Inventory Management Guide.
|
See Also:
|
26.2.2 Issuing Parts Included on the Work Order Parts List
From Equipment/Plant Management (G13), choose Equipment Work Orders
From Equipment Work Orders (G1316), choose Work Order Processing
From Work Order Processing (G1317), choose Work Order Inventory Issues
You issue parts included on the work order parts list when you need to add costs to a work order for parts that you included on the parts list. This method is especially useful when you want to issue all parts from the parts list to the work order at the same time. You can specify the debit account to which any or all of the parts are charged if it differs from the charge to business unit specified on the work order.
You can also use Work Order Inventory Issues to issue parts to a work order that are not included on the work order parts list. When you issue parts that are not included on the work order parts list, the system updates the parts list to include the additional parts. You can use processing options to restrict the parts issued to a work order to only parts that are included on the parts list.
You can use processing options to direct the system to automatically preload all part detail lines with the Process Issue option. This is particularly useful if you rarely choose not to issue parts from the parts list to the work order. Other processing options allow you to update the work order status based on whether all or only some of the parts have been issued to the work order. This is especially useful for lengthy parts lists for which the availability of some of the parts might be delayed.
To issue parts included on the work order parts list
On Work Order Inventory Issues
Figure 26-1 Work Order Inventory Issues screen
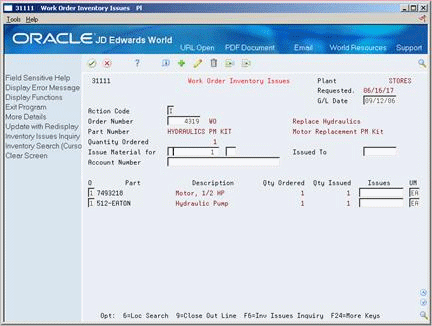
Description of "Figure 26-1 Work Order Inventory Issues screen"
-
To locate a work order, complete the following field:
-
Order Number
The system updates the screen with default values for all inventory items and quantities from the work order parts list.
-
-
Complete the following optional fields:
-
Issue Material For
-
Issued To
-
Issue Quantity
-
Account Number
-
-
Choose More Details.
Figure 26-2 Work Order Inventory Issues screen
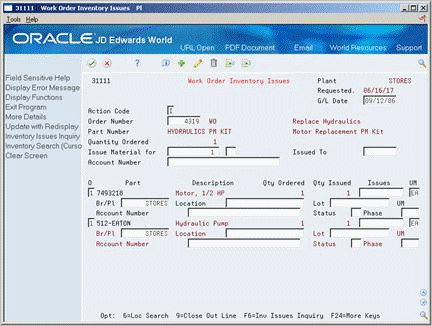
Description of "Figure 26-2 Work Order Inventory Issues screen"
-
Complete the following optional fields:
-
Br/Pl Branch or Plant
-
Location
-
Lot
-
Account Number
-
Phase
-
-
For each part to issue to the work order, choose Process Issue.
| Field | Explanation |
|---|---|
| Issue Material for | The number of parent items you want to process. The system calculates lower-level values in quantity per the number of parent items requested. For example, if 3 components are needed for a parent item, and the requested quantity is 10, the system plans for 30 components. |
| Issued To | A number that identifies an entry in the Address Book system. Use this number to identify employees, applicants, participants, customers, suppliers, tenants, and any other Address Book members.
Form-specific information The system enters a default value based on the second address book number (AN8) entered on the work order header. |
| Location | A code that identifies inventory locations in a branch/plant. You define the format of the location identifier by branch/plant. |
| Lot | A number that identifies a lot or a serial number. A lot is a group of items with similar characteristics. |
| Account Number | A field that identifies an account in the general ledger. You can use one of the following formats for account numbers:
The first character of the account indicates the format of the account number. You define the account format in the General Accounting Constants program. Form-specific information Identifies the debit account to which the parts are charged. The account that you enter in this field overrides the charge to business unit on the work order. If you leave this field blank, the system charges the parts based on the charge to business unit on the work order and the object account from the Inventory system AAIs. This field appears in the header and detail portions of the screen. If you enter an account in the header portion of the screen and leave the account fields blank in the detail portion of the screen, the header account applies to all detail lines. If you enter an account in the detail portion for a particular item, it overrides the account specified in the header portion. |
26.2.3 What You Should Know About
| Topic | Discussion |
|---|---|
| Reversing an inventory issue transaction | You can reverse an inventory issue transaction by typing the quantity of the item that you want to reverse as a negative number in the Issues field. |
| Closing out parts no longer required | You can close out parts no longer required for a maintenance task by choosing Close Out Line for each item that you no longer need. You must also remove the value from the Issues field for the items that you do not want to process. When you close out an item, the system indicates closed in the Issues field for that item. |
| Equipment under warranty | When you issue parts to a work order for a piece of equipment for which you have defined a warranty, the system provides a soft warning indicating the warranty status. |
| Issuing non-stock parts | You can issue non-stock parts to a work order if you have defined them on the work order parts list. When you use Work Order Inventory Issues to issue non-stock parts, the system updates the work order parts list, but does not create any accounting transactions.
See Appendix A, "Inventory Concepts and Setup" for more information about stock and non-stock parts. |
| Import/Export Functionality for Work Order Inventory Issues (P31111) | You can use the Import/Export functionality to allow Import and export Equipment Work Order Inventory issues.
Use the Function Key to create a template to export P31111 to a file or upload data from an outside file to P31111. |
26.2.5 Issuing Miscellaneous Parts to a Work Order
From Equipment/Plant Management (G13), choose Equipment Work Orders
From Equipment Work Orders (G1316), choose Work Order Processing
From Work Order Processing (G1317), choose Inventory Issues
Use Inventory Issues to issue miscellaneous parts to a work order when you need to assign different account numbers to charge parts issues than the account from the work order parts list. You can also use this method if you want to add parts costs directly to a piece of equipment without using a work order.
26.2.6 Before You Begin
-
Verify that you have purchased and installed the following systems. You must have installed these systems to be able to access Inventory Issues:
-
· System 40 - Inventory Base and Order Processing
-
· System 41 - Inventory Management
-
-
You must set the processing option for Screen Control to display equipment-based issues or equipment and subledger-based issues to enter an equipment number and a work order number on Inventory Issues.
|
See Also:
|
To issue miscellaneous parts to a work order

-
Complete the following fields:
-
Branch/Plant
-
Account Number
-
Subledger
-
Equipment Number
-
Explanation
-
-
For each part, complete the following fields:
-
Number
-
Quantity
-
Location
-
Lot
-
-
For each part, complete the following optional field:
-
Unit of Measure
-
-
Complete the following optional fields:
-
Transaction Date
-
Type
-
Phase
-
-
Choose Additional Information.
Figure 26-4 Inventory Issues screen (Additional Information area)

Description of "Figure 26-4 Inventory Issues screen (Additional Information area)"
-
Complete the following optional fields:
-
Branch or Plant
-
Extended Cost
-
| Field | Explanation |
|---|---|
| Branch/Plant | An alphanumeric field that identifies a separate entity within a business for which you want to track costs. For example, a business unit might be a warehouse location, job, project, work center, or branch/plant.
You can assign a business unit to a voucher, invoice, fixed asset, and so on, for purposes of responsibility reporting. For example, the system provides reports of open accounts payable and accounts receivable by business units to track equipment by responsible department. Security for this field can prevent you from locating business units for which you have no authority. Note: The system uses this value for Journal Entries if you do not enter a value in the AAI table. Form-specific information The Branch/Plant field in the fold area lets you indicate from which branch to issue if an item has more than one branch location. |
| Explanation | This text identifies the reason that a transaction occurred.
Form-specific information A specific explanation for a particular issue. If you leave this field blank, the system automatically supplies this explanation from the descriptions that are associated with the document type that you specified. |
| Quantity | The available quantity can be on-hand balance minus commitments, reservations, and backorders. This is user defined in branch/plant constants.
Form-specific information This is the quantity of an inventory item to be issued. |
| Location | A code that identifies inventory locations in a branch/plant. You define the format of the location identifier by branch/plant. |
| Lot | A number that identifies a lot or a serial number. A lot is a group of items with similar characteristics.
Form-specific information You can set the processing options to have the system use the lot specified in the primary location as the default. |
| Trans. Date | The date the work order was entered into the system. |
| Phase | A user defined code (00/W1) that indicates the current stage or phase of development for a work order. You can assign a work order to only one phase code at a time.
Note: Certain forms contain a processing option that allows you to enter a default value for this field. If you enter a default value on a screen for which you have set this processing option, the system displays the value in the appropriate fields on any work orders that you create. The system also displays the value on the Project Setup screen. You can either accept or override the default value. Form-specific information You can charge inventory costs to a particular phase of a project. |
| Extended | For accounts receivable and accounts payable, this is the invoice (gross) amount. For sales orders and purchase orders, this is the unit cost times the number of units. |
26.2.7 What You Should Know About
26.2.8 Processing Options
See Section 55.8, "Equipment and Subledger Inventory Issues (P4112)"
See Section 55.9, "Simple Inventory Issues (P4112)"
See Section 55.10, "Work Order (Subledger) Inventory Issues (P4112)"
26.2.9 Posting Inventory Issues to the G/L
From Equipment/Plant Management (G13), choose Equipment Work Orders
From Equipment Work Orders (G1316), choose Work Order Processing
From Work Order Processing (G1317), choose Post Inventory to G/L
When you issue parts to a work order, the system creates unposted G/L transaction records in the Account Ledger table (F0911). Each transaction contains the work order number and the equipment number. You must post these transactions to the G/L. You use Post Inventory to G/L to post transactions to the G/L. When you post transactions to the G/L, the system updates the Account Balances table (F0902).
After you post inventory transactions to the G/L, you must post them to equipment in order to update the Item Balances table (F1202). Processing options in the G/L post program enable you to post transactions to equipment at the same time you post to the G/L.
When you choose Post Inventory to G/L, the system displays Processing Options Revisions. After you choose the appropriate processing options, the system displays a message that the batch was submitted to post.
26.2.10 What You Should Know About
26.3 Entering Employee Time on a Work Order
You can enter employee time on a work order to account for labor costs associated with the work order. You can use the following methods to enter employee time:
When you use the Time Accounting system, you can enter labor time for individual routing steps. When you use the Payroll system, the system calculates payroll liabilities, such as payroll taxes and employee benefits.
You can enter employee time for a work order using the following methods:
-
Enter work order time by employee
-
Enter work order time by shop or business unit
26.3.1 Before You Begin
-
Verify that you have purchased and installed at least one of the following systems. You must have installed at least one of these systems to be able to enter employee time on a work order:
-
· System 05 - Time Accounting and HRM Base
-
· System 07 - Payroll
-
· System 77 - Payroll (Canadian)
-
-
Verify that the Debit - Labor/Billings/Equipment table is set up. See Setting Up Automatic Accounting Instructions in either the JD Edwards World U.S. Payroll II Guide or the JD Edwards World Time Accounting Guide.
26.3.2 What You Should Know About
26.3.3 Entering Work Order Time by Employee
From Equipment/Plant Management (G13), choose Equipment Work Orders
From Equipment Work Orders (G1316), choose Work Order Processing
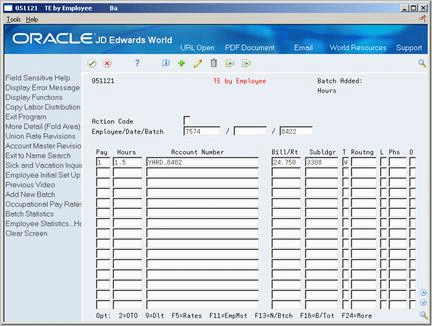
From Work Order Processing (G1317), choose TE by Employee
Alternately, you can choose Time Entry from the Payroll Master Menu or the Canadian Payroll Master Menu.
Enter work order time by employee when you need to:
-
Transfer employee information for an individual employee from a work order to payroll
-
Charge employee hours and costs to a work order, a piece of equipment, or an individual routing step
To enter work order time by employee
-
Complete the following fields:
-
Employee
-
Date
-
Batch Number
-
Pay Type
-
Hours
Note:
You may add your own batch number or have the system automatically assign the batch number by selecting 1 in Processing Option #4. -
-
Complete the following field:
-
Account Number
-
-
If you are not using speed entry, complete the following fields:
-
Subledger
-
Subledger type
-
-
Complete the following optional fields:
-
Billing Rate
-
Routing (Time Accounting only)
Note:
You can set the processing options to allow you to select which employee rate will be used, such as Employee Occupational Rate or the Union Rate. -
-
Choose More Detail.
Figure 26-6 TE by Employee screen (Detail area)

Description of "Figure 26-6 TE by Employee screen (Detail area)"
-
If you are not using speed entry, complete the following field:
-
Eqwo (Equipment Worked On)
-
To generate a timecard journal
From Time Accounting System (G05), choose Time Card Post/History Update
From Time card Post and History Update (G0513), choose Generate Timecard Journals
On Generate Timecard Journals
Figure 26-7 Generate Timecard Journals screen
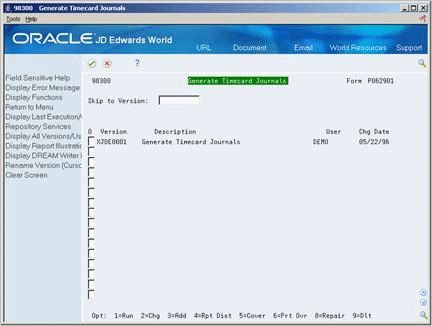
Description of "Figure 26-7 Generate Timecard Journals screen"
-
Create a version of P062901.
-
In Processing Options, enter the correct G/L date for Journal Entries and set the other processing options to your preference.
-
In Data Selection, make sure you enter the batch number created from Time Entry.
-
Run the Program.
-
Select Journal Batch Review.
-
Review the new Batch number.
-
Approve the batch.
On Post Journals to G/L
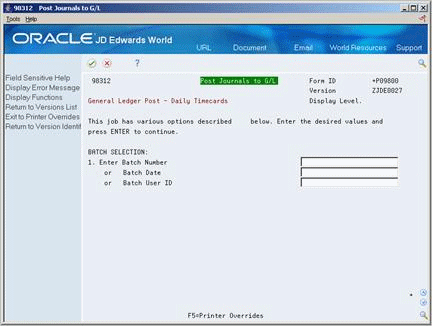
-
Enter the Batch number
-
Choose Enter.
After running the program, you will have G/L entries for employee time entry on a work order, which you can review for the proper accounts, credit and debit entries. You will also have a batch record, which you can review in the Batch Header Revisions program P0011.
| Field | Explanation |
|---|---|
| Bill/Rt | A rate used for the billing of labor services. This rate is often referred to as the billing or recharge rate. The extended amount based on this rate will be charged to the primary distribution account on the timecard with an offset being made to an account derived from the Accounting Rules table. This rate will not affect the employee's payroll. To allow billing rates in time entry, you must set the employee's record type as either 2 or 3 on the Basic Employee Entry screen.
A rate entered on any of the following screens overrides the rate in the Employee Primary Job table:
|
| Account Number | A field that identifies an account in the general ledger. You can use one of the following formats for account numbers:
The first character of the account indicates the format of the account number. You define the account format in the General Accounting Constants program. Form-specific information You can use speed codes to reduce data entry when you enter work order information. When you enter a speed code, the system automatically enters account information that is stored elsewhere in the system. To enter a speed code, enter a back slash (\), the work order number, and a period (.) For example, work order 145648 is entered as \145648. in the Account Number field. When you add the timecard information, the system:
|
| Routing | In routings, this number is used to sequence the fabrication or assembly steps in the manufacture of an item. You can track costs and charge time by operation.
In bills of material, this number designates the routing step in the fabrication or assembly process that requires a specified component part. You define the operation sequence after you create the routing for the item. The Shop Floor Control system uses this field in the backflush/preflush by operation process. In engineering change orders, this number is used to sequence the assembly steps for the engineering change. Skip To fields allow you to enter an operation sequence that you want to begin the display of information. You can use decimals to add steps between existing steps. For example, use 12.5 to add a step between steps 12 and 13. |
26.3.4 What You Should Know About
26.3.6 Entering Work Order Time by Shop or Business Unit
From Equipment/Plant Management (G13), choose Equipment Work Orders
From Equipment Work Orders (G1316), choose Work Order Processing
From Work Order Processing (G1317), choose TE by Shop or Business Unit
You can enter employee time on a work order to account for labor costs associated with the work order. You can enter time by job or business unit when you need to:
-
Transfer shared information for multiple employees from a work order to payroll
-
Charge hours and costs for multiple employees to a work order or multiple accounts
To enter work order time by shop or business unit
On TE by Shop or Business Unit
Figure 26-9 TE by Shop or Business Unit screen
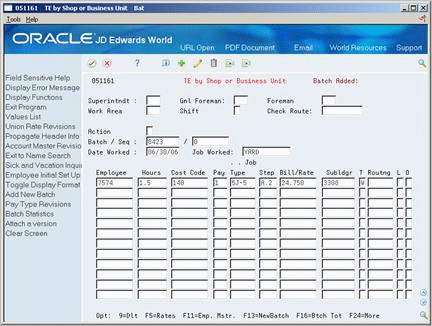
Description of "Figure 26-9 TE by Shop or Business Unit screen"
-
Complete the following fields:
-
Batch Number
-
Date Worked
-
Job Worked
-
Employee
-
Hours
-
Cost Code
-
Pay Type
-
-
If you are not using speed entry, complete the following fields:
-
Subledger
-
Subledger Type
-
-
Complete the following optional field:
-
Routing Step (Time Accounting only)
-
-
To display equipment fields, choose Values List.
Figure 26-10 TE by Shop or Business Unit screen (Equipment fields)
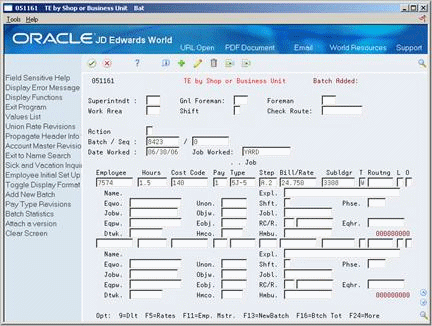
Description of "Figure 26-10 TE by Shop or Business Unit screen (Equipment fields)"
-
If you are not using speed entry, complete the following field:
-
Eqwo (Equipment Worked On)
-