7 Work With Bills of Material
A bill of material defines an item as a parent or component in the assembly. It details the specific components and quantities that are used to assemble the parent item and provides the foundation for costing and planning activities.
As you define a bill of material, you combine information from the Manufacturing Constants, Item Master, and Branch/Plant tables. The resulting bill of material is stored in the Bill of Material table. Changes are stored in the Bill of Material Audit table (if you choose to track them).
This chapter contains these topics:
-
If you are using batch bills of material, define a bill of material for batch bills, define routings that correspond to the batch sizes, and set the processing options for Enter/Change Bill and Work Order Entry to activate batch functions.
See Section 6.3, "Setting Up Bill of Material Types" and Entering a Routing in the JD Edwards World Configuration Management Guide.
| Topic | Description |
|---|---|
| Deleting a bill of material | When you delete a parent item's bill of material, the item's lower level components and subassemblies are not affected.
When you delete a bill of material, you are prompted to confirm the deletion. |
| Entering similar bills of material | If you want to enter bills of material for the same parent item but to multiple locations, you can use the "same as except" method. Locate the existing bill, change the appropriate data, and reenter it. |
| Importing mass amounts of data | As an alternative to entering bill of material data manually, you can use the Bill of Material Revisions - Z File program (P3002Z) to import an extensive amount of bill of material data into your system. See Appendix C, "Import Mass Data into Manufacturing Systems" for more information. |
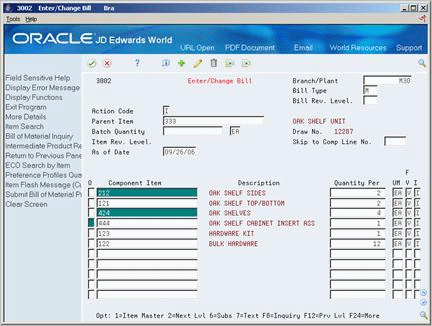
7.1 Entering Parent Items
You can use the following functions in the Bill of Material program (P3002):
From Daily Product Data Management (G30), choose Daily PDM Discrete
From Daily PDM Discrete (G3011), choose Enter/Change Bill
On Enter/Change Bill
-
Complete the following required fields:
-
Branch/Plant
-
Bill Type
-
Parent Item
-
-
Complete the following optional fields:
-
Item Revision Level
-
As of Date
-
Skip to Component Line Number
-
| Field | Explanation |
|---|---|
| Branch/Plant | A secondary or higher level business unit. Sometimes used to reference a branch or plant with several departments or jobs subordinate to it.
Branch/Plant - (MMCU) Dept A - (MCU) Dept B - (MCU) Job 123 - (MCU) Form-specific information The branch or plant from which the component is selected. In multi-plant processing, the branch for the component and the parent should be the same. The default value is the parent branch. If this value is the same as the parent branch, then the Multi-Plant Generation program (P3483) produces transfer orders for the component at the demand branch based on the branch/plant relationships table. If this value is not the same as the parent branch, then no transfer orders are generated at the demand branch. A valid item branch record is not required for components. You can set a processing option for Enter/Change Bill (P3002) so that the system does not check for a component's item branch information. However, you should ensure that a valid location exists for that component if you want to maintain Engineering Change Management information. |
| Bill Type | A user defined code (system 40, type TB), that designates the type of bill of material. You can define different types of bills of material for different uses. For example:
M – (Default) Standard manufacturing bill RWK – Rework bill SPR – Spare parts bill The system enters bill type M in the work order header when you create a work order, unless you specify another bill type. The system reads the bill type code on the work order header to know which bill of material to use to create the work order parts list. MRP uses the bill type code to identify the bill of material to use when it attaches MRP messages. Batch bills of material must be type M for shop floor control, product costing, and MRP processing. Form-specific information Type M is not required, but MRP uses it to explode component requirements for work orders without parts lists. Enter an asterisk (*) to display all bill types. This value defaults from the processing options for Enter/Change Bill (P3002). |
| Item Rev. Level | The revision level for an item. If you enter a revision level, verify that the revision level of the routing for an item matches the revision level on the bill of material for the item. |
| As of Date | This field is used for effectivity checking. Enter a specific date to display documents (orders, bills of material, routings, and substitute components) that are effective on or after that date. The current system date is the default, but you can enter any future or past date. |
| Comp. Line Number | A number that indicates the sequence of the components on a bill of material. It initially indicates the relative sequence in which a component was added to a kit or single level bill of material. You can modify this number to change the sequence in which the components appear on the bill of material.
Skip To fields allow you to enter a component line number that you want to begin the display of information. Form-specific information In the Skip to Sequence field, you can enter a sequence number to position the component with that number as the first line of information displayed. The default value is the next sequential number. |
On Enter/Change Bill
-
Continue by completing the following fields:
-
Batch Quantity
-
Batch Unit of Measure
-
| Field | Explanation |
|---|---|
| Batch Quantity | The quantity of finished units that you expect this bill of material or routing to produce. This field allows you to specify varying quantities of components based on the amount of finished goods produced. For example, 1 ounce of solvent is required per unit up to 100 units of finished product. However, if 200 units of finished product are produced, 2 ounces of solvent are required per finished unit. In this example, you would set up batch quantities for 100 and 200 units of finished product specifying the proper amount of solvent per unit. |
| UM | A user defined code (system 00/type UM) that identifies the unit of measurement for an amount or quantity. For example, it can represent a barrel, box, cubic yard, gallon, an hour, and so on. |
7.2 Working With Components
From Daily Product Data Management (G30), choose Daily PDM Discrete
From Daily PDM Discrete (G3011), choose Enter/Change Bill
After you have defined the parent item, you must define the components of the item.
Complete the following tasks:
-
Add components (required)
-
Enter additional manufacturing information
-
Enter reference information
-
Enter a percent bill
-
Enter grade and potency information
-
Enter substitute items
On Enter/Change Bill
-
Access the detail area.
Figure 7-2 Enter/Change Bill (Details) screen
Description of "Figure 7-2 Enter/Change Bill (Details) screen"
-
Complete the following required fields for each component:
-
Component Item
-
Quantity Per
-
Unit of Measure
-
Effective From
-
Effective Thru
-
Component Branch/Plant
-
-
Complete the following fields:
-
Partials Allowed (Y/N)
-
Revision Level
-
| Field | Explanation |
|---|---|
| Quantity Per | The number of units to which the system applies the transaction.
Form-specific information A number that indicates how many components you use to manufacture the parent item. A quantity of zero is valid. The default value is 1. |
| UM | A user defined code (system 00/type UM) that identifies the unit of measurement for an amount or quantity. For example, it can represent a barrel, box, cubic yard, gallon, an hour, and so on. |
| Effective From | A date that indicates one of the following:
The default is the current system date. You can enter future effective dates so that the system plans for upcoming changes. Items that are no longer effective in the future can still be recorded and recognized in Product Costing, Shop Floor Control, and Capacity Requirements Planning. The Material Requirements Planning system determines valid components by effectivity dates, not by the bill of material revision level. Some forms display data based on the effectivity dates you enter. |
| Effective Thru | A date that indicates one of the following:
The default is December 31 of the default year defined in the Data Dictionary for Century Change Year. You can enter future effective dates so that the system plans for upcoming changes. Items that are no longer effective in the future can still be recorded and recognized in Product Costing, Shop Floor Control, and Capacity Requirements Planning. The Material Requirements Planning system determines valid components by effectivity dates, not by the bill of material revision level. Some forms display data based on the effectivity dates you enter. |
| Branch/Plant | A secondary or higher level business unit. Sometimes used to reference a branch or plant with several departments or jobs subordinate to it.
Branch/Plant - (MMCU) Dept A - (MCU) Dept B - (MCU) Job 123 - (MCU) Form-specific information The branch or plant from which the component is selected. In multi-plant processing, the branch for the component and the parent should be the same. The default value is the parent branch. If this value is the same as the parent branch, then the Multi-Plant Generation program (P3483) produces transfer orders for the component at the demand branch based on the branch/plant relationships table. If this value is not the same as the parent branch, then no transfer orders are generated at the demand branch. A valid item branch record is not required for components. You can set a processing option for Enter/Change Bill (P3002) so that the system does not check for a component's item branch information. However, you should ensure that a valid location exists for that component if you want to maintain Engineering Change Management information. |
| Partials Allowed (Y/N) | When you specify component and substitute items on the bill of material, this field indicates whether the total quantity is required to be available or if a partial quantity available is acceptable to commit.
Example: 100 lb of item A is available: 150 lb of item A is needed. If substitutes are not used and Partials Allowed is set to Y for item A, then the 100 lb will be committed. If substitute processing is used, substitutes will be checked next, and Partials Allowed on the substitute record will be considered. |
| Comp. Rev Level | The current revision level of a component on the bill of material. It is usually used with an engineering change notice or order (ECN or ECO). |
| Operation Sequence Number | In routings, this number is used to sequence the fabrication or assembly steps in the manufacture of an item. You can track costs and charge time by operation.
In bills of material, this number designates the routing step in the fabrication or assembly process that requires a specified component part. You define the operation sequence after you create the routing for the item. The Shop Floor Control system uses this field in the backflush/preflush by operation process. In engineering change orders, this number is used to sequence the assembly steps for the engineering change. Skip To fields allow you to enter an operation sequence that you want to begin the display of information. You can use decimals to add steps between existing steps. For example, use 12.5 to add a step between steps 12 and 13. Form-specific information JD Edwards World recommends that you do not use an operation number more than once within the same work center. |
| Percent of Scrap | Scrap is the percentage of unusable component material created during the manufacture of a particular parent item. During DRP/MPS/MRP generation, the system increases gross requirements for the component item to compensate for the loss.
Note: Shrink is the expected loss of parent items (and hence, components) due to the manufacturing process. Shrink and scrap are compounded to figure the total loss in the manufacture of a particular item. Accurate shrink and scrap factors can help to produce more accurate planning calculations. Enter percents as whole numbers: 5% as 5.0 Form-specific information The Shop Floor Control and Material Requirements Planning systems inflate component requirements by this percentage. This scrap percent is unique to the relationship of one parent and one component. |
| Operation Scrap % | The system uses this value to increase or decrease the amount of materials to account for loss within the operation. The system updates this value on Enter/Change Bill of Material when you run the Planned Yield Update program. The system calculates this value by compounding the yield percentages from the last operation to the first operation. Use a processing option in Enter/Change Routing to enable the system to calculate the component scrap percent. |
7.2.1 What You Should Know About
| Topic | Description |
|---|---|
| Indicating reusable tools | If the tool is located on the shop floor and reused as needed, you can indicate that it is a necessary component item required for the parent item. To do so, enter reusable tools as text lines or non-stock items in the bill of material. |
| Indicating expendable tools | You enter expendable tools (that is, tools used one time) on the bill of material like any other component item. The manufacturing process commits and consumes expendable tools in the same way as the other components. Examples of expendable tools are paint roller pads and drill bits. |
| Transitioning new components | You might need to replace one part with another in the bill of material. You can either scrap the old part or use up the inventory. To do so:
MRP uses up the quantity of the old part. When the quantity reaches zero and there are still requirements, the system generates a planned order release. This planned order becomes the requirement for the new item in the same period (because the lead time of the old part is zero). MRP then plans the new part. This alerts the material planner to change the bill of material by removing the old part. |
To enter additional manufacturing information
On Enter/Change Bill
-
Access the detail area.
-
Complete the following fields:
-
Operation Sequence
-
Percent of Scrap
-
The following field displays manufacturing information:
-
Operation Scrap Percent
To enter reference information
On Enter/Change Bill
-
Access the detail area.
-
Complete the following fields:
-
Component Line Number
-
Bubble Sequence
-
Line Type
-
Remark
-
The following fields display stocking information:
-
Stocking Type
-
Drawing Number
| Field | Explanation |
|---|---|
| Bubble Sequence | A secondary bill of material sequence number to indicate the drawing bubble number. |
| Line Type | A code that controls how the system processes lines on a transaction. It controls the systems with which the transaction interfaces (General Ledger, Job Cost, Accounts Payable, Accounts Receivable, and Inventory Management). It also specifies the conditions under which a line prints on reports and is included in calculations. Codes include:
S – Stock item J – Job cost N – Non-stock item F – Freight T – Text information M – Miscellaneous charges and credits W – Work order Form-specific information The Branch/Plant table (F4102) supplies the default for this field. You can use line type T to display a text line on this form in the sequence you define. The text does not display on review forms. |
| Stocking Type | A user defined code (41/I) that indicates how you stock an item (for example, as finished goods, or as raw materials). The following stocking types are hard-coded and you should not change them:
B – Bulk floor stock C– Configured item F – Feature K – Kit parent item N – Non-stock |
| Drawing Number | An engineering drawing number that might be the same as the part or item number. |
7.2.2 What You Should Know About
| Topic | Description |
|---|---|
| Using nonstock items | Nonstock items include drawings, bulk items, or reference materials. The system does not plan for nonstock items, but they appear on the bill of material and parts list for shop floor personnel. |
| Using bulk items | You use bulk items on the shop floor. Bulk items are not closely tracked, but ordered in large quantities as they are needed. Examples include tape, rubber bands, lubricants, cleaning fluid, rivets, and nails. You must enter bulk items in the Item Master/Branch Plant. |
| Using floor stock items | Floor stock items are like normal inventory items, but are available on the shop floor. Floor stock is set up as stocking type B in Item Branch/Plant information to bypass inventory issues. Also, the Issue Type Code is set to F to default for bills of material and ensure accurate cost accounting for the parent item. |
| Drawing numbers | You can enter drawing numbers on your bills of material as nonstock items so that they print on the shop paperwork.
If your drawing numbers differ for each branch/plant, enter the drawing number as a component. |
On Enter/Change Bill
-
Complete the task to enter a parent item.
-
For each component, enter a % (percent sign) in the following field:
-
Fixed/Variable
-
| Field | Explanation |
|---|---|
| F V | Indicates if the quantity per assembly for an item on the bill of material varies according to the quantity of the parent item produced or is fixed regardless of the parent quantity. This value also determines if the component quantity is a percent of the parent quantity. Valid values are:
F – Fixed Quantity V – Variable Quantity (Default) % – Quantities are expressed as a percentage and must total 100% For fixed quantity components, the Work Order and MRP systems do not extend the component's quantity per assembly value by the order quantity. For Process Manufacturing, the system stores percent components. Therefore, the system treats zero batch sizes like variable-quantity components, and treats batch sizes greater than zero like fixed-quantity components. |
7.2.3 What You Should Know About
| Topic | Description |
|---|---|
| Working with components in a percent bill | You can enter as many components as necessary, but the sum of the percentages must equal 100%. The system uses the batch size to calculate percentages of the bill for each component. Verify that each component can convert to the bill unit of measure either by item conversion or standard unit of measure conversion. See also Defining Default Units of Measure in the JD Edwards World Bulk Stock Management Guide. |
To enter grade or potency information
You can define either grade or potency information, but not both.
On Enter/Change Bill
-
Access the detail area.
-
For grade information, complete the following fields:
-
From Grade
-
Thru Grade
-
-
For potency information, complete the following fields:
-
From Potency
-
Thru Potency
-
| Field | Explanation |
|---|---|
| From Grade | A code (system 40, type LG) that indicates the minimum grade that is acceptable for an item.
The system displays a caution message if you try to purchase or issue items with grades that do not meet the minimum grade acceptable. The system does not allow you to sell items with grades that do not meet the minimum acceptable level. |
| Thru Grade | A code (system 40, type LG) that indicates the maximum grade that is acceptable for an item.
The system displays a caution message if you try to purchase or issue items with grades that exceed the maximum grade acceptable. The system does not allow you to sell items with grades that exceed the maximum grade acceptable. |
| From Potency | A number that indicates the minimum potency, or percentage of active ingredients, acceptable for an item.
The system displays a caution message if you try to purchase or issue items that do not meet the minimum acceptable potency. The system does not allow you to sell items that do not meet the minimum acceptable potency. |
| Thru Potency | A number that indicates the maximum potency, or percentage of active ingredients, that is acceptable for an item.
The system displays a caution message if you try to purchase or issue items that have a potency that exceeds the maximum potency acceptable. The system does not allow you to sell items that have a potency that exceeds the maximum potency acceptable. |
On Enter/Change Bill of Material
-
Choose the Bill Substitutes option (6) for the component to substitute.
On Component Substitutes
-
Complete the following fields:
-
Substitute Item
-
Substitute Item Sequence
-
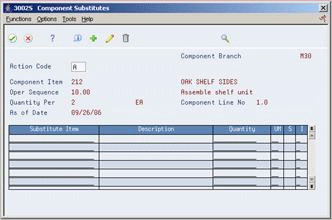
| Field | Explanation |
|---|---|
| Substitute Item | A number that the system assigns to an item. It can be in short, long or 3rd item number format.
Form-specific information The number assigned to a substitute item. |
| Substitute Item Sequence Number | Indicates the sequence the substitute items for a component. The system looks for substitute items by this sequence number. For the component being substituted, set this field to zero. |
7.2.4 What You Should Know About
| Topic | Description |
|---|---|
| Identifying substitutions | The system highlights a component's item description to indicate a substitution. |
| Automatic substitutions | You can make component substitutions automatically when the parts list is attached to the work order. Set up manufacturing constants to hard commit at creation of the parts list. Soft commits will commit to the original component, regardless of availability. |
| Global substitutions | Use component substitution for a specific component. Use item cross references for global substitutions. See Set Up Item Cross Reference in the JD Edwards World Inventory Management Guide. |
| Item Cross-Reference Substitutions | Item Cross-Reference substitutions are used when one item can be universally substituted for another item. To use this substitution, the substitute relationship must be set up as a cross-reference type S in the Item Cross-Reference Table (P41040).
Enter 8 in the option code field for a component on the parts list (P3111). This will display screen P31042, where the quantities to substitute are entered manually. Substitutes will only display on this screen if there are units available. If there are no units available for any substitutes, the screen will display blank, even though substitutes are set up in the item cross-reference table. This substitution method can only be performed manually, as the processing options for P31410 and P48013 only apply to Bill of Material substitutions. |
7.3 Enter Planning Bill and Kit Information
The manufacturing industry uses planning bills and kits to produce items in which components are features and might not be listed as separate inventory items. When you enter these components as parts of kits, the system places them in the planning and manufacturing processes.
From Daily Product Data Management (G30), choose Daily PDM Discrete
From Daily PDM Discrete (G3011), choose Enter/Change Bill
To enter planning bill and kit information
On Enter/Change Bill
-
Access the detail area.
-
For each component, complete the following fields:
-
Feature Planned Percent
-
Feature Cost Percent
-
Unit Price
-
Unit Cost
-
Standard/Optional/Feature
-
Required (Y/N)
-
Default Component
-
| Field | Explanation |
|---|---|
| Feature Planned % | The percentage of demand for a specified feature based on projected sales. For example, a company might sell 35% of their computers with a standard keyboard and 65% of them with an extended keyboard, based on customer demand.
The Material Planning system uses this percentage to accurately plan for a feature's component items. Enter percents as whole numbers: 5% as 5.0. The default value is 100%. |
| Feature Cost % | A percentage used by the Simulate Cost Rollup program to calculate the cost of a feature or option item as a percentage of the total cost of the parent.
Enter the percentage as a whole number: 5% as 5.0 |
| Unit Price | A base or default price that is used with multipliers from the pricing rules to develop discounted prices. If no formula applies to an item or no discounts apply to a customer, this price is used directly. This field is only used for pricing on sales orders when a non-stock item is part of a kit.
Form-specific information The system uses price rather than price record F4106 if the bill of material contains non-stock items. The default value comes from the Sales Order detail line. |
| Unit Cost | The amount per unit (the total cost divided by the unit quantity). This field is only used for costing on sales orders when a non-stock item is part of a kit.
Form-specific information The system uses this cost rather than cost record F4105 if the bill of material contains non-stock items. The default value comes from the Sales Order detail line. |
| Standard/Optional/Feature | A code that indicates whether a component is standard or optional within a bill of material or for kit processing. Valid codes are:
S – Standard. The item is always included in any transaction involving the bill of material. O – Optional. In order entry, you can specify whether the item will be included in a particular sale. F – Feature. The item has features that you must specify at order entry. The default value is S. |
| Required (Y/N) | A code that specifies whether a component is required. The default is N. Valid codes are:
Y – This component is required. N – This component is not a required selection during order processing. The default value is N. |
| Default Component | If you are creating Sales Orders using the EDI/Batch Order Edit and Creation Process (P40211Z), you can use this field to specify a default component.
Enter Y in this field to mark this line as a default component. When you specify a kit master item, the EDI/Batch Order Creation system will automatically select all related standard and default components. |
7.4 Enter Production Information
From Daily Product Data Management (G30), choose Daily PDM Discrete
From Daily PDM Discrete (G3011), choose Enter/Change Bill
For each component, you can enter production information used by the Shop Floor Control system.
To enter production information
On Enter/Change Bill
-
Access the detail area.
-
For each component, complete the following fields:
-
Issue Type
-
Lead time Offset
-
| Field | Explanation |
|---|---|
| I | A code that defines how the system issues each component in the bill of material from stock. In shop floor control, it indicates how the system issues a part to a work order. Valid codes are:
I – Manual issue (default) F – Floor stock (no issue) B – Backflush (when part is reported as complete) P – Preflush (when parts list is generated) U – Super backflush (at pay-point operation) S – Sub-contract item (send to supplier) Blank Shippable end item You can issue a component in more than one way within a specific branch/plant by using a different code on the bill of material and work order parts list. The bill of material code overrides the branch/plant value. |
| Leadtime Offset | Indicates the number of days a part is needed before or after the start date of a manufacturing work order. The system adds the lead time offset days for the part to the start date of the work order to determine the actual date the part is required. To indicate that a part is needed prior to the work order start date, enter the days as a negative number. To indicate how many days after the work order start date that the part is required, enter a positive number. |
7.5 Enter Component Locators
From Daily Product Data Management (G30), choose Daily PDM Discrete
From Daily PDM Discrete (G3011), choose Enter/Change Bill
Use component locators to indicate the specific location of a component within a subassembly.
-
On Enter/Change Bill, locate the parent item.
-
Enter 4 in the Option field to access Component Locator Revisions.
Figure 7-4 Component Locator Revisions screen
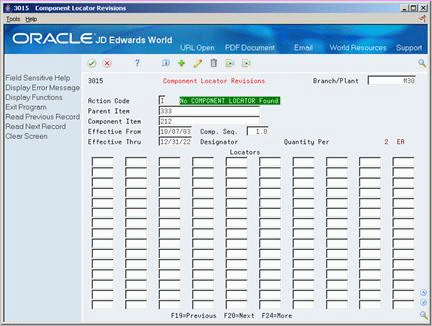
Description of "Figure 7-4 Component Locator Revisions screen"
-
On Component Locator Revisions, complete the following field:
-
Locators
-
| Field | Explanation |
|---|---|
| Locators | This field identifies the specific location of a component in the assembly of an item, for example, the location of a part on a circuit board. |
7.5.1 What You Should Know About
| Topic | Description |
|---|---|
| Reviewing component locators | You can specify a locator and display the components that belong in that location. |
| Reviewing additional component locators | To review other component locators, you must enter values in all fields in the header. |
| Defining locations | You can define locations with any combination of characters, but the number of locations must equal the quantity per assembly. |
7.6 Working With Text
You can create text for a routing and bill of material and attach this text to the work order parts list and work order routing. Attached text is indicated by a highlight on the form.
You can locate the text on the following forms within the Shop Floor Control system:
-
Work Order Parts List
-
Routing Revisions
-
Rate Based Hours Entry
-
Rate Based Inventory Issues
When you locate the text on any of these forms, the text is unique to the parts list, routing, rate based schedule, or inventory. You can change the text and it will not impact the text originally entered on bill of material or routing. You can create separate text for the different batch bills of a parent item.
Working with text consists of the following:
-
Entering text
-
Revising text
-
Copying text models
-
Reviewing user information
On Enter/Change Bill
-
Choose the Text (7) option.
On BOM Component Master Text
Figure 7-5 BOM Component Master Text screen
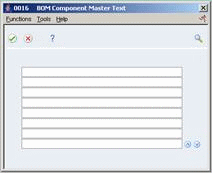
Description of "Figure 7-5 BOM Component Master Text screen"
-
Type the text and press Enter.
On BOM Component Master Text
-
Press F9 to delete a line.
-
Press F8 to insert a line.
-
Press Enter to save your revisions.
-
On BOM Component Master Text, choose the Select Model Memo function.
-
Select a model.
On BOM Component Master Text, choose the Display User & Date of Entry & Update function.
7.7 Changing Multiple Bills of Material
From Product Data Management (G30), enter 27
From Advanced Product Data Management (G3031), choose Where Used Update
You change multiple bills of material by running the Where Used Update program. This program also prints a report indicating the changes. You can use this program to perform mass updates such as:
-
Replacing one component item with another
-
Deleting an item
-
Changing effectivity dates for an item
-
Changing the quantity per assembly value for an item
-
Changing the Issue Type Code
-
Changing the unit of measure
First specify the items you want to change, and then define the change with processing options. The system locates all occurrences of the item (as a component) and updates the bills of material. You can also update a component which has past or future effectivity dates.
You can run this program in either proof or final mode. In proof mode, the system generates a report of the proposed changes for your review but doesn't update the data. In final mode, the system generates a report that identifies the changes and updates to the data.
|
Caution: You can potentially change many bills of material in your system if you run this program. JD Edwards World recommends that you run this program in proof mode first to verify your choices before running it in final mode to change the data. You might want to restrict access to this program. |
7.7.1 Before You Begin
-
Review your bills of material to verify that the item you are updating is active (within the effectivity dates) and appears in at least one bill of material. See Section 18.6, "Bill of Material Inquiry (P30200)."
7.7.2 What You Should Know About
| Topic | Description |
|---|---|
| Changing and deleting | If you want to make changes to a bill of material and remove the old records, run the program twice. First, run the program to create the new records and then run it again to delete the old ones. |
| Change limitations | The system stores these changes in the Bill of Material table. The existing parts lists, MRP calculations, and Costing information are not automatically updated.
The program updates the following fields:
|

7.8 Verifying Bills of Material
From Product Data Management (G30), enter 27
From Advanced Product Data Management (G3031), choose Integrity Analysis
To check your bills of material for low-level codes and product structure errors (where a parent item is listed as a component of itself), use the Integrity Analysis program.
This program generates a report that identifies any bills of material you need to correct. If the report indicates errors, you should correct the bills of material and run the Integrity Analysis program again. When the program does not find errors in the bills of material, it updates the low level codes in both the Item Master and the Branch/Plant tables.
JD Edwards World recommends that you run the Integrity Analysis program immediately after a data conversion, such as system startup, and then on a periodic basis, such as two or four times a year. You should also run the Integrity Analysis program before running the Simulated Cost Rollup or DRP/MPS/MRP Generation programs.
7.8.1 Example: Integrity Analysis Report with Errors
This report indicates that the parent item's bill of material has an error; a component has not been defined on Item Master Information.
Figure 7-9 Bill of Material Analysis Report with Errors

Description of "Figure 7-9 Bill of Material Analysis Report with Errors"
7.8.2 Example: Integrity Analysis Report without Errors
This report indicates that the parent item's bill of material is correct.
Figure 7-10 Bill of Material Analysis Report without Errors

Description of "Figure 7-10 Bill of Material Analysis Report without Errors"
7.8.3 What You Should Know About
| Topic | Description |
|---|---|
| Verifying bills of material online | There is an alternate procedure to running Integrity Analysis. You can activate online validation and the system validates items as you enter them. In this procedure, the system does not allow you to enter recursive components. An error message is displayed, and you will not be able to enter a parent item as a component of itself. |
|
Caution: When Integrity Analysis is selected from the menu, it submits a job. There are no data selections or processing options. Users should be excluded from F3002, F4101, and F4102 while the program runs. |
7.9 Copying Bills of Material
From Product Data Management (G30), enter 27
From Advanced Product Data Management (G3031), choose Copy BOM by Branch/Plant
You can copy a bill of materials from one branch/plant to another. When you set up a new branch/plant, this saves you the time and effort of manually setting up new bills of materials from scratch.
The Copy Bill of Material by Branch/Plant program (P3002CPY) can be run in a Proof or Final mode. In both modes, the program creates exception and detail reports. The exception report edits items against the Item Branch File (F4102) and adds item records to the file if they do not already exist. It also shows the records to be added to the Bill of Materials Master file (F3002) for the "To" branch. The detail report lists the BOMs and items created during the process.
When you run the program in Final mode, it updates all of the necessary data in the Manufacturing database.
|
Note: JD Edwards World strongly recommends that you first run the program in Proof mode to review the reports and verify what you are about to do. |
On Copy BOM by Branch/Plant
-
Enter 1 in the Option field and press Enter to run the program.
-
Follow the processing option instructions to enter the following:
-
From Branch/Plant
-
To Branch/Plant
-
Proof or Final mode
-
Component Branch/Plant values
-
Bills of Materials for Batch Quantities
-
-
Press Enter to run the program.
7.9.1 What You Should Know About
| Topic | Description |
|---|---|
| Component branch/plant values | You can set a processing option value to compare the component branch/plant to the From branch/plant. If they are different, you can update the To branch/plant values. |
| Bills of materials for batch quantities | When you run the program, you have the option of either creating BOMs for all batch quantities or only those with a batch quantity of zero. |