3 Work with Interactive Sales Orders
This chapter contains these topics:
From ECS Sales Order Management (G4910), choose ECS Sales Order Processing
From ECS Sales Order Processing (G491011), choose Enter Orders (Page Mode)
3.1 Working with Interactive Sales Orders (ECS)
You enter sales orders to record information about your customers and the items they have ordered. When you enter a sales order interactively, the system automatically enters pertinent information currently stored in the customer, item, preference, and pricing records. The system then processes the order as soon as you complete the order entry.
You can enter a sales order in one of two ways:
-
Enter customer, order processing, invoice, accounts receivable, and shipping information on the order header. Header information relates to an entire order. The system maintains this information in the Sales Order Header table (F4201).
-
Enter the detailed item, price, shipping, accounts receivable, and commission information for each sales order line. Detail information relates to individual lines in a sales order. The system maintains this information in the Sales Order Detail table (F4211).
When you complete the required fields, the system enters default information from the Sales Order Header (F4201), Item Master (F4101), Item Location (F41021), Address Book (F0101), and Customer Master (F0301) tables.
You can also enter kit items on a sales order. You use kit items to group related items so that you can enter less information on the order. The end product, or "parent" item, is not stocked as an inventory item. You enter kit items on a sales order in the same way you enter individual items.
You can simplify sales order entry by using order templates. A template is a system-generated "best guess" as to what your customer will order. A template includes your customer's most frequently ordered items.
As you are entering detail information, you can substitute items for backordered items. You can also identify cross-reference information for "associated" items. Associated items are commonly sold in conjunction with other items.
3.1.1 What You Should Know About
| Topic | Description |
|---|---|
| Sold To and Ship To addresses | You can define a default address for a customer if the address to which you send the invoice (Sold To) is different from the address to which you send the shipment (Ship To). You can instruct the system to automatically fill in the Ship To address whenever you enter the Sold To address. |
| Canceling and deleting sales orders | If you have made an error or need to remove an order, you can:
You must use a purge program to remove an order from the system. See Chapter 45, "Purge Data." |
| Locating an item | When entering a sales order, you can locate key item information, such as the item number and available quantities, in one of the following ways, depending on how you set the prompting control processing options for the Sales Order Entry program:
See Section 6.2, "Copying Item Information to Sales Orders (ECS)." |
| Duplicating an order | You can streamline sales order entry by duplicating sales orders. You set the processing options for order duplication default values to control order duplication. You can:
|
3.2 Entering Header Information (ECS)
You enter header information that applies to the entire sales order, not just specific sales order lines. To enter header information, complete the following tasks:
-
Enter order information
-
Enter invoice information
-
Enter accounts receivable information
-
Enter shipping information
-
Enter commission information
When you finish entering header information, you can enter detail information for each item on the sales order.
If you choose to enter only detail information, you must set the appropriate prompting control processing option to not display the order header. You can set the processing options to use default values for some header information.
3.2.1 Before You Begin
-
Set the prompting control processing option to display the Enter Orders (Page Mode) form before the Sales Order Entry form
3.2.2 What You Should Know About
Figure 3-1 Enter Orders (Page Mode) screen
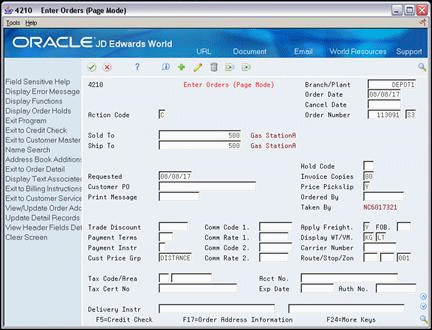
Description of "Figure 3-1 Enter Orders (Page Mode) screen"
On Enter Orders (Page Mode)
-
Complete the following fields:
-
Branch/Plant
-
Sold To
-
Ship To
-
Mark-For (optional)
-
-
Review the following fields and make any necessary changes:
-
Order Date
-
Cancel Date
-
Order Number
-
Order Type
-
Hold Code
-
Requested
-
Customer PO
-
Price Pickslip
-
Ordered By
-
Taken By
-
On Enter Orders (Page Mode)
Complete the following fields:
-
Invoice Copies
-
Print Message
To enter accounts receivable information
On Enter Orders (Page Mode)
Complete the following fields:
-
Trade Discount
-
Payment Terms
-
Payment Instrument
-
Tax Code
-
Tax Area
-
Account Number
-
Tax Certificate Number
-
Expiration Date
-
Authorization Number
On Enter Orders (Page Mode)
Complete the following fields:
-
Carrier Number
-
Route
-
Stop
-
Zone
To enter commission information
On Enter Orders (Page Mode)
Complete the following fields:
-
Commission Code 1
-
Commission Rate 1
-
Commission Code 2
-
Commission Rate 2
3.3 Entering Detail Information (ECS)
After you enter header information, you enter detail information that applies to individual sales order lines, such as items, quantities, and prices. Some of the detail information carries over from the heading information, including the following:
-
Customer and shipping address numbers
-
Branch/plant and order information, such as order number and order date
-
Requested date and customer purchase order number
If you choose not to use the order header, you can enter all of the necessary information for the sales order on the Sales Order Entry form. You must set the appropriate prompting control processing option for the Sales Order Entry program to display only the Sales Order Entry form. You can also set the processing options to use default values for some header information.
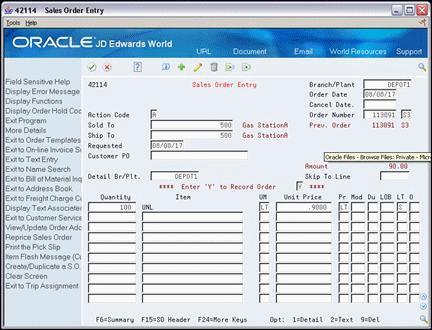
On Enter Orders (Page Mode)
-
Access Sales Order Entry.
-
On Sales Order Entry, complete the following fields to enter item information:
-
Detail Branch/Plant
-
Quantity
-
Item
-
-
Complete the following fields to enter item information or leave blank to accept default values:
-
Unit of Measure
-
Unit Price
-
Pricing Unit of Measure
-
Mode of Transport
-
Duty Status
-
Line of Business
-
Requested
-
Promised
-
-
Figure 3-3 Sales Order Entry (Fold Area) screen

Description of "Figure 3-3 Sales Order Entry (Fold Area) screen"
-
Complete the following fields to enter item information for each branch/plant in which the item is stored or leave blank to accept default values:
-
Branch/Plant
-
Accounting Branch/Plant
-
Location
-
Lot
-
Description 1
-
-
Complete the following fields to enter price information for each sales order line or leave blank to accept default values:
-
Extended Price
-
Taxable
-
Price Codes
-
-
Complete the following fields to enter detail order information for each sales order line or leave blank to accept default values:
-
Last Status
-
Next Status
-
Print Message
-
-
Complete the following fields to enter date information for each sales order line or leave blank to accept default values:
-
Requested Date
-
Load Date
-
Promised Date
-
Cancel
-
-
Complete the following fields to enter quantity information for each sales order line or leave blank to accept default values:
-
S (Scheduled to Ship)
-
B (Backordered)
-
C (Cancelled)
-
3.3.1 What You Should Know About
| Topic | Description |
|---|---|
| Adding a message to an order line | You access the Associated Text Window to attach a message to a detail sales order line. You can specify on which documents this message prints, such as pick slips and invoices. You can also add a message by accessing the Text Line Entry window and entering a line type for the text message. |
| Viewing item flash messages | Flash messages for order lines contain information, such as engineering change orders, that people need to know when selling an item. If a flash message exists for an order line, the system highlights the Quantity and Item fields. You can choose an option in either of these fields to view the flash message. |
| Reviewing quantity information | When you order items that are not available in the quantity that you need on the promised date, the Supply/Demand Inquiry form might display, depending on how you set the processing options. You can also display this form manually.
See Section 6.6, "Reviewing Supply and Demand Information (ECS)." |
| Reviewing price information | You can access and review price information on the Check Price and Availability form before selecting a price for an item.
See Section 6.3, "Reviewing Price and Availability Information (ECS)." |
| Entering Mark-For addresses | You can set the Mark-For Address processing options in Sales Order Entry ECS - Detail to display the Mark-For Address.
You use the Mark-For address to specify the location of the final destination of the order. In the retail industry, you can use this address to distinguish from the Ship To address, which can often represent a Distribution Center rather than a retail outlet. You can only enter customers that you have set up in the Address Book Master and Customer Billing Instructions. If you enter a Mark-For address, the system assesses the tax based on the information that you set up in the Customer Billing Instructions for the Mark-For address instead of the Sold To address. |
| Service Warranty Management | A processing option determines if service warranties are assigned to sales lines by batch. The DREAM writer version can be specified. |
3.4 Entering Additional Order Information (ECS)
After you have entered header and detail information, you can enter additional order information for each individual sales order line, if necessary. You can enter the following additional information:
-
Accounts receivable and price information
-
Shipping information
-
Code and order information
-
Sales and commission information
-
Item information
The system automatically enters most of the information on the Order Detail Information form. You can review this information and make changes or additions as necessary.
To enter additional order information
-
Access Order Detail Information for the order detail line that you want to change.
Figure 3-4 Order Detail Information screen
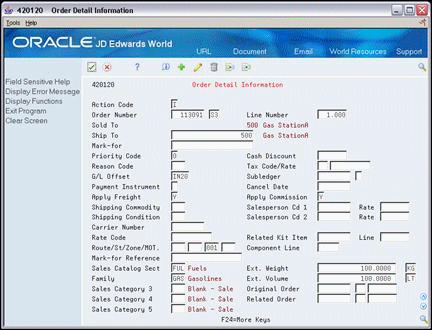
Description of "Figure 3-4 Order Detail Information screen"
-
On Order Detail Information, review or complete the following fields for shipping information:
-
Ship To
-
Shipping Commodity
-
Shipping Condition
-
Carrier Number
-
Apply Freight
-
Rate Code
-
Route
-
Stop
-
Zone
-
MOT
-
-
Review or complete the following fields for accounts receivable and price information:
-
Cash Discount %
-
G/L Offset
-
Subledger
-
Subledger Type
-
-
Review or complete the following fields for code and order information:
-
Priority Code
-
Reason Code
-
Original Order
-
Original Order Type
-
Original Order Line Number
-
Related Order
-
Related Order Type
-
Related Order Line Number
-
-
Review or complete the following fields for sales and commission information:
-
Sales Catalog Sections
-
Family
-
Sales Category
-
Apply Commission
-
Salesperson Code 1
-
Salesperson Code 1 Commission Rate
-
Salesperson Code 2
-
Salesperson Code 2 Commission Rate
-
-
Review or complete the following fields for item information:
-
Extended Weight
-
Weight Unit of Measure
-
Extended Volume
-
Volume Unit of Measure
-
3.5 Entering a Kit Item (ECS)
You use kit items to package items together or to create an end item that has been assembled from multiple inventory items. This allows you to enter less information on the sales order. You enter kit items on a sales order in the same way you enter individual items.
Kit items are comprised of two or more component items attached to a "parent" item number. The parent item is not stocked as an inventory item. For example, you might combine the two component items, unleaded gas and additive A, to create the parent item, super unleaded octane 97, which is not stocked as an inventory item.
When you enter an item number for a kit on a sales order, the Kit Window form displays. You can review the pre-selected items and quantities that make up the kit. You can also select any optional items that you want to include on the sales order.
3.5.1 Before You Begin
-
Verify that kit items have been set up. See Entering Item Master Records for Kits in the JD Edwards World Inventory Management Guide.
-
Verify that a bill of material has been set up for each parent item. See Entering a Bill of Material in the JD Edwards World Inventory Management Guide.
-
Verify that the kit processing options are set to display the kit component items on the sales order.
On Sales Order Entry
-
Complete the following fields for the parent item:
-
Quantity
-
Item
The Kit Window appears with the associated component items selected.
-
-
On the Kit Window, select any optional components that you want to add to the order.
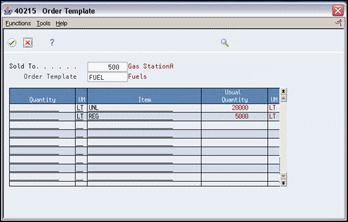
3.6 Entering an Order from a Template (ECS)
To save time and eliminate repetition in order entry, you can enter an order from a template that contains frequently ordered items. Templates can be standard or customer-specific.
You enter information from a template in two ways:
-
Copy all of the items and quantities from the customer's template onto a new sales order
-
Manually override a customer's default template by adding, deleting, or changing item or quantity information
3.6.1 Before You Begin
-
Verify that templates have been created and assigned. See Chapter 28, "Work with Order Templates."
-
Verify that the order template processing option is set to permit order template processing for either the Sold To customer number or the Ship To customer number.
To enter an order from a template
On Sales Order Entry
-
Complete the following fields:
-
Branch/Plant
-
Sold To
-
Ship To
Alternatively, you can complete these same fields on the Enter Orders (Page Mode) form.
If one or more default templates are assigned to the customer, the Order Template window appears.
-
-
On the Order Template window, choose all of the item information on the template.
-
Accept the item information.
The system returns the item information to the sales order.
-
For each of the items now listed on the sales order, complete the following field or leave blank for any item that you do not want to include:
-
Quantity
-
-
Enter additional items and quantities on the sales order, if needed.
3.6.2 What You Should Know About
3.7 Entering Substitute and Associated Items (ECS)
As you are entering detail information, you can substitute items for backordered items, if the customer accepts substitute items. Substituting an item on a sales order cancels any quantities for the original item that are on backorder. After you add a substitute item, the original order line displays a "Canceled by Substitution" status, and the new order line displays a "Sold as a substitute" status. Order lines show the split between the original and the substituted items.
If your company normally sells certain items in conjunction with each other, you can enter "associated" items on your sales order. You can set up the system to prompt you to ask the customer whether they want to add the associated items when you enter the original item. For example, if a customer regularly orders 10W30 oil in conjunction with 20W40 oil, you can set up the system to display the Substitute/Associated Items window when this customer orders one of these two items.
3.7.1 Before You Begin
-
Verify that the cross-reference table for substitute and associated items has been set up. See Setting Up Item Cross-References in the JD Edwards World Inventory Management Guide.
-
Verify that the cross-reference information processing options have been set for substitute and associated items.
-
Verify that the customer has been set up to accept substitute items in the customer billing instructions. See Chapter 41, "Set Up Commission Information."
To enter substitute and associated items
On Sales Order Entry
-
Complete the following fields to enter an item:
-
Quantity
-
Item
-
-
Access the Substitute/Associated Item window.
Figure 3-7 Substitute/Associated Items screen
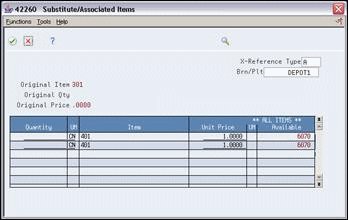
Description of "Figure 3-7 Substitute/Associated Items screen"
-
On the Substitute/Associated Item window, complete the following fields for each substitute and associated item:
-
Quantity
-
Price
-