Remote Development Setup
You can build, run, and debug projects on the local host (the system from which you started the IDE) or on a remote host running a UNIX® operating system. Remote development lets you run the IDE locally in your familiar desktop environment, while using the computing power and development tools on a remote server to build your projects.
You can configure remote development hosts in the Build Tools tab of the Options dialog box. To add a remote host:
-
Choose Tools > Options, and click the C/C++ category.
-
In the Build Tools tab of the Options dialog box, click Edit.
-
In the Build Hosts Manager dialog box, click Add.
-
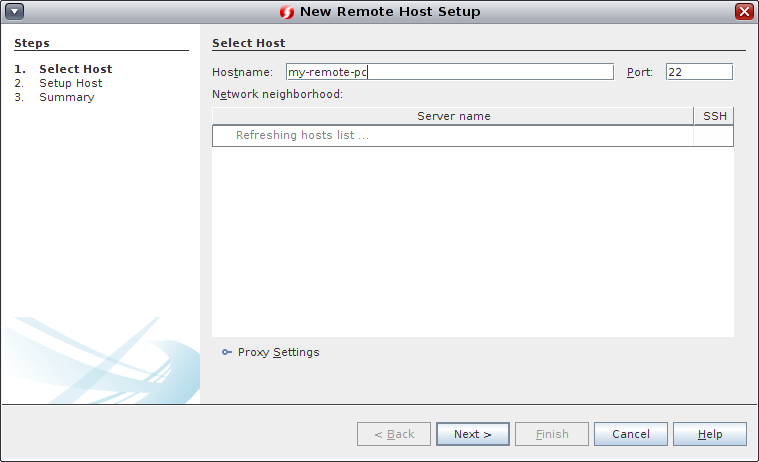
On the Select Host page in the New Remote Build Host wizard, type the system name of the host in the Hostname field or double-click an available host in the Network neighborhood list to select it and clicklick Next.

-
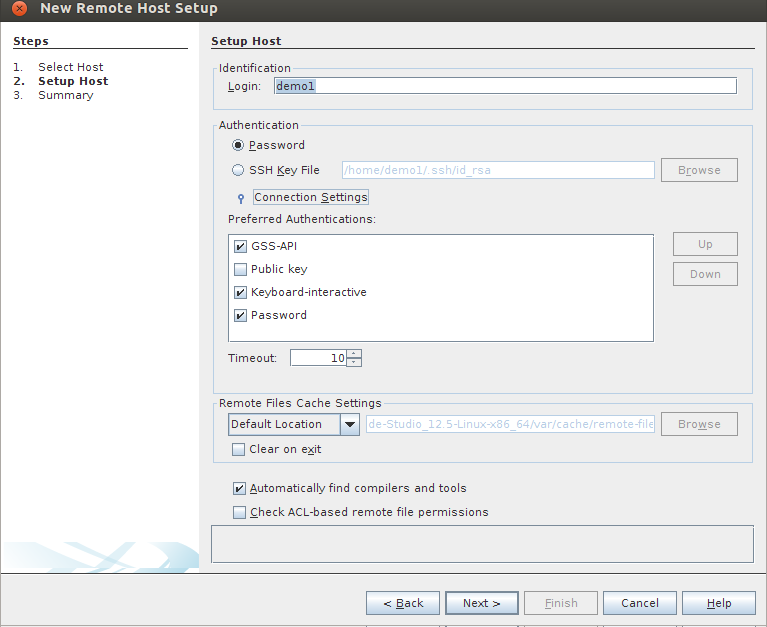
On the Setup Host page, type your ID into the Login field.
-
Click Connection Settings. An expandable drop-down list appears, where you can set your list of connections in order of preference or establish a connection timeout.

-
Once you elect your settings, click the Password node and click Next.
-
The wizard prompts you for a password, connects to the host, and displays a Summary page. Click Finish.
-
After the host is added to the Build Hosts list in the Build Hosts Manager dialog box, click OK.
-
You can set properties that specify how the IDE uses the remote host in the Services window. Expand the C/C++ Build Hosts node, right-click the remote host, and choose Properties. Set the desired properties in the Host Properties dialog box.
-
To set the remote host as the default build host, right-click the host in the C/C++ Build Hosts node in the Services window, and choose Set as Default.
To develop a project on a remote host, the project must be on a shared filesystem that is visible on both the local host and the remote host. Typically such a filesystem is shared using NFS or Samba. You can define the mapping between local and remote paths to project source files when you define the remote host.
When you create a project, the default build host is selected as the build host for the project. You can change the build host for the project on the Build panel of the Project Properties dialog box. You can also specify the build host when you are debugging an executable or a core file.
To work on a project that resides on a remote host on your local host, choose File > Open Remote C/C++ Project.
Using the Remote Development Toolbar
The IDE provides a Remote Development Toolbar, for easier access to projects and files on the remote host. You can use the icons to select a remote host you have already configured and work on projects and files on the remote host the same as if they were local. This is known as full remote development.
To learn more about remote development modes, see the C/C++ Remote Development Modes help page in the IDE.
You can do the following with the remote toolbar:
-
Click the Connect Status icon to connect or disconnect to the server selected in the list next to the icon.
-
Click the Create Remote Project icon to create a new project on the currently connected host.
-
Click the Open Remote Project icon to open a project on the currently connected host.
-
Click the Open Remote File icon to open a file on the currently connected host.
Using the Terminal Window for a Build Host
You can open a terminal window in the IDE for a local or remote host. The terminal window opens as a tab in the Output area of the IDE. A remote host does not need to be set up in advance for the IDE, but must be running the SSH daemon.
To learn about how to open a terminal window in the IDE, see Opening a Terminal Window for a Build Host in the IDE help. To open a terminal window for a local host, choose Window > IDE Tools > Terminal.
You can also personalize the display options of the command line terminal window. For more information, see Options Window: Miscellaneous: Terminal in the IDE help.
Remote Desktop Distribution
The Remote Desktop Distribution feature lets you generate a zip file containing a distribution of the IDE and the Code Analyzer that will run on almost any operating system and use the Oracle Developer Studio compilers and tools on a remote server. When you run the IDE on a desktop system, it will recognize the server on which you generated the distribution as a remote host and access the tool collection in your Oracle Developer Studio installation.
For more information about Remote Desktop Distribution, see How to Develop Code from a Remote Desktop with Oracle Developer Studio (http://www.oracle.com/technetwork/articles/servers-storage-dev/howto-use-ide-desktop-1639741.html).