RF Store Transfer Receipt Transaction

RF Store Transfer Receipt allows you to receive a store transfer line defined in the Store Transfer Receipt Table (INSTXR) into a specified warehouse and location using an RF gun to scan the item to receive and the location where the item will be placed. You can receive the entire store transfer line or receive a partial quantity of the store transfer line. You can also process store transfer receipts using the Working with Store Transfer Receipt (WSRT) menu option. The lines on a store transfer remain open until you close the store transfer.
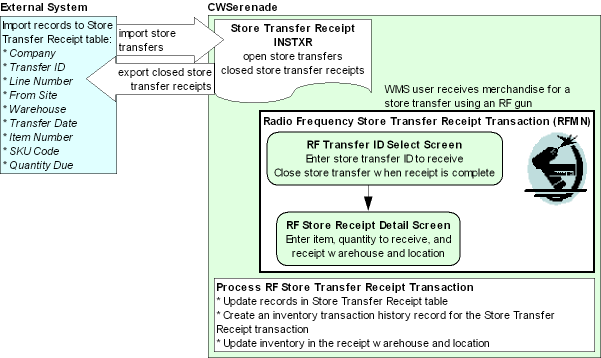
RF Store Transfer Receipt Illustration:
In this topic:
• RF Store Transfer Receipt Process
• Selecting the Store Transfer to Receive
• Receiving an Item on a Store Transfer
For more information: See Processing Store Transfer Receipts for more information on receiving a store transfer using the Working with Store Transfer Receipt (WSRT) menu option.
RF Store Transfer Receipt Process

Use the following steps to complete an RF Store Transfer Receipt transaction.
1. |
Use the RF Transfer ID Select Screen to enter the store transfer ID you wish to receive. In order to receive an item on a store transfer, the store transfer line must be in an Open (O) status in the Store Transfer Receipt Table (INSTXR). |
2. |
Use the RF Store Receipt Detail Screen to: • Enter or scan the item you wish to receive. • Enter the quantity you wish to receive. • Enter or scan the location where you wish to receive the quantity. |
3. |
When you complete the RF Store Transfer Receipt transaction, the system updates the Store Transfer Receipt record in the Store Transfer Receipt Table (INSTXR) and the inventory information in the location and warehouse where the item was placed. |
If More than One Store Transfer Line Matches the Item to Receive
If the item to receive exists on more than one store transfer line on the store transfer, the system receives the first store transfer line in numeric order whose Quantity due is equal to or greater than the receipt quantity entered on the RF Store Receipt Detail screen.
If the Quantity due for all matching store transfer lines is less than the quantity entered on the RF Store Receipt Detail screen, the system displays an error message: Recpt Qty > Ord Qty. You cannot receive across store transfer lines in RF Store Transfer Receiving.
Example: You receive 110 units of item ABC for store transfer ID 1234. The system matches the following store transfer lines to the item and SKU to receive.
Store transfer line # |
Qty Due |
Qty Received |
Results |
1 |
100 |
0 |
The system uses store transfer line 2 as the store transfer line to receive against since it is the first store transfer line in numeric order whose Quantity due is greater than the quantity entered on the RF Store Receipt Detail screen. |
2 |
125 |
0 |
|
3 |
150 |
0 |
Over Receiving the Quantity on a Store Transfer Line
The Over Receipt % (A61) system control value allows you to receive more than the quantity ordered on the store transfer line, up to the percentage limit defined in the system control value. This allows you to receive merchandise that the external system over-ships. For a partial receipt, the system compares the Quantity received against the Quantity due on the store transfer line in the Store Transfer Receipt Table (INSTXR).
Secured Feature: The Override Tolerance (A18) secured feature allows you to override the percentage defined in the Over Receipt % (A61) system control value and receive any amount greater than the quantity ordered on the store transfer line.
Over Receipt Examples: In the examples below, the Over Receipt % (A61) system control value is set to 10%.
Order Qty |
Receipt Qty |
Results |
100 |
100 |
The system receives the 100 units into inventory since the quantity received matches the quantity ordered. |
100 |
110 |
The system receives the 110 units into inventory since the quantity received falls within the Over Receipt % (A61). |
100 |
115 |
Because the receipt quantity is greater than the Over Receipt % (A61), the system receives the 115 units only if the user performing the Store Transfer Receipt has authority to the Override Tolerance (A18) secured feature. If the user does not have authority to the Override Tolerance (A18) secured feature, the system displays an error message: Receipt Qty Exceeds Order Qty. |
Item Locations During RF Store Transfer Receiving
The Allow Multiple Primary Item Locations (D12) system control value defines whether multiple primary locations are allowed for an item.
• If set to ALLOW, the system allows you to receive the item into a primary location other than the primary location already defined for the item.
• If set to NOT ALLOW or CONFIRM, the system prevents you from receiving the item into more than one primary location. If the receipt location is a primary location other than the primary location already defined for the item, the system displays an error message: No Mult Primary.
Note: Regardless of the setting of this system control value, the system allows you to receive the item into a non-primary location.
Updating an item’s primary primary location: Regardless of the setting of the Update Primary Primary Location for Item During Receiving (I35) system control value, the system does not update the item’s primary primary location with the receipt primary location.
Successful RF Store Transfer Receipts
CWSerenade performs the following updates when it processes an RF Store Transfer Receipt transaction.
• Increases the Quantity received for the associated records in the Store Transfer Receipt table by the receipt quantity.
• Creates an inventory transaction history record for the Store Transfer Receipt transaction. You can review inventory transaction history in Display Inventory Transaction History (DITH).
• The Inventory transaction code is A Adjustment.
• The Item transaction history ID contains the store transfer ID.
• The User is the user that accepted the store transfer receipt.
• Increases the on-hand quantity of the item/SKU in the receipt item warehouse and item location.
Receiving into a pending warehouse: When you receive merchandise into a pending warehouse, the system performs the following updates at receiving time:
• Creates an inventory transaction history record for the Store Transfer Receipt transaction in the pending warehouse. You can review inventory transaction history in Display Inventory Transaction History (DITH).
• The Inventory transaction code is A Adjustment.
• The Item transaction history ID contains the store transfer ID.
• The User is the user that accepted the store transfer receipt.
• Creates a pending putaway detail record. If a pending putaway detail record already exists for the PO (for store transfer receipts, the PO number is 9999999) and item/SKU, the system adds the receipt quantity to the existing pending putaway detail record. The pending putaway detail record indicates:
• The quantity of the item in the pending warehouse for this receipt. The on hand quantity for the item at the item warehouse level indicates the total pending putaway quantity for the item.
• The “final destination” warehouse where the inventory will be placed.
• The expected due date of the inventory; this due date will display in order entry, order maintenance, standard or streamlined order inquiry, inventory inquiry, and item availability for the “final destination” warehouse.
• Creates a PO layering record for the “final destination” warehouse.
The following updates do not occur when merchandise is received into a pending warehouse.
• The on-hand quantity for the item in the “final destination” warehouse is not changed.
• The costing calculation is not performed.
These updates occur when the merchandise is transferred from the pending putaway warehouse to the “final destination” warehouse.
See Pending Putaway Overview for an overview of the updates the system performs when you place inventory into a pending warehouse.
Closing Store Transfer Receipts
Once you have finished receiving the lines for a store transfer, you can close the store transfer by selecting Cls on the RF Transfer ID Select Screen.
CWSerenade performs the following updates when you Close a store transfer:
• Updates the records in the Store Transfer Receipt table associated with the store transfer ID.
• Updates User with the user ID of the user that closed the store transfer.
• Updates the Process Status to closed (X).
• Updates the Process date to the current date.
• Updates the Qty received to 0 for any store transfer lines on the store transfer that were not received against.
• Prevents you from making any further updates to the store transfer in Working with Store Transfer Receipt (WSRT) or using the Store Transfer Receipt option in Radio Frequency Transactions (RFMN).
Exporting closed store transfer receipts: On a regular basis, the external system retrieves closed records in the Store Transfer Receipt table.
Note: It is the responsibility of the external system to retrieve closed records from this table.
Store Transfer Receipt report: Use the Printing the Store Transfer Receipt Report (PSRR) menu option to print the Store Transfer Receipt Report. This report displays receipt information for a specific store transfer ID or for store transfers closed within a specified date range.
Options Not Supported in the Store Transfer Receipt Process
The following functions are not supported through the Store Transfer Receipt process.
• Receiving into suspense (Allow Receipt to Suspense (A59) system control value).
• Serial number tracking. You do not have the opportunity to enter serial numbers for the units received.
• Receiving non-inventory items that do not exist in the Item table.
Selecting the Store Transfer to Receive

Purpose: Use the RF Transfer ID Select screen to enter the store transfer ID you wish to receive.
In order to receive an item on a store transfer, the store transfer line in the Store Transfer Receipt Table (INSTXR) must be in an Open (O) status.
How to display this screen: Select option 4. Store Txfr Rcpts and select OK or press Enter at the RF RECEIV MENU Screen; see RF Screen Layout.
Cursor placement: When you first advance to this screen, the system places the cursor in the Transfer ID field.
Completing the RF Transfer ID Select Screen
Use the following steps to select a store transfer ID for RF Store Transfer Receipt.
1. |
Optionally, enter the company associated with the store transfer you wish to receive in the Cmp field. The code for the company you are currently in defaults, but you can override it. |
2. |
Optionally, use the Print Tags Option field to indicate whether you wish to create a price tag batch and print price tags for the items on the store transfer that are assigned to a price tag type. Note: This field displays only if records exist in the Price Tag Type table for your company. See Creating a Price Tag Batch for an RF Store Transfer Receipt Transaction for more information. |
3. |
Enter the store transfer ID number you wish to receive in the Transfer ID field. |
4. |
Select OK or press Enter to validate your entries. See RF Transfer ID Select Screen Errors for a list of errors you can receive on this screen. |
5. |
Select OK or press Enter again to advance to the RF Store Receipt Detail Screen, where you can receive an item on the specified store transfer ID. |
Field |
Description |
Cmp Company |
A code for the company associated with the store transfer. The code for the company you are currently in defaults, but you can override it. Company codes are defined in and validated against the Company table. Numeric, 3 positions; required. |
Transfer ID |
The store transfer ID you wish to receive. At least one line for the store transfer ID must be in an Open (O) status in the Store Transfer Receipt Table (INSTXR). Numeric, 10 positions; required. |
Defines whether the system creates a price tag batch and prints price tags for the items on the store transfer that are assigned to a price tag type. • A = Print All Tags. This option allows you to print price tags for all of the items on the store transfer prior to receiving the store transfer. With this option, the system: • creates a price tag batch in the Price Tag Batch table, using the next available number in the Price Tag Batch # number assignment. • creates a price tag detail for each item on the store transfer that is assigned to a price tag type. The system uses the Quantity due in the Store Transfer Receipts table as the number of tags to create for each item. • immediately prints the tags in the batch; see Printing Price Tags. • R = Print Received Tags. This option allows you to print price tags only for the items on the store transfer that are received in this transaction. With this option, the system: • creates a price tag batch in the Price Tag Batch table, using the next available number in the Price Tag Batch # number assignment. • creates a price tag detail for each item received on the store transfer that is assigned to a price tag type. The system uses the receipt quantity as the number of tags to create for each item. • immediately prints the tags in the batch; see Printing Price Tags. • blank = The system does not create a price tag batch or print price tags. Note: This field displays only if records exist in the Price Tag Type table for your company. You can review and work with the price tag batch in Working with Price Tags (WPTG). See Price Tag Overview and Setup for more information on price tags. Numeric, 1 position; optional. |
Screen Option |
Procedure |
Continue with RF Store Transfer Receipts |
Enter the store transfer ID you wish to receive and select OK or press Enter to advance to the RF Store Receipt Detail Screen, where you can receive an item on the specified store transfer ID. See Receiving an Item on a Store Transfer. |
Clear the information from the screen and restore the defaults |
Select Clr or press F8. |
Close all lines for the store transfer ID |
Select Cls or press F9. See Closing Store Transfer Receipts. |
Exit the screen |
Select Exit or press F3. |
RF Transfer ID Select Screen Errors
Error Message |
Cause |
Invalid Transfer ID |
The store transfer ID entered in the Transfer ID field is invalid for the specified company. |
Invalid Cmp |
The company code entered in the Cmp field is invalid. |
Invalid Transfer status |
All of the lines for the store transfer ID entered in the Transfer ID field are in a Closed (X) status. |
Receiving an Item on a Store Transfer
Purpose: Use the RF Store Receipt Detail screen to receive an item on the specified store transfer ID. You can enter the quantity you wish to receive and the warehouse and location where you wish to place the item.
In order to receive a full or partial store transfer line, the store transfer line must be in an Open (O) status in the Store Transfer Receipt Table (INSTXR). In addition, the item location cannot be on physical freeze. Note: The system allows the item location to be on reservation freeze and the item warehouse to be on allocation freeze. In addition, the system allows the location to be frozen.
RF Store Receipt Detail Screen
How to display this screen: Complete the RF Transfer ID Select Screen and select OK or press Enter; see RF Screen Layout.
Cursor placement: When you first advance to this screen, the system places the cursor in the UPC or SS field.
Completing the RF Store Receipt Detail Screen
Use the following steps to enter the quantity to receive for a specified item on the store transfer.
1. |
Enter the item to receive. The setting of the Default Scan Type for RF Receiving and PI (K68) system control value controls whether you can scan the short SKU barcode or UPC barcode to default the item and SKU. • If set to blank or SHORTSKU, the system displays the SS field where you can scan the short SKU barcode on the RF Item Label, or manually complete the SS field it default the associated item and SKU in the Itm and SKU fields. • If set to UPC08, UPC12, UPC13, or UPC14, the system displays the UPC field where you can scan the UPC barcode or manually complete the UPC field to default the associated item and SKU in the Itm and SKU fields. The setting also indicates the length of the UPC barcode that can be scanned. Note: Include any leading zeros. For example, if the UPC code is 06012011, enter 06012011 and not 6012011. • Optionally, you can manually enter the item and SKU in the Itm and SKU fields. Once you enter the item to receive, the system validates the item and SKU and displays the quantity due for the store transfer line if you have authority to the Display Purchase Order Quantity in Receiving (B02) secured feature. |
2. |
The setting of the Default Quantity in RF Receiving (K71) system control value determines the quantity that defaults to the Qty field once you specify the item and SKU to receive. In addition, this setting controls whether you use Standard RF Store Transfer Receipts or Quick-Entry RF Store Transfer Receipts. • If set to *ONE, the system defaults a receipt quantity of 1 and performs Quick-Entry RF Store Transfer Receipts. • If set to *DUE, the system defaults the quantity remaining to receive for the store transfer line and performs Standard RF Store Transfer Receipts. • If set to *NONE or blank, the system does not default a quantity and performs Standard RF Store Transfer Receipts. |
|
Quick-Entry RF Store Transfer Receipts The system performs Quick-Entry RF Store Transfer Receipts if the Default Quantity in RF Receiving (K71) system control value is set to *ONE. • If a valid warehouse and location combination defaults, the system automatically receives the item into the default location for a quantity of 1 without waiting for you to select OK or press Enter to proceed with the receipt. The system displays the message Line received to indicate that the store transfer line has been received for a quantity of 1. • If a valid warehouse and location combination does not default, the system advances the cursor to the Loc field. Scan the location barcode on the RF Bin Location Label or manually complete the Loc field. To scan the location barcode on the Bin Location label correctly, the cursor on the screen must be in the Loc field. Once you enter a location, the system automatically receives the item for a quantity of 1 without waiting for you to select OK or press Enter to proceed with the receipt. The system displays the message Line received to indicate that the store transfer line has been received for a quantity of 1. See Warehouse Default and Location Default for more information on when the system defaults a warehouse and location. |
|
Standard RF Store Transfer Receipts The system performs Standard RF Store Transfer Receipts if the Default Quantity in RF Receiving (K71) system control value is set to *DUE, *NONE or blank. The system advances the cursor to the Qty field if a location defaults but a quantity does not default; otherwise, the system advances the cursor to the Loc field. • If a quantity does not default, enter the quantity to receive in the Qty field. If the Default Quantity in RF Receiving (K71) system control value is set to *DUE, the system defaults the quantity remaining to receive for the store transfer line, but you can override it. • If a valid warehouse and location combination does not default or you wish to receive the item in a different location, scan the location barcode on the RF Bin Location Label or manually complete the Loc field. To scan the location barcode on the Bin Location label correctly, the cursor on the screen must be in the Loc field. See Warehouse Default and Location Default for more information on when the system defaults a warehouse and location. • Select OK or press Enter to validate your entries. See RF Store Receipt Detail Screen Errors. • Select OK or press Enter again to receive the quantity of the item into the specified warehouse and location. The system displays the message Line received to indicate the quantity specified for the store transfer line has been received. |
3. |
You can receive another item on the store transfer or exit the screen to return to the RF Transfer ID Select Screen where you can select to close all lines for the store transfer ID, or select to receive lines for another store transfer ID. |
Field |
Description |
Transfer ID |
The store transfer ID to receive. This is the store transfer ID selected on the RF Transfer ID Select Screen. Numeric, 10 positions; display-only. |
SS Short SKU |
The short SKU code for the item being received. Short SKU codes are defined in and validated against the SKU table. This field displays only if the Default Scan Type for RF Receiving and PI (K68) system control value is set to blank or SHORTSKU. Scanning the Short SKU Barcode To scan the short SKU barcode on the RF Item Label correctly, the cursor on the screen must be in the SS field. Once you scan the short SKU barcode, the system updates the Itm and SKU fields with the associated item/SKU. Numeric, 7 positions; optional. |
UPC |
The UPC code for the item being received. UPC codes are defined in and validated against the Item UPC table. This field displays only if the Default Scan Type for RF Receiving and PI (K68) system control value is set to UPC08, UPC12, UPC13, or UPC14. • If set to UPC08, the UPC scanned cannot be greater than 8 positions. • If set to UPC12, the UPC scanned cannot be greater than 12 positions. • If set to UPC13, the UPC scanned cannot be greater than 13 positions. • If set to UPC14, the UPC scanned cannot be greater than 14 positions. Scanning the UPC Barcode To scan the UPC barcode correctly, the cursor on the screen must be in the UPC field. Once you scan the UPC barcode, the system updates the Itm and SKU fields with the associated item/SKU. Note: Include any leading zeros. For example, if the UPC code is 06012011, enter 06012011 and not 6012011. Alphanumeric, 14 positions; optional. |
Itm |
The code for the item being received. Item codes are defined in and validated against the Item table. Alphanumeric, 12 positions; required if Short SKU or UPC not entered. |
SKU |
A code for the SKU of the item. SKU codes are defined in and validated against the SKU table. Alphanumeric, three 4-position fields; required if the item contains SKUs. |
Qty Quantity to receive |
The quantity of the item to receive. The quantity must be a positive number greater than zero, without decimals. Quantity Default The setting of the Default Quantity in RF Receiving (K71) system control value determines the quantity that defaults to the Qty field once you specify the item and SKU to receive. • If set to *NONE or blank, the system does not default a quantity. • If set to *ONE, the system defaults a quantity of 1. In addition, once a valid item, warehouse and location are defined, the system automatically receives the item for a quantity of 1 without waiting for you to select OK or press Enter to proceed with the receipt. • If set to *DUE, the system defaults the quantity due on the store transfer line. Over Receiving the Store Transfer Line Quantity The Over Receipt % (A61) system control value allows you to receive more than the quantity ordered on the store transfer line, up to the percentage limit defined in the system control value. This allows you to receive merchandise that the external system over-ships. See Over Receiving the Quantity on a Store Transfer Line. Override Tolerance Secured Feature The Override Tolerance (A18) secured feature allows you to override the percentage defined in the Over Receipt % (A61) system control value and receive any amount greater than the quantity ordered on the store transfer line. Numeric, 7 positions; required. |
Due Quantity due |
The quantity due for the store transfer line. The quantity due is a calculated number: Qty due in Store Transfer Receipt table - Qty received in Store Transfer Receipt table = Qty due for store transfer line. The system displays this value after the item has been identified and only if you have authority to the Display Purchase Order Quantity in Receiving (B02) secured feature. Numeric, 7 positions; display-only. |
Warehouse unlabeled field to the left of the Loc field |
A code for the warehouse where the item on the store transfer is to be received. Warehouse codes are defined in and validated against the Warehouse table. If the LPN Tracking (E16) system control value is selected, the system defaults the warehouse code defined for the first store transfer line on the store transfer ID in the Store Transfer Receipt Table (INSTXR). If the LPN Tracking (E16) system control value is unselected, the system uses the following hierarchy to default a warehouse code to the Warehouse field: 1. If the warehouse on the store transfer record is a non-allocatable warehouse, default the warehouse for the first Warehouse Default Location record whose Location type is Non-Allocatable Whs Receiving in Working with Default Warehouse Locations (WWDL). 2. If the warehouse on the store transfer record is an allocatable warehouse and the Default Pending Putaway in RF Receiving (K72) system control value is selected, default the warehouse for the first Warehouse Default Location record whose Location type is Pending Putaway in Working with Default Warehouse Locations (WWDL). 3. Default the warehouse code defined for the first store transfer line on the store transfer ID in the Store Transfer Receipt Table (INSTXR). Numeric, 3 positions; display-only. |
Loc Location |
The code for the location where the item on the store transfer is to be received. Location codes are defined in and validated against the Location table. The location must be a valid location for the specified warehouse. The item location cannot be on physical freeze. Note: The system allows the item location to be on reservation freeze and the item warehouse to be on allocation freeze. In addition, the system allows the location to be frozen. If the LPN Tracking (E16) system control value is selected, the system defaults the first primary location defined for the item in the specified warehouse. If a primary location is not defined for the item in the specified warehouse, you must specify a location. If the LPN Tracking (E16) system control value is unselected, the system uses the following hierarchy to default a location to the Loc field. 1. If the warehouse on the store transfer record is a non-allocatable warehouse, default the location for the first Warehouse Default Location record whose Location type is Non-Allocatable Whs Receiving in Working with Default Warehouse Locations (WWDL). 2. If the warehouse on the store transfer record is an allocatable warehouse and the Default Pending Putaway in RF Receiving (K72) system control value is selected, default the location for the first Warehouse Default Location record whose Location type is Pending Putaway in Working with Default Warehouse Locations (WWDL). 3. If the Default Pending Putaway in RF Receiving (K72) system control value is unselected and the Default Primary Location - Suspense Placement and PO Receipts (C08) system control value is selected, default the item’s primary primary location. 4. If the Default Primary Location - Suspense Placement and PO Receipts (C08) system control value is unselected, the system does not default a location to the Loc field. Scanning the Location Barcode You can scan the location barcode on the RF Bin Location Label to default a location. To scan the location barcode correctly, the cursor on the screen must be in the Loc field. Allowing Multiple Primary Item Locations During Receiving The Allow Multiple Primary Item Locations (D12) system control values defines whether multiple primary locations are allowed for an item; see Item Locations During RF Store Transfer Receiving. Alphanumeric, 7 positions; required. |
Screen Option |
Procedure |
Perform a RF Store Transfer Receipt transaction for the specified store transfer ID, item, and receipt quantity to the specified warehouse and location |
|
Clear the information from the screen and restore the defaults |
Select Clr or press F8. |
Add a store transfer line to the current store transfer being received |
Select Crt or press F6 to create a store transfer line; see Creating a Store Transfer Line. In order to use this option, you must first enter the item and quantity. This option does not display if the Add PO Detail Line during PO Receipts (A21) secured feature is set to EXCLUDE. |
Exit the screen |
Select Exit or press F3. |
Creating a Store Transfer Line
Use the following steps to add an item to a store transfer. Use this option to track merchandise sent by the external system that was not included on the original store transfer.
Note: The Add PO Detail Line during PO Receipts (A21) secured feature determines whether the Crt button displays on the RF Store Receipt Detail Screen. If you have authority to this secured feature, the Crt button is visible and you can add an item to a store transfer.
1. |
Enter the item to add. The setting of the Default Scan Type for RF Receiving and PI (K68) system control value controls whether you can scan the short SKU barcode or UPC barcode to default the item and SKU. • If set to blank or SHORTSKU, the system displays the SS field where you can scan the short SKU barcode on the RF Item Label, or manually complete the SS field to default the associated item and SKU in the Itm and SKU fields. • If set to UPC08, UPC12, UPC13, or UPC14, the system displays the UPC field where you can scan the UPC barcode or manually complete the UPC field to default the associated item and SKU in the Itm and SKU fields. The setting also indicates the length of the UPC barcode that can be scanned. Note: Include any leading zeros. For example, if the UPC code is 06012011, enter 06012011 and not 6012011. • Optionally, you can manually enter the item and SKU in the Itm and SKU fields. |
2. |
Enter the quantity to receive in the Qty field. The setting of the Default Quantity in RF Receiving (K71) system control value determines the quantity that defaults to the Qty field once you specify the item and SKU to receive. • If set to *NONE or blank, the system does not default a quantity. • If set to *ONE, the system defaults a quantity of 1. • If set to *DUE, the system displays the message: Invalid Receipt Quantity. Note: If you are using Quick-Entry RF Store Transfer Receipts to receive inventory and the item/SKU you wish to add already exists on the store transfer, the system will immediately receive the item into the default location for a quantity of 1 without waiting for you to select Crt to create a new store transfer line. In order to create a new line on the store transfer for the item, you must first receive the existing store transfer lines for the item. |
3. |
Select Crt or press F6 to add the item to the store transfer. The system displays the message: Store Transfer line added. If the Default Quantity in RF Receiving (K71) system control value is set to *ONE, the system immediately receives it; otherwise, you can specify a location and select OK to receive the item. The system creates a new record in the Store Transfer Receipt Table (INSTXR): • Company = The company associated with the store transfer ID. • Transfer ID = The transfer ID you selected on the RF Transfer ID Select Screen. • Line Number = The next available line number for the store transfer ID. • From Site = The site code on the first line defined for the store transfer ID. • Warehouse = The warehouse specified on the RF Store Receipt Detail Screen. • Transfer Date = The date you created the new store transfer line. • ITM Number = The item specified on the RF Store Receipt Detail Screen. • SKU Code = The SKU specified on the RF Store Receipt Detail Screen. • Qty due = The quantity specified on the RF Store Receipt Detail Screen. • Qty received = 1 if the Default Quantity in RF Receiving (K71) system control value is set to *ONE; otherwise, 0 until you receive the new line. • User = blank. • Process status = O (Open). • Process date = 0. |
RF Store Receipt Detail Screen Errors
Error Message |
Cause |
Item Not Identified |
The Itm and SKU fields are blank. See Completing the RF Store Receipt Detail Screen for more information on identifying the item and SKU. |
Invalid Item |
The value in the Itm field is not a valid item number in the Item table. |
Invalid SKU |
The item contains SKUs, and the SKU fields are blank or contain an invalid value. |
Invalid Warehouse |
The warehouse code in the Whs field is not a valid warehouse. |
Missing Location |
The Loc field is blank. |
Loc not in Whs |
The location in the Loc field is not a valid location for the specified warehouse. |
Invalid UPC |
The UPC code in the UPC field is not a valid UPC code in the Item UPC table. |
Invalid Short SKU |
The short SKU code in the SS field is not a valid short SKU code in the SKU table. |
Line Not Found |
An open store transfer line for the specified item and SKU could not be found on the store transfer. |
No Mult Primary |
The Allow Multiple Primary Item Locations (D12) system control value is set to CONFIRM or NOT ALLOW and a primary location other than the one specified is already defined for the item to receive. See Item Locations During RF Store Transfer Receiving. |
Missing Receipt Qty |
The Qty field is blank or 0. |
Invalid Receipt Qty |
The Qty field contains an invalid quantity, such as a negative number. |
Recpt Qty > Ord Qty |
The receipt Qty is greater than that quantity due on the store transfer line and: • the receipt quantity is greater than the allowed over receipt percentage defined in the Over Receipt % (A61) system control value, and • the user performing the receipt does not have authority to the Override Tolerance (A18) secured feature. |
Item Loc Frozen |
The item location for the location in the Loc field is on physical freeze (the Physical freeze field in the Item Location table is Y). |
