
Purpose: This topic describes how to set up your system to use RF (radio frequency) devices to help manage your inventory.
The setup includes:
• Work with Warehouse Locations (WLOC)
• Work with Default Warehouse Locations (WWDL)
• Work with Return Disposition Values (WRDV)
• Work with Users (WUSR) and Work with User Classes (WUCL)
• System Control Values Related to RF
• Secured Features Related to RF
• Setting Up the RF Printer Using Windows Print Service
• LabelPrinters Properties File
• Correcting RF Printer Errors
• RF Gun
• Configuring the RF Gun to Beep for RF Actions
For more information: See:
• Radio Frequency Overview for an overview of the RF process.
• Radio Frequency Transactions (RFMN) for more information on how to process RF transactions.
• Radio Frequency Inquiry and Maintenance (RFMN) for more information on how to review RF information, print RF labels, and create or update LPNs.
• Price Tag Overview and Setup for more information on price tags and the setup required to print price tags. You can print price tags for an RF PO Receipt Transaction and RF Store Transfer Receipt Transaction.

• Work with Warehouse Locations (WLOC)
• Work with Default Warehouse Locations (WWDL)
• Work with Return Disposition Values (WRDV)
• Work with Users (WUSR) and Work with User Classes (WUCL)

RF requires that you have at least two warehouses defined on your system: a main warehouse and a staging warehouse.
Staging Warehouse
The staging warehouse differs from the main warehouse in that the Allocatable field should be unselected. This setting will prevent the system from attempting to reserve stock that is currently in the staging area.
Additionally, you need to define the staging warehouse in the Default Staging Warehouse (E15) system control value.
Main Warehouse
The Allocatable field should be selected for the main warehouse so that the system can reserve stock from the warehouse.
Work with Warehouse Locations (WLOC)
The locations you create within your staging warehouse should include the following:
• an intransit location (for stock that is in the process of moving to a new location)
• a primary location (for stock awaiting putaway in primary)
• a bulk location (for stock awaiting putaway in bulk storage)
• a returns location (for returns awaiting putaway)
• one or more backorder locations (for items whose total backorder quantity cannot be fulfilled from primary. You may want to create more than one backorder location to facilitate picking backordered items)
All locations in your staging warehouse should be defined as non-pickable and non-frozen (Pickable location = unselected and Freeze = unselected). Additionally, you should not define staging warehouse locations as primary types (Location type = Secondary, or Bulk, but not Primary), so that the system will delete item/location records when you move stock out of the staging area, and will not delete LPNs when you move stock into staging (the system does not permit an LPN to exist in a primary location).
The locations you define in your staging warehouse need not be actual locations; instead, they may be “logical” places to receive stock that indicate the item's actual destination. For example, you might create a location in your staging warehouse named PRIMARY (which you would not define as a primary location type); when you receive stock into this location, the system would print LPN labels with the location indicated as PRIMARY, and the item's actual primary location appearing to the right. This indicates to your warehouse staff that the case, which is currently in your staging area, is awaiting putaway in the primary location indicated.
Example: Staging Warehouse Location Setup
Location |
Location Type |
Pickable |
Freeze |
Typical Use |
TRANSIT |
Bulk (can also be Secondary) |
unselected |
unselected |
Place stock in this location when it is in-transit between locations. |
PRIMARY |
Bulk (can also be Secondary) |
unselected |
unselected |
Place stock in this location when it is to be placed in it’s “primary primary” location in the main warehouse. |
BULK |
Bulk (can also be Secondary) |
unselected |
unselected |
Place stock in this location when it is to be placed in a bulk location in the main warehouse. |
RETURNS |
Bulk (can also be Secondary) |
unselected |
unselected |
Place stock in this location when it is associated with a return and should be inspected before being placed in an allocatable location. |
BACKORD |
Bulk (can also be Secondary) |
unselected |
unselected |
Place stock in this location when it will be used to fulfill backorders. |
For more information: See Creating and Maintaining Locations (WLOC).
Additional Main Warehouse Locations
You must define an intransit location within your main warehouse. Like the staging warehouse locations, this location should be non-pickable and non-frozen, and should be a type other than primary.
Additionally, you should define one or more backorder locations if you will be picking from these locations in addition to primary. These backorder locations should be set up to mirror the backorder locations in the staging warehouse, except that you may want to define the backorder locations in your main warehouse as pickable. You may want to define these backorder locations as primary, so that the system will delete LPNs when you place stock in these locations. This would remove the need to delete LPN records through Displaying License Plate Information (WLPN) when you pick out of a backorder location.
When you receive into a backorder location in the staging warehouse, you will need to process an RF Receipt Putaway Pull Transaction and RF Receipt Putaway Put Transaction to move the stock from the backorder location in the staging warehouse to the corresponding backorder location in the main warehouse.
Example: Main Warehouse Location Setup
Location |
Location Type |
Pickable |
Freeze |
Typical Use |
A010101 |
Primary |
selected |
unselected |
Used as an item’s “primary primary” location; this is the location the system generally reserves stock from. |
B010101 |
Secondary |
selected |
unselected |
Used as a backup to the primary location; if the primary location does not have enough available stock, the system can use a secondary pickable location to fulfill the remaining quantity. |
C010101 |
Bulk |
unselected |
unselected |
Used to store bulk stock in cases quantities. |
R010101 |
Bulk |
unselected |
unselected |
Used to indicate the stock is associated with a return and should be inspected before placing in an allocatable location. |
TRANSIT |
Bulk |
unselected |
unselected |
The system automatically moves stock to the default intransit location in your main warehouse when you perform an RF Pull transaction for an LPN or item transfer. |
BACKORD |
Primary |
selected |
unselected |
Used to pick stock to fulfill backorders. |
Work with Default Warehouse Locations (WWDL)
You need to identify the staging and main warehouse locations by defining them using Working with Default Warehouse Locations (WWDL). This identification tells the system which location to use when performing RF transactions. For example, the system automatically moves stock to the default intransit location in the warehouse when you perform an RF Pull transaction for an LPN or item transfer.
The default location types to assign in your staging warehouse are:
• Bulk
• Backorder
• Intransit
• Primary
• Return
• Non-Alloc Whs Receiving (used during an RF PO Receipt Transaction and RF Store Transfer Receipt Transaction if the warehouse on the PO Header or Store Transfer is a non-allocatable warehouse)
The default location type to assign to your main warehouse is Intransit.
The only fields you need to define in the Default Warehouse Location table for most locations are the Warehouse, Location type, and Location, with the possible exception of backorder locations. You might define more than one backorder location to limit the unit quantity for each location and make picking from backorder easier. In this case, you would use the Max qty per bin field to define the amount to place in each backorder location.
Default Warehouse Location for RF Return Pull Transactions
When you process an RF Return Pull Transaction, the warehouse and location defined for the first warehouse default location record with a location type of Return defaults. You can override the location that defaults but you cannot override the warehouse that defaults for the RF Return Pull transaction. Because you cannot override the default warehouse, when you create a default warehouse location with a location type of Return for your staging warehouse, you need to make sure that it is the first default warehouse location record with a location type of Return.
Example 1: The following default warehouse location records exist with a location type of Return:
Warehouse |
Location |
Location Type |
5 Staging Warehouse |
RETURNS |
Return |
6 Boston Warehouse |
C01 |
Return |
In this situation, because the first default warehouse location record with a location type of Return, is staging warehouse 5 / RETURNS location, the system defaults staging warehouse 5 and location RETURNS to the Return Pull Stock Screen.
Example 2: The following default warehouse location records exist with a location type of Return:
Warehouse |
Location |
Location Type |
4 Main Warehouse |
C01 |
Return |
5 Staging Warehouse |
RETURNS |
Return |
In this situation, because the first default warehouse location record with a location type of Return is main warehouse 4 / C01 location, the system defaults main warehouse 4 and location C01 to the Return Pull Stock Screen. Because you cannot update the warehouse that defaults to the Return Pull Stock screen, you cannot select to pull from the staging warehouse.
The Pieces per case field in the Item table defines the maximum unit quantity contained in a case, pallet, or other unit of storage for an item. The system will avoid breaking a case when suggesting placement in a bulk or backorder location; it will suggest that any loose units be placed in primary. In addition, the system will assign a separate LPN at purchase order receiving for each case based on the pieces per case defined for the item.
Primary Location
The Warehouse and Location fields in the SKU table define the primary warehouse and location where you stock the item. The location you enter defaults to the RF LPN Label and RF Return Label. The warehouse you enter defaults to certain RF screens; see Default Warehouse for RF Screens.
See Performing Initial Item Entry (MITM) for information on defining items.
Item Location Minimum/Maximum Quantity
The Minimum quantity and Maximum quantity defined for each item location in the item’s main warehouse determines the replenishment location suggested during Staging Warehouse/Location Placement.
Work with Return Disposition Values (WRDV)
Create a return disposition value for the staging warehouse and location where you wish to receive items that customers return. You can then define this return disposition value in the Default Disposition Code (C18) system control value. See Establishing Return Disposition Values (WRDV).
Work with Users (WUSR) and Work with User Classes (WUCL)
Assigning the RF Menu to a User or User Class
For users who will work using an RF gun, you need to set up the users so that they advance directly to the RF menu when they sign on to CWSerenade.
To assign the *RFMENU to a user:
• enter *RFMENU in the Default menu field at the Change or Change User screen if you wish to assign individual users to work with an RF gun.
• enter *RFMENU in the Default menu field at the Change or Create User Class Screen if you wish to assign all users assigned to a user class to work with an RF gun. You can create a user class, such as RFMENU, and assign all users that use an RF gun to this user class. Note: If you assign the *RFMENU at the user class level, make sure you do not assign a default menu at the user level; otherwise, the default menu defined at the user level will override the default menu assigned at the user class level.
If a user wants to use the RF menu and other menu options: Users assigned to the *RFMENU default menu cannot access screens other than the Radio Frequency Transactions (RFMN) menu option. In order for a user to use an RF Gun and also use other CWSerenade screens, you should create two separate user IDs for the user: one user ID that is used when the user is using an RF gun and one user ID when the user is using other CWSerenade screens.
Example:
BMIRANDA |
The user would use this user ID when she is not using an RF gun. |
RFBM |
The user would use this user ID when she is using an RF gun. Note: To reduce the amount of keying required when signing on to CWSerenade using an RF gun, keep the user ID short. |
For more information: See:
• Setting Up User Classes (WUCL) for more information on setting up user classes in CWSerenade.
• Working with User Records (WUSR) for more information on setting up users in CWSerenade.
System Control Values Related to RF
System Control Value |
Description |
The warehouse that the system checks first for most transactions and inquiries. The system defaults this warehouse to certain screens in the Radio Frequency Transactions (RFMN) menu option; see Default Warehouse for RF Screens to review a table that explains which warehouse defaults to certain RF screens. |
|
The actual or logical warehouse that represents where you stage stock prior to putaway. The system uses the staging warehouse when suggesting Staging Warehouse/Location Placement during PO Receipts. |
|
Defines whether to assign LPNs (license plate numbers) to stock in order to facilitate the use of radio frequency devices in managing your inventory. The system assigns an LPN to each carton at Purchase Order Receipts (PORC). The LPN provides a means to track the movement and location of stock at the carton level, rather than the individual unit. The LPN remains with the carton until you put it away in the item's primary location. In addition, when using the Replenish Primary Locations function, initiated through Working with Replenishment Control (MSRP), if you are using radio frequency and you have the LPN Tracking (E16) system control value selected, the system will not generate a Replenishment Control request. When you create a replenishment control request, the system will analyze the inventory level in both the primary and secondary/bulk locations and generate a Replenishment Detail by 'From' Location Report that you can use as a worksheet to assist you in confirming the item quantities to replenish. The request you create will not generate and will clear from the screen. See Replenish Primary Locations Overview. You must select this field to use RF. |
|
Defines the type of location for the system to select first during PO Receipts. |
|
Defines the type of location for the system to select second during PO Receipts. |
|
Defines the type of location for the system to select last during PO Receipts. |
|
Round Up Quantity in RF Suggest Warehouse Placement for B/O (F16) |
Defines whether the system should round up to the nearest case quantity when suggesting location placement in a default backorder location in the staging warehouse. |
You may want to set this field to BULK so that the system does not attempt to replenish from an intransit location. |
|
Controls whether your current company code defaults to the Return Pull Stock Screen and Return Put Stock Screen in the Radio Frequency Transactions (RFMN) menu option. |
|
Defines whether the system defaults an item/SKU's primary warehouse to certain screens in the Radio Frequency Transactions (RFMN) menu option; see Default Warehouse for RF Screens to review a table that explains which warehouse defaults to certain RF screens. |
|
Umbrella system control value that defines the values required to perform a physical inventory. Complete these system control values if you wish to use RF Physical Inventory. Also, see RF Physical Inventory Setup for the system control values that directly impact RF Physical Inventory. |
|
Defines the type of barcode that is available to scan in RF Physical Inventory, RF Receipts, RF Mass Transfer, and RF Mass Putaway. |
|
Defines the quantity to default during RF Receipts. |
|
Defines whether the system defaults the pending putaway location during RF Receipts. |
|
Defines the quantity to default to the RF Mass Transfer Screen for an RF Mass Transfer. |
|
Defines whether the system suppresses the printing of the new RF LPN label when you process an RF LPN Transfer Pull transaction and partially pull the LPN quantity. |
|
Umbrella system control value that defines the print programs and printers used to print labels during radio frequency processing. See RF Label Setup. |
|
Defines the print program used to print RF LPN labels. The base print program is RFR0070. See RF LPN Label for required setup and a sample LPN label. |
|
Defines the ID of the printer used to print RF LPN labels. The base printer ID is LPN_PTR and should not be changed. See RF LPN Label for required setup and a sample LPN label. |
|
Defines the print program used to print RF Bin Location labels. The base print program is RFR0072. See RF Bin Location Label for required setup and a sample Bin Location label. |
|
Defines the ID of the printer used to print RF Bin Location labels. The base printer ID is BIN_PTR and should not be changed. See RF Bin Location Label for required setup and a sample Bin Location label. |
|
Defines the print program used to print RF Item labels. The default program is RFR0071. See RF Item Label for required setup and a sample Item label. |
|
Defines the ID of the printer used to print RF Item labels. The base printer ID is ITM_PTR and should not be changed. See RF Item Label for required setup and a sample Item label. |
|
Defines the print program used to print RF Return labels. The base print program is RFR0073. See RF Return Label for required setup and a sample Return label. |
|
Defines the ID of the printer used to print RF Return labels. The base printer ID is RET_PTR and should not be changed. See RF Return Label for required setup and a sample Return label. |
|
Defines the print program used to print RF Carton labels. The base print program is RFR0080. See RF Carton Label for required setup and a sample Carton label. |
|
Defines the ID of the printer used to print RF Carton labels. The base printer ID is CAR_PTR and should not be changed. See RF Carton Label for required setup and a sample Carton label. |
|
Defines the format of the item/SKU for barcoded item codes on RF labels. This code tells the system how to interpret item codes that you scan through an RF gun. The only valid setting besides blank is SHORT SKU. This setting indicates that the short SKU code defined in the SKU table for the item/SKU appears on the label. |
Secured Features Related to RF
You control user access to individual RF transactions through the following secured features:
Secured Feature |
Description |
Controls whether a user can update inventory through the Create LPN and Adjust LPN options in the Radio Frequency Inquiry and Maintenance (RFMN) menu option. |
|
Controls whether a user can process an RF Receipt transaction through the Radio Frequency Transactions (RFMN) menu option. |
|
Controls whether a user can process an RF Replenishment transaction through the Radio Frequency Transactions (RFMN) menu option. |
|
Controls whether a user can process an RF Return transaction through the Radio Frequency Transactions (RFMN) menu option. |
|
Controls whether a user can process an RF LPN Transfer transaction through the Radio Frequency Transactions (RFMN) menu option. |
|
Controls whether a user can process the following item transfers through the Radio Frequency Transactions (RFMN) menu option. An Item Transfer differs from an LPN Transfer in that you enter item/SKU and quantity information rather than transferring the complete LPN. |
|
Controls whether a user can use RF LPN Inquiry, RF Item Inquiry, RF Bin Inquiry, and Item Inquiry by UPC available through the Radio Frequency Transactions (RFMN) menu option. This feature does not control any inquiry options available through standard CWSerenade menus or fast paths. |
|
Controls whether a user can use Print Item Label, Print LPN Label, or Print Bin Location Label through the Radio Frequency Transactions (RFMN) menu option. |
|
Controls whether a user can use the Create LPN, Adjust LPN, Build LPN, Change Primary Location, and Assign Primary Location options through the Radio Frequency Transactions (RFMN) menu option. |
|
Controls whether a user can enter a first count in RF Physical Inventory. |
|
Controls whether a user can enter a second count in RF Physical Inventory. |
|
Controls whether a user can enter a final count in RF Physical Inventory. |
|
Controls whether a user can accept the first count in RF Physical Inventory. |
|
Controls whether a user can accept the second count in RF Physical Inventory. |
|
Controls whether a user can accept the final count in RF Physical Inventory. |
A Zebra1 printer is required to print RF labels. You can also use a Zebra printer for other types of labels, such as the additional pick control label.
The recommended Zebra printer to use with CWSerenade Radio Frequency is the thermal transfer TLP 2844 bar code label printer. Contact your MICROS representative if you wish to use a different Zebra printer that supports the EPL language set to print RF labels.
Because CWSerenade Radio Frequency prints 3 different size labels, you may want a separate Zebra printer for each label size.
• The base print programs for RF Carton Label and RF LPN Label print labels that are 4" high x 4" wide.
• The base print programs for RF Return Label and RF Item Label print labels that are 2" high x 4" wide.
• The base print program for RF Bin Location Label print labels that are 1" high x 4" wide.
Note: When you configure your Zebra printers, you must assign the printers a static IP address. If your printers use a dynamic IP address, you will need to continuously update the LabelPrinters Properties File with the new IP address defined for each printer and select Change in Refresh System Properties (PROP) or stop and restart the SERENADE service (or the application server).
Visit the Zebra web site (www.zebra.com) for more information about Zebra printers and to download documentation about your Zebra printer.
RF Printer Setup
Communicating with the RF Printer: The PRINTER_CONNECTION setting in the LabelPrinters Properties File indicates how CWSerenade connects to the RF printer.
• TCP indicates CWSerenade connects to the RF printer using a TCP/IP socket connection.
• WIN indicates the RF printer is set up as a Windows Print Service. If you set up the RF printer as a Windows Print Service, you must perform some additional setup; see Setting Up the RF Printer Using Windows Print Service.
Regardless of how you set up the RF printer, you must complete the LabelPrinters Properties File.
Important: If you print a high volume of labels at a time, MICROS recommends you set up the RF printer as a Windows Print Service.
If you change the PRINTER_CONNECTION setting: Check the label printer settings defined for each user on the Work with User Label Printers Screen and the associated system control values to make sure the label printer defined is a valid printer based on the printer connection setting.
Setting Up the RF Printer Using Windows Print Service
• Installing the Zebra Print Driver
• Sharing the Zebra Print Driver
• Adding the RF Printer to each CWSerenade Application Server
Before you begin: You will need to know:
• The printer model; this information should be provided on the physical printer and in the documentation that came with the printer.
• The IP address of the Zebra printer; see Verifying the RF Printer Configuration Settings.
• The user account that installed CWSerenade; see below.
User account: In order for CWSerenade to recognize the printer, the user account that installed CWSerenade should be the same account that installs the Zebra Driver.
Note: If you have more than one CWSerenade application server, you must check the settings for each application server.
To determine the user account that installed CWSerenade:
1. |
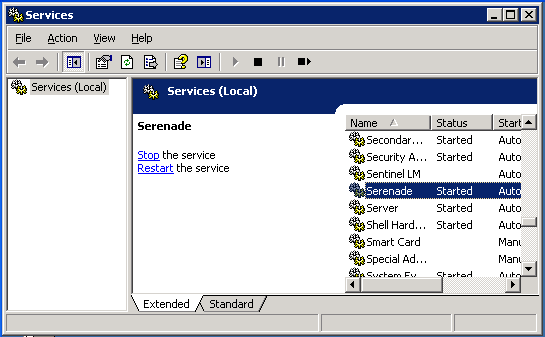
On the CWSerenade application server, select Start > Administrative Tools > Services to advance to the Services window.
|
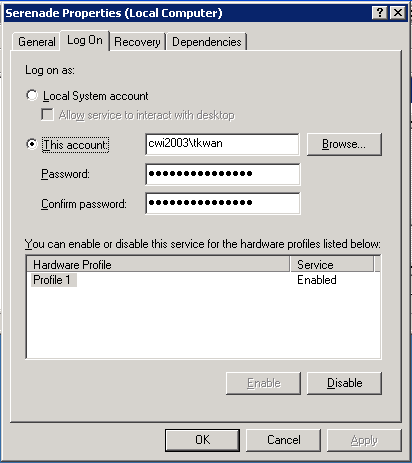
2. |
Locate the SERENADE service, right-click on the service, and select Properties to advance to the Serenade Properties window. Select the Log On tab to review the user account used to install CWSerenade. This is the user account you should use to install the Zebra Driver.
|
Installing the Zebra Print Driver
Install the Zebra Print Driver on a Windows network server. Note: In order to print labels correctly, do not install the Zebra Print Driver on a CWSerenade application server.
To install:
1. |
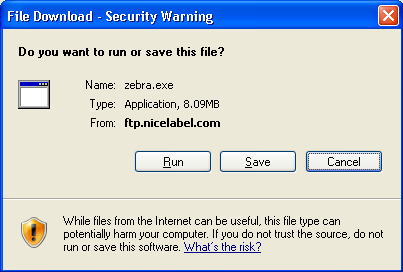
Download the Zebra Print Driver from the NiceLabel web site: http://www.nicelabel.com/downloads/nicedrivers/zebra. Refer to your Zebra printer documentation to determine the correct driver to download for your printer. |
2. |
When prompted to run or save the file, select Run.
|
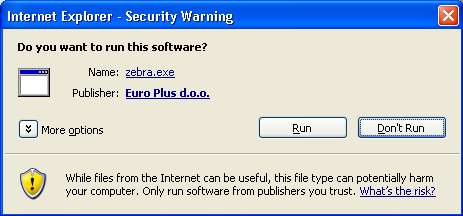
3. |
When prompted to run the software, select Run.
|
4. |
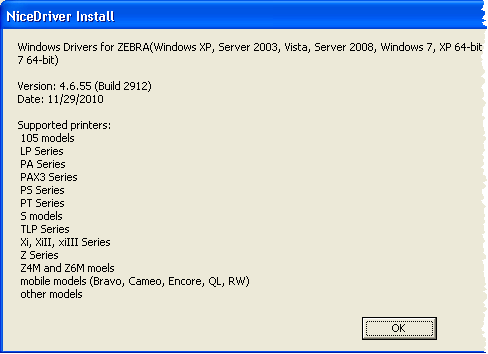
Review the installation requirements, and select OK.
|
5. |
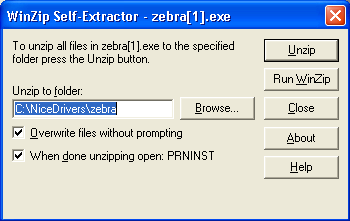
At the WinZip Self-Extractor window, select the location where you wish to extract the contents of the file, and select Unzip.
|
6. |
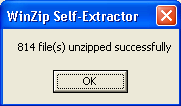
When the files have all been extracted successfully, select OK.
|
7. |
The installation wizard should start automatically. If it does not, locate the files that you have just extracted and double-click the install file (PrnInst.exe) to start the Installation Wizard. |
8. |
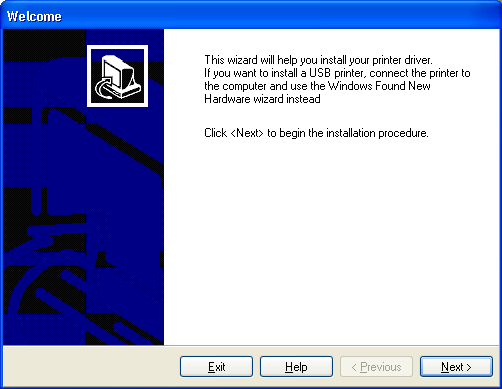
At the Welcome window, click Next.
|
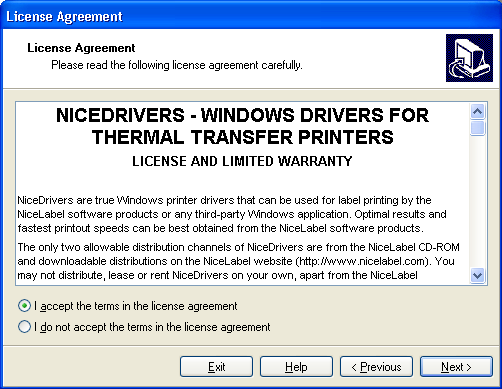
9. |
At the License Agreement window, select I accept the terms in the license agreement and click Next.
|
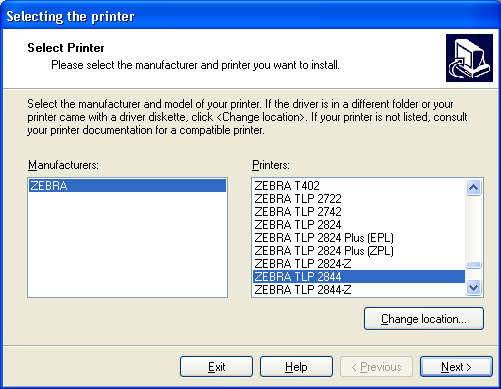
10. |
At the Select Printer window, select the manufacturer and model of your printer. Click Next.
|
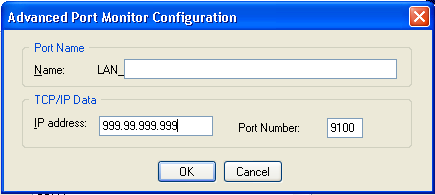
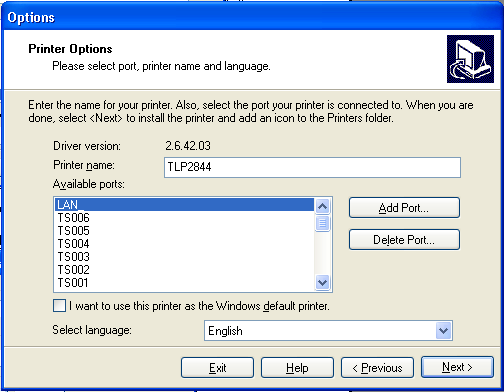
11. |
At the Printer Options window, select Add Port to advance to the Advanced Port Monitor Configuration window. Enter the IP address of your printer and click OK.
Printer name: The name of the printer should not contain any spaces.
Click Next. |
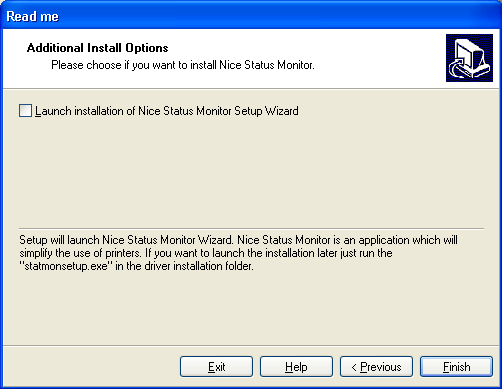
12. |
At the Additional Install Options window, uncheck the additional installation options and click Finish to complete the installation.
|
Sharing the Zebra Print Driver
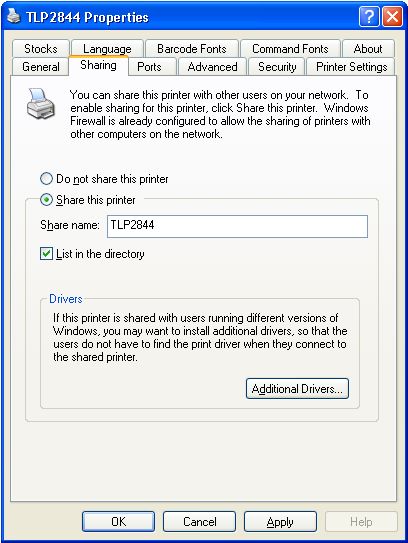
1. |
On the server where you have installed the Zebra Print Driver, advance to Start > Printers & Faxes and locate the Zebra Print Driver you have just installed. Right-click on it and select Properties to advance to the Properties window. On the Sharing tab: Select Share this printer, enter a Share name, and select List in the directory.
Click OK. |
Adding the RF Printer to each CWSerenade Application Server
Complete these steps on each CWSerenade application server.
1. |
Advance to Start > Printers & Faxes and select Add a printer to start the Add Printer Wizard. |
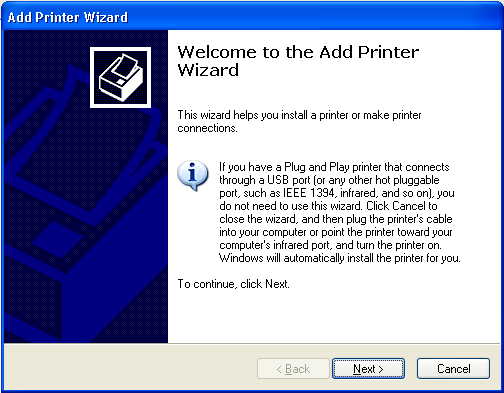
2. |
At the Welcome window, click Next.
|
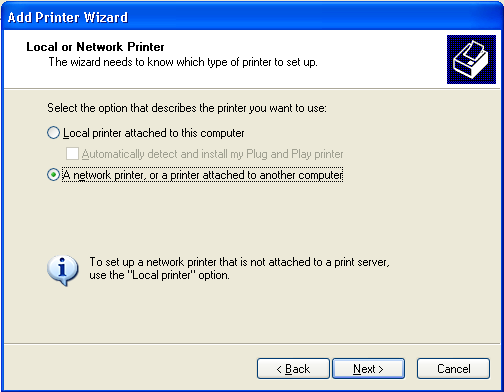
3. |
At the Local or Network Printer window, select network printer. Click Next.
|
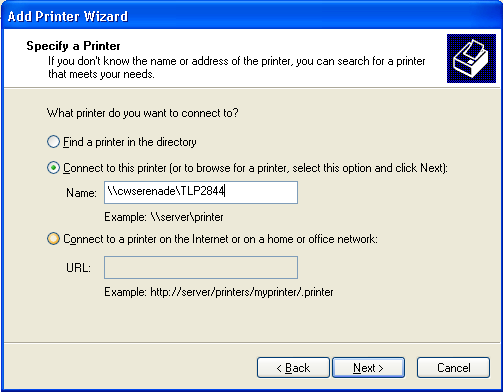
4. |
At the Specify a Printer window, select Connect to this printer and enter the location of the Zebra Print Driver. Click Next.
|
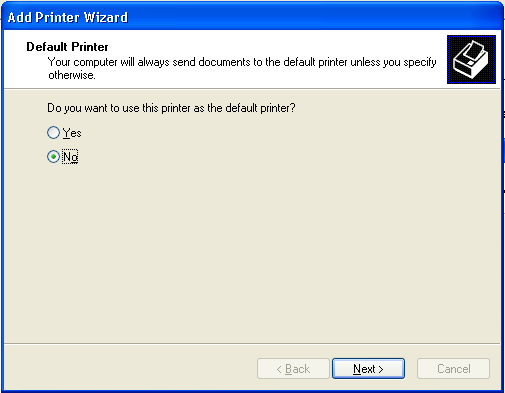
5. |
At the Default Printer window, select No. Click Next.
|
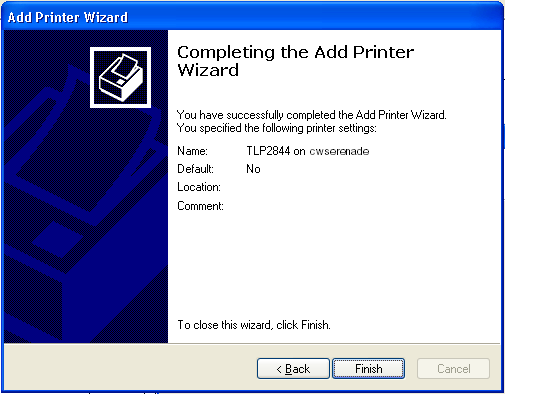
6. |
At the Completing the Wizard window, click Finish to complete the installation.
|
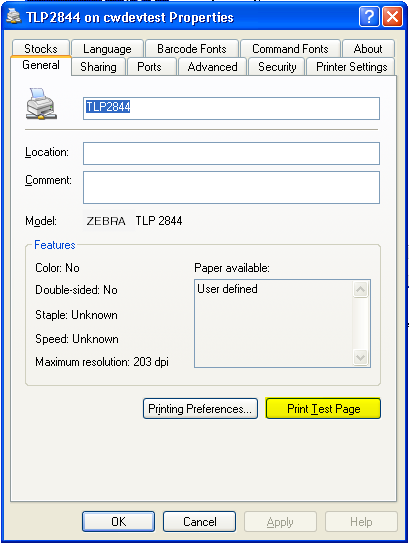
7. |
In the Printers & Faxes window, right-click on the printer you just created and select Properties to advance to the Properties window. On the General tab, select Print Test Page to verify that the printer was installed correctly.
|
The LabelPrinters Properties file stores information required to print RF and other label types, such as the additional pick control label.
Where is the file located? This file is located in the same folder as the other CWSerenade properties files, where C: represents the root drive of the default drive:
C:\Serenade\server\conf\cwdirectcpproperties\ cwdirectcp_labelprinters.properties
How to edit the file: MICROS recommends that you first make a backup copy of the configuration file. Then use a text editor, being careful not to change any of the settings except those indicated below.
Note: Your changes take effect the next time you select Change in Refresh System Properties (PROP) or stop and restart the SERENADE service (or the application server).
Sample file:
STOCK_PTR_TYPE=TLP_1234
#Printer IP Address BIN_PTR=192.168.255.255 ITM_PTR=192.168.255.254 RET_PTR=192.168.255.253 CAR_PTR=192.168.255.252 LPN_PTR=192.168.255.251 PPITM_PTR=192.168.255.250 PADDL_PTR=192.168.255.249
#Window Service - printer names WBIN_PTR=\\\\cwdevtest\\TLP2844 WITM_PTR=\\\\cwdevtest\\TLP2844 WRET_PTR=\\\\cwdevtest\\TLP2844 WCAR_PTR=\\\\cwdevtest\\TLP2844 WLPN_PTR=\\\\cwdevtest\\TLP2844 WPPITM_PTR=\\\\cwdevtest\\TLP2844 WPADDL_PTR==\\\\cwdevtest\\TLP2844
# Printer configuration # PRINTER_CONNECTION=WIN - sets up as window service # PRINTER_CONNECTION=TCP - sets up as tcp/ip socket connection (default) PRINTER_CONNECTION=TCP
#CVS Files - label format defintion BIN_CSV_FILE=c:\\CWDirectCP\\LabelFormats\\rf_bin_label.csv ITM_CSV_FILE=c:\\CWDirectCP\\LabelFormats\\rf_item_label.csv RET_CSV_FILE=c:\\CWDirectCP\\LabelFormats\\rf_return_label.csv CAR_CSV_FILE=c:\\CWDirectCP\\LabelFormats\\rf_carton_label.csv LPN_CSV_FILE=c:\\CWDirectCP\\LabelFormats\\rf_lpn_label.csv PPITM_CSV_FILE=c:\\CWSerenade2.0\\LabelFormats\\pickpack_item_label.csv PICKADDL_CSV_FILE=C:\\CWSerenade\\LabelFormats\\pick_additional_label.csv
#Time interval to send requests to printer in milliseconds. Example TIME_DELAY 2000 = 2 seconds TIME_DELAY=2000 |
Settings in file related to RF: The settings below are related to RF; see Price Tag Settings in LabelPrinters Properties File for more information on the settings required for price tags.
Property Name |
Description |
|
A Zebra printer is required to print RF labels; see RF Printer. |
|
STOCK_PTR_TYPE |
Enter the type of Zebra printer used to print labels. The delivered Zebra printer type is TLP_2844. |
|
Defines the IP address for the printer used to print labels. Complete these settings if the PRINTER_CONNECTION setting is TCP. Defining More than one Printer for a Type of Label You can insert a line to define more than one printer for a type of label. For example, if you want to use three printers to print RF bin location labels, you would define three lines similar to the following: BIN_PTR1=192.168.255.255 BIN_PTR2=192.168.255.254 BIN_PTR3=192.168.255.253 where BIN_PTR1 represents the printer ID and 192.168.255.255 represents the IP address for the printer. Note: Do not use the same printer ID for more than one printer. In addition, the printer ID should not be more than 10 positions since you need to enter this printer ID in a system control value. For more information: See Verifying the RF Printer Configuration Settings for more information on determining the IP address of the RF label printer. |
|
BIN_PTR |
The IP address of the printer used to print the RF Bin Location Label. See RF Bin Label Setup for more information on the setup required to print this label. |
ITM_PTR |
The IP address of the printer used to print the RF Item Label. See RF Item Label Setup for more information on the setup required to print this label. |
RET_PTR |
The IP address of the printer used to print the RF Return Label. See RF Return Label Setup for more information on the setup required to print this label. |
CAR_PTR |
The IP address of the printer used to print the RF Carton Label. See RF Carton Label Setup for more information on the setup required to print this label. |
LPN_PTR |
The IP address of the printer used to print the RF LPN Label. See RF LPN Label Setup for more information on the setup required to print this label. |
PPITM_PTR |
The IP address of the printer used to print the Pick Pack Item Label. See Printer for Pick/Pack Item Labels (K47) for more information on the setup required to print this label. |
PADDL_PTR |
The IP address of the printer used to print additional pick control labels. See Addl Pick Label Printer ID (L66) for more information on the setup required to print this label. |
Window Service - Printer Names Defines the name of the RF printer when it is set up as a Windows Print Service; see Setting Up the RF Printer Using Windows Print Service instructions. Complete these settings if the PRINTER_CONNECTION setting is WIN. Important: If you are using Windows 2008 or Windows 2008 R2, your entries MUST be in all uppercase; otherwise the entries are case-sensitive. |
|
WBIN_PTR |
The name of the server where the Zebra Print Driver is installed and the name of the RF printer used to print the RF Bin Location Label. Enter the name of the server and the name of the RF printer in the following format: WBIN_PTR=\\\\server_name\\RFPrinter_name See RF Bin Label Setup for more information on the setup required to print this label. |
WITM_PTR |
The name of the server where the Zebra Print Driver is installed and the name of the RF printer used to print the RF Item Label. Enter the name of the server and the name of the RF printer in the following format: WITM_PTR=\\\\server_name\\RFPrinter_name See RF Item Label Setup for more information on the setup required to print this label. |
WRET_PTR |
The name of the server where the Zebra Print Driver is installed and the name of the RF printer used to print the RF Return Label. Enter the name of the server and the name of the RF printer in the following format: WRET_PTR=\\\\server_name\\RFPrinter_name See RF Return Label Setup for more information on the setup required to print this label. |
WCAR_PTR |
The name of the server where the Zebra Print Driver is installed and the name of the RF printer used to print the RF Carton Label. Enter the name of the server and the name of the RF printer in the following format: WCAR_PTR=\\\\server_name\\RFPrinter_name See RF Carton Label Setup for more information on the setup required to print this label. |
WLPN_PTR |
The name of the server where the Zebra Print Driver is installed and the name of the RF printer used to print the RF LPN Label. Enter the name of the server and the name of the RF printer in the following format: WLPN_PTR=\\\\server_name\\RFPrinter_name See RF LPN Label Setup for more information on the setup required to print this label. |
WPPITM_PTR |
The name of the server where the Zebra Print Driver is installed and the name of the RF printer used to print the Pick/Pack Item Label. Enter the name of the server and the name of the RF printer in the following format: WPPITM_PTR=\\\\server_name\\RFPrinter_name See Printer for Pick/Pack Item Labels (K47) for more information on the setup required to print this label. |
WPADDL_PTR |
The name of the server where the Zebra Print Driver is installed and the name of the RF printer used to print the additional pick control label. Enter the name of the server and the name of the RF printer in the following format: WPADDL_PTR=\\\\cwdevtest\\TLP2844 See Addl Pick Label Printer ID (L66) for more information on the setup required to print this label. |
Printer Configuration Defines how to communicate with the RF printer. |
|
WIN = The RF printer is set up as a Windows Print Service; see Setting Up the RF Printer Using Windows Print Service. You must complete the Window Service - Printer Names settings. TCP = The RF printer is set up with a TCP/IP socket connection. You must complete the Printer IP Address settings. If you change the PRINTER_CONNECTION setting: Check the label printer settings defined for each user on the Work with User Label Printers Screen and the associated system control values to make sure the label printer defined is a valid printer based on the printer connection setting. Important: If you print a high volume of labels at a time, MICROS recommends you set up the RF printer as a Windows Print Service. |
|
|
The following settings define the location for the CSV file used to determine the content and format of each RF label. A separate CSV file is used for each type of label. Default label format location: The default location used to store label formats is C:\CWSerenade\LabelFormats, where C: is the root drive where CWSerenade is installed. This location contains the base CWSerenade label formats and any unique label formats that have been defined. Important: Do not change the information in the CSV files; changing the information in the CSV file will cause errors when printing labels. |
|
BIN_CSV_FILE |
The location on the CWSerenade application server where the rf_bin_label.csv file is located. The contents of this file determine the information that prints on the RF Bin Location Label and how the information is presented on the label. The default location is the following, where C: is the root drive where CWSerenade is installed: C:\\CWSerenade\\LabelFormats\\rf_bin_label.csv |
ITM_CSV_FILE |
The location on the CWSerenade application server where the rf_item_label.csv file is located. The contents of this file determine the information that prints on the RF Item Label and how the information is presented on the label. The default location is the following, where C: is the root drive where CWSerenade is installed: C:\\CWSerenade\\LabelFormats\\rf_item_label.csv |
RET_CSV_FILE |
The location on the CWSerenade application server where the rf_return_label.csv file is located. The contents of this file determine the information that prints on the RF Return Label and how the information is presented on the label. The default location is the following, where C: is the root drive where CWSerenade is installed: C:\\CWSerenade\\LabelFormats\\rf_return_label.csv |
CAR_CSV_FILE |
The location on the CWSerenade application server where the rf_carton_label.csv file is located. The contents of this file determine the information that prints on the RF Carton Label and how the information is presented on the label. The default location is the following, where C: is the root drive where CWSerenade is installed: C:\\CWSerenade\\LabelFormats\\rf_carton_label.csv |
LPN_CSV_FILE |
The location on the CWSerenade application server where the rf_lpn_label.csv file is located. The contents of this file determine the information that prints on the RF LPN Label and how the information is presented on the label. The default location is the following, where C: is the root drive where CWSerenade is installed: C:\\CWSerenade\\LabelFormats\\rf_carton_label.csv |
PPITM_CSV_FILE |
The location on the CWSerenade application server where the pickpack_item_label.csv file is located. The contents of this file determine the information that prints on the Pick Pack Item label and how the information is presented on the label. The default location is the following, where C: is the root drive where CWSerenade is installed: C:\\CWSerenade\\LabelFormats\\pickpack_item_label.csv |
PICKADDL_CSV_FILE |
The location on the CWSerenade application server where the pick_additional_label.csv file is located. The contents of this file determine the information that prints on the additional pick control label and how the information is presented on the label. The default location is the following, where C: is the root drive where CWSerenade is installed: C:\\CWSerenade\\LabelFormats\\pick_additional_label.csv |
Time Delay Between Print Jobs |
|
TIME_DELAY |
The number of seconds to wait between each print job. Use this delay to prevent the RF printer from skipping labels; this may occur if you have set up your RF printer to use a TCP/IP socket connection (the PRINTER_CONNECTION setting is set to TCP). The default time delay is 2 seconds (2000). |
• Correcting RF Printer Errors
• Review your RF Label Setup
• Review the RF Printer
As you print RF labels, the system writes a message to the CWSerenade Application Log and CWDirect Log indicating the label printed.
RF label print error: If an error occurs when printing RF labels, the system includes an error message about the RF label in the CWSerenade Application Log and CWDirect Log. For example, if an error occurs when the system tries to print an RF LPN label, an error message similar to the following displays in the log:
Application log: 10:17:16,578 ERROR APP - Error occurred while printing LPN label:null
CWDirect log: 2008-09-16 10:17:16,578 339281741 ERROR [APP] (http-0.0.0.0-8080-1:) (CWLog.java:57) Error occurred while printing LPN label:null
If an error occurs when printing RF labels, check the following:
• Check the RF Labels (K01) umbrella system control value to review the system control values related to printing RF labels, or check the Addl Pick Label Printer ID (L66) system control value for a problem related to the additional pick control label.
• Verify the settings defined in the LabelPrinters Properties File.
• If you have set up the RF printer as a Windows Print Service:
• make sure you have shared the Zebra Print Driver; see Sharing the Zebra Print Driver.
• make sure you have added the RF printer to each CWSerenade application server; see Adding the RF Printer to each CWSerenade Application Server.
• Check the configuration settings defined for the RF Printer; see Verifying the RF Printer Configuration Settings.
• Reset the RF Printer; see Resetting the RF Label Printer.
Verifying the RF Printer Configuration Settings
To check the configuration settings defined for the RF label printer:
1. Press the test button located on the back of the printer next to the power switch. To press the test button, you need to insert something small into the test button hole, such as a paperclip.
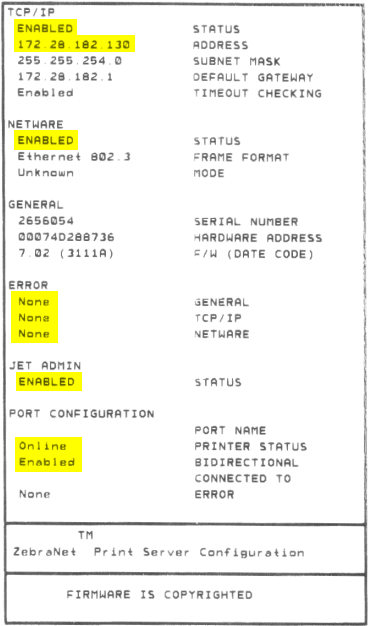
2. When you press the test button, the printer prints a configuration label. See Sample RF Configuration Label. Use this configuration label to:
• verify that the TCP/IP Status is ENABLED.
• verify that the IP address defined for the printer matches the IP address defined in the LabelPrinters Properties File. If the IP address on the RF configuration label is 0.0.0.0, you need to use the Serial Number provided on the configuration label to set the IP address.
• verify that the Netware Status is ENABLED.
• verify that no configuration errors exist.
• verify that the Jet Admin status is ENABLED.
• verify that the Printer Status is Online and Enabled.
For more information: See the ZebraNet PrintServer II User Guide for more information on how to install and configure the RF label printer for your network.
Resetting the RF Label Printer
To reset the RF label printer:
1. Turn off the printer and load the printer labels.
2. Turn the printer back on while holding down the feed button.
3. When the status light on the printer blinks, release the feed button.
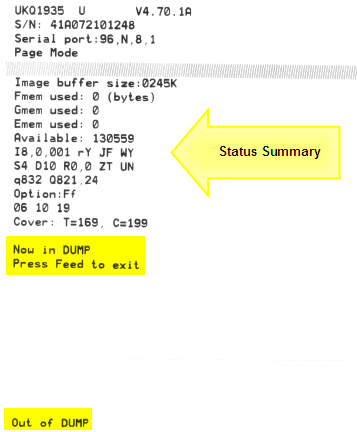
4. The status light on the printer turns green and the printer advances the labels to measure and verify the length of the labels. The printer then prints a status summary label and remains in diagnostic dump mode.
5. To begin normal operation, tap the feed button. The printer advances a label and prints Out of DUMP on the label. See Sample RF Status Summary Label.
For more information: See the Zebra Printer User Guide for more information on troubleshooting the RF label printer.
Sample RF Status Summary Label
|
Purpose: In order to print RF labels, you must complete the required label setup.
• Printing RF Bin Location Labels
• Sample RF Bin Location Label
Label printer hierarchy: When a user prints one of the types of labels listed above, the system uses the following hierarchy to determine the printer to use to print the label.
1. Use the printer defined for the user at the Work with User Label Printers Screen.
2. If a printer is not defined for the user, use the default printer defined in the associated system control value for the label.
• For RF carton labels, use the default printer defined in the RF Carton Printer ID (J99) system control value.
• For RF LPN labels, use the default printer defined in the RF LPN Printer ID (J95) system control value.
• For RF return labels, use the default printer defined in the RF Return Printer ID (J98) system control value.
• For RF item labels, use the default printer defined in the RF Item Printer ID (J97) system control value.
• For RF bin location labels, use the default printer defined in the RF Bin Location Printer ID (J96) system control value.
• For pick pack item labels, use the default printer defined in the Printer for Pick/Pack Item Labels (K47) system control value. If a printer ID is not defined in this system control value, the system uses the printer whose printer ID defined in the LabelPrinters Properties File is PPITM_PTR.
Purpose: You can use the RF Carton label to affix to a carton when you dock a purchase order. Docking is an optional step before formally receiving a purchase order. If you dock a purchase order, you record the fact that you have received a shipment against the purchase order, not the actual contents of the shipment. You can dock a purchase order once or several times. See Docking Purchase Orders (MDPO) for more information on docking.
In order to print RF Carton labels, you need to complete the necessary setup.
RF Carton Label Print Program (E27) system control value |
Enter the name of the program that produces RF Carton labels to affix to a carton when you dock a purchase order. The base print program is RFR0080. |
RF Carton Printer ID (J99) system control value |
Enter the ID of the default printer used to print RF Carton labels. The system uses this printer unless a carton label printer is assigned to the user in Working with User Label Printers (WULP). The base printer ID is CAR_PTR. |
Working with User Label Printers (WULP) menu option |
Use the Work with User Label Printers Screen to assign a user to a printer used to print RF Carton labels. If you do not assign an RF carton label printer to a user, when the user prints RF Carton labels, the system prints the labels on the default printer defined in the RF Carton Printer ID (J99) system control value. |
The LabelPrinters Properties file stores printer information, such as the printer ID, IP address, and Zebra printer type, to print labels. The settings in this file that are used to print RF Carton labels are: CAR_PTR: Enter the IP address of the printer used to print RF Carton labels. Note: If more than one printer ID is defined for RF Carton labels, make sure to enter an IP address for each printer. See Defining More than one Printer for a Type of Label. Used if the PRINTER_CONNECTION setting is TCP. WCAR_PTR: The name of the server where the Zebra Print Driver is installed and the name of the RF printer used to print the RF Carton label. Used if the PRINTER_CONNECTION setting is WIN. CAR_CSV_FILE: Enter the location on the CWSerenade application server where the rf_carton_label.csv file is located. The contents of this file determines the information that prints on the RF Carton label and how the information is presented on the label. The default location is the following, where C: is the root drive where CWSerenade is installed: C:\\CWSerenade\\LabelFormats\\rf_carton_label.csv |
The system prints RF Carton labels when you dock a purchase order and select to print RF Carton labels; see Docking Purchase Orders (MDPO).
A sample RF Carton label is presented below. This sample was printed using the base print program RFR0080. The base print program prints RF Carton labels that are 4" high x 4" wide. Note: The sample label below is not to actual size. Your label may differ if you use a different print program.
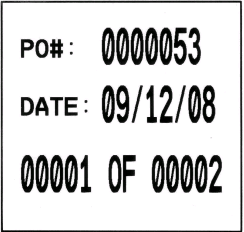
Contents:
• PO#: The purchase order that was docked.
• Date: The date the purchase order was docked, in MM/DD/YY format.
• Carton number: The carton number in the total carton count for the purchase order that was docked; for example 00001 OF 00001 or 00001 OF 00002.
Purpose: The system assigns an LPN to each case when you receive a purchase order. You can use an RF gun to scan the LPN barcode on the LPN label, so that you can register each movement of the case throughout the warehouse.
In order to print RF LPN labels, you need to complete the necessary setup.
LPN Tracking (E16) system control value |
Select this system control value to print RF LPN labels. |
RF LPN Label Print Program (E22) system control value |
Enter the name of the program that produces barcoded RF LPN labels for use in managing your inventory through radio frequency devices. The base print program is RFR0070. |
RF LPN Printer ID (J95) system control value |
Enter the ID of the default printer used to print RF LPN labels. The system uses this printer unless an LPN label printer is assigned to the user in Working with User Label Printers (WULP). The base printer ID is LPN_PTR. |
Working with User Label Printers (WULP) menu option |
Use the Work with User Label Printers Screen to assign a user to a printer used to print RF LPN labels. If you do not assign an RF LPN label printer to a user, when the user prints RF LPN labels, the system prints the labels on the default printer defined in the RF LPN Printer ID (J95) system control value. |
The LabelPrinters Properties file stores printer information, such as the printer ID, IP address, and Zebra printer type, to print RF labels. The settings in this file that are used to print RF LPN labels are: LPN_PTR: Enter the IP address of the printer used to print RF LPN labels. Note: If more than one printer ID is defined for RF LPN labels, make sure to enter an IP address for each printer. See Defining More than one Printer for a Type of Label. Used if the PRINTER_CONNECTION setting is TCP. WLPN_PTR: The name of the server where the Zebra Print Driver is installed and the name of the RF printer used to print the RF LPN label. Used if the PRINTER_CONNECTION setting is WIN. LPN_CSV_FILE: Enter the location on the CWSerenade application server where the rf_lpn_label.csv file is located. The contents of this file determines the information that prints on the RF LPN label and how the information is presented on the label. The default location is the following, where C: is the root drive where CWSerenade is installed: C:\\CWSerenade\\LabelFormats\\rf_lpn_label.csv |
|
You need to identify the staging and main warehouse locations by defining them using Working with Default Warehouse Locations (WWDL). This identification tells the system which location to use when performing RF transactions (and which location to print on the RF LPN label). For example, the system automatically moves stock to the default intransit location in the warehouse when you perform an RF Pull transaction for an LPN or item transfer. |
The system prints RF LPN labels when:
• you receive a purchase order through the Receiving Purchase Orders (PORC) menu option or when you complete an RF PO Receipt Transaction. The LPN indicates the stock is currently located in a location in the staging warehouse and needs to be put away in the item’s primary primary location in the main warehouse.
• you process an RF Receipt Putaway Pull Transaction and partially pull the LPN quantity. The LPN indicates the current location as intransit, the destination location as the item’s primary primary location in the main warehouse, and the pulled quantity as the new LPN quantity.
• you process an RF Receipt Putaway Put Transaction and put away a partial LPN quantity.
• you process an RF LPN Transfer Pull Transaction and partially pull the LPN quantity. The LPN indicates the current location as intransit, the destination location as the item’s primary primary location in the main warehouse, and the pulled quantity as the new LPN quantity. Note: If the Suppress Labels for RF LPN Transfers (L57) system control value is selected, the system does not print the new LPN label when you process an RF LPN Transfer Pull transaction and partially pull the LPN quantity. Instead, the system advances you to the LPN Created screen where you can review the new LPN number and its contents.
• you process an RF LPN Transfer Put Transaction if you do not put away the stock in a primary location. The LPN indicates the current location as the location you have selected for the RF LPN Transfer Put transaction and the destination location as the item’s primary primary location in the main warehouse.
• you select to print an LPN label from the LPN Print Screen; see Print LPN Label.
• you create a new LPN using the Create LPN Screen.
• you select to print a range of LPN labels from the Print LPN Labels by Range Screen.
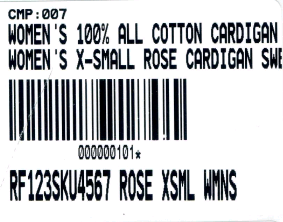
A sample RF LPN label is presented below. This sample was printed using the base print program RFR0070. The base print program prints RF LPN labels that are 4" high x 4" wide. Note: The sample label below is not to actual size. Your label may differ if you use a different print program.

|
Contents:
• Company description: The company associated with the LPN.
• Date: The date the LPN was printed, in MM/DD/YY format.
• Time: The time the LPN was printed, in HH:MM:SS format.
• LPN barcode: The LPN barcode consists of the 3 position company code + the 6 position LPN number.
• Item: The full 40 positions of the item description for the item associated with the LPN.
• SKU: The full 40 positions of the SKU description for the SKU associated with the LPN.
• Qty: The quantity of the item/SKU associated with the LPN.
• Item number: The item number for the item associated with the LPN.
• SKU code: The SKU code for the item associated with the LPN.
• Item barcode: The item barcode consists of the short SKU number; the short SKU number is a unique number assigned to an item/SKU in the SKU table. An asterisk (*) displays at the end of the short SKU number to indicate the end of the barcode.
• From location code: A code for the location where the stock for the LPN currently resides.
• To location code: A code for the location where the stock should be put away. This is the item’s primary primary location. However, unless you are processing an RF Replenishment, you can select to put away the stock for the LPN in another location.
Purpose: Use RF Return labels to scan the short SKU barcode as you move returned items back to a location in your main warehouse.
In order to print RF Return labels, you need to complete the necessary setup.
RF Return Label Print Program (E25) system control value |
Enter the name of the program that produces RF Return labels. The base print program is RFR0073. |
RF Return Printer ID (J98) system control value |
Enter the ID of the default printer used to print RF Return labels. The system uses this printer unless a return label printer is assigned to the user in Working with User Label Printers (WULP). The base printer ID is RET_PTR. |
Working with User Label Printers (WULP) menu option |
Use the Work with User Label Printers Screen to assign a user to a printer used to print RF Return labels. If you do not assign an RF Return label printer to a user, when the user prints RF Return labels, the system prints the labels on the default printer defined in the RF Return Printer ID (J98) system control value. |
The LabelPrinters Properties file stores printer information, such as the printer ID, IP address, and Zebra printer type, to print RF labels. The settings in this file that are used to print RF Return labels are: RET_PTR: Enter the IP address of the printer used to print RF Return labels. Note: If more than one printer ID is defined for RF Return labels, make sure to enter an IP address for each printer. See Defining More than one Printer for a Type of Label. Used if the PRINTER_CONNECTION setting is TCP. WRET_PTR: The name of the server where the Zebra Print Driver is installed and the name of the RF printer used to print the RF Return label. Used if the PRINTER_CONNECTION setting is WIN. RET_CSV_FILE: Enter the location on the CWSerenade application server where the rf_return_label.csv file is located. The contents of this file determines the information that prints on the RF Return label and how the information is presented on the label. The default location is the following, where C: is the root drive where CWSerenade is installed: C:\\CWSerenade\\LabelFormats\\rf_return_label.csv |
The system prints RF Return labels when you process a return using Order Entry, during Order Maintenance, using the Working with Return Authorizations: Standard Process, or Working with Return Authorizations: Streamlined Process (the system prints the RF Return label when the return is received).
The system prints a separate RF Return label for each unit returned.
Printing additional labels: You can also print these labels through the Print Item Location Labels (PILL) menu option.
Note: The system does not print an RF Return label if the return does not affect inventory.
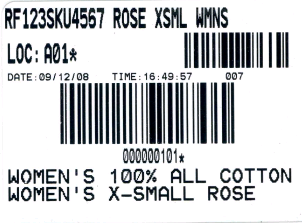
A sample RF Return label is presented below. This sample was printed using the base print program RFR0073. The base print program prints RF Return labels that are 2" high x 4" wide. Note: The sample label below is not to actual size. Your label may differ if you use a different print program.
|
Contents:
• Item number: The item number defined for the item that was returned.
• SKU code: The SKU code defined for the SKU of the item.
• Loc: A code for the item’s primary primary location. An asterisk (*) prints at the end of the location code if the location is less than 7 positions. If a primary primary location has not been defined for the item, an asterisk (*) prints in place of the location code.
• Barcode: The company barcode used to identify the company associated with the item/SKU.
• Date: The date when the item was returned, in MM/DD/YY format.
• Time: The time when the item was returned, in HH:MM:SS format.
• Company code: A code for the company associated with the item/SKU.
• Barcode: The short SKU barcode used to identify the short SKU code for the item/SKU that was returned.
• Short SKU code: The short SKU code used to identify the item and SKU. An asterisk (*) prints after the short SKU code to indicate the end of the barcode.
• Item description: The first 33 positions of the item description.
• SKU description: The first 33 positions of the SKU description.
Purpose: Use RF Item labels to scan the short SKU barcode as you move items from one location to another in the staging and main warehouse.
In order to print RF Item labels, you need to complete the necessary setup.
RF Item Label Print Program (E24) system control value |
Enter the name of the program that produces RF item labels. The base print program is RFR0071. |
RF Item Printer ID (J97) system control value |
Enter the ID of the default printer used to print RF item labels. The system uses this printer unless an item label printer is assigned to the user in Working with User Label Printers (WULP). The base printer ID is ITM_PTR. |
Working with User Label Printers (WULP) menu option |
Use the Work with User Label Printers Screen to assign a user to a printer used to print RF item labels. If you do not assign an RF item label printer to a user, when the user prints RF item labels, the system prints the labels on the default printer defined in the RF Item Printer ID (J97) system control value. |
The LabelPrinters Properties file stores printer information, such as the printer ID, IP address, and Zebra printer type, to print RF labels. The settings in this file that are used to print RF Item labels are: ITM_PTR: Enter the IP address of the printer used to print RF Item labels. Note: If more than one printer ID is defined for RF item labels, make sure to enter an IP address for each printer. See Defining More than one Printer for a Type of Label. Used if the PRINTER_CONNECTION setting is TCP. WITM_PTR: The name of the server where the Zebra Print Driver is installed and the name of the RF printer used to print the RF Item label. Used if the PRINTER_CONNECTION setting is WIN. ITM_CSV_FILE: Enter the location on the CWSerenade application server where the rf_item_label.csv file is located. The contents of this file determines the information that prints on the RF Item label and how the information is presented on the label. The default location is the following, where C: is the root drive where CWSerenade is installed: C:\\CWSerenade\\LabelFormats\\rf_item_label.csv |
The system prints RF Item labels when you select to print an RF Item label at the Itm Lbl Prt Screen; see Print Item Label.
A sample RF Item label is presented below. This sample was printed using the base print program RFR0071. The base print program prints RF Item labels that are 2" high x 4" wide. Note: The sample label below is not to actual size. Your label may differ if you use a different print program.
|
Contents:
• Cmp: A code for the company where the item/SKU is located.
• Item description: The first 32 positions of the item description.
• SKU description: The first 32 positions of the SKU description.
• Barcode: The short SKU barcode used to identify the item and SKU.
• Short SKU code: The short SKU code used to identify the item and SKU. An asterisk (*) displays after the short SKU code to indicate the end of the barcode.
• Item number: The item number defined for the item.
• SKU code: The SKU code defined for the SKU of the item.
Purpose: You can use an RF gun to scan the RF Bin Location label as you move stock from a location or put stock away in a location.
• Printing RF Bin Location Labels
• Sample RF Bin Location Label
In order to print RF Bin Location labels, you need to complete the necessary setup.
RF Bin Location Label Print Program (E23) system control value |
Enter the name of the program that produces RF Bin Location labels. The base print program is RFR0072. |
RF Bin Location Printer ID (J96) system control value |
Enter the ID of the default printer used to print RF Bin Location labels. The system uses this printer unless a bin location label printer is assigned to the user in Working with User Label Printers (WULP). The base printer ID is BIN_PTR. |
Working with User Label Printers (WULP) menu option |
Use the Work with User Label Printers Screen to assign a user to a printer used to print RF bin location labels. If you do not assign an RF bin location label printer to a user, when the user prints RF bin location labels, the system prints the labels on the default printer defined in the RF Bin Location Printer ID (J96) system control value. |
The LabelPrinters Properties file stores printer information, such as the printer ID, IP address, and Zebra printer type, to print RF labels. The settings in this file that are used to print RF Bin Location labels are: BIN_PTR: Enter the IP address of the printer used to print RF Bin Location labels. Note: If more than one printer ID is defined for RF bin location labels, make sure to enter an IP address for each printer. See Defining More than one Printer for a Type of Label. Used if the PRINTER_CONNECTION setting is TCP. WBIN_PTR: The name of the server where the Zebra Print Driver is installed and the name of the RF printer used to print the RF Bin label. Used if the PRINTER_CONNECTION setting is WIN. BIN_CSV_FILE: Enter the location on the CWSerenade application server where the rf_bin_label.csv file is located. The contents of this file determines the information that prints on the RF Bin Location label and how the information is presented on the label. The default location is the following, where C: is the root drive where CWSerenade is installed: C:\\CWSerenade\\LabelFormats\\rf_bin_label.csv |
Printing RF Bin Location Labels
The system prints RF Bin Location labels when you select to print an RF Bin Location label from the Bin Loc Prt Screen; see Print Bin Location Label.
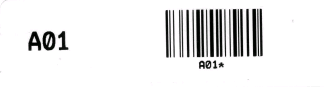
A sample RF Bin Location label is presented below. This sample was printed using the base print program RFR0072. The base print program prints RF Bin Location labels that are 1" high x 4" wide. Note: The sample label below is not to actual size. Your label may differ if you use a different print program.
|
Contents:
• Location code: A code for a location in a warehouse.
• Bin location barcode: The barcode for the location. An asterisk (*) displays after the location code if it is less than 7 positions.
The RF menus differ from standard CWSerenade menus in that they are designed for easier transactions on the RF gun. The RF gun has a small display, and you can use it either to scan a bar code or type information.
Each entry you complete on an RF gun updates the system the same way as transactions you complete at a terminal. In addition, when you are not using an RF gun you can advance to and use the RF menus by entering RFMN in the Fast path field at the top of any CWSerenade screen, or by selecting the RF Main Menu from a menu.
Web browser: The RF screen suite does not work in Internet Explorer 10 or 11.
Recommended RF gun: The recommended RF gun to use with CWSerenade Radio Frequency is the MOTOROLA Symbol MC9090-G RFID2 mobile device.
Typically, you would use the stylus provided with the RF gun to navigate the CWSerenade RF menus and screens that display on the RF gun. You can also directly touch the RF Gun screen to perform touch screen navigation.
In addition, you can use the Input Panel keyboard that displays on the RF gun screen or the keypad built into the base of the RF gun to navigate the CWSerenade RF menus and screens.
Scanning with the RF gun: Scanning with the RF gun is simply a way of entering data into the appropriate fields without pressing keys. For this reason, before you scan a barcode with the RF gun, make sure the cursor on the screen is positioned to the correct field. If you scan a barcode when the cursor on the screen is not in the correct field, the numbers will scan into the wrong fields. For example, if you scan the LPN code, which consists of both company code and LPN number, when the cursor is in the LPN field, the LPN number will scan into the company code field, and the company code will scan into the LPN field.
For more information: See the MC9090-G RFID Mobile User Guide for more information on how to use the MOTOROLA Symbol MC9090-G RFID mobile device and for more information on the keypad functions.
Configuring the RF Gun to Beep for RF Actions
You can configure the RF gun to beep when an action occurs on certain RF screens. This is useful if your users do not look at the screen on the RF gun as they are working and require an audible indicator when the screen is ready to continue, waiting for confirmation, or if an error occurred. There are three beeps that the RF gun will emit:
• A high pitched single beep when an action on an RF screen is successful and the screen is ready to continue.
• A medium pitched double beep when a confirmation is required from the user on an RF screen, such as selecting OK to proceed.
• A low pitched triple beep when an error occurred on an RF screen that requires user intervention.
RF screens enabled for audible beep: The RF gun will emit an audible beep on the following screens:
• RF Mass Transfer Screen: The RF gun:
• emits a high-pitched single beep when you first advance to the screen.
• when using Quick-Entry RF Mass Transfer, emits a high-pitched single beep when the transfer is complete.
• when using Standard RF Mass Transfer, emits a medium-pitched double beep after completing the screen and selecting OK or pressing Enter to validate the entries. The RF gun also emits a high-pitched single beep when the transfer is complete.
• emits a low pitched triple beep when an error occurs.
• Mass Putaway Screen: The RF gun:
• emits a high-pitched single beep when you first advance to the screen.
• emits a high-pitched single beep when the transfer is complete.
• emits a low pitched triple beep when an error occurs.
• Physical Inventory Screen: The RF gun:
• emits a high-pitched single beep when you first advance to the screen.
• emits a medium-pitched double beep after completing the screen and selecting OK or pressing Enter to validate the entries.
• emits a low pitched triple beep when an error occurs.
• Multiple Item Entry Screen: The RF gun:
• emits a high-pitched single beep when you first advance to the screen.
• emits a low pitched triple beep when an error occurs.
• Multiple Item Scan Screen: The RF gun:
• emits a high-pitched single beep when you first advance to the screen.
• emits a high-pitched single beep when a count is entered.
Instructions: To configure the RF gun to emit an audible beep on certain RF screens, you must set up CWSerenade to run in the MOTOROLA Symbol3 PocketBrowser. The PocketBrowser sits above the web browser that is used to launch CWSerenade on the RF gun.
Prerequisites:
• MOTOROLA Symbol MC9090-G RFID mobile device.
• CWSerenade version 3.5.2 or higher loaded and accessible from the MC9090 mobile device.
• A licensed version of Symbol PocketBrowser version 3.0.8.1 or higher loaded onto the MC9090 mobile device.
• A standard Windows PC that can plug into the MC9090 mobile device using the Microsoft ActiveSync communication tool.
• The SerenadeRF_PocketBrowser.zip file that was delivered to you from MICROS. Contact your MICROS representative to request this file.
Configuration Steps:
Use the following steps to set up CWSerenade to run in the Symbol PocketBrowser. Complete these steps for each RF gun you wish to use with CWSerenade.
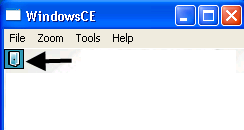
1. |
Connect the MC9090 mobile device to the Windows PC that has Microsoft ActiveSync and make sure it connects. The Microsoft ActiveSync window looks like the following when it is connected to the MC9090 mobile device:
|
2. |
Unzip the SerenadeRF_PocketBrowser.zip file to the desktop of the Windows PC. |
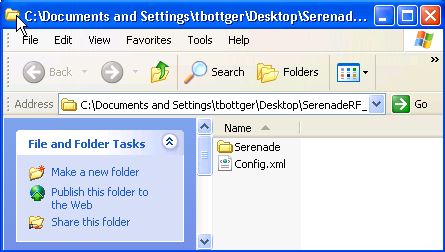
3. |
Open the SerenadeRF_PocketBrowser folder that was unzipped. This folder contains: • Serenade folder. • Config.xml file.
|
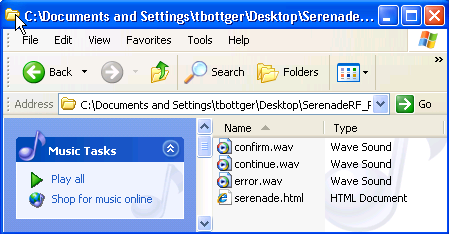
4. |
Open the Serenade folder. This folder contains: • confirm.wav file: this file is used to emit a high pitched single beep when an action on an RF screen is successful and the screen is ready to continue. • continue.wav file: this file is used to emit a medium pitched double beep when a confirmation is required from the user on an RF screen, such as selecting OK to proceed. • error.wav file: this file is used to emit a low pitched triple beep when an error occurs on an RF screen that requires user intervention. • serenade.html configuration file.
|
5. |
Open the serenade.html file in a text editor. Replace the text REPLACE_WITH_YOUR_SERENADE_APP_SERVER with the name or IP address of the CWSerenade application server used to connect with the MC9090 mobile device for RF.
<HTML> <HEAD> <TITLE>CWSerenade</TITLE> <meta http-equiv='imagetoolbar' content='no'/> <META HTTP-Equiv='KeyCapture' content='KeyValue:All;AccelerateKey:All;' /> <META HTTP-Equiv="QuitButton" Content="Visibility:Visible"/> <META HTTP-Equiv="QuitButton" Content="Left:0"/> <META HTTP-Equiv="QuitButton" Content="Top:0"/> <META HTTP-Equiv="QuitButton" Content="Width:20"/> <META HTTP-Equiv="QuitButton" Content="Height:20"/> <meta http-equiv="refresh" content="1;url=http:\\REPLACE_WITH_YOUR_SERENADE_APP_SERVER:8080\jenasys"> </HEAD> <BODY> </BODY> </HTML>
Save your changes and close the file. |
6. |
Return to the SerenadeRF_PocketBrowser folder and keep this folder open since it will be used in a later configuration step.
|
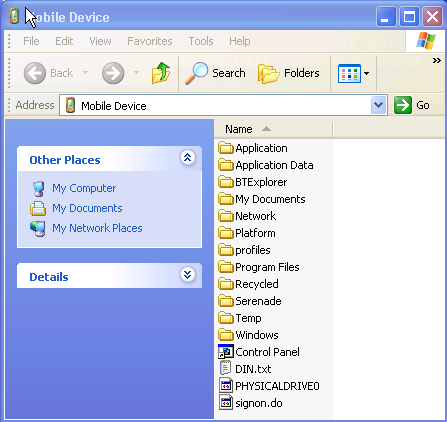
7. |
In Microsoft ActiveSync, select File > Explore to advance to the Mobile Device explorer window and keep this folder open since it will be used in the next configuration step.
|
8. |
Use the following steps to copy information from the SerenadeRF_PocketBrowser folder to the Mobile Device explorer window. • In the SerenadeRF_PocketBrowser folder, highlight and right-click on the Serenade folder, and select Copy to copy the Serenade folder and its contents. • In the Mobile Device explorer window, right click and select Paste to place the Serenade folder and its contents to the main explorer directory of the Mobile Device. • In the SerenadeRF_PocketBrowser folder, highlight and right-click on the Config.xml file, and select Copy to copy the Config.xml file. • In the Mobile Device explorer window, advance to Program Files > PocketBrowser > Config. Right click in this directory and select Paste to place the Config.xml file in the Config directory of the Mobile Device. When you are asked if you want to replace the existing file, click Yes. |
9. |
Close the Mobile Device Explorer window and unplug the MC9090 mobile device from the PC. |

Verify Configuration
Use the following steps to verify that the MC9090 mobile device is configured to run in the Symbol PocketBrowser correctly.
1. |
On the MC9090 mobile device, select Start > Programs > Motorola PocketBrowser > PocketBrowser to start PocketBrowser and log in to a CWSerenade session. Log in to CWSerenade as you normally would when using an RF gun; for example, log in with a user ID that is set up to advance directly to the RF menu; see Assigning the RF Menu to a User or User Class. |
2. |
At the RF Main Menu in CWSerenade, select 3. Transfer to advance to the RF Trans menu. At the RF Trans menu, select 3. Mass Transfer to advance to the Mass Transfer screen. When you advance to this screen, the MC9090 mobile device will emit a high pitched single beep to indicate the screen is ready. |
Note: If the RF gun does not emit the high pitched single beep, check your configuration setup as defined in the instructions above.
To Exit CWSerenade and Close Symbol PocketBrowser on the RF Gun
When you are done using the RF gun to process RF transactions in CWSerenade, log out of CWSerenade as you normally would. When you return to the CWSerenade log in screen, click the door icon in the upper left-hand corner of the screen to close PocketBrowser and exit the MC9090 mobile device.
- Zebra is a registered trademark and printer TLP 2844 is a service mark of ZIH Corp. All other marks are trademarks or registered trademarks of their respective holders.
- MOTOROLA and the Stylized “M” Logo are registered in the U.S. Patent & Trademark Office. Symbol and the Symbol logo is a registered trademark of Symbol Technologies, Inc. All other product or service names are the property of their respective owners.
- MOTOROLA and the Stylized “M” Logo are registered in the U.S. Patent & Trademark Office. Symbol and the Symbol logo is a registered trademark of Symbol Technologies, Inc. All other product or service names are the property of their respective owners.
