
Purpose: RF LPN Transfer allows you to move a complete or partial LPN from one warehouse and location to another warehouse and location.
With RF LPN Transfer transactions:
• The system does not validate that an item/location record exists for the location where you are placing the stock.
• You can move a complete or partial LPN quantity. If you transfer less than the complete LPN quantity, the system assigns a new LPN number to the quantity in transit. The existing LPN number remains with the quantity you are leaving in its present location.
• If you put the stock away in a primary location, the system deletes the LPN record at this time.
To complete an RF LPN Transfer transaction, you must perform both an RF LPN Transfer Pull Transaction and an RF LPN Transfer Put Transaction.
Secured feature: The Allow Access to RF LPN Transfer (A51) secured feature controls access to this option.
In this topic:
• RF LPN Transfer Pull Transaction
• RF LPN Transfer Pull Process
• RF LPN Transfer Put Transaction

An RF LPN Transfer transaction consists of two transactions:
• RF LPN Transfer Pull transaction: Use the LPN Pull Stock Screen to pull the LPN from its current location. When you process an RF LPN Transfer Pull transaction, the system transfers the LPN from its current location to the intransit location in the same warehouse. See RF LPN Transfer Pull Transaction.
• RF LPN Transfer Put transaction: Use the LPN Put Stock Screen to put the LPN into a specified warehouse and location. When you process an RF LPN Transfer Put transaction, the system transfers the LPN from the intransit location to the specified warehouse and location. In addition, if you put the stock in a primary location, the system deletes the LPN record at this time. See RF LPN Transfer Put Transaction.
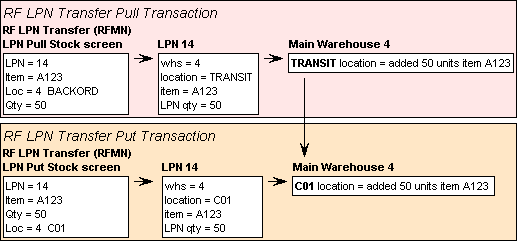
You currently have a 50 unit case of item A123 in location BACKORD in main warehouse 4. You have fulfilled all of your outstanding backorders for this item and want to transfer this leftover case to bulk storage location C01 in main warehouse 4.
The RF transactions to perform are:
• RF LPN Transfer Pull transaction: Pull the LPN from location BACKORD in main warehouse 4. The system transfers the LPN to the TRANSIT location in main warehouse 4.
• RF LPN Transfer Put transaction: Put the LPN in location C01 in main warehouse 4. The system transfers the LPN from the TRANSIT location in main warehouse 4 to the C01 location in main warehouse 4. Because the system did not put the stock in a primary location, the system does not delete the LPN record at this time.
RF LPN Transfer Illustration
Use this screen to select the RF LPN Transfer transaction you wish to perform.
Screen Option |
Procedure |
Process an RF LPN Transfer Pull transaction |
Select option 1. Pull Stock and select OK or press Enter to advance to the LPN Pull Stock Screen; see RF LPN Transfer Pull Transaction. |
Process an RF LPN Transfer Put transaction |
Select option 2. Putaway Stock and select OK or press Enter to advance to the LPN Put Stock Screen; see RF LPN Transfer Put Transaction. |
RF LPN Transfer Pull Transaction

Purpose: Use the LPN Pull Stock Screen to process an RF LPN Transfer Pull transaction.
When you process an RF LPN Transfer Pull transaction, the system transfers the LPN from its current warehouse and location to the intransit location in the same warehouse.
How to display this screen: Select option 1. Pull Stock and select OK or press Enter at the RF LPN TRN MENU Screen; see RF Screen Layout.
Cursor placement: When you first advance to this screen, the system places the cursor in the Company field.
Use the following steps to process an RF LPN Transfer Pull transaction.
1. Scan the LPN barcode on the RF LPN Label or manually complete the Company and LPN fields. To scan the LPN barcode on the LPN label correctly, the cursor on the screen must be in the Company field.
2. When you scan the LPN barcode, the system automatically populates the Itm, SKU, Warehouse, Loc and Qty fields with the information defined for the LPN. If you manually complete the Company and LPN fields, you must first select OK or press Enter to validate your entries and populate these fields.
3. Optionally, change the quantity in the Qty field if you wish to partially pull the LPN quantity. See Pulling a Partial LPN Quantity for an RF LPN Transfer Pull Transaction. Select OK or press Enter to validate your change.
4. Select OK or press Enter to process the RF LPN Transfer Pull transaction. The system transfers the LPN from its current location to the intransit location in the same warehouse and displays the following message: Pull Processed. You can process another RF LPN Transfer Pull transaction or exit the screen to perform a different function.
RF LPN Transfer Pull errors: See RF LPN Transfer Pull Errors for a list of errors that you can receive on the LPN Pull Stock Screen.
To complete the RF LPN Transfer transaction: To complete the RF LPN Transfer transaction, you must transfer the LPN from the intransit location to a specified warehouse and location; see RF LPN Transfer Put Transaction for instructions.
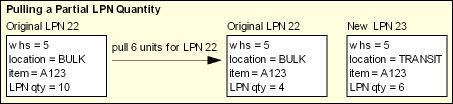
Pulling a Partial LPN Quantity for an RF LPN Transfer Pull Transaction
If you partially pull the LPN quantity, the system creates a new RF LPN Label for the quantity in transit and leaves the existing LPN with the quantity remaining in the current location. The system looks at the setting of the Suppress Labels for RF LPN Transfers (L57) system control value:
• If this system control value is unselected, the system prints the new LPN label and displays the following message on the LPN Pull Stock screen: Pull Processed.
• If this system control value is selected, the system does not print the new LPN label and instead advances you to the LPN Created Screen where you can review the new LPN created. Select OK or press Enter on this screen to return to the LPN Pull Stock screen; the system displays the following message: Pull Processed. You can print the new LPN label using the Print LPN Label option in Radio Frequency Inquiry and Maintenance (RFMN).
LPN creation history: When a new LPN is created, the system also creates a record in the LPN Creation History table, providing details of the LPN: LPN number, associated PO number (if any), LPN quantity, date and time created, item/SKU, warehouse, location, user ID, and the program that created the LPN.
Example: If the quantity for LPN 22 is 10, but you select to pull 6, the system assigns a new LPN number to the 6 units pulled and leaves LPN 22 with the remaining 4 units in the staging warehouse.
Field |
Description |
Company Unlabeled field to the left of the LPN field |
A code for the company where the LPN is located. The current company defaults, but you can override it. Company codes are defined in and validated against the Company table. Scanning the LPN Barcode on the LPN Label To scan the LPN barcode on the RF LPN Label correctly, the cursor on the screen must be in the Company field. Selecting a Different Company If you select a different company, the system validates that you have authority to the company and that the settings of related system control values are consistent in the new company. The related system control values are: • Default Staging Warehouse (E15) • RF Item Number Label Type (E28) Numeric, 3 positions; required. |
LPN license plate number |
The LPN for the stock you wish to pull for LPN transfer. Numeric, 6 positions; required. |
Itm Item |
The item associated with the LPN. The item number defaults after you scan the LPN barcode on the RF LPN Label or manually complete the Company and LPN fields. Alphanumeric, 12 positions; display-only. |
SKU |
The SKU for the item associated with the LPN. The SKU defaults after you scan the LPN barcode on the RF LPN Label or manually complete the Company and LPN fields. Alphanumeric, three 4-position fields; display-only. |
Warehouse Unlabeled field to the left of the Loc field |
A code for the warehouse that contains the location from which you wish to pull stock by LPN for transfer. Warehouse Default The warehouse code defined in the Default Warehouse (A04) system control value defaults when you initially advance to the LPN Pull Stock screen; however the warehouse defined for the LPN defaults after you scan the LPN barcode on the RF LPN Label or manually complete the Company and LPN fields. Numeric, 3 positions; display-only. |
Loc Location |
A code for the location where the LPN is located. The location defaults after you scan the LPN barcode on the RF LPN Label or manually complete the Company and LPN fields. Alphanumeric, 7 positions; display-only. |
Qty Quantity |
The quantity of the item associated with the LPN. Pulling a Partial LPN Quantity If you enter a quantity smaller than the LPN quantity in order to pull only part of the LPN, the system assigns a new LPN to the quantity in transit and leaves the existing LPN with the quantity remaining in the staging warehouse location. The system looks at the setting of the Suppress Labels for RF LPN Transfers (L57) system control value to determine whether to print the LPN label: • If unselected, the system immediately prints the new LPN label. • If selected, the system does not print the new LPN label and instead advances you to the LPN Created Screen where you can review the contents of the LPN label. You can print the new LPN label using the Print LPN Label option in Radio Frequency Inquiry and Maintenance (RFMN). Select OK on this screen to return to the LPN Pull Stock Screen. See Pulling a Partial LPN Quantity for an RF LPN Transfer Pull Transaction for an example. Numeric, 7 position; required. |
Screen Option |
Procedure |
Process the RF LPN Transfer Pull transaction |
See RF LPN Transfer Pull Process for instructions. |
Process an RF LPN Transfer Put transaction |
Select Put or press F7 to advance to the LPN Put Stock Screen; see RF LPN Transfer Put Transaction. |
Clear the information from the screen and restore the defaults |
Select Clr or press F8. |
Exit the screen |
Select Exit or press F3. |
Error Message |
Cause |
Invalid from Cmpy |
The company number you entered is not a valid company on your system, or the company field is blank. |
Unauthorized Cmpy |
You do not have authority to the company number you entered. |
SCV Error - E28 (or other value) |
The company whose number you entered has a system control value related to RF with a setting that is incompatible with your current company. |
Invalid LPN Number |
The LPN number you entered does not exist in the current company. |
LPN Required |
The LPN field is blank. |
LPN Is Intransit |
The LPN you entered is currently in an intransit location. |
Qty GT LPN Qty |
You entered an amount in the quantity field that is larger than the total quantity for the LPN. |
Qty Must be Positive |
You entered a negative number in the quantity field. |
On Hand Negative |
The quantity you are attempting to pull is greater than the quantity on-hand in the warehouse, possibly because of a discrepancy between the LPN quantity and the actual on-hand quantity. |
On Hand LT Prt Qty |
The quantity you are attempting to pull is greater than the quantity on-hand in the location, possible because of a discrepancy between the LPN quantity and the actual on-hand quantity. |
Physical in Progress |
The inventory is frozen because a physical inventory is in progress. |
Unauthorized Item |
Your user class is excluded from working with the vendor who provides this item.See Setting Up User Classes (WUCL). |
Use this screen to review the new LPN created when you partially pull the LPN quantity during the RF LPN Transfer Pull Transaction. The system creates a new LPN label for the quantity in transit and leaves the existing LPN with the quantity remaining in the current location.
How to display this screen: Select OK or press Enter on the LPN Pull Stock Screen after changing the Qty field to a quantity smaller than the LPN quantity in order to pull only part of the LPN.
Important: The system advances you to this screen only if the Suppress Labels for RF LPN Transfers (L57) system control value is selected; if this system control value is unselected, the system prints the new LPN label created when you partially pull the LPN quantity during the RF LPN Transfer Pull Transaction.
All fields on this screen are display-only.
Field |
Description |
Company unlabeled field to the left of the LPN field |
A code for the company where the LPN is located. Numeric, 3 positions; display-only. |
LPN license plate number |
The new LPN for the quantity in transit. Numeric, 6 positions; display-only. |
Warehouse unlabeled field to the left of the Loc field |
A code for the warehouse where the LPN is located. Numeric, 3 positions; display-only. |
Loc |
A code for the location in the warehouse where the LPN is located; typically, this is the intransit location. Alphanumeric, 7 positions; display-only. |
Itm |
The item associated with the LPN. Alphanumeric, 12 positions; display-only. |
SKU |
The SKU of the item associated with the LPN. Alphanumeric, three 4-position fields; display-only. |
Qty |
The quantity of the item associated with the LPN. Numeric, 7 positions; display-only. |
Select OK or press Enter on this screen to return to the LPN Pull Stock Screen. The system displays the following message: Pull Processed.
RF LPN Transfer Put Transaction
Purpose: Use the LPN Put Stock Screen to process an RF LPN Transfer Put transaction.
When you process an RF LPN Transfer Put transaction, the system transfers the LPN from the intransit location to a specified warehouse and location. In addition, if you put the stock away in a primary location, the system deletes the LPN record.
How to display this screen: Select option 2. Putaway Stock and select OK or press Enter at the RF LPN TRN MENU Screen; see RF Screen Layout.
Cursor placement: When you first advance to this screen, the system places the cursor in the Company field.
Use the following steps to process an RF LPN Transfer Put transaction.
1. |
Scan the LPN barcode on the RF LPN Label or manually complete the Company and LPN fields. To scan the LPN barcode on the LPN label correctly, the cursor on the screen must be in the Company field. |
2. |
When you scan the LPN barcode, the system automatically populates the Itm, SKU and Qty fields with the information defined for the LPN. If you manually complete the Company and LPN fields, you must first select OK or press Enter to validate your entries and populate these fields. |
3. |
Optionally, change the quantity in the Qty field if you are not putting the entire LPN away in the location. See Putting Away a Partial LPN Quantity for an RF LPN Transfer Put Transaction. |
4. |
Enter the warehouse where you wish to put away the LPN in the Whs field. • If the Default Primary Warehouse in RF (G32) system control value is unselected, the warehouse code defined in the Default Warehouse (A04) system control value defaults, but you can override it. • If the Default Primary Warehouse in RF (G32) system control value is selected, the system defaults the item’s primary warehouse, but you can override it. |
5. |
Scan the location barcode on the RF Bin Location Label or manually complete the Loc field where you wish to put away the LPN. To scan the bin location barcode on the Bin Location label correctly, the cursor on the screen must be in the Loc field. Note: The system does not validate that an item/location record for the destination location already exists when you perform an LPN transfer. |
6. |
Select OK or press Enter to validate your entries. |
7. |
Select OK or press Enter again to process the RF LPN Transfer Put transaction. The system transfers the LPN to the warehouse and location you have selected and displays the following message: Put Processed. |
You can process another RF LPN Transfer Put transaction or exit the screen to perform a different function.
LPN label: When you process an RF LPN Transfer Put transaction, if you do not put the stock away in a primary location, the system prints a new LPN label, displaying its current location and the destination as the item’s primary primary location. See RF LPN Label for more information on the setup required to print LPN labels and to review a sample LPN label.
LPN creation history: When a new LPN is created, the system also creates a record in the LPN Creation History table, providing details of the LPN: LPN number, associated PO number (if any), LPN quantity, date and time created, item/SKU, warehouse, location, user ID, and the program that created the LPN.
Deleting the LPN: If you have put the stock away in a primary location, the system deletes the LPN number at this time.
RF LPN Transfer Put errors: See RF LPN Transfer Put Errors for a list of errors you can receive on the LPN Put Stock Screen.
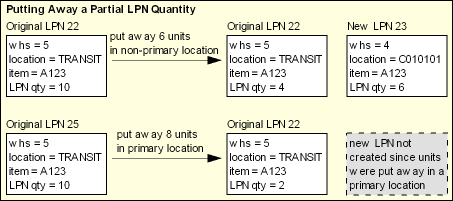
Putting Away a Partial LPN Quantity for an RF LPN Transfer Put Transaction
If you enter a quantity smaller than the LPN quantity in order to put away only part of the LPN, the system assigns a new LPN to the quantity put away and leaves the existing LPN with the quantity remaining in the intransit location. If the LPN is put away in a non-primary location, the system assigns a new LPN to the quantity put away; if the LPN is put away in a primary location, the system does not create a new LPN.
Example: If the quantity for LPN 22 is 10, but you select to putaway 6 in a non-primary location, the system assigns a new LPN number to the 6 units put away and leaves LPN 22 with the remaining 4 units in the staging warehouse. Likewise, if the quantity for LPN 25 is 10, but you select to putaway 8 in a primary location, the system leaves LPN 25 with the remaining 2 units in the intransit location and does not create a new LPN for the 8 that have been put away.
Field |
Description |
Company Unlabeled field to the left of the LPN field |
A code for the company where the LPN is located. The current company defaults, but you can override it. Company codes are defined in and validated against the Company table. Scanning the LPN Barcode on the LPN Label To scan the LPN barcode on the RF LPN Label correctly, the cursor on the screen must be in the Company field. Selecting a Different Company If you select a different company, the system validates that you have authority to the company and that the settings of related system control values are consistent in the new company. The related system control values are: • Default Staging Warehouse (E15) • RF Item Number Label Type (E28) Numeric, 3 positions; required. |
LPN license plate number |
The LPN for the stock you wish to transfer to a specified warehouse and location. Numeric, 6 positions; required. |
Itm Item |
The item associated with the LPN. The item number defaults after you scan the LPN barcode on the RF LPN Label or manually complete the Company and LPN fields. Alphanumeric, 12 positions; display-only. |
SKU |
The SKU for the item associated with the LPN. The SKU defaults after you scan the LPN barcode on the RF LPN Label or manually complete the Company and LPN fields. Alphanumeric, three 4-position fields; display-only. |
Qty Quantity |
The quantity of the item associated with the LPN. The full LPN quantity defaults after you scan the LPN barcode on the LPN label or manually complete the Company and LPN fields. Putting Away a Partial LPN Quantity If you enter a quantity smaller than the LPN quantity in order to put away only part of the LPN, the system assigns a new LPN to the quantity put away and leaves the existing LPN with the quantity remaining in the intransit location. If the LPN is put away in a non-primary location, the system assigns a new LPN to the quantity put away; if the LPN is put away in a primary location, the system does not create a new LPN. See Putting Away a Partial LPN Quantity for an RF LPN Transfer Put Transaction for an example. Numeric, 7 positions; required. |
Warehouse Unlabeled field to the left of the Loc field |
A code for the warehouse where you wish to put the stock associated with the LPN. Warehouse Default • If the Default Primary Warehouse in RF (G32) system control value is unselected, the warehouse code defined in the Default Warehouse (A04) system control value defaults, but you can override it. • If the Default Primary Warehouse in RF (G32) system control value is selected, the system defaults the item’s primary warehouse, but you can override it. Numeric, 3 positions; required. |
Loc Location |
A code for the location where you wish to put the stock associated with the LPN. Location codes are defined in and validated against the Location table. Note: The system does not validate that an item/location record for the destination location already exists when you perform an LPN transfer. Scanning the Location Barcode on the Bin Location Label To scan the location barcode on the RF Bin Location Label correctly, the cursor on the screen must be in the Loc field. Alphanumeric, 7 positions; required. |
.
Screen Option |
Procedure |
Process the RF LPN Transfer Put transaction |
See RF LPN Transfer Put Process for instructions. |
Process an RF LPN Transfer Pull Transaction for another LPN |
Select Pull or press F7 to advance to the LPN Pull Stock Screen; see RF LPN Transfer Pull Transaction. |
Clear the information from the screen and restore the defaults |
Select Clr or press F8. |
Exit the screen |
Select Exit or press F3. |
Error Message |
Cause |
Invalid from Cmpy |
The company number you entered is not a valid company on your system, or the company field is blank. |
Unauthorized Cmpy |
You do not have authority to the company number you entered. |
SCV Error - E28 (or other value) |
The company whose number you entered has system control values related to RF or the SKU field with a setting that is incompatible with your current company. |
Invalid LPN Number |
The LPN number you entered does not exist in the current company. |
LPN Required |
The LPN field is blank. |
LPN in PRIMARY (or other location) |
The LPN you entered is not currently in an intransit location. |
To Whs Invalid |
The warehouse number you entered to override the default warehouse is not valid. |
To Location Invalid |
The location code you entered does not exist in the warehouse indicated. |
To Loc Required |
You did not enter a location code. |
Qty GT LPN Qty |
You entered a number in the Quantity field that is greater than the total quantity for the LPN. |
Qty Must be Positive |
You entered a negative number in the quantity field. |
Must Clear Fields |
You selected Pull or pressed F7 to advance to the LPN Pull Stock Screen without clearing the fields. |
Physical in Progress |
The inventory is frozen because a physical inventory is in progress. |
Unauthorized Item |
Your user class is excluded from working with the vendor who provides this item. See Setting Up User Classes (WUCL). |
Purpose: RF Item Transfer allows you to move inventory by item from its current warehouse and location to a specified warehouse and location.
Moving inventory by item, rather than by LPN, might be useful to transfer stock that is not currently associated with an LPN; for example, if the items were in your warehouse before you began assigning LPNs, or if the items are in a primary location and their LPNs were deleted.
With RF Item Transfers:
• You can move inventory by item, rather than by LPN.
• When you perform an RF Item Transfer Put transaction, the system checks the total quantity of the item in transit in the warehouse and recommends that you put away the entire quantity. If you put away less than the entire quantity, the system first decreases the quantity associated with any LPNs, selecting the LPNs to decrease (and delete, if the LPN quantity reaches zero) in numeric sequence. If there is no quantity associated with an LPN in transit, the system decreases the quantity of any "loose" units.
To complete an RF Item Transfer transaction, you must perform both an RF Item Transfer Pull Transaction and an RF Item Transfer Put Transaction.
Secured Feature: The Allow Access to RF Item Transfer (A52) secured feature controls access to this option.
In this topic:
• RF Item Transfer Pull Transaction
• RF Item Transfer Pull Process
• RF Item Transfer Pull Errors
• RF Item Transfer Put Transaction
• RF Item Transfer Put Process
An RF Item Transfer transaction consists of two transactions:
• RF Item Transfer Pull Transaction: Use the Item Pull Stock Screen to pull the item from its current warehouse and location. When you process an RF Item Transfer Pull transaction, the system transfers the item from its current warehouse and location to the intransit location in the current warehouse. See RF Item Transfer Pull Transaction.
• RF Item Transfer Put Transaction: Use the Item Put Stock Screen to put the item into a specified warehouse and location. When you process an RF Item Transfer Put transaction, the system transfers the item from the intransit location to the specified warehouse and location.
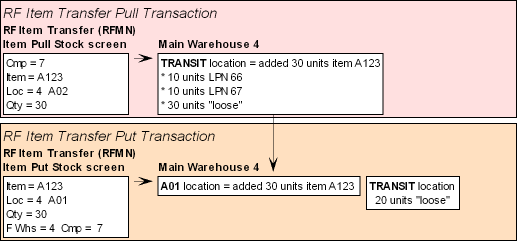
You currently have two primary locations for item A123: A01 and A02. You want to consolidate the two locations, so you are moving the 30 units in A02 to A01. Both locations are in your main warehouse, warehouse 4.
The RF transactions to perform are:
• RF Item Transfer Pull transaction: Pull the 30 units from location A02 in main warehouse 4. The system transfers the 30 units to the TRANSIT location in main warehouse 4.
• RF Item Transfer Put transaction: Put the 30 units in location A01 in main warehouse 4.
The following stock exists in the TRANSIT location in main warehouse 4 for item A123:
• 10 units associated with LPN 66
• 10 units associated with LPN 67
• 30 "loose" units not associated with an LPN (this is the quantity that you pulled from location A02)
The system transfers 30 units from the TRANSIT location to the A01 location in main warehouse 4:
• the system transfers the 10 units for LPN 66 and deletes the LPN
• the system transfers the 10 units for LPN 67 and deletes the LPN
• the system transfers 10 "loose" units
The quantity of item A123 remaining in the TRANSIT location is 20 units.
RF Item Transfer Illustration
Use this screen to select the RF Item Transfer transaction you wish to perform.
Screen Option |
Procedure |
Process an RF Item Transfer Pull transaction |
Select option 1. Pull Stock and select OK or press Enter to advance to the Item Pull Stock Screen; see RF Item Transfer Pull Transaction. |
Process an RF Item Transfer Put transaction |
Select option 2. Putaway Stock and select OK or press Enter to advance to the Item Put Stock Screen; see RF Item Transfer Put Transaction. |
RF Item Transfer Pull Transaction
Purpose: Use the Item Pull Stock Screen to process an RF Item Transfer Pull transaction.
When you process an RF Item Transfer Pull transaction, the system transfers the item quantity from its current warehouse and location to the intransit location in the same warehouse.
How to display this screen: Select option 1. Pull Stock and select OK or press Enter at the RF ITM TRN MENU Screen; see RF Screen Layout.
Cursor placement: When you first advance to this screen, the system places the cursor in the Itm field.
Use the following steps to process an RF Item Transfer Pull transaction.
1. Enter the company where the stock is currently located in the Cmp field. The current company defaults, but you can override it.
2. Scan the item barcode on the RF Item Label or manually complete the Itm and SKU fields. To scan the item barcode on the Item label correctly, the cursor on the screen must be in the Itm field. When you scan the item barcode, the system automatically populates the Itm field. If the item contains SKUs, the system also automatically populates the SKU field. Note: You can also enter the short SKU code defined for the item/SKU in the Itm field. If you enter the short SKU code, the system automatically updates the Itm field with the item code and the SKU field with the SKU code when you select OK or press Enter.
3. Enter the warehouse where the stock is currently located in the Warehouse field. The warehouse code defined in the Default Warehouse (A04) system control value defaults, but you can override it.
4. Scan the location barcode on the RF Bin Location Label where the stock is currently located or manually complete the Loc field. To scan the location barcode on the Bin Location label correctly, the cursor on the screen must be in the Loc field.
5. Enter the quantity of the stock you wish to move from the specified warehouse and location in the Qty field.
6. Select OK or press Enter to validate your entries. Correct any fields if necessary and select OK or press Enter to validate your changes.
7. Select OK or press Enter again to process the RF Item Transfer Pull transaction. The system transfers the stock to the intransit location in the current warehouse and displays the following message: Pull Processed.
You can process another RF Item Transfer Pull transaction or exit the screen to perform a different function.
RF Item Transfer Pull errors: See RF Item Transfer Pull Errors for a list of errors that you can receive on the Item Pull Stock Screen.
To complete the RF Item Transfer transaction: To complete the RF Item Transfer transaction, you must transfer the stock from the intransit location to a specified warehouse and location; see RF Item Transfer Put Transaction for instructions.
Field |
Description |
Company Unlabeled field to the left of the LPN field |
A code for the company where the stock you wish to transfer currently resides. The current company defaults, but you can override it. Company codes are defined in and validated against the Company table. Selecting a Different Company If you select a different company, the system validates that you have authority to the company and that the settings of related system control values are consistent in the new company. The related system control values are: • Default Staging Warehouse (E15) • RF Item Number Label Type (E28) Numeric, 3 positions; required. |
Itm Item |
The item whose stock you wish to transfer. Scanning the Item Barcode on the Item Label To scan the Item barcode on the RF Item Label correctly, the cursor on the screen must be in the Itm field. Using the Short SKU Code You can also enter the short SKU code defined for the item/SKU in the Itm field. If you enter the short SKU code, the system automatically updates the Itm field with the item code and the SKU field with the SKU code when you select OK or press Enter. Alphanumeric, 12 positions; required. |
SKU |
The SKU for the item whose stock you wish to transfer. The SKU code defaults after you scan the Item barcode on the RF Item Label; otherwise, you will need to manually complete the SKU code if the item contains SKUs. Alphanumeric, three 4-position fields; required. |
Warehouse Unlabeled field to the left of the Loc field |
A code for the warehouse where the stock you wish to transfer currently resides. Warehouse Default The warehouse code defined in the Default Warehouse (A04) system control value defaults, but you can override it. Numeric, 3 positions; required. |
Loc Location |
A code for the location where the stock you wish to transfer currently resides. Location codes are defined in and validated against the Location table. Scanning the Location Barcode on the Bin Location Label To scan the location barcode on the RF Bin Location Label correctly, the cursor on the screen must be in the Loc field. Alphanumeric, 7 positions; required. |
Qty Quantity |
The quantity of the item you wish to transfer from the specified warehouse and location. Numeric, 7 positions; required. |
.
Screen Option |
Procedure |
Process the RF Item Transfer Pull transaction |
See RF Item Transfer Pull Process for instructions. |
Process an RF Item Transfer Put transaction |
Select Put or press F7 to advance to the Item Put Stock Screen; see RF Item Transfer Put Transaction. |
Clear the information from the screen and restore the defaults |
Select Clr or press F8. |
Exit the screen |
Select Exit or press F3. |
Error Message |
Cause |
Invalid from Cmpy |
The company number you entered is not a valid company on your system, or the company field is blank. |
Unauthorized Cmpy |
You do not have authority to the company number you entered. |
SCV Error - E28 (or other value) |
The company whose number you entered has a system control value related to RF with a setting that is incompatible with your current company. |
Invalid Item/SKU |
You have not entered complete and accurate information in the item and SKU fields. |
Invalid Intransit |
The warehouse code you entered is not valid. |
From Loc Invalid |
The location code does not exist in the indicated warehouse. |
Item Loc Not Found |
There is no record of the item in this location. This may be due to a discrepancy caused by a non-RF transaction; most standard CWSerenade transactions do not update LPN records. |
On Hand LT Prt Qty |
You have entered a quantity that is greater than the on-hand quantity of the item in this location. This message also indicates if the quantity you enter exceeds the non-printed (on pick slip) quantity. |
On Hand Negative |
You have entered a quantity that is greater than the on-hand quantity of the item in this warehouse. |
Quantity is Zero |
You did not enter a quantity to transfer. |
Qty Must be Positive |
You entered a negative number in the quantity field. |
Must Clear Fields |
You selected Put or pressed F7 to advance to the Item Put Stock Screen without clearing the fields. |
Physical in Progress |
The inventory is frozen because a physical inventory is in progress. |
Unauthorized Item |
Your user class is excluded from working with the vendor who provides this item. See Setting Up User Classes (WUCL). |
RF Item Transfer Put Transaction
Purpose: Use the Item Put Stock Screen to process an RF Item Transfer Put transaction.
When you process an RF Item Transfer Put transaction, the system transfers the item quantity from the intransit location to a specified warehouse and location.
How to display this screen: Select option 2. Putaway Stock and select OK or press Enter at the RF ITM TRN MENU Screen; see RF Screen Layout.
Cursor placement: When you first advance to this screen, the system places the cursor in the Itm field.
Use the following steps to process an RF Item Transfer Put transaction.
1. |
Scan the Item barcode on the RF Item Label or manually complete the Itm and SKU fields. To scan the Item barcode on the Item label correctly, the cursor on the screen must be in the Itm field. Note: You can also enter the short SKU code defined for the item/SKU in the Itm field. If you enter the short SKU code, the system automatically updates the Itm field with the item code and the SKU field with the SKU code when you select OK or press Enter. |
2. |
Enter the warehouse where you wish to put away the stock in the Warehouse field. • If the Default Primary Warehouse in RF (G32) system control value is unselected, the warehouse code defined in the Default Warehouse (A04) system control value defaults, but you can override it. • If the Default Primary Warehouse in RF (G32) system control value is selected, the system defaults the item’s primary warehouse, but you can override it. |
3. |
Enter the location where you wish to put away the stock in the Loc field. • If the Default Primary in RF Item Transfer Put Screen (K88) system control value is selected, the item’s primary primary location defaults, but you can override it. • If a location does not default, or you do not wish to use the default location, scan the Location barcode on the RF Bin Location Label where you wish to put away the stock or manually complete the Loc field. To scan the Location barcode on the Bin Location label correctly, the cursor on the screen must be in the Loc field. Note: The system does not validate that an item/location record already exists for the destination location when you perform an item transfer. |
4. |
Enter the quantity you wish to transfer from the intransit location to the specified location in the Qty field. |
5. |
Enter the warehouse where the stock currently resides in the F Whs field. • If the Default Primary Warehouse in RF (G32) system control value is unselected, the warehouse code defined in the Default Warehouse (A04) system control value defaults, but you can override it. • If the Default Primary Warehouse in RF (G32) system control value is selected, the system defaults the item’s primary primary warehouse, but you can override it. |
6. |
Complete the Cmp field is you are putting the items away in a different company. |
7. |
Select OK or press Enter to validate your entries. Correct any fields if necessary and select OK or press Enter again to validate your changes. |
8. |
Select OK or press Enter again to process the RF Item Transfer Put transaction. The system transfers the item quantity to the warehouse and location you have selected and displays the following message: Put Processed. |
You can process another RF Item Transfer Put transaction or exit the screen to perform a different function.
RF Item Transfer Put errors: See RF Item Transfer Put Errors for a list of errors you can receive on the Item Put Stock Screen.
Field |
Description |
Itm Item |
The item whose stock you wish to transfer. Scanning the Item Barcode on the Item Label To scan the Item barcode on the RF Item Label correctly, the cursor on the screen must be in the Itm field. Using the Short SKU Code You can also manually enter the short SKU code defined for the item/SKU in the Itm field. If you enter the short SKU code, the system automatically updates the Itm field with the item code and the SKU field with the SKU code when you select OK or press Enter. Alphanumeric, 12 positions; required. |
SKU |
The SKU for the item whose stock you wish to transfer. The SKU code defaults after you scan the Item barcode on the Item label; otherwise, you will need to manually complete the SKU code if the item contains SKUs. Alphanumeric, three 4-position fields; required if the item contains SKUs. |
Warehouse Unlabeled field to the left of the Loc field |
A code for the warehouse where you wish to put the item quantity. Warehouse Default • If the Default Primary Warehouse in RF (G32) system control value is unselected, the warehouse code defined in the Default Warehouse (A04) system control value defaults, but you can override it. • If the Default Primary Warehouse in RF (G32) system control value is selected, the system defaults the item’s primary warehouse, but you can override it. Numeric, 3 positions; required. |
Loc Location |
A code for the location where you wish to put the item quantity. Scanning the Location Barcode on the Bin Location Label To scan the Location barcode on the RF Bin Location Label correctly, the cursor on the screen must be in the Loc field. Note: The system does not validate that an item/location record already exists for the destination location when you perform an item transfer. Alphanumeric, 7 positions; required. |
Qty Quantity |
The quantity of the item you wish to transfer from the intransit location to the specified warehouse and location. Numeric, 7 positions; required. |
F Whs From warehouse |
A code for the warehouse where the item stock currently resides. Warehouse Default • If the Default Primary Warehouse in RF (G32) system control value is unselected, the warehouse code defined in the Default Warehouse (A04) system control value defaults, but you can override it if this is not the warehouse where the stock currently resides. • If the Default Primary Warehouse in RF (G32) system control value is selected, the system defaults the item’s primary warehouse, but you can override it if this is not the warehouse where the stock currently resides. Numeric, 3 positions; required if you are putting the stock in a different warehouse. |
Cmp Unlabeled field to the right of the F Whs field |
The code for the company where you are putting the items away. The company code of your current company defaults, but you can override it. Company codes are defined in and validated against the Company table. Numeric, 3 positions; required if you are putting the stock in a different company. |
.
Screen Option |
Procedure |
Process the RF Item Transfer Put transaction |
See RF Item Transfer Put Process for instructions. |
Process an RF Item Transfer Pull transaction |
Select Pull or press F7 to advance to the Item Pull Stock Screen; see RF Item Transfer Pull Transaction. |
Clear the information from the screen and restore the defaults |
Select Clr or press F8. |
Exit the screen |
Select Exit or press F3. |
Error Message |
Cause |
Invalid from Cmpy |
The company number you entered is not a valid company on your system, or the company field is blank. |
Unauthorized Cmpy |
You do not have authority to the company number you entered. |
SCV Error - A26 (or other value) |
The company whose number you entered has system control values related to RF with a setting that is incompatible with your current company. |
Invalid Item/SKU |
You have not entered complete and accurate information in the item and SKU fields. |
Invalid Intransit |
The "from" warehouse code (F Whs) you entered is not valid. |
Item Not Intransit |
There is no record of the item in the intransit location for the "from" warehouse. |
To Whs Invalid |
The warehouse number you entered to override the default warehouse is not valid. |
To Location Invalid |
The location code you entered does not exist in the warehouse indicated. |
To Loc Required |
You did not enter a location code. |
Qty Must be Positive |
You entered a negative number in the quantity field. |
Tot Intrans=XXX |
You did not enter a quantity to put away. The system displays this message indicating the total quantity of the item in transit in the current warehouse. |
On Hand LT Prt Qty |
You have entered an amount greater than the quantity of the item currently in transit in the "from" warehouse. |
Must Clear Fields |
You selected Pull or pressed F7 to advance to the Item Pull Stock Screen without clearing the fields. |
Physical in Progress |
The inventory is frozen because a physical inventory is in progress. |
Unauthorized Item |
Your user class is excluded from working with the vendor who provides this item. See Setting Up User Classes (WUCL). |
