
Purpose: Radio frequency (RF) technology enables you to enter inventory information on your system by scanning a bar-coded label with a hand-held device.
CWSerenade supports the use of an RF gun to register stock movement such as putaway, transfers, replenishment, returns, and physical inventory counts on your system without typing the information at a terminal. As a result, you can improve accuracy and efficiency in your warehouse.
In this topic:
• License Plate Number Tracking
• Inventory Transactions Outside of RF
• Radio Frequency Illustration
• RF Menus
For more information: See:
• Radio Frequency Setup for more information on the setup required to use RF.
• Radio Frequency Transactions (RFMN) for more information on how to process RF transactions.
• Radio Frequency Inquiry and Maintenance (RFMN) for more information on how to review RF information, print RF labels, and create or update LPNs.

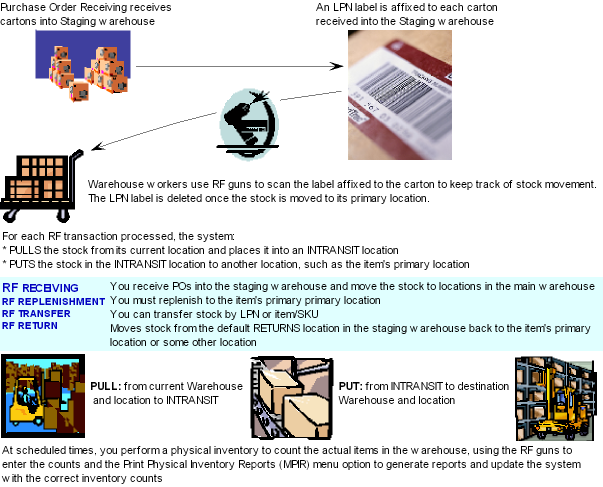
You can track inventory movement through license plate numbers (LPNs). The system assigns an LPN to each case, carton or container when you receive a purchase order, based on the Pieces per case quantity defined for the item. For example, if item AA100 is defined with a Pieces per case of 12, the system will assign 4 unique LPNs when you receive a quantity of 48. You print the LPN labels and affix them to each carton. The LPN label includes a barcode that you can scan as you move the carton from one location to another.
The system keeps track of each LPN's item/SKU, quantity, and location until you put the LPN away in its primary picking location; at this point, the LPN is deleted. You can review LPNs in Displaying License Plate Information (WLPN). The system also creates a record in the LPN Creation History table when an LPN is created through Receiving, Physical Inventory, Inventory Transaction, or the Create LPN Screen.
If you use LPN tracking, the system uses a different process to suggest location placement at purchase order receipt than the standard suggestion routine. The system will consider each item's minimum and maximum settings in the primary location and its current backorders. However, the system suggests you place the stock in a staging warehouse, which may be defined separately on your system from your main warehouse. See Staging Warehouse/Location Placement for more information on how the system determines where merchandise should be placed in the staging warehouse.
The staging warehouse is the area in your warehouse where received inventory awaits putaway. You use default locations in your staging warehouse to refer to actual locations in your main warehouse. For example, if you need to replenish an item's primary location, you would place stock in the staging warehouse, in a location named PRIMARY. The LPN label will display both this location code and the item's actual primary location, to facilitate putaway in the main warehouse.
Warehouse Workers
You can set up warehouse employees who will always use the RF gun so that they advance directly to the Radio Frequency Transactions (RFMN) menu when they log on; see Assigning the RF Menu to a User or User Class.
In addition, you can use secured features to control each employee's access to the various RF functions; see Secured Features Related to RF.
Inventory Transactions Outside of RF
Any inventory transaction that occurs in CWSerenade but outside of RF, with the exception of purchase order receiving, will not update LPN records. This means that certain actions such as immediate or batch inventory transactions may cause a discrepancy between your actual on-hand quantity in a location and the quantity assigned to LPNs. You can print the Item Location/LPN Discrepancy Report to review items in your warehouses whose item/location quantity does not equal the total quantity assigned to LPNs. You can use the LPN maintenance options in Radio Frequency Transactions (RFMN) or Displaying License Plate Information (WLPN) to correct these discrepancies.

Purpose: The RF menus differ from standard CWSerenade menus in that they are designed for easier transactions on the RF gun. The RF gun has a small display, and you can use it either to scan a bar code or type information.
|
Each entry you complete on an RF gun updates the system the same way as transactions you complete at a terminal. In addition, when you are not using an RF gun you can advance to and use the RF menus by entering RFMN in the Fast path field at the top of any CWSerenade screen, or by selecting the RF Main Menu from a menu.
Note: The RF screen suite does not work in Internet Explorer 10 or 11.
The Radio Frequency Transactions (RFMN) menu option supports the following RF transactions.
RF Transaction |
Description |
RF Receipts allows you to: • Receive a PO line into a specified warehouse and location. Typically during an RF PO Receipt Transaction, you would receive the purchase order into the staging warehouse. • Move stock by LPN from its current warehouse and location to a specified warehouse and location. Typically, you would move the LPN that was generated during PO Receipts from the staging warehouse to a specified location in the main warehouse. To complete an RF Receipt Putaway transaction, you must perform both an RF Receipt Putaway Pull Transaction and an RF Receipt Putaway Put Transaction. When you receive a PO line and the LPN Tracking (E16) system control value is selected, the system generates an RF LPN Label for the quantity received. If you use price tags, you have the option to print price tags for all of the items on the PO prior to receiving or for the items on the PO that are received; see Price Tag Overview and Setup. Moving a Partial LPN Quantity During RF Putaway, you can move a partial LPN quantity. In this situation, the system assigns a new LPN to the quantity in transit and leaves the existing LPN with the quantity remaining in the current location. See Pulling a Partial LPN Quantity for an RF Receipt Putaway Pull Transaction. Deleting the LPN If you put the stock away in its primary location in the main warehouse, the system deletes the LPN record at this time. |
|
RF Store Transfer Receipt allows you to receive a store transfer line defined in the Store Transfer Receipt Table (INSTXR) into a specified warehouse and location using an RF gun to scan the item to receive and the location where the item will be placed. You can receive the entire store transfer line or receive a partial quantity of the store transfer line. You can also process store transfer receipts using the Working with Store Transfer Receipt (WSRT) menu option. The lines on a store transfer remain open until you close the store transfer. If you use price tags, you have the option to print price tags for all of the items on the store transfer prior to receiving or for the items on the store transfer that are received; see Price Tag Overview and Setup. |
|
RF Replenishment allows you to move stock by LPN to its primary primary location. Use the Replenishment Detail by 'From' Location Report as a worksheet to assist you in confirming the item quantities to replenish. To complete an RF Replenishment transaction, you must perform both an RF Replenishment Pull Transaction and an RF Replenishment Put Transaction. Moving a Partial LPN Quantity With RF Replenishment, you cannot move a partial LPN. RF Replenishment requires you to move the entire LPN quantity. Deleting the LPN Because you put the stock away in a primary location, the system deletes the LPN record at this time. |
|
RF LPN Transfer allows you to move a complete or partial LPN from its current warehouse and location to another specified warehouse and location. With RF LPN Transfer transactions, the system does not validate that an item/location record exists for the location where you are placing the stock. To complete an RF LPN Transfer transaction, you must perform both an RF LPN Transfer Pull Transaction and an RF LPN Transfer Put Transaction. Moving a Partial LPN Quantity You can move a complete or partial LPN quantity. If you transfer less than the complete LPN quantity, the system assigns a new LPN number to the quantity in transit and looks at the setting of the Suppress Labels for RF LPN Transfers (L57) system control value to determine whether to print the new LPN label. The existing LPN number remains with the quantity you are leaving in its present location. Deleting the LPN When you put the stock away in a primary location, the system deletes the LPN record at this time. |
|
RF Item Transfer allows you to move inventory by item from its current warehouse and location to another specified warehouse and location. Moving inventory by item, rather than by LPN, might be useful to transfer stock that is not currently associated with an LPN; for example, if the items were in your warehouse before you began assigning LPNs, or if the items are in a primary location and their LPNs were deleted. To complete an RF Item Transfer transaction, you must perform both an RF Item Transfer Pull Transaction and an RF Item Transfer Put Transaction. When you perform an RF Item Transfer Put transaction, the system checks the total quantity of the item in transit in the warehouse and recommends that you put away the entire quantity. If you put away less than the entire quantity, the system first decreases the quantity associated with any LPNs, selecting the LPNs to decrease (and delete, if the LPN quantity reaches zero) in numeric sequence. If there is no quantity associated with an LPN in transit, the system decreases the quantity of any "loose" units. |
|
RF Mass Transfer allows you to perform the RF Item Transfer Pull Transaction and the RF Item Transfer Put Transaction in one step. With this option, you must scan the location where the item will be pulled, scan the location where the item will be placed, and scan the UPC barcode, short SKU barcode, or manually enter the item to move. If the Default Quantity in RF Mass Transfer (L31) system control value is set to *ONE, once you complete these scans, the mass transfer takes place immediately for a quantity of 1, and the from and to locations remain on the screen so that you can continue to scan items for mass transfer. If this system control value is blank or *NONE, you must define a transfer quantity and select OK to process the mass transfer. |
|
RF Mass Putaway allows you to perform quick-entry RF item transfer processing. With this option, you must scan the location in the warehouse where the item will be pulled, scan the location in the warehouse where the item will be placed, and scan the UPC barcode or short SKU barcode of the item to move. Once you complete these scans, pull and put transactions take place immediately for a quantity of 1, and the from and to locations remain on the screen so that you can continue to scan items. |
|
RF Return allows you to move items that your customers have returned from the default returns location in your staging warehouse back to the item’s primary location or another location. If you return the item to a primary location, the system validates that the primary location is the item’s primary primary location. To complete an RF Return transaction, you must perform both an RF Return Pull Transaction and an RF Return Put Transaction. Default Returns Location Use Working with Default Warehouse Locations (WWDL) to define a default returns location. The system defaults the first default returns location in alphabetical warehouse sequence to the RF Return Pull transaction. For example, if you define a default returns location for warehouse 4 and warehouse 5, the system defaults the default returns location for warehouse 4 to the RF Return Pull transaction. Note: You cannot change the default warehouse for an RF Return Pull transaction. Because you cannot override the default warehouse, when you create a default returns location, you need to make sure that the first default returns location record is for the warehouse you wish to default to the RF Return Pull transaction. |
|
RF Physical Inventory allows you to enter counts for a physical inventory using an RF gun. |
|
RF LPN Inquiry allows you to review the information for an LPN, such as the LPN’s item/SKU, quantity, warehouse and location. |
|
RF Item Inquiry allows you to review the information for an item/SKU, such as the locations where the item is stored, the quantity in each location, whether the location is pickable, and the location type. |
|
RF Bin Inquiry allows you to review the information for a location, such as the item/location records for a particular location and the quantity of each item/SKU in the location. |
|
RF Item Inquiry by UPC allows you to review the information for an item/SKU by scanning the UPC barcode for an item. You can review information such as the locations where the item is stored, the quantity in each location, whether the location is pickable, and the location type. |
|
Print Item Label allows you to print RF Item labels. See RF Item Label and Sample RF Item Label for more information on the setup required to print RF Item labels and to review a sample label. |
|
Print LPN Label allows you to print RF LPN labels. See RF LPN Label and Sample RF LPN Label for more information on the setup required to print RF LPN labels and to review a sample label. |
|
Print Bin Location Label allows you to print RF Bin Location labels. See RF Bin Location Label and Sample RF Bin Location Label for more information on the setup required to print RF Bin Location labels and to review a sample label. |
|
Create LPN allows you to create a new LPN. When you create a new LPN, the system: • does not require you to assign an LPN number. • allows you to update inventory. • automatically prints an LPN label. This may be helpful if you have inventory in your warehouse not currently assigned to an LPN, perhaps because you are in the process of converting to an RF system. Note: The system does not allow you to create an LPN in a primary location. |
|
Adjust LPN allows you to adjust the quantity of the item/SKU defined for an existing LPN. You can also use this option to delete an LPN by adjusting the quantity to zero if there is currently a record of the item in this location. When you adjust an LPN, you can also update inventory. • If you update inventory when you adjust an LPN, the system does not validate that the item quantity in the location is greater than or equal to the quantity you define for the LPN. This means that you can create a discrepancy between your on-hand quantity and your LPN record if there is no sufficient quantity of the item in the location. • If you do not update inventory when you adjust an LPN, it is as if you are allocating the quantity from the existing stock in the location. |
|
Build LPN allows you to build a new LPN. When you build an LPN, the system: • requires you to assign an LPN number. • does not allow you to update inventory. • does not automatically print an LPN label. This may be helpful if, for example, you wish to transfer stock out of primary and into bulk storage, but the system had deleted the LPN when you first placed the case in primary. In this situation, you would use the existing LPN label and assign the same number as before. Because you do not update inventory levels when you build an LPN, it is as if you are allocating the quantity from the existing stock in the location you indicate. The system does not validate that you have an item quantity in the location that is greater than or equal to the quantity you define for the LPN. This means that you will create a discrepancy between your on-hand quantity and your LPN quantity if you do not make sure that you have a sufficient quantity of the item in the location. Note: The system does not allow you to build an LPN in a primary location. |
|
Change Primary Location allows you to create a new primary primary location for an item, and to move the existing inventory from the original primary primary location to the new primary primary location. |
|
Assign Primary Location allows you to create a primary primary location for an item, including the minimum and maximum quantities for the location. Note: If the item already exists in the location you specify at this screen, the system updates the minimum and maximum quantity fields for the item/location record; however, no message will display telling you that the item/location record already exists. |
The following example provides an overview of how you would use RF to manage inventory putaway. This example is for illustration only.
RF PO Receiving
You receive four cartons of item RFSKU. Each carton contains 12 units. This is consistent with the Pieces per case of 12 defined for RFSKU.
Carton 1 |
12 units |
Carton 2 |
12 units |
Carton 3 |
12 units |
Carton 4 |
12 units |
Total: |
48 units |
You currently have none of item RFSKU on-hand. The maximum capacity defined for the item’s primary location, A02, is 24 units. You have a backorder quantity of 30 for the item.
In RF PO Receipts, you select Suggst for the item when you receive the PO line to suggest locations.
• The Type of RF Location to Search First (F12) is *PRIMARY
• The Type of RF Location to Search Second (F13) is *BACKORDER
• The Type of RF Location to Search Third (F14) is *BULK
The system suggests the following:
Warehouse |
Location |
Quantity |
5 |
PRIMARY |
24 |
5 |
BACKORD |
12 |
5 |
BULK |
12 |
Warehouse 5 is your staging warehouse. Warehouse 4 is your main warehouse.
The system made the suggestions above because:
• You need 24 units to replenish primary.
• After replenishing primary, you still require another 6 units to fulfill your backorders. The system suggested 12 units to avoid breaking a case of 12.
• The remaining case will go to bulk.
The system always suggests that receipts go to the staging warehouse based on your inventory requirements in the main warehouse.
Creating LPNs
If you accept the suggestions as described above and complete the purchase order receipt, the system creates the following LPNs:
LPN |
Item |
Warehouse |
Location |
Quantity |
1 |
RFSKU |
5 |
PRIMARY |
12 |
2 |
RFSKU |
5 |
PRIMARY |
12 |
3 |
RFSKU |
5 |
BACKORD |
12 |
4 |
RFSKU |
5 |
BULK |
12 |
When you accept the purchase order receipt, the system prints LPN labels for you to affix to each carton.
If you were now to perform an inventory inquiry, the system would indicate that the merchandise is on-hand in warehouse 5, your staging warehouse. Normally, you would define your staging warehouse as non-viewable in Order Entry, so that your Order Entry operators would not be aware that the items were in the warehouse at this time.
RF Receipt Putaway
RF Receipt Putaway allows you to move inventory by LPN from its current warehouse and location to a specified warehouse and location.
Typically, you would use RF Receipt Putaway to move the LPN that was generated during PO Receipts from the staging warehouse to a specified location in the main warehouse.
Receiving an LPN, like other RF transactions, consists of two transactions:
• RF Receipt Putaway Pull transaction: Use this transaction to pull the stock for the LPN from its current location in the staging warehouse. When you process an RF Receipt Putaway Pull transaction, the system transfers the LPN from its current location to the INTRANSIT location in the staging warehouse.
• RF Receipt Putaway Put transaction: Use this transaction to put the stock for the LPN into a specified location in the main warehouse. When you process an RF Receipt Putaway Put transaction, the system transfers the LPN from the INTRANSIT location in the staging warehouse to a specified location in the main warehouse. In addition, if you put the stock in its primary location in the main warehouse, the system deletes the LPN record at this time.
RF Receipt Putaway Pull Transaction
Samples of the RF screens you use for an RF Receipt Putaway Pull transaction (pull out of a default location in a staging warehouse and into an intransit location) are:
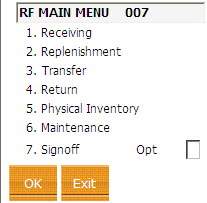
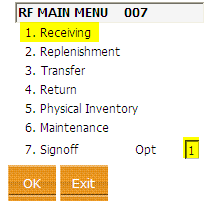
RF MAIN MENU: Select option 1. Receiving.
|
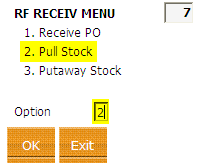
RF RECEIV MENU: Select option 2. Pull Stock.
|
Rcvd Pull Stock: Scan the LPN barcode on the LPN label for the stock you wish to pull and complete the RF Receipt Putaway Pull transaction.
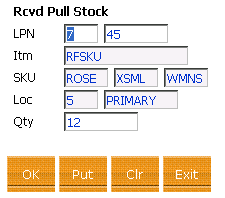
|
When you have completed the last screen, the message Pull Processed appears.
If you were now to perform an inventory inquiry, the system would indicate that this LPN is now in the INTRANSIT location in the staging warehouse.
RR Receipt Putaway Put Transaction
Samples of the RF screens you use for an RF Receipt Putaway Put transaction (move out of the intransit location in the staging warehouse and into a location in your main warehouse) are:
RF MAIN MENU: Select option 1. Receiving.
|
RF RECEIV MENU: Select option 3. Putaway Stock:
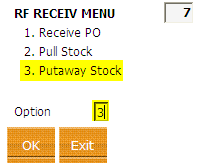
|
Rcvd Put Stock: Scan the LPN barcode on the LPN label and complete the RF Receipt Putaway Put transaction.
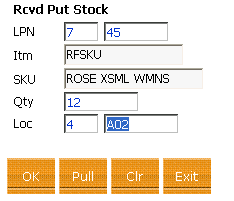
|
When you have completed the third screen, the message Put Processed appears.
Note: It is not necessary to back out to the main RF menu after a pull transaction to perform a put transaction.
The units in the case are now on-hand in the primary location in your main warehouse, available for picking. Because this is the primary location, the LPN is deleted from the system at this point.
Each completed RF transaction will create four inventory transaction records. For example, the example above would create the following:
1. pull from staging PRIMARY,
2. put to staging INTRANSIT,
3. pull from staging INTRANSIT, and
4. put to A01 in the main warehouse.
See Display Inventory Transaction History (DITH) for more information on reviewing the inventory transaction records created for an RF transaction.
