Install a New NVMe Storage Drive (CRU)
To install a new Oracle 3.2 TB NVMe SSD (2.5 Inch small form factor) into a server:
- Back up your data, as required, before changing your server configuration.
-
Identify a supported and available slot in the server.
Refer to the servers service manual for drive locations on the server.
Note - Before installing an Oracle 3.2 TB NVMe SSD 2.5-inch small form factor drive, locate a server slot on the servers front panel labeled NVMe (with SFF-8639 disk backplane and connector) that is capable of supporting the Oracle 3.2 TB NVMe SSD. Your server chassis must contain NVMe equipment, including Oracle NVMe Switch Controller Cards and cables. Refer to the servers service manual for NVMe SSD installation instructions. -
Locate the storage drive filler panel in the server.
If the optional NVMe storage drives are installed in the servers front panel, they are labeled NVMe0, NVMe1, NVMe2, NVMe3 and so on. However, the server operating systems assign these storage drives different names. For the corresponding names assigned by the operating systems, refer to the servers service manual.
- Prepare the SSD for installation.
-
Record the serial number of the NVMe SSD and NVMe slot number where the SSD will be installed.
This drive serial number (WWN) and server slot information can be used at a later time for identifying drives from the console.
Refer to the servers service manual.
-
If necessary, remove the drive filler panel.
Remove the blank storage drive filler panel on the server chassis that aligns with the empty NVMe drive slot.
For instructions on how to remove drive filler panels, refer to the servers service manual.
-
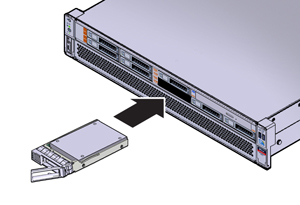
Slide the Oracle 3.2 TB NVMe SSD into the supported NVMe slot until the drive is fully
seated.
The following figure shows how to insert the SSD in a server NVMe slot:

- Close the drive latch to lock the drive in place.
-
Configure the server for the new SSD.
- If applicable, perform any required commands for your system to install the device driver for the new SSD.
- If applicable, perform any required commands for your system to recognize the new SSD.
-
Verify successful installation of the SSD through your systems OS.
Upon completed installation, the Oracle 3.2 TB NVMe SSD is visible to your server operating system.
- Configure the system to maximize flash technology.
Refer to the servers administration guide.