Chapter 12: System Control File Components

Purpose: The System Control file is where you define many of the processing characteristics of the system. The options in this file are used to control special system information, such as:
• How the system will calculate pricing in Order Entry
• How SKU information will appear
• How you will perform a physical inventory
• Whether you will use Cart/Bin picking
• How you will assign purchase order numbers
The information defined in the System Control file is confidential and critical to the operation of your system. Access to the System Control file is restricted to users who have security. You must be defined as a system administrator (Y in the Security admin (Security Administrator) field in your user record) in order to change information in this file. This file should not be available to all users.
Recommended setting: MICROS users should not have authority to make updates to system control values.
In this chapter:
• Work with System Control Values Screen
• Create System Control Value Screen
• Change System Control Value Screen
• Display System Control Value Screen
• Work with System Control Values by Code Screen
• Display System Control Value History Screen
• Display All System Control Value History Screen
• Print System Control Value History Window
• System Control Value History Report
Work with System Control Values Screen
Purpose: Use this screen to create, change, delete, and display a system control value.
How to display this screen: Enter 8 next to an application area on the Work with System Values/Features Screen, available by entering WSYS in the Fast path field or by selecting Work with System Values/Features from a menu.
MSR0043 DISPLAY Work with System Control Values 12/05/03 12:20:36 EZK Mail Order
Application code . : A/R
Opt Grp Description-Value
Type options, press Enter. 2=Change 3=Copy 4=Delete 5=Display 8=View history
ALL A/R Aging 2 Column Heading - (31-90) ALL A/R Aging 3 Column Heading - (91-150) ALL A/R Aging 4 Column Heading - (151-210) ALL A/R Aging 5 Column Heading - (211-270) ALL A/R Aging 6 Column Heading - (271+) ALL A/R Aging 1 Days - (30) ALL A/R Aging 2 Days - (90) ALL A/R Aging 3 Days - (150) ALL A/R Aging 4 Days - (210) +
F3=Exit F6=Create F8=View history F12=Cancel F21=Print list F24=Select company |
Field |
Description |
Grp (Application group) |
The application group to which these system control values relate. Alphanumeric, 3 positions; optional. |
Description-Value |
A description of this system control value. Alphanumeric, 60 positions; optional. |
Screen Options |
Procedure |
Create a system control value |
Press F6 to advance to the Create System Control Value Screen. |
Change a system control value |
Enter 2 next to a system control value to advance to the Change System Control Value Screen. |
Copy a system control value |
Enter 3 next to a system control value to advance to the Copy Company Info Window. |
Delete a system control value |
Enter 4 next to a system control value to delete it. Note: You can delete a system control value only if you have created it. You cannot delete a system control value that was delivered with the system. |
Display a system control value and a detailed description (on-line help) of the system control value |
Enter 5 next to a system control value to advance to the Display System Control Value Screen. |
View the history of a system control value |
Enter 8 next to a system control value to advance to the Display System Control Value History Screen. Note: This option is not available for an “umbrella” system control value, that is, a value used to group other system control values; instead, the system displays an error message: Option not valid for Umbrella value. For example, you cannot select this option for Pricing Values (B31); instead, you can view history for any of the system control values available under the Pricing Values umbrella. The exception is Use PkMS Interface Values (F31); even though it serves as an umbrella value, you can also set this value separately. |
View the history of all system control values |
Press F8 to advance to the Display All System Control Value History Screen. |
Create System Control Value Screen
Purpose: Use this screen to create a system control value. Typically, you would create a system control value only if you were modifying the system and needed to add a control parameter as part of the modification.
Screen layout: Almost all of the system control value screens have common fields. These are:
• Application
• Application group
• Sequence #
• Description
• Narrative
How to display this screen: Press F6 at the Work with System Control Values Screen.
MSR0044 ENTER Create System Control Value 11/09/99 9:49:08 EZK Mail Order
Application . : G/L
Applic group . Value . . . . . Type . . . . . (NBR,QTY,Y/N,CDE,VAL,VNM,PCT,WGT,DTE) Sequence# . . . Description . . Narrative . . .
F3=Exit F12=Cancel |
Field |
Description |
Application (Application area) |
The application area (for example, Order Entry) to which this system control value belongs. Application areas are used to categorize similar control values, secured features, and menu options by functional area. Once an application area has been assigned to a control value, it cannot be changed. Alphanumeric, 3 positions; display-only. |
Applic group (Application group) |
The application group to which this system value relates. Application groups further define functions within an application area and are used to categorize similar control values, secured features, and menu options. Example: Within the Order Entry application area, examples of application groups may be freight and tax. The application group you enter is validated against the Application Group file. See Chapter 11: Setting Up Application Groups. Alphanumeric, 3 positions; required. |
Value |
A number that you assign to the system control value that identifies it to the system. This is an internal code that programs reference when checking a specific system control value. Once you have assigned this value, you cannot change it. The Value field is not shown in change or display mode. Alphanumeric, 3 positions; required. |
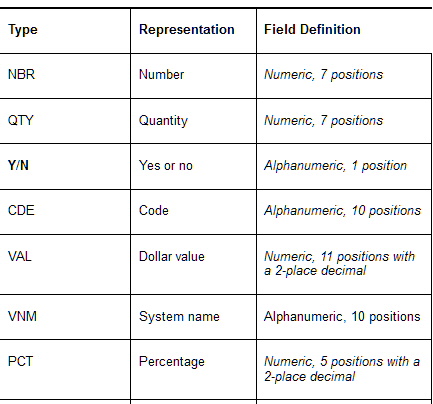
Type |
The type of parameter this system control value represents. The value you assign in the Type field describes whether an alphanumeric code, a number, percentage, or some other value will be required for the system control value. Example: If you create a control value that requires entry of a whole number, you must assign NBR and not Y/N. When you assign one of the Type values in this field, its representation will appear on Change and Display screens. Example: If you enter NBR as the type, Number will appear as the field (instead of Type) on the Change and Display screens. |
|
|
Sequence# |
The number you assign controls the order in which the control values display on the screen within the application group. Numeric, 5 positions; required. |
Description |
A description of this system control value that explains this control value and appears on all System Control Value screens. Alphanumeric, 60 positions; required. |
Narrative |
Free-form text that describes in detail this system control value. Alphanumeric, 2 lines, 120 positions; required. |
 Alphanumeric, 3 positions; required.
Change System Control Value Screen
To change: Enter 2 next to a system control value at the Work with System Control Values Screen to advance to the Change System Control Value screen. You cannot change the Description or Application fields. See Create System Control Value Screen for a description of these fields.
Note: The Value field from the Create System Control Value screen does not appear. To display the value (SCV code) that has been assigned to a system control value, use the Display System Control Value Screen. The Value field appears as the SCV code field on the Display screen.
The field that differs from the Create screen is the Code field. When this control value was created, the control value Type was CDE. Because of the control value type, you are required to enter an alphanumeric description (up to 10 characters) in this field. Each Change screen in this chapter contains a description of the value you are required to enter.
To copy: Enter 3 for any system control value at the Work with System Control Values Screen to advance to the Copy Company Info window.
Copy Company Info
Press ENTER to copy Company 27 information into Company
Or press F12 to cancel copy procedure. Or Press F15 to copy to All Companies.
F12=Cancel F15=All Companies |
Copy to one company: This window allows you to enter a code for the company to which you want to copy all system control values that do not already exist in the target company from the source company. Then press Enter. You receive a system message that the system control value has been created for the company code you entered in the pop-up window.
Copy to all companies: To copy system control values to all companies that you have defined, do not enter a company code, but press F15 to copy system control values to all companies.
Existing values: If you copy a system control value for which a value has already been defined, the system control value is copied to the target company with the value that was defined in the source company.
If you copy a system control value to a company that already contains the same system control value, you receive a message that the control value you wanted to copy already exists. It does not replace the existing system control value.
Companies are defined using the Setting Up Companies (WCMP) menu option.
Display System Control Value Screen
To display: Enter 5 for a system control value at the Work with System Control Values Screen to advance to the Display System Control Value screen.
Note: Help text appears only in Display mode.
Enter help text: Press F6 to make the Help text fields enterable.
Work with System Control Values by Code Screen
Purpose: This screen provides a different presentation of the system control values: it lists the entire set of system control values by their 3-position alphanumeric SCV code instead of by application area.
This screen allows you to scan by the system control value's description; you do not need to know which application area the system control value is in.
How to display this screen: Press F7 at the Work with System Values/Features Screen, available by entering WSYS in the Fast path field or by selecting Work with System Values/Features from a menu.
MSR0414 DISPLAY Work with SCV by Code 12/02/03 14:29:57 EZK Mail Order
Opt Cde Description-Value
Type options, press Enter. 2=Change 3=Copy 4=Delete 5=Display 8=View history
A01 Physical Inventory Entry Method - (TICKETS) A02 Inventory Transaction Batch Security - (N) A03 FIFO Flag - (Y) A04 Default Warehouse - (2) A05 Number of outstanding physicals - (106) A06 Cycle counting - (Y) A07 Assign batch numbers - () A08 Batch size - (0) A09 Physical File Generation Output - (TICKETS) A10 Freeze item during Physical Inventory - (Y) A11 Print On-hand quantity - (N) +
F3=Exit F6=Create F8=View history F12=Cancel F21=Print list F24=Select company |
Field |
Description |
|
(Code) |
The SCV code. Alphanumeric, 3 positions; optional. |
Description-Value |
The description of this system control value. Alphanumeric, 60 positions; optional. |
This screen includes the following options in addition to those at the Work with System Control Values Screen.
Option |
Procedure |
View the history of a system control value |
Enter 8 next to a system control value to advance to the Display System Control Value History Screen. Note: This option is not available for an “umbrella” system control value, that is, a value used to group other system control values; instead, the system displays an error message: Option not valid for Umbrella value. For example, you cannot select this option for Pricing Values (B31); instead, you can view history for any of the system control values available under the Pricing Values umbrella. The exception is Use PkMS Interface Values (F31); even though it serves as an umbrella value, you can also set this value separately. |
View the history of all system control values |
Press F8 to advance to the Display All System Control Value History Screen. |
Display System Control Value History Screen
Purpose: Use this screen to review the history of a particular system control value, including when it was created and each time a setting was changed.
History created when? The system creates a record in the System Control Value History file each time you:
• Add:
• create a new system control value by pressing F6 at the Work with System Control Values by Code Screen
• add a new system control value by applying a PTF upgrade (Note: A Change record is also created immediately afterward)
• copy system control values from one company to another
• Change:
• enter 2 next to a system control value to advance to the Change System Control Value Screen and then press Enter, regardless of whether you actually change any information. If you did not actually change the value, the Before and After values displayed at this screen are the same.
• use Working with FIFO Cost Conversion (WFCV) to change from or to FIFO costing
• add a new system control value by applying a PTF upgrade (Note: A Change record is created immediately after creating the Add record)
• Delete: enter 4 next to a system control value to delete it. You can review deleted system control values through the Display All System Control Value History Screen or the System Control Value History Report.
History not created when? There are no System Control Value History records for changes that you:
• made before upgrading to version 8.0 of CWDirect.
• make to a system control value by other means, such as updating the System Control file directly.
System control value history for PTF upgrades: When you create a new system control value through applying a PTF upgrade, the upgrade creates two system control value history records: an Add record and a Change record. The Add record has a Before value of blank or zero and an After value of your selected setting, and the Change record has the selected setting as both the Before and After values.
Entity-level overrides: You can set entity-level system control value overrides by entering 2 next to the value at the Work with Entity SCV Overrides Screen in Working with Entities (WENT). The system also uses the System Control Value History file to track these changes. Changes to entity-level values are displayed only through Working with Entities (WENT), while changes to the company-level System Control file are displayed only through Work with System Values/Features (WSYS); however, both types of changes are included in the System Control Value History Report.
Note: The Display System Control Value History screen is not available for entity-level system control value overrides; instead, you can press F8 at the Work with Entity SCV Overrides Screen to advance to the Display All System Control Value History Screen.
How to display this screen: Enter 8 next to a system control value at the Work with System Control Values by Code Screen or the Work with System Control Values Screen.
Note: This option is not available for an “umbrella” system control value, that is, a value used to group other system control values; instead, the system displays an error message: Option not valid for Umbrella value. For example, you cannot select this option for Pricing Values (B31); instead, you can view history for any of the system control values available under the Pricing Values umbrella by selecting them individually. The exception is Use PkMS Interface Values (F31); even though it serves as an umbrella value, you can also set this value separately.
MSR1424 DISPLAY Display System Control Value History 12/02/03 16:17:04 EZK Mail Order
Value code . : I05 Type . . . . : Y/N Description . : Sell Out Set if Component is Soldout
Action Date Time Before After User Change 12/02/03 16:16:59 Y EKAPLAN
F3=Exit F12=Cancel |
Field |
Description |
Value code |
The Cde you selected at the Work with System Control Values by Code Screen or the Work with System Control Values Screen. Alphanumeric, 3 positions; display-only. |
Type |
The type of system control value. Possible types are: • CDE: code • DTE: date • NBR: number • PCT: percentage • QTY: quantity • VAL: value • VNM: system name • WGT: weight • Y/N: yes/no value See the Create System Control Value Screen for a discussion of each type. Alphanumeric, 3 positions; display-only. |
Description |
The description of the system control value. Alphanumeric, 60 positions; display-only. |
Action |
The action taken for the system control value which created the System Control Value History record. Possible actions are: • Add = This type of record is created when you create a new system control value or copy system control values from one company to another. • Change = This type of record is created when you enter 2 next to a system control value to advance to the Change System Control Value Screen and then press Enter, regardless of whether you actually change any information. If you did not actually change the value, the Before and After values displayed at this screen are the same. It is also created when you use Work with FIFO Cost Conversion (WFCV) to change from or to FIFO costing or immediately after creating the Add record when you create a new system control value through a PTF upgrade • Delete = This type of record is created when you enter 4 next to a system control value. You should not delete system-supplied control values. Note: Records of deletions are displayed on the Display All System Control Value History Screen and on the System Control Value History report. Alphanumeric, 6 positions; display-only. |
Date |
The date when the action occurred. Numeric, 6 positions (MM/DD/YY format); display-only. |
Time |
The time when the action occurred. Numeric, 6 positions (HH:MM:SS format); display-only. |
Before |
The setting of the system control value before the action occurred. This field is blank for Add records. NBR and QTY types: numeric, 7 positions; display-only. Y/N types: alphanumeric, 1 position; display-only. CDE and VNM types: alphanumeric, 10 positions; display-only. VAL types: numeric, 11 positions with a 2-place decimal; display-only. PCT types: numeric, 5 positions with a 2-place decimal; display-only. WGT types: numeric, 7 positions with a 2-place decimal; display-only. DTE types: numeric, 6 positions; display-only. |
After |
The setting of the system control value after the action occurred. This value is the same as the Before setting: • if the user changed some other field, such as the Narrative, or simply pressed Enter after entering 2 next to a system control value • for a Delete history record or for an Add record (both blank or zero) • a Change record created immediately after an Add record when you add a new system control value by applying a PTF upgrade NBR and QTY types: numeric, 7 positions; display-only. Y/N types: alphanumeric, 1 position; display-only. CDE and VNM types: alphanumeric, 10 positions; display-only. VAL types: numeric, 11 positions with a 2-place decimal; display-only. PCT types: numeric, 5 positions with a 2-place decimal; display-only. WGT types: numeric, 7 positions with a 2-place decimal; display-only. DTE types: numeric, 6 positions; display-only. |
User |
The user ID of the person who performed the action. Alphanumeric, 10 positions; display-only. |
Display All System Control Value History Screen
Purpose: Use this screen to review history for all system control values, including those you have deleted.
How to display this screen: Press F8 at the Work with System Control Values by Code Screen or the Work with System Control Values Screen (for company-level system control values) or the Work with Entity SCV Overrides Screen (for entity-level system control value overrides).
If displayed for entity-level overrides: If you display this screen by pressing F8 at the Work with Entity SCV Overrides Screen, only changes made to the selected entity are included on the screen.
MSR1426 DISPLAY Display All System Control Value History 12/02/03 16:58:36 EZK Mail Order
Date Cde Action Time Before After User
11/11/03 F44 Use Streamlined Return Authorizations. Change 15:08:53 N Y EKAPLAN ------------------------------------------------------------------------------ 11/12/03 F44 Use Streamlined Return Authorizations. Change 8:44:44 Y N EKAPLAN ------------------------------------------------------------------------------ 11/12/03 F44 Use Streamlined Return Authorizations. Change 10:44:38 N Y EKAPLAN ------------------------------------------------------------------------------ 11/12/03 A71 Default version of Order Entry Change 11:04:40 HEADER HEADER/DTL EKAPLAN ---------------------------------------------------------------------------- +
F3=Exit F12=Cancel F21=Print list |
Field |
Description |
Date |
The date when the action occurred. You can enter a date to display changes that occurred on that date or later. Numeric, 6 positions (MM/DD/YY format); optional. |
Cde |
The code identifying the system control value. You can enter a complete code to display changes for that code only. Alphanumeric, 3 positions; optional. |
Description (unlabeled field to the right of the Cde) |
The description of the system control value. If the system control value has been deleted, the description displayed is SCV does not exist. Alphanumeric, 60 positions; display-only. |
Action |
The action taken to update the System Control file. Possible actions are: • Add = This type of record is created when you create a new system control value or copy system control values from one company to another • Change = This type of record is created when you enter 2 next to a system control value to advance to the Change System Control Value Screen (or similar screen for umbrella or entity-level values) and then press Enter, regardless of whether you actually change any information. If you did not actually change the value, the Before and After values displayed at this screen are the same. This type of record is also created when you use Work with FIFO Cost Conversion (WFCV) to change from or to FIFO costing or immediately after creating the Add record when you create a new system control value through a PTF upgrade • Delete = This type of record is created when you enter 4 next to a system control value. You should not delete system-supplied control values. Alphanumeric, 6 positions; display-only. |
Time |
The time when the action occurred. Numeric, 6 positions (HH:MM:SS format); display-only. |
Before |
The setting of the system control value before the action occurred. This field is blank for Add records. NBR and QTY types: numeric, 7 positions; display-only. Y/N types: alphanumeric, 1 position; display-only. CDE and VNM types: alphanumeric, 10 positions; display-only. VAL types: numeric, 11 positions with a 2-place decimal; display-only. PCT types: numeric, 5 positions with a 2-place decimal; display-only. WGT types: numeric, 7 positions with a 2-place decimal; display-only. DTE types: numeric, 6 positions; display-only. |
After |
The setting of the system control value after the action occurred. This value is the same as the Before setting: • if the user changed some other field, such as the Narrative, or simply pressed Enter after entering 2 next to a system control value • for a Delete history record or for an Add record (both blank or zero) • a Change record created immediately after an Add record when you add a new system control value by applying a PTF upgrade NBR and QTY types: numeric, 7 positions; display-only. Y/N types: alphanumeric, 1 position; display-only. CDE and VNM types: alphanumeric, 10 positions; display-only. VAL types: numeric, 11 positions with a 2-place decimal; display-only. PCT types: numeric, 5 positions with a 2-place decimal; display-only. WGT types: numeric, 7 positions with a 2-place decimal; display-only. DTE types: numeric, 6 positions; display-only. |
User |
The user ID of the person who performed the action. Alphanumeric, 10 positions; display-only. |
Option |
Procedure |
Print a report of all system control value activity for a selected period |
Press F21 to advance to the Print System Control Value History Window. |
Print System Control Value History Window
Purpose: Use this window to select the date range to include on the System Control Value History Report, and to generate the report. The report will include all system control value history that occurred in the specified date range, including any activity both at the company level and any changes to entity-level overrides made through the Work with Entity SCV Overrides Screen.
How to display this window: Press F21 at the Display All System Control Value History Screen.
Print System Control Value History
Starting date . . . . .
Ending date . . . . . .
F3=Exit F9=Submit F12=Cancel
|
Completing this screen:
1. Enter the Starting date and the Ending date to include on the report. The system verifies that your Ending date is not earlier than your Starting date, and that your Starting date is not in the future. Each date is a six-position numeric field in MMDDYY format.
2. Press F9 to submit the PRT_SCVHIS job, which generates the System Control Value History Report.
Note: If there are no System Control Value History records for the date range you enter, the PRT_SCVHIS job is deleted and no report is generated; the job does not produce an empty report. There might be no records if there were no updates to the System Control file for the selected period, or if the date range is before version 8.0 of CWDirect, which introduced the System Control Value History file, was applied.
| Part C: System Control Values and Number Assignments | Contents | SCVs | Search | Glossary | Reports | XML | Index | System Control Value History Report |

IN03_01 CWDirect 18.0 August 2015 OTN