Chapter 22: Setting Up Accounts Payable Values

Purpose: The Accounts Payable section of the System Control file defines parameters that control:
• Column headings for Accounts Payable screens and reports
• Purge criteria
• Aging categories
• Invoice processing
• Statement processing
For more information: For instructions and screen samples on how to create, change, delete, and copy a system control value, see Chapter 12: System Control File Components.
Section note: This section requires you to enter the column headings that appear on A/P screens and reports and the number of days duration for each A/P aging bucket. Although you are not required to complete values for all six aging categories, you must complete the values for each aging category you use, and for each corresponding value.
For example, if you complete A/P Aging 1 Column Heading (C22) through A/P Aging 4 Column Heading (C25), you must complete A/P Aging 1 Days (C28) through A/P Aging 4 Days (C31).
Quick Reference of Accounts Payable System Control Values
This table describes briefly each system control value for the Accounts Payable application area and lists the control value, a short definition, other control values to which you should refer in this section, if necessary, and a column where you can indicate the value that you assigned for your company.
If you are working with multiple companies, make a copy of this table for each company on your system.
Company: ______________________________
System Control Value |
Description |
Your Value |
Defines the number of days after the A/P check is reconciled or voided that it is purged from the system. |
Number: |
|
Defines the column heading for the first aging bucket. |
Code: |
|
Defines the column heading for the second aging bucket. |
Code: |
|
Defines the column heading for the third aging bucket. |
Code: |
|
Defines the column heading for the fourth aging bucket. |
Code: |
|
Defines the column heading for the fifth aging bucket. |
Code: |
|
Defines the column heading for the sixth aging bucket. |
Code: |
|
Defines the number of days duration of the first aging bucket. |
Number: |
|
Defines the number of days duration of the second aging bucket. |
Number: |
|
Defines the number of days duration of the third aging bucket. |
Number: |
|
Defines the number of days duration of the fourth aging bucket. |
Number: |
|
Defines the number of days duration of the fifth aging bucket. |
Number: |
|
Defines the number of days duration of the sixth aging bucket. |
Number: |
|
Defines whether you will age an A/P invoice by due date or invoice date. |
Code: |
|
Defines whether you will use preprinted checks or assign your own check numbers. |
Yes/No: |
|
Defines the program that prints A/P checks. |
Program: |
|
Defines the maximum number of vendor invoices that can be paid on a single A/P check. |
Number: |
|
Defines the General Ledger Account Number to be used for posting A/P Discounts. |
Number: |
|
Defines whether the system consolidates payment on vendor invoices to a single check, lists the invoices being paid on multiple check stubs, and voids the remaining checks. |
Yes/No: |
|
Defines whether you will match a vendor's invoice against the actual purchase order or drop ship pick slip on which merchandise was ordered or shipped. |
Yes/No: |
|
Defines the “To” warehouse to default for items on a vendor charge back. |
Number: |
|
Defines the "To" location to default for items on a vendor charge back. |
Code: |
|
Defines whether the vendor charge back number defaults as the A/P credit invoice number to use when processing a vendor charge back. |
Code: |
|
Defines whether the vendor charge back number defaults as the A/P invoice number to use when reversing a vendor charge back. |
Code: |
|
Defines whether the system processes a return to vendor inventory transaction for items with a "To" location when you process the A/P credit for a vendor charge back. |
Yes/No: |
|
Defines whether you enter A/P invoices in batch mode or have the invoices post to A/P immediately upon entry. |
Yes/No: |
|
Defines whether you can apply discounts to A/P invoice totals during A/P invoice entry when you are matching the invoice to a purchase order. |
Yes/No: |
|
Defines whether the Parent vendor number field is required on the Create and Change Vendor screens in Work with Vendors. |
Yes/No: |
|
Defines the system control values used in the A/P invoice upload interface. |
|
|
Defines the division to use when creating A/P invoices through the upload. |
Code: |
|
Defines the bank to use when creating A/P invoices through the upload. |
Code: |
|
A/P Invoice Upload Default Detail General Ledger Number (H72) |
Defines the default general ledger number when creating A/P invoices through the upload if the A/P Transaction record does not already have a general ledger number. |
Number: |
Defines the maximum percentage that an uploaded A/P invoice line can vary from the purchase order line unit quantity without causing the batch to be suspended. |
Number: |
|
Defines the maximum percentage that an uploaded A/P invoice line can vary from the purchase order line unit cost without causing the batch to be suspended. |
Number: |
|
Defines whether to use the A/P terms information from the uploaded invoice, rather than checking the purchase order or the vendor terms. |
Yes/No: |
|
Defines whether uploaded A/P invoices should be accepted automatically if they pass all thresholds and other edits. |
Yes/No: |
Purpose: Use this screen to define the number of days after a check has been voided or reconciled that it will be deleted.
MSR0054 OPEN Change System Control Value 2/10/97 15:26:38
Description . : A/P Files Purge Days
Number . . . .
Narrative . . .
Application . : A/P Applic group . M/E Sequence# . . . 1
F3=Exit F12=Cancel |
Number field: Enter the number of days after which a check has been voided or reconciled that it is eligible to be purged through the Purge A/P Checks/Invoices program.
For more information: See System Operations Chapter 64: Additional Purges.
A/P Aging 1 Column Heading (C22)
Purpose: Use this screen to define the column heading for the first aging bucket, which will print on screens and reports.
MSR0051 OPEN Change System Control Value 2/10/97 14:44:30
Description . : A/P Aging 1 Column Heading
Code . . . . .
Narrative . . .
Application . : A/P Applic group . ALL Sequence# . . . 1
F3=Exit F12=Cancel |
Code field: Enter the column heading for the first aging category, which will print on screens and reports. This column heading represents the number of days that an A/P account is past due for the first aging category. This is a 10-position, alphanumeric field.
If you enter a heading in this field, make sure you complete the system control value, A/P Aging 1 Days (C28).
A/P Aging 2 Column Heading (C23)
Purpose: Use this screen to define the column heading for the second aging bucket, which will print on screens and reports.
MSR0051 OPEN Change System Control Value 2/10/97 14:47:28
Description . : A/P Aging 2 Column Heading
Code . . . . .
Narrative . . .
Application . : A/P Applic group . ALL Sequence# . . . 2
F3=Exit F12=Cancel |
Code field: Enter the column heading for the second aging bucket, which will print on screens and reports. This column heading represents the number of days that an A/P account is past due for the second aging category. This is a 10-position, alphanumeric field.
If you enter a heading in this field, make sure you complete the system control value, A/P Aging 2 Days (C29).
A/P Aging 3 Column Heading (C24)
Purpose: Use this screen to define column heading for the third aging bucket, which will print on screens and reports.
MSR0051 OPEN Change System Control Value 2/10/97 14:56:40
Description . : A/P Aging 3 Column Heading
Code . . . . .
Narrative . . .
Application . : A/P Applic group . ALL Sequence# . . . 3
F3=Exit F12=Cancel |
Code field: Enter the column heading for the third aging bucket, which will print on screens and reports. This column heading represents the number of days since the invoice date that an A/P account is past due for the third aging category. This is a 10-position, alphanumeric field.
If you enter a heading in this field, make sure you complete the system control value, A/P Aging 3 Days (C30).
A/P Aging 4 Column Heading (C25)
Purpose: Use this screen to define the column heading for the fourth aging bucket, which will print on screens and reports.
MSR0051 OPEN Change System Control Value 2/10/97 15:03:43
Description . : A/P Aging 4 Column Heading
Code . . . . .
Narrative . . .
Application . : A/P Applic group . ALL Sequence# . . . 4
F3=Exit F12=Cancel |
Code field: Enter the column heading for the fourth aging bucket, which will print on screens and reports. This column heading represents the number of days that an A/P account is past due for the fourth aging category. This is a 10-position, alphanumeric field.
If you enter a heading in this field, make sure you complete the system control value, A/P Aging 4 Days (C31).
A/P Aging 5 Column Heading (C26)
Purpose: Use this screen to define the column heading for the fifth aging bucket, which will print on screens and reports.
MSR0051 OPEN Change System Control Value 2/10/97 15:05:26
Description . : A/P Aging 5 Column Heading
Code . . . . .
Narrative . . .
Application . : A/P Applic group . ALL Sequence# . . . 5
F3=Exit F12=Cancel |
Code field: Enter the column heading for the fifth aging bucket, which will print on screens and reports. This column heading represents the number of days that an A/P account is past due for the fifth aging category. This is a 10-position, alphanumeric field.
If you enter a heading in this field, make sure you complete the system control value, A/P Aging 5 Days (C32).
A/P Aging 6 Column Heading (C27)
Purpose: Use this screen to define the column heading for the sixth aging bucket, which will print on screens and reports.
MSR0051 OPEN Change System Control Value 2/10/97 15:07:11
Description . : A/P Aging 6 Column Heading
Code . . . . .
Narrative . . .
Application . : A/P Applic group . ALL Sequence# . . . 6
F3=Exit F12=Cancel |
Code field: Enter the column heading for the sixth aging bucket, which will print on screens and reports. This column heading represents the number of days that an A/P account is past due for the sixth aging category. This is a 10-position, alphanumeric field.
If you enter a heading in this field, make sure you complete the system control value, A/P Aging 6 Days (C33).
Purpose: Use this screen to define the number of days duration of the first aging bucket.
MSR0054 OPEN Change System Control Value 2/10/97 15:09:16
Description . : A/P Aging 1 Days
Number . . . .
Narrative . . .
Application . : A/P Applic group . ALL Sequence# . . . 1
F3=Exit F12=Cancel |
Number field: Enter the number of days since the invoice date or the invoice due date that an A/P account will be considered past due for the first aging category. This is a 7-position, numeric field.
Whether you will age accounts by due date or invoice date is defined in the system control value, A/P Age by Date Type (C50).
If you enter a number in this field, make sure you complete the system control value, A/P Aging 1 Column Heading (C22).
Purpose: Use this screen to define the number of days duration of the second aging bucket.
MSR0054 OPEN Change System Control Value 2/10/97 15:12:40
Description . : A/P Aging 2 Days
Number . . . .
Narrative . . .
Application . : A/P Applic group . ALL Sequence# . . . 2
F3=Exit F12=Cancel |
Number field: Enter the number of days since the invoice date or the invoice due date that an A/P account will be considered past due for the second aging category. This is a 7-position, numeric field.
Whether you will age accounts by due date or invoice date is defined in the system control value, A/P Age by Date Type (C50).
If you enter a number in this field, make sure you complete the system control value, A/P Aging 2 Column Heading (C23).
Purpose: Use this screen to define the number of days duration of the third aging bucket.
MSR0054 OPEN Change System Control Value 2/10/97 15:14:27
Description . : A/P Aging 3 Days
Number . . . .
Narrative . . .
Application . : A/P Applic group . ALL Sequence# . . . 3
F3=Exit F12=Cancel |
Number field: Enter the number of days since the invoice date or the invoice due date that an A/P account will be considered past due for the third aging category. This is a 7-position numeric field.
Whether you will age accounts by due date or invoice date is defined in the system control value, A/P Age by Date Type (C50).
If you enter a number in this field, make sure you complete the system control value, A/P Aging 3 Column Heading (C24).
Purpose: Use this screen to define the number of days duration of the fourth aging bucket.
MSR0054 OPEN Change System Control Value 2/10/97 15:16:20
Description . : A/P Aging 4 Days
Number . . . .
Narrative . . .
Application . : A/P Applic group . ALL Sequence# . . . 4
F3=Exit F12=Cancel |
Number field: Enter the number of days since the invoice date or the invoice due date that an A/P account will be considered past due for the fourth aging category. This is a 7-position numeric field.
Whether you will age accounts by due date or invoice date is defined in the system control value, A/P Age by Date Type (C50).
If you enter a number in this field, make sure you complete the system control value, A/P Aging 4 Column Heading (C25).
Purpose: Use this screen to define the number of days duration of the fifth aging bucket.
MSR0054 OPEN Change System Control Value 2/10/97 15:18:24
Description . : A/P Aging 5 Days
Number . . . .
Narrative . . .
Application . : A/P Applic group . ALL Sequence# . . . 5
F3=Exit F12=Cancel |
Number field: Enter the number of days since the invoice date or invoice due date that an A/P account will be considered past due for the fifth aging category. This is a 7-position numeric field.
Whether you will age accounts by due date or invoice date is defined in the system control value, A/P Age by Date Type (C50).
If you enter a number in this field, make sure you complete the system control value, A/P Aging 5 Column Heading (C26).
Purpose: Use this screen to define the number of days duration of the sixth aging bucket.
MSR0054 OPEN Change System Control Value 2/10/97 15:22:49
Description . : A/P Aging 6 Days
Number . . . .
Narrative . . .
Application . : A/P Applic group . ALL Sequence# . . . 6
F3=Exit F12=Cancel |
Number field: Enter the number of days since the invoice date or invoice due date that an A/P account will be considered past due for the sixth aging category. This is a 7-position numeric field.
Whether you will age accounts by due date or invoice date is defined in the system control value, A/P Age by Date Type (C50).
If you enter a number in this field, make sure you complete the system control value, A/P Aging 6 Column Heading (C27).
Purpose: Use this screen to define whether A/P invoices will age by the invoice due date or the invoice date.
MSR0051 OPEN Change System Control Value 2/23/97 17:04:54
Description . : A/P Age by Date Type
Code . . . . . DUE DUE INVOICE
Narrative . . .
Application . : A/P Applic group . ALL Sequence# . . . 100
F3=Exit F12=Cancel |
Code field: Enter the code that will indicate which date will be used when aging open A/P invoices. Values are:
• DUE (Due date)
• INVOICE (Invoice date)
The value you specify here is used to evaluate which aging buckets should be updated in the Vendor record, based on the open invoices for the vendor. The system updates the appropriate aging buckets in the Vendor Extended record, based on the number of days defined in the A/P Aging Days 1-6 fields in the System Control file.
Purpose: Use this screen to define whether you use preprinted (and pre-numbered) A/P checks.
MSR0052 OPEN Change System Control Value 2/23/97 17:06:47
Description . : Use Preprinted Checks
Yes/No . . . . Y (Y,N) Narrative . . .
Application . : A/P Applic group . ALL Sequence# . . . 100
F3=Exit F12=Cancel |
Yes/No field: If you enter Y in this field, you will not be prompted to enter a check number for A/P checks during the A/P Check Generation program (or if you enter a direct disbursement).
If you enter N, you will be prompted to enter the starting check number when printing A/P checks during the A/P Check Generation program. The system keeps track of the most current check number and displays this value for your information.
For more information: See Accounts Payable Part C: Generating A/P Checks.
A/P Check Printing Program (C52)
Purpose: Use this screen to define the name of the program that prints A/P checks to pay your vendors for purchases.
MSR0053 OPEN Change System Control Value 2/23/97 17:08:37
Description . : A/P Check Printing Program
System name . . ACR0193 Narrative . . .
Application . : A/P Applic group . ALL Sequence# . . . 100
F3=Exit F12=Cancel |
Code field: Enter the name of the program that prints A/P checks. This is a 10-position, alphanumeric field. The base print program is ACR0196.
For more information: See Accounts Payable Part D: Working with A/P Checks.
Max # of Invoices on a Check (C53)
Purpose: Use this screen to define the maximum number of vendor invoices that can be included on a single A/P check.
MSR0054 OPEN Change System Control Value 2/10/97 15:26:38
Description . : Max # of invoices on a check
Number . . . .
Narrative . . .
Application . : A/P Applic group . M/E Sequence# . . . 1
F3=Exit F12=Cancel |
Number field: Enter the number of vendor invoices that can be included on a single A/P check. Regardless of the setting of this value, the system supports including up to 10 invoices, and will generate additional check(s) if the number of invoices eligible to be paid is greater than this value. If this system control value is blank, the system includes up to 10 invoices per check.
For more information: See Accounts Payable Part D: Working with A/P Checks.
A/P Discount General Ledger Account # (C55)
Purpose: Use this screen to define the General Ledger account number to be used for posting A/P discounts.
MSR0054 OPEN Change System Control Value 2/10/97 15:05:01
Description . : A/P Discount General Ledger Account #
Number . . . .
Narrative . . .
Application . : A/P Applic group . ALL Sequence# . . . 1
F3=Exit F12=Cancel |
Number field: Enter the General Ledger account number to which discounts taken on vendor invoices will post automatically.
General Ledger account numbers are defined in and validated against the General Ledger Account file.
For more information:
• Accounts Payable Chapter 40: General Ledger Overview
• Accounts Payable Part B: Entering A/P Invoices
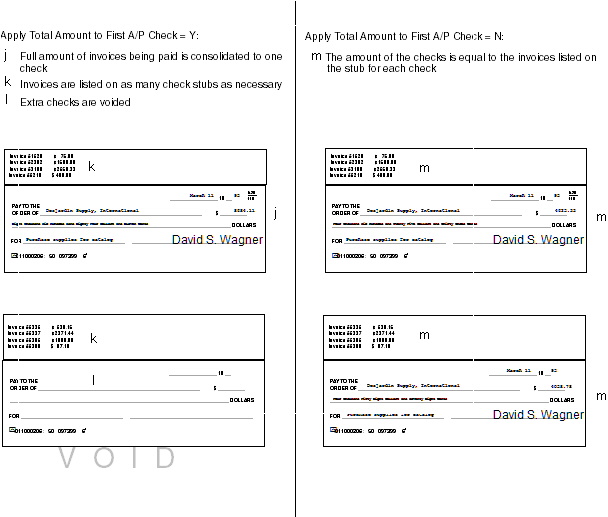
Apply Total Amount to First A/P Check (D18)
Purpose: Use this screen to define whether the system should:
• consolidate payment for multiple vendor invoices into a single check,
• list each invoice being paid on each check stub
• void the additional checks
MSR0052 OPEN Change System Control Value 2/10/97 16:27:53
Description . : Apply total amount to first A/P Check
Yes/No . . . . (Y,N) Narrative . . .
Application . : A/P Applic group . ALL Sequence# . . . 101
F3=Exit F12=Cancel |
Yes/No field: Enter Y in this field to print the entire amount being paid to the vendor on the first check, list each invoice being paid on the check stubs, and void all checks but the first.
Enter N to print the amount being paid to the vendor on each check and print the corresponding invoice numbers on each check stub.
Note: The number of invoices that you can pay off on a single check is controlled by the value in the Max # of Invoices on a Check (C53) system control value.
Examples: These two examples show how the system prints A/P checks based on entering a Y or N value in this field in the System Control file.
Conditions: You are paying off 8 invoices received from the vendor and you can include up to 4 invoices on a check.
For more information: See Accounts Payable Part D: Working with A/P Checks.
Use Purchase Order/Drop Ship Matching (D21)
Purpose: Use this screen to identify whether to match vendor invoices against:
• the purchase order on which the merchandise was ordered, or
• the drop ship pick slip on which the merchandise was shipped to the customer by the vendor
MSR0052 OPEN Change System Control Value 2/10/97 15:14:58
Description . : Use Purchase Order/Drop Ship Matching in A/P?
Yes/No . . . . (Y,N) Narrative . . .
Application . : A/P Applic group . ALL Sequence# . . . 100
F3=Exit F12=Cancel |
Yes/No field: If you enter Y in this field, the system automatically retains vendor, item, unit and cost information for the items ordered on each purchase order or drop ship pick. This enables you to associate items ordered or shipped against the vendor's invoice.
If you enter N or leave this field blank, the system does not capture this information.
This field must be set to Y if you are using the A/P invoice upload interface. See A/P Invoice Upload Values (H69).
For more information: See Accounts Payable Part B: Entering A/P Invoices.
VCB Default "To" Warehouse (D86)
Purpose: Use this screen to define the warehouse code that defaults at the Vendor Charge Back Detail screen.
MSR0054 CHANGE Change System Control Value 2/12/97 14:06:29
Description . : VCB Default "To" Warehouse
Number . . . . 001 002 003 004 005 006 007 010 011 012 050 Narrative . . .
Application . : A/P Applic group . ALL Sequence# . . . 100
F3=Exit F12=Cancel |
Number field: Enter the number representing the warehouse to default on the Vendor Charge Back Detail Screen (Create A Vendor Charge Back). The “To” warehouse is the warehouse where the inventory will be transferred when you process the charge back. If you do not specify a “To” warehouse and location, the system will perform a return to vendor (V) rather than a transfer (T) inventory transaction when you process the charge back.
The warehouse number is a 3-position, numeric code, defined in and validated against the Warehouse file; see Warehousing Chapter 41: Creating and Maintaining Warehouses (WWHS).
Leave this field blank if you do not want a warehouse code to default at the Vendor Charge Back Detail screen.
VCB Default "To" Location (D87)
Purpose: Use this screen to define the location code that defaults at the Vendor Charge Back Detail screen.
MSR0051 CHANGE Change System Control Value 2/12/97 14:18:07
Description . : VCB Default "To" Bin Location
Code . . . . .
Narrative . . .
Application . : A/P Applic group . ALL Sequence# . . . 101
F3=Exit F12=Cancel |
Code field: Enter the code representing the “To” location you want to default on the Vendor Charge Back Detail Screen (Create A Vendor Charge Back). The “To” location is the location where the inventory will be transferred when you process the charge back. If you do not specify a “To” warehouse and location, the system will perform a return to vendor (V) rather than a transfer (T) inventory transaction when you process the charge back. You can override the default “To” location at the Vendor Charge Back Detail screen.
The location code is a 7-position, alphanumeric code, defined in and validated against the Location file; see Chapter 43: Creating and Maintaining Locations (WLOC).
Leave this field blank if you do not want a location code to default.
VCB A/P Invoice Number Default Method (E34)
Purpose: Use this screen to define whether the A/P credit invoice number defaults based on the vendor charge back number when you process a charge back.
MSR0051 CHANGE Change System Control Value 2/12/97 14:27:21
Description . : VCB A/P invoice number default method
Code . . . . . VCBNUM
Narrative . . .
Application . : A/P Applic group . ALL Sequence# . . . 999
F3=Exit F12=Cancel |
Code field: Enter VCBNUM in this field if you want the vendor charge back number to default into the A/P Invoice # field when you process a vendor charge back. The A/P invoice number is an 11-position, alphanumeric field.
The number will have the letters CR appended to indicate that this is a credit invoice; for example, if the vendor charge back number is 4444, the default invoice number will be 000004444CR.
The A/P invoice number field appears in the pop-up window that displays when you press F9 to process an open vendor charge back.
You can override the default invoice number. This is a required field if you enter Y in the Process A/P field at this window; if you enter N, the system ignores the invoice number.
Leave this field blank if you do not want to default the vendor charge back number into the A/P invoice number field when you process the A/P credit on a vendor charge back.
VCB Reverse A/P Invoice Number Default Method (E35)
Purpose: Use this screen to define whether the A/P invoice number defaults based on the vendor charge back number when you reverse a charge back.
MSR0051 CHANGE Change System Control Value 2/12/97 14:27:21
Description . : VCB reverse A/P invoice number default method
Code . . . . . VCBNUM
Narrative . . .
Application . : A/P Applic group . ALL Sequence# . . . 999
F3=Exit F12=Cancel |
Code field: Enter VCBNUM in this field if you want the vendor charge back number to default into the Reversal invoice number field when you reverse a vendor charge back. The invoice number is an 11-position, alphanumeric field.
The number will have the letters DR appended; for example, if the vendor charge back number is 4444, the default invoice number will be 000004444DR.
The Reversal invoice number field appears in the Reverse Vendor Charge Back Window that displays when you press F21 to reverse a processed or shipped vendor charge back.
You can override the default invoice number at this window. This is a required field.
Leave this field blank if you do not want to default the vendor charge back number into the Reversal invoice number field when you reverse a vendor charge back.
VCB Perform Inventory Write Off During A/P Posting (E36)
Purpose: Use this screen to define whether the system adjusts merchandise out of inventory if you specify a "To" location for a vendor charge back.
MSR0052 CHANGE Change System Control Value 2/12/97 14:53:25
Description . : VCB Perform inventory write off during A/P posting
Yes/No . . . . (Y,N) Narrative . . .
Application . : A/P Applic group . ALL Sequence# . . . 999
F3=Exit F12=Cancel |
Yes/No field: Enter Y in this field if you want to the system to adjust merchandise out of inventory for items on a vendor charge back that have a “To” location. The fact that you specify a “To” location means that the system performs a transfer (T) when you process the inventory transaction for the vendor charge back. The adjustment takes place when you process the A/P credit associated with the vendor charge back. The system will perform a V (return to vendor) transaction for the items on the charge back in the “To” location. If you later reverse the charge back, the system processes a reversal of the V transaction, which adjusts the inventory back up in the “To” location.
Enter N in this field or leave it blank if you want the system to leave the merchandise in the “To” location when you process the A/P credit. You will need to use the Work with Inventory Transactions function to adjust the inventory out of the “To” location. If you later reverse the charge back, the system processes a reversal of the V transaction, which adjusts the inventory back up in the item's original location (the “From” location you selected at the Vendor Charge Back Detail screen).
If you do not specify a "To" location when you process a vendor charge back, the system never performs a transfer (T) for the merchandise; it simply processes a return to vendor (V) transaction out of the item's original location when you process the vendor charge back. If you later reverse the charge back, the system processes a reversal of the V transaction, which adjusts the inventory back up in the item's original location.
The different ways in which the system can handle the inventory transactions for vendor charge backs, depending on the presence of a "To" location and the setting of this system control value, are described in this table.
VCB Perform Inventory Write Off During A/P Posting Setting |
"To" Location Specified? |
Inventory Transactions when you Process Inventory |
Inventory Transactions when you Process the A/P Credit |
Inventory Transactions when you Reverse the Charge Back |
N |
Yes |
T (transfer) out of original location and into "To" location |
none |
V (return to vendor) into the original location -- on-hand increases |
Y |
Yes |
T out of original location and into "To" location |
V out of "To" location -- on-hand decreases |
V into the "To" location -- on-hand increases |
N or Y |
No |
V out of original location -- on-hand decreases |
none |
V into the original location -- on-hand increases |
If the system control value is set to N, and you specify a “To” location, you will need to adjust the inventory down at the “To” location outside of the vendor charge back process. |
||||
For more information: See Accounts Payable Chapter 35: Working with Vendor Charge Backs (WVCB).
Batch Entry of A/P Invoices (F02)
Purpose: Use this screen to define whether you enter A/P invoices in batch mode or with immediate update to A/P.
MSR0052 CHANGE Change System Control Value 1/14/98 12:01:19
Description . : Batch Entry of A/P Invoices
Yes/No . . . . Y (Y,N) Narrative . . .
Application . : A/P Applic group . ALL Sequence# . . . 99
F3=Exit F12=Cancel |
Yes/no field: Enter Y in this field if you want to use batch entry of A/P invoices. You might prefer to use batching to increase the accuracy and controls of A/P invoice entry.
If you set this field to Y:
• The initial Enter A/P Invoices screen that displays when you select A/P Invoice Entry (fast path = MAPE) requires you to enter totals to use as batch controls.
• Each invoice you enter will be in suspended (S) status until you accept or reject the batch it belongs to. Suspended invoices are not available for check generation, do not appear on most reports (except those that specifically include suspended invoices), and do not post to A/P until you accept the batch. If you are matching a purchase order receipt to a suspended invoice, the item(s) on the purchase order will not be available for matching to another invoice until you accept or reject the batch. Only upon acceptance will the invoices go to open (O) or held (H) status.
• You have access to additional screens that allow you to work with and review batches and suspended invoices within batches.
Set this field to N or leave it blank to enter invoices and have them update interactively. The Enter A/P Invoices screen will not require batch controls, and you will not have access to the batch-related fields in A/P entry. Also, each invoice you enter will go directly to open (O) or held (H) status.
This field must be set to Y if you are using the A/P invoice upload interface. See A/P Invoice Upload Values (H69).
For more information:
• screens you use to enter A/P invoices: Accounts Payable Chapter 13: Working with A/P Invoice Entry (MAPE)
• secured features that control working with A/P batches: Chapter 29: Setting Up Secured Features
Enter Gross A/P Invoice Amount (F03)
Purpose: Use this screen to define whether you can apply or change the discount percentages that apply to A/P invoice totals.
MSR0052 CHANGE Change System Control Value 1/14/98 12:31:23
Description . : Enter Gross A/P Invoice Amount
Yes/No . . . . Y (Y,N) Narrative . . .
Application . : A/P Applic group . ALL Sequence# . . . 99
F3=Exit F12=Cancel |
Yes/no field: Enter Y in this field if you want to enter the gross invoice total in A/P invoice entry and have the system calculate the net total by applying any discount percentages. The gross invoice total will be a required field in A/P invoice entry, and the merchandise total will be a display-only field that the system calculates.
Note: Gross invoice amount entry applies only when you are matching the A/P invoice to a purchase order receipt.
When you select a purchase order for matching in A/P invoice entry, the discount percentages from the purchase order, if any, default onto the invoice header. You can accept the defaults or change them.
Similarly, you can override the discount percentages that apply to each item on the invoice, either separately or against all items at once. Updating the discounts for the invoice header does not update any of the discounts at the item level.
Matching totals: To accept and process an A/P invoice, the invoice total and the total cost of all included items and other charges must match. This matching may be difficult to do when you enter the gross invoice amount and have the system calculate discount amounts if situations such as:
• Override discounts at the item level: If the discount(s) that apply to all of the items on the invoice are not the same, it may be difficult to match the invoice and item totals. For example, if you enter an invoice total of $100.00 with a 10% discount, the system calculates a merchandise total of $90.00. Unless each item on the invoice is also using a 10% discount, the total cost of included items may not match the $90.00 total.
• Unit discounts: You cannot have the system calculate unit discounts at the invoice level.
• Price overrides: If you override the item cost on a purchase order, the default discounts may not apply automatically to that price (this is controlled by the Apply Discount to Manual Cost (D96) system control value). In this case, it will be somewhat more difficult to identify the items that have not take the discount and adjust them so that the invoice totals match.
• Foreign currency: Using A/P invoice discounts is not currently implemented for foreign currencies.
When you are entering an A/P invoice whose totals do not match “easily,” you can simply enter the merchandise total in the Gross merchandise field and clear each of the discount percentage fields; in this way, you force the totals to match. However, if you often process invoices that present these exceptions, it may be easier for you to set the Enter gross A/P invoice amount system control value to N.
Set this field to N or leave it blank if you want to enter the net total merchandise amount in A/P entry. You will not be able to apply discounts to the A/P total. Also, you will not be able to update the discounts for all items on the invoice at once, although you will still be able to work with discounts for one item at a time.
For more information: See Accounts Payable Chapter 13: Working with A/P Invoice Entry (MAPE).
Require Entry of Parent Vendor (G31)
Purpose: Use this screen to define whether the Parent vendor number field is required on the Create and Change Vendor screens in Work with Vendors.
MSR0052 CHANGE Change System Control Value 1/27/00 10:16:15
Description . : Require Entry of Parent Vendor (Y/N)
Yes/No . . . . (Y,N) Narrative . . .
Application . : A/P Applic group . ALL Sequence# . . . 10
F3=Exit F12=Cancel |
Yes/No field: Enter Y in this field if you want the Parent vendor field on the Create and Change Vendor screens in Work with Vendors to be a required field.
An error message displays if you press Enter on the Create or Change Vendor screen and the Parent vendor number field is blank:
Parent Vendor number is required.
Parent vendors are companies made up of different vendors who supply you with merchandise or services. You may define a vendor as a parent vendor if you wish to pay the main (parent) vendor for the merchandise you received from each subsidiary (child) vendor.
Example: Vendors 101, 102, and 103 all report to vendor 10123. Instead of paying vendors 101, 102, and 103 separately for the merchandise you received, you can pay vendor 10123 for all of the merchandise you received from each of the subsidiary vendors.
Enter N or leave this field blank if you do not want the Parent vendor number field on the Create and Change Vendor screens in Work with Vendors to be a required field.
A/P Invoice Upload Values (H69)
Purpose: Use this screen to specify how to handle invoices uploaded from CWCollaborate.
MSR1280 ENTER Edit A/P Invoice Upload Values 4/26/02 12:40:40 EZK Mail Order
Default division . . . . . . Default bank . . . . . . . . Default detail GL# . . . . . Unit variance percent . . . . Cost variance percent . . . . Use uploaded terms code . . . (Y,N) Auto accept batches . . . . . (Y,N)
F3=Exit F12=Cancel |
This screen includes the following values which control how the system handles uploaded invoices. You should use this screen to set these values, rather than selecting each system control value individually.
Your changes to the following values take effect only after you have stopped and restarted the CDC job in WMS Background Jobs (WPBJ).
Additional required system control values: In addition to the following fields, you must also set these system control values to Y to use the A/P invoice interface to create invoices:
• Use Purchase Order/Drop Ship Matching (D21)
• Batch Entry of A/P Invoices (F02)
See Working with A/P Invoice Upload Errors (WAPU) for an overview of the A/P invoice upload process.
A/P Invoice Upload Division (H70)
The system uses this division for invoices you create through the invoice upload from CWCollaborate. This division corresponds to the Division field at the Enter A/P Invoices Screen (When Using Batching). Your entry is validated against the Division file.
This value is required if you are using the A/P invoice interface to create invoices.
The system uses this bank for invoices you create through the invoice upload from CWCollaborate. This bank corresponds to the Bank field at the Enter A/P Invoices Screen (When Using Batching). Your entry is validated against the Bank file.
This value is required if you are using the A/P invoice interface to create invoices.
A/P Invoice Upload Default Detail General Ledger Number (H72)
The system uses this general ledger number when creating an A/P invoice detail line for any detail line that does not have a matching A/P Transaction record with a general ledger number. The A/P Transaction record normally gets its general ledger number from the purchase order detail line; the purchase order detail line gets its general ledger number from the R inventory transaction code, if the Default Receipt General Ledger Number (D95) system control value is set to Y.
This value is required if you are using the A/P invoice interface to create invoices, unless the general ledger number will always default from the purchase order detail line.
A/P Invoice Upload Unit Variance Percent (H74)
Indicates the percentage by which the units on an uploaded invoice detail line can exceed or fall short of the unit quantity on the matching A/P Transaction record without preventing the batch from processing automatically, if the A/P Invoice Upload Auto Accept Batch (H73) system control value is set to Y.
Example: |
If the uploaded invoice detail quantity is: |
variance percent = 10.00% A/P transaction quantity = 10 |
11: Exceeds the transaction quantity by 10%. It does not breach the variance percentage and will not prevent the batch from processing automatically. |
|
12: Exceeds the transaction quantity by 20%. It breaches the variance percentage, and the batch will be suspended. |
|
8: Falls short of the transaction quantity by 20%. It breaches the variance percentage, and the batch will be suspended. |
Credit invoices are not evaluated for invoice variance.
This is a five-position numeric field with two decimal places.
Leave this field blank if:
• you are not using the invoice upload, or
• you want all invoice detail quantities that do not match the A/P transaction quantity exactly to prevent the batch from processing automatically, or
• the A/P Invoice Upload Auto Accept Batch (H73) field is set to set to N or is blank.
A/P Invoice Upload Cost Variance Percent (H75)
Indicates the percentage by which the cost of an uploaded invoice detail line can exceed or fall short of the unit cost on the matching A/P Transaction record without preventing the batch from processing automatically, if the A/P Invoice Upload Auto Accept Batch (H73) system control value is set to Y.
Example: |
If the uploaded invoice detail cost is: |
variance percent = 10.00% A/P transaction cost = 10.00 |
11.00: Exceeds the transaction cost by 10%. It does not breach the variance percentage and will not prevent the batch from processing automatically. |
|
12.00: Exceeds the transaction cost by 20%. It breaches the variance percentage, and the batch will be suspended. |
|
8.00: Falls short of the transaction cost by 20%. It breaches the variance percentage, and the batch will be suspended. |
Credit invoices are not evaluated for invoice variance.
This is a five-position numeric field with two decimal places.
Leave this field blank if:
• you are not using the invoice upload, or
• you want all invoice detail quantities that do not match the A/P transaction quantity exactly to prevent the batch from processing automatically, or
• the A/P Invoice Upload Auto Accept Batch (H73) field is set to set to N or is blank.
A/P Invoice Upload Terms Code Usage (H76)
Set this field to Y to have the system uses the A/P terms information included in the invoice upload when creating the A/P invoice; otherwise, set this field to N or leave it blank to have the system check the purchase order for A/P terms information. Selecting the Terms Code for an overview of how the system determines which terms code to use on an uploaded invoice.
A/P Invoice Upload Auto Accept Batch (H73)
Indicates whether the system should automatically accept and process A/P invoice batches if all required information is available and the invoices do not breach the A/P Invoice Upload Unit Variance Percent (H74) or the A/P Invoice Upload Cost Variance Percent (H75).
If this field is set to Y, the system accepts batches automatically if they include all required information and do not breach either of the variances or any dollar limits specified for additional charges; however, any batches that do not meet these criteria will be suspended.
If this field is set to N or is blank, the system suspends all batches without checking whether the variances and dollar limits have been breached.
You use A/P entry to review and approve suspended batches. See Enter A/P Invoices Screen (When Using Batching) for more information.
| Chapter 21: Setting Up Forecasting Values | Contents | SCVs | Search | Glossary | Reports | XML | Index | Chapter 23: Setting Up the Number Assignment File (WNUM) |

IN03_11 CWDirect 18.0 August 2015 OTN