4 Deploying Oracle Software on Oracle Database Appliance

Complete these tasks to deploy the Oracle Database Appliance software.

About Deploying Oracle Database Appliance

Review this information to understand the available deployment options and requirements.

Deploying a new Oracle Database Appliance requires a direct connection to the system to configure the Oracle Integrated Lights Out Manager (ILOM) and the first network. To complete the first part of the deployment, you can either connect a monitor and keyboard to the system or connect a laptop to the serial port. If you use the serial port, ensure that the baud rate speeds match. After the first network is configured, you can perform the remaining deployment steps on the Oracle Database Appliance system or from a remote system.

The procedure to deploy software consists of the following steps:

  1. Copy the Oracle Database Appliance GI and DB software that you downloaded earlier.

  2. Update the repository with Oracle Database Appliance GI and DB software.

  3. Deploy your configuration.

The steps to deploy your Oracle Database Appliance configuration vary, depending on the type of platform and whether you want to deploy a bare metal platform or a virtualized platform:

  • Oracle Database Appliance X7-2S and X7-2M are single node systems that you deploy as a bare metal platform.

  • Oracle Database Appliance X7-2-HA is a multi-node system with the option to deploy as a bare metal platform or a virtualized platform.

Deploying Oracle Database Appliance software requires approximately 1 hour to complete.

About Deploying a Bare Metal Platform

The Web Console is the preferred method of deploying your bare metal platform configuration. The Web Console provides all of the fields necessary to provision Oracle Database Appliance, including configuring the system, network, database, and Oracle Auto Service Request (Oracle ASR). If you prefer to use the command-line interface, you must create a JSON file to configure the deployment options.

At a high level, you will complete the following configuration steps in the Web Console to deploy Oracle Database Appliance:

  1. Configure the system

  2. Configure the client access network

  3. Configure an Oracle ILOM network

  4. (Optional) Configure a database

  5. (Optional) Configure Oracle ASR

Copying the Oracle Database Appliance GI and DB Software

Copy the software bundle to the system and update the repository to the latest version before deploying the appliance.

You must copy the GI and DB software to the Oracle Database Appliance.

Copy the file using a Secure Copy (scp) or Secure File Transfer Protocol (sftp) protocol. To use scp or sftp, you must first set up a static IP address (for example, oda_host) and configure Oracle Database Appliance with that address by using the configure-firstnet command. This command ensures the system is available in your network, enabling you to use the Oracle Appliance Manager Web Console to deploy Oracle Database Appliance.

Alternatively, you can use a USB storage device. To use a USB drive to transfer the files, you must format it first as FAT32, ext3, or ext4. NTFS file formats are not supported.

Before running the command odacli update-repository, ensure that your appliance has the latest version of the dcs-agent and that the initial network connection is configured.

  1. Download the software files from My Oracle Support to a temporary location on an external client.
    1. Unzip the files.
    2. If the files are split into more than one zip file, then concatenate the two zip files into a single zip file.
  2. Copy the GI and DB software from the external client to Oracle Database Appliance. Use the scp or sftp protocol to copy the bundle.

    oda-sm-release number -date-GI-12.1.0.2.zip to root@oda_host

    oda-sm-release number -date–DB.zip to root@oda_host

    For example, if you use the scp command, then enter a command similar to the following, where the temporary host address is oda_host, the release number is 12.2.1.1.0, and you are copying the bundle to /tmp:

    scp oda-sm-release number -date-GI-12.1.0.2.zip root@oda_host:/tmp

    scp oda-sm-release number -date-DB-12.1.0.2.zip root@oda_host:/tmp

    scp oda-sm-release number -date-DB-11.2.0.4.zip root@oda_host:/tmp

    For example, if you use the sftp command, then enter a command similar to the following, where the temporary host address is oda_host, and you are copying the bundle to /tmp:

    sftp root@oda_host

    Enter the root password.

    put oda-sm-12.2.1.1.0-date-DB-12.1.0.2.zip

  3. Update Oracle Database Appliance with the files that have been copied to system in the previous step. If there is more than one file, you can list all of them separated by a comma. Spaces are not allowed between the filenames.

    For example, enter a command similar to the following to update the image file, where the temporary host address is oda_host, and you are copying the bundle to /tmp:

    # opt/oracle/dcs/bin/odacli update-repository –f /tmp/oda-sm-12.2.1.1.0-160XXXX-GI-12.1.0.2.zip,/tmp/oda-sm-12.2.1.1.0-160XXXX-DB-12.1.0.2.zip,/tmp/oda-sm-12.2.1.1.0-160XXXX-DB-11.2.0.4.zip

  4. Run the command odacli list-jobs to check the status.
    # odacli list-jobs
    
  5. If the system is an Oracle Database Appliance X7-2-HA system, ensure that you run these steps on both nodes.

Deploying a Single Node Bare Metal Platform

Configure the system, network, user groups, and database and deploy Oracle Database Appliance X7-2S or X7-2M.

Use the checklists that you completed earlier as a reference for the configuration settings needed to deploy the appliance.

Before deploying Oracle Database Appliance, complete the tasks in “Preparing for Oracle Database Appliance Installation” and “Readying Oracle Database Appliance for Deployment”.

Complete the following tasks to prepare for deploying Oracle Database Appliance:

  1. Register your hardware SI and new software licenses that you received with Oracle Database Appliance to your My Oracle Support profile.

  2. Plan your configuration options.

  3. Gather your system requirements and complete the checklists for your deployment. You can use the checklists as a reference for the configuration settings needed to deploy the appliance.

Complete the following tasks to ready the system before deploying Oracle Database Appliance:

  1. Attach the network cables.

  2. Perform a first startup of the appliance.

  3. Configure Oracle Integrated Lights Out Manager (ILOM).

  4. Configure an initial network connection.

  5. Download the latest version of the Oracle Database Appliance Software and copy it to the appliance.

  6. Log into the Web Console. When you launch the Web Console on an unconfigured appliance, the Appliance page notifies you that the appliance is not configured and provides a link to the pages needed to configure and create the appliance.

See also:

Your browser determines how you log into the Web Console. In some cases, you must accept credentials for the DCS-controller on port 7093, and DCS-agent on port 7070. If you experience problems launching the Web Console, see Logging into the Web Console for more information.

  1. Launch the Web Console and enter the credentials: User name: oda-admin, Password: welcome1
    https://ODA-host-ip-address:7093/mgmt/index.html
    
  2. Click Create Appliance.
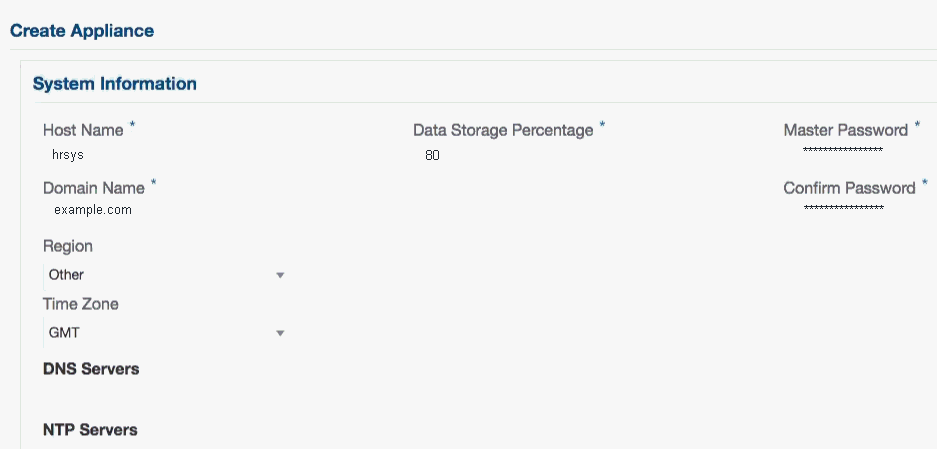
  3. Enter the following information to configure the system information:
    1. Host Name: Enter the host name.
      The host name can contain alphanumeric characters and dashes (-), but cannot start with a number or dash (-) or end with dash (-). Do not exceed 30 characters.
    2. Domain Name: Enter the domain name.
      For example, example.com.
    3. (Optional) Region: Select the region of the world where the Oracle Database Appliance is located.
    4. (Optional) Time Zone: Select the time zone where the Oracle Database Appliance is located.
    5. Data Storage Percentage: Enter a whole number between 10 and 90 to define the percentage of storage reserved for DATA, the remainder is reserved for RECO. For example, if you enter 80, then 80% of the storage is for DATA and 20% is for RECO.
    6. Diskgroup Redundancy: This field appears when the Web Console detects that the system has at least five (5) NVMe storage devices. Select Normal or High.
      If the system has less than five (5) NVMe storage devices, redundancy is automatically set to Normal and this field does not appear.
    7. Master Password and Confirm Password: Enter the master password in both fields.
      The master password is the password set for UNIX users, root, SYS, SYSTEM, and PDBADMIN. The password must begin with an alpha character and cannot contain quotation marks. Do not exceed 30 characters.
    8. (Optional) DNS Servers: Enter addresses for one or more DNS servers.
    9. (Optional) NTP Servers: Enter addresses for one or more NTP servers.
  4. Enter the following information to configure the network information:
    The Network Information page enables you to configure the primary client access network and an Oracle Integrated Lights Out Manager (ILOM) network. You are only required to configure the client access network. The ILOM configuration is optional if you already configured the ILOM for the appliance and you do not need to make changes.
    1. Client Access Network IP Address: Enter the IP address for the primary client access network.
    2. Client Access Network Subnet Mask: Enter the subnet mask address for the primary client access network.
    3. Client Access Network Gateway: Enter the gateway address for the primary client access network.
    4. (Optional) ILOM Host Name: Enter the name of the Oracle ILOM host.
    5. (Optional) ILOM Network IP Address: Enter the IP address for the ILOM.
    6. (Optional) ILOM Network Subnet Mask: Enter the subnet mask address for the ILOM.
    7. (Optional) ILOM Network Gateway: Enter the gateway address for the ILOM.
  5. Determine how you want to configure your users and groups and whether or not you want to allow operating system role separation:
    • Two users with six groups: Customize Users and Groups, select No. Allow OS Role Separation, select Yes. This is the default configuration.
    • Two customized users with six customized groups: Customize Users and Groups, select Yes. Allow OS Role Separation, select Yes.
    • Single user with two groups: Customize Users and Groups, select No. Allow OS Role Separation, select No
    • Single user with six groups: Customize Users and Groups, select Yes. Allow OS Role Separation, select No. SAP deployments use this configuration.
  6. Do you want to create an initial database? Select Yes and go to Step 8 or select No and go to Step 9.
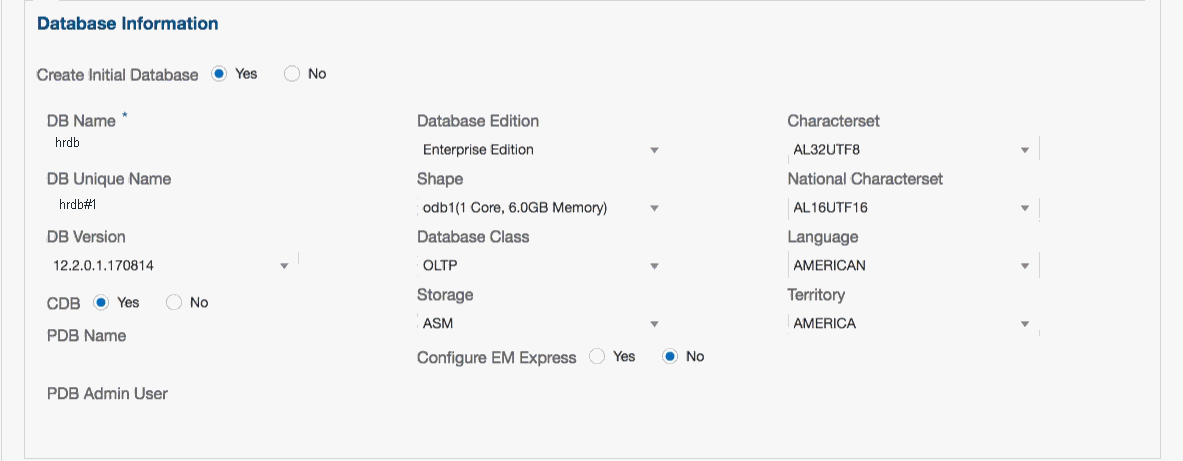
  7. Enter the following information to configure the database:
    1. DB Name: Enter a name for the database.
      The name must contain alphanumeric characters and cannot exceed 8 characters. Enter a name, do not use the default database name db1.
    2. (Optional) DB Unique Name: Enter a globally unique name for the database.
      Databases with the same DB Name within the same domain (for example, copies of a database created for reporting or a physical standby) must have a different DB Unique Name that is unique within the enterprise. The name can contain alphanumeric, underscore (_), dollar ($), and pound (#) characters, but must begin with an alphabetic character. No other special characters are permitted in a database name. The unique name cannot exceed 30 characters.
    3. DB Version: Select a database bundle patch number.
    4. CDB: Select Yes or No to specify whether or not you want a Container Database (CDB). This field is only visible for Oracle Database 12.2.x.
    5. (Optional) PDB Name: Enter a name for the pluggable database (PDB).
      The name must begin with an alphanumeric character. The following characters are valid: alphanumeric characters, and underscore (_).
    6. (Optional) PDB Admin User: Enter an Admin user name for the pluggable database (PDB).
    7. Database Edition: Select the Oracle Database edition, either Standard Edition and Enterprise Edition. Your license determines which database edition you are eligible to create in the appliance.
    8. (Optional) Shape: Select a database shape from the list.
    9. (Optional) Database Class: Select a database class from the list.
      The database version and edition determine the classes that are available. Oracle Database 12.x and Enterprise Edition support OLTP, DSS, or IMDB. Oracle Database 11.2.0.4 and Enterprise Edition support OLTP and DSS. Standard Edition only supports OLTP.
    10. (Optional) Storage: Select ACFS or ASM.
      Oracle Database 11.2 is only supported on Oracle ACFS.
    11. (Optional) Configure EM Express: Select Yes or No.
      Select Yes to configure the Oracle Enterprise Manager Database Express (EM Express) console for Oracle Database 12.2.0.1, 12.1.0.2 or the Database Control Console for Oracle Database 11.2.0.4.
    12. (Optional) Characterset: Select a characterset.
    13. (Optional) National Characterset: Select a national characterset.
    14. (Optional) Language: Select the database language.
    15. (Optional) Territory: Select a territory or location from the list.
  8. (Optional) Configure and enable Oracle ASR on the ASR page.

    You can configure and enable Oracle Auto Service Request (Oracle ASR) now or later:

    • To not enable Oracle ASR during deployment, select No and click Submit. After deployment, you can configure an internal Oracle ASR or register with an external Oracle ASR Manager from either the Web Console or command-line interface.
      • Internal Oracle ASR: choose to configure Oracle ASR Manager on Oracle Database Appliance or use Oracle ASR Manager configured on another server in the same network as your appliance.

      • External Oracle ASR: If you already have Oracle ASR Manager configured elsewhere, you can register Oracle Database Appliance with your existing Oracle ASR Manager.

    • To enable Oracle ASR, select Yes and complete the fields:
    1. ASR User Name: Enter the e-mail address associated with the My Oracle Support account under which the server is registered.
    2. Password: Enter the password associated with the My Oracle Support account under which the server is registered.
    3. SNMP Version: Select V2 or V3. V2 is the default and recommended version.
    4. (Optional) HTTP Proxy used for Upload to ASR: Select Yes or No.
    5. Proxy Server Name: If you are using a proxy for upload, enter the proxy server name.
    6. Proxy Port: If you are using a proxy for upload, enter the proxy port.
    7. (Optional) HTTP Proxy Requires Authentication: If you are using a proxy for upload, select Yes if you require authentication. If you do not require authentication, select No.
    8. (Optional) Proxy Password: If you are using a proxy for upload and require authentication, enter the proxy password.
  9. Click Submit. When prompted, click Yes to confirm that you want to start the job to deploy the appliance.

The job to create the appliance takes time to complete. To monitor the job progress, click the Activity tab . Click the job number to view the tasks.

The deployment is complete when the word SUCCESS appears after each task. To check the status from the command line, run the command odacli list-jobs . A job is not complete if the status is running.

After deployment, the root and database users SYS, SYSTEM, and PDBADMIN are set to the master password. The oracle and grid passwords are set to welcome1. Change these passwords to comply with your user security protocols.

Deploying a Multi-Node Bare Metal Platform

Configure the system, network, user groups, and database and deploy Oracle Database Appliance X7-2-HA.

Use the checklists that you completed earlier as a reference for the configuration settings needed to deploy the appliance. When you launch the Web Console on an unconfigured appliance, the Appliance page notifies you that the appliance is not configured and provides a link to the pages needed to configure and create the appliance.

See Also:

Your browser determines how you log into the Web Console. In some cases, you must accept credentials for the DCS-controller on port 7093, and DCS-agent on port 7070. If you experience problems launching the Web Console, see Logging into the Web Console for more information.

Before deploying Oracle Database Appliance, complete the tasks in “Preparing for Oracle Database Appliance Installation” and “Readying Oracle Database Appliance for Deployment”.

  1. Open a browser and enter the following URL to launch the Web Console:
    The URL must include the host name or IP address of the first node (Node0).
    https://Node0-ODA-host-ip-address:7093/mgmt/index.html
    
  2. Enter the following credentials:
    • User name: oda-admin
    • Password: welcome1
  3. Click Create Appliance.
    If Create Appliance is disabled, ensure that you are launching the console on the first node (Node0).
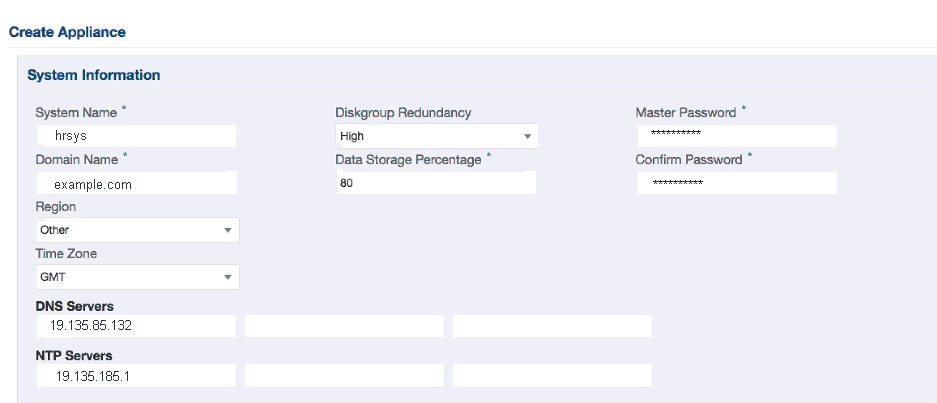
  4. Enter the following system information to configure the system:
    1. Host Name: Enter the host name.
      The host name can contain alphanumeric characters and dashes (-), but cannot start with a number or dash (-) or end with dash (-). Do not exceed 30 characters.
    2. Domain Name: Enter the domain name.
    3. Region: Select the region of the world where the Oracle Database Appliance is located.
    4. Time Zone: Select the time zone where the Oracle Database Appliance is located.
    5. (Optional) DNS Servers: Enter addresses for one or more DNS servers.
    6. (Optional) NTP Servers: Enter addresses for one or more NTP servers.
    7. Diskgroup Redundancy: This field appears when the Web Console detects that the system has at least five (5) NVMe storage devices. Select Normal or High.
      The redundancy level is for DATA, RECO, and FLASH. If you select High redundancy, then DATA, RECO, and FLASH are all High redundancy.

      If the system has less than five (5) NVMe storage devices, redundancy is automatically set to Normal and this field does not appear.

    8. Data Storage Percentage: Enter a whole number between 10 and 90 to define the percentage of storage reserved for DATA, the remainder is reserved for RECO. For example, if you enter 80, then 80% of the storage for DATA and 20% for RECO.
    9. Master Password and Confirm Password: Enter the master password in both fields.
      The master password is the password set for UNIX users, root, SYS, SYSTEM, and PDBADMIN. The password must begin with an alpha character and cannot contain quotation marks. Do not exceed 30 characters.
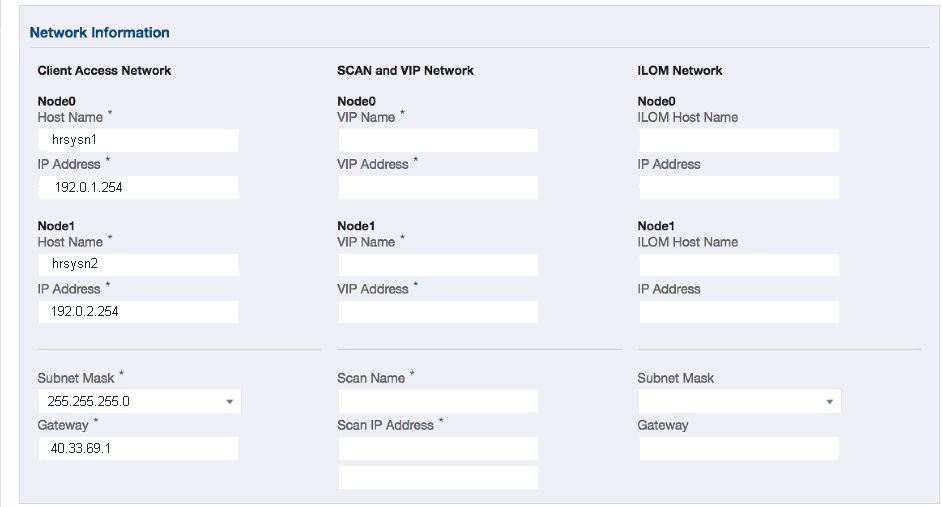
  5. Enter the following information to configure the network:
    This page enables you to configure the primary client access network, virtual networks, and an Oracle Integrated Lights Out Manager (ILOM) network. You are only required to configure the client access network. The ILOM configuration is optional if you already configured the ILOM for the appliance and you do not need to make changes.
    1. Client Access Network Host Name: For Node0, enter the host name for the primary client access network.
    2. Client Access Network IP Address: For Node0, enter the IP address for the primary client access network.
    3. Client Access Network Subnet Mask: Enter the subnet mask address for the primary client access network.
    4. Client Access Network Gateway: Enter the gateway address for the primary client access network.
    5. Client Access Network Interface: Enter the interface for the primary client access network.
    6. VIP Name for Node0: Enter the name of the virtual IP network for Node0.
    7. VIP IP Address for Node0: Enter the virtual IP address that resides on Node0 and is shared between the nodes.
    8. VIP Name for Node1: Enter the name of the virtual IP network for Node0.
    9. VIP IP Address for Node1: Enter the virtual IP address that resides on Node1 and is shared between the nodes.
    10. (Optional) ILOM Host Name: Enter the name of the Oracle ILOM host.
    11. (Optional) ILOM Network IP Address: Enter the IP address for the ILOM.
    12. (Optional) ILOM Network Subnet Mask: Enter the subnet mask address for the ILOM.
    13. (Optional) ILOM Network Gateway: Enter the gateway address for the ILOM.
  6. Determine how you want to configure your users and groups and whether or not you want to allow operating system role separation:
    • Two users with six groups: Customize Users and Groups, select No. Allow OS Role Separation, select Yes. This is the default configuration.
    • Two customized users with six customized groups: Customize Users and Groups, select Yes. Allow OS Role Separation, select Yes.
    • Single user with two groups: Customize Users and Groups, select No. Allow OS Role Separation, select No
    • Single user with six groups: Customize Users and Groups, select Yes. Allow OS Role Separation, select No. SAP deployments use this configuration.
  7. Do you want to create an initial database? Select Yes and go to Step 8 or select No and go to Step 9.
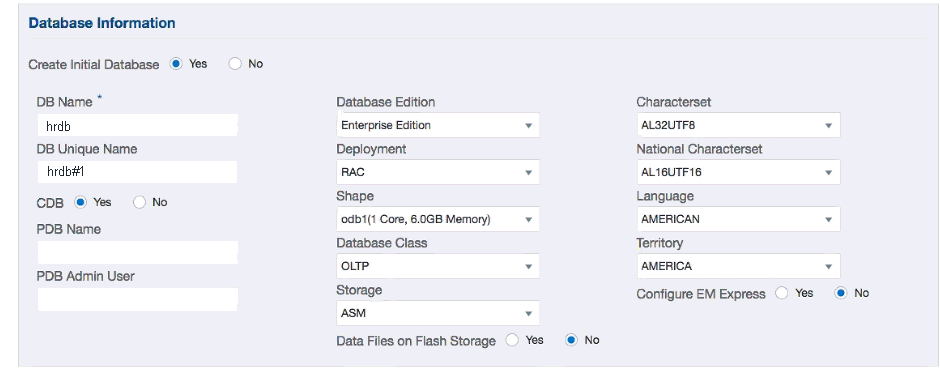
  8. Enter the following information to configure an initial database:
    1. DB Name: Enter a name for the database.
      The name must contain alphanumeric characters and cannot exceed 8 characters.
    2. (Optional) DB Unique Name: Enter a globally unique name for the database.
      Databases with the same DB Name within the same domain (for example, copies of a database created for reporting or a physical standby) must have a different DB Unique Name that is unique within the enterprise. The name must contain alphanumeric, underscore (_), dollar ($), and pound (#) characters, but must begin with an alphabetic character. No other special characters are permitted in a database name. The unique name cannot exceed 30 characters.
    3. DB Version: Select a database bundle patch number.
    4. CDB: Select Yes or No to specify whether or not you want a Container Database (CDB).
    5. PDB Name: Enter a name for the pluggable database (PDB).
      The name must begin with an alphanumeric character. The following characters are valid: alphanumeric characters, and underscore (_).
    6. PDB Admin User: Enter an Admin user name for the pluggable database (PDB).
    7. Database Edition: Select the Oracle Database edition, either Standard Edition and Enterprise Edition. Your license determines which database edition you are eligible to create in the appliance.
    8. Deployment: Select a deployment type from the list. The options are RAC, RAC-One, or SI (single instance database). If you select a single instance database, then select the node for the SI database deployment.
      If you select a single instance database, then you have the option to create the database on either Node0 or Node1. The default is Node0.
    9. Shape: Select a database shape from the list.
    10. Database Class: Select a database class from the list. The options are:
      • Enterprise Edition 12c: OLTP, DSS, IMDB

      • Enterprise Edition 11g: OLTP, DSS

      • Standard Edition: OLTP

    11. Storage: Select ACFS or ASM.
      Only Oracle 12.2 and 12.1 databases can use ASM storage. Oracle Database 11.2 is only supported on Oracle ACFS.
    12. Date Files on Flash Storage: Select Yes or No.
      This option is only available if the HA system has HDD storage drives.
    13. Configure EM Express: Select Yes or No.
      Select Yes to configure the Oracle Enterprise Manager Database Express (EM Express) console for Oracle Database 12.2.1.0 or 12.1.0.2 or the Database Control Console for Oracle Database 11.2.0.4. Selecting Yes enables you to use the console to manage the database.
    14. Characterset: Select a characterset.
    15. National Characterset: Select a national characterset.
    16. Language: Select the database language.
    17. Territory: Select a territory or location from the list.
  9. (Optional) Configure and enable Oracle ASR on the ASR page.

    You can configure and enable Oracle Auto Service Request (Oracle ASR) now or later:

    • To not enable Oracle ASR during deployment, select No and click Submit. After deployment, you can configure an internal Oracle ASR or register with an external Oracle ASR Manager from either the Web Console or command-line interface.
      • Internal Oracle ASR: choose to configure Oracle ASR Manager on Oracle Database Appliance or use Oracle ASR Manager configured on another server in the same network as your appliance.

      • External Oracle ASR: If you already have Oracle ASR Manager configured elsewhere, you can register Oracle Database Appliance with your existing Oracle ASR Manager.

    • To enable Oracle ASR, select Yes and complete the fields:
    1. ASR User Name: Enter the e-mail address associated with the My Oracle Support account under which the server is registered.
    2. Password: Enter the password associated with the My Oracle Support account under which the server is registered.
    3. SNMP Version: Select V2 or V3. V2 is the default and recommended version.
    4. HTTP Proxy used for Upload to ASR: Select Yes or No.
    5. Proxy User Name: If you are using a proxy for upload, enter the proxy user name.
    6. Proxy Port: If you are using a proxy for upload, enter the proxy port.
    7. (Optional) HTTP Proxy Requires Authentication: If you are using a proxy for upload, select Yes if you require authentication. If you do not require authentication, select No.
    8. (Optional) Proxy Password: If you are using a proxy for upload and require authentication, enter the proxy password.
  10. Click Submit. When prompted, click Yes to confirm that you want to start the job to deploy the appliance.
The job to create the appliance takes time to complete. To monitor the job progress, click the Activity tab . Click the job number to view the tasks.

After deployment, the root and database users SYS, SYSTEM, and PDBADMIN are set to the master password. The oracle and grid passwords are set to welcome1. Change these passwords to comply with your user security protocols.