6 Managing Drives
View Drive Information
The drive table displays drive information such as state, SCSI element ID, IP address, serial number, and WWN.
-
Click Drives in the left navigation area of the GUI.
-
For more options, select a drive and then right-click or use the Actions drop-down.
Note:
To select multiple drives at once: shift-click or ctrl-click the drives in the table.
IP Addressing of Drives
The GUI shows the IP address of installed drives (follow the procedure above and locate the IP Address column). The drive IP address assignment depends on the drive bay and module frame ID.
| SL4000 Network Address | Third Octet | Fourth Octet |
|---|---|---|
| 192.168.0.0/19
One subnet for all drive network hosts |
1-30 determined by the frame ID | 1-32 determined by drive bay |
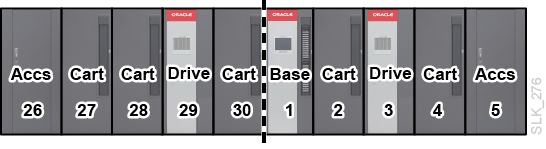
Frame ID Values
Drive IP addressing uses the frame ID of the module. The library controller and root switch compute the frame ID when the library initializes. Valid values range from 1 to 30. The Base Module is always 1 and the module to the left of the Base is always 30. The value increments when moving to the right and decrements when moving to the left. Note that the frame ID values are different than the module numbers (see "The Center Line of the Library and Module Numbers").
Physically Locate a Drive Using the Locator LED
You can flash the "Ok to Remove" blue LED on the rear of the drive to locate the drive. See Figure 1-11 for a diagram showing the location of the LED.
-
Select a one or more drives from the drive table or cell map (see "View Drive Information" or "View the Cell Map").
-
From the Actions drop-down (or right-click menu), select Locate and then Activate Locator LED.
-
Open the rear door of the Base or Drive Module and locate the drive tray with the blinking blue LED.
-
To turn the LED off, repeat the steps above, except select Deactivate Locator LED.
Set a Drive Online or Offline
You typically take a drive offline when servicing the drive or updating the drive firmware. The library will not mount a tape to an offline drive. If you take a mounted drive offline, the drive's state switches to "going offline" and then to "offline" once the tape dismounts.
-
Select one or multiple drives from the drive table or cell map (see "View Drive Information" or "View the Cell Map").
-
From the Actions drop-down (or right-click menu), select Go Online or Go Offline.
Turn a Drive On or Off
The power button on the rear of the drive tray is non-functional (see Figure 1-11 for a diagram). Therefore, you must use the GUI to power the drive on or off.
-
Select one or multiple drives from the drive table (see "View Drive Information").
-
From the Actions drop-down (or right-click menu), select Power On Drive or Power Off Drive.
Reset a Drive (Power Cycle the Drive)
Resetting a drive powers the drive off and then back on and performs initialization of the drive. This action may resolve a drive problem.
-
Select one or multiple drives from the drive table or cell map (see "View Drive Information" or "View the Cell Map").
-
From the Actions drop-down (or right-click menu), select Power Cycle Drive.
Force a Drive to Unload a Tape Cartridge
Forcing a drive to unload will stop any read/write operations in process. Typically, applications send a unload command to the drive on the data path before issuing a command to the library to dismount the drive. However, you may need to initiate a forced unload through the GUI if there is a problem with the drive.
-
Select a drive from the drive table (see "View Drive Information").
-
From the Actions drop-down (or right-click menu), select Force Unload Drive.
Configure the Drive Fast Load Setting
The fast-load setting defines how the drive handles replying to mount requests. If either the partition setting or individual drive setting is fast, then the library fast loads the drive.
-
Click Drives in the left navigation area of the GUI.
-
Select one or more drives in the table.
-
From the Actions drop-down (or right-click menu), select Drive Setting and then select Normal or Fast for Fast-Load Type.
-
Normal (default) – The library will reply to a mount request only after the selected tape is loaded and threaded in the drive.
-
Fast – The library will reply to a mount request after the selected tape is inserted into the drive, but before loading and threading completes.
-
Configure Drive Auto Cleaning
If auto cleaning is enabled, the library will automatically mount a cleaning tape from a system cell to a drive that has indicated it needs cleaning following a dismount. This cleaning operation occurs before the library returns the status for the dismount operation. If disabled, the host software must manage drive cleaning. The library only uses cleaning tapes from system cells for auto cleaning. Cleaning tapes for host managed drive cleaning reside in storage cells.
You can enable auto cleaning for an entire partition or for an individual drive. The library auto cleans a drive if auto cleaning is enabled for either the drive or the partition containing the drive. For example, if you disable auto cleaning for a partition, but enable auto cleaning for a single drive within that partition, the library will still auto clean that drive. Likewise, if you enable auto cleaning for the partition, but disable it for a single drive within that partition, the library will still auto clean that drive.
Set Drive Auto Cleaning for an Individual Drive
-
Click Drives in the left navigation area of the GUI.
-
Select one or more drives in the table.
-
From the Actions drop-down (or right-click menu), select Drive Setting and then select Yes or No for Auto Clean Enabled.
Set Drive Auto Cleaning for a Partition
-
Click Partitioning in the left navigation area of the GUI.
-
Select the partition, and then click Edit Partition
 .
. -
Select Drive Auto Clean (when checked, the library automatically handles drive cleaning).
Manually Clean a Drive
Normally, either the library or the host manages drive cleaning. However, there may be occasions when you need to perform a manual clean. Refer to the drive manufacturer's documentation for information on whether manual cleaning is allowed.
CAUTION:
Cleaning a drive before it is due is not recommended. Excessive drive cleaning can prematurely wear out a drive head.-
Verify the system cells contain a valid cleaning tape for the drive you need to clean (see "View a List of Tape Cartridges").
-
Navigate to the drive table (see "View Drive Information"). Verify the drive needs cleaning by looking at the status of the "Cleaning Needed" column.
-
Select the drive, and then from the Actions drop-down (or right-click menu), select Clean Drive.
Add a Drive Alias
You can configure a drive alias to display in the library GUI. This can assist with drive identification.
-
Click Drives in the left navigation area of the GUI.
-
Select one or more drives in the table.
-
From the Actions drop-down (or right-click menu), select Drive Setting and then select enter a drive alias.
Drive Serial Number Spoofing
The library "spoofs" the true serial number of LTO drives, meaning the library uses the right-most 10 characters of the drive tray serial number rather than the drive manufacturing serial number. The library only spoofs drive serial numbers for LTO drives (T10000 drive spoofing is not supported). The library returns the spoofed value for the SCSI medium changer "read element status" command and the "inquiry" command.
Spoofing helps when replacing a failed drive because the "spoofed" serial number of the drive is the same after the replacement, eliminating the need to reconfigure applications. When requesting drive service, you can provide the spoofed value to look up the service contract for the drive.
Configure MDVOP
Use the following procedure to setup the network on a VOP admin station to manage multiple SL4000s.
-
On the admin station, change the gateway setting for the static route of the IP port used to manage the SL4000 library. You can automate this with either a shell script on Unix or a .bat file on Windows.
-
Once the route's gateway points to the SL4000 library you want to manage, set up individual MDVOP configuration files (.vop files) to manage that library.
-
Launch the specific MDVOP configuration for that library.