5 Configuring the Library
Configure the Library with the Configuration Wizard
IMPORTANT:
Network and time configuration changes require you to restart the library. You must restart the library immediately for time changes to take effect.Use the configuration wizard to configure network settings, time settings, and library settings.
-
Click Configuration in the left navigation area of the GUI.
-
From the Settings tab, click Configure
 .
. -
Select the options you want to configure, click Next. Follow the wizard instructions.
Caution:
If using DNS, verify all DNS server information is correct and that the Customer Port has a valid link before applying the configuration. Invalid DNS information can cause library startup to take 2 hours. -
Select Accept Changes. Click Apply.
Configure the Public Network, Service Network, or OKM Ports
Note:
Each port must be on a separate subnet. If network ports are on the same subnet, you will only be able to reach one port.In the configuration wizard, you can enter applicable IPv4 or IPv6 information for each port. For the physical location of the customer and service port, see "Library Controller (LOC)". For the physical location of the OKM port, see "Root Switch (LOER)".
-
Public Network Port (Customer Port) — IP information is required. DNS information is optional, but all DNS information must be valid before applying the configuration. Incorrect DNS information or unreachable DNS servers, will cause the library startup to take up to 2 hours.
-
Service Network Port — IP address and netmask information is required. Gateway information is optional. You can accept the default information.
-
Oracle Key Manager Port — IP information is optional. You can select Port Disabled, which will unconfigure and take down the port.
Each installed network port has its own configuration step in the configuration wizard. You must proceed through each port one screen at a time. For example, to configure only the OKM port, click Next to bypass the public and service port pages. There is no way to start at the OKM port page.
Select the Library Interface to Use for OKM
The drives in the library can communicate with an Oracle Key Manager (OKM) cluster over any of the three external interfaces on the library (Public, Service, OKM). Oracle recommends that you use the OKM interface. The OKM appliance and the SL4000 interface must be on the same subnet.
Use the configuration wizard to select which library interface to use for OKM (see "Configure the Library with the Configuration Wizard"). Select Configure Network Settings and click Next until you reach the Choose OKM Interface page. Select the network interface and accept the changes. The library will need to restart.
After configuring the OKM interface on the SL4000, you will need to modify the gateway settings of the OKM appliance. For more information, see the OKM documentation.
Date and Time Configuration Options
Set the library date and time using the configuration wizard (see "Configure the Library with the Configuration Wizard"). You must restart the library immediately for the time changes to take effect.
-
Library Time Zone - Select the geographic time zone where the library resides. Internally the library always runs on UTC (coordinated universal time), but the library uses the "Library Time Zone" parameter to adjust the times displayed at the local operator panel. For browser connections, the GUI automatically adjusts the time to the local time of the browser.
-
Configure Date and Time - Select an option from the drop-down menu: "Using Network Time Protocol" and then enter the address of up to five Network Time Protocol (NTP) servers. Or, select "Manually" and then, enter the time using the same time zone as the library time zone. The library will adjust its internal clock to UTC based on the library time zone parameter selected above.
-
Individual users can choose to display the dates and times in UTC — "Display Dates and Times in UTC"
Library Settings Options
You select library settings when powering down (see "Turn Off the Library") or configuring the library (see "Configure the Library with the Configuration Wizard").
-
Library Partitioning Active - Selecting this option enables partitioning in the library (see "Partitioning the Library"). You no longer need a hardware activation file to enable partitioning.
-
Bypass audit if door opened with power off – Normally, if a door opens while the library is off, the library will run a full audit when it resumes operation. However, if you plan to enter the library while it is off, but will not move any tape cartridges, then you can enable this option to bypass the full audit. This is also known as "suppress HBO" (suppress Has Been Opened). Only select this option if you are not going to add, remove, or move any tapes or drive trays.
-
Probe for physical configuration changes upon next restart - The robot will scan the module identification blocks during startup and perform a full audit. You must select this option when modifying the physical configuration (see also "What Occurs to Partitions When the Physical Configuration Changes").
The probe only occurs on the initial restart after you select this option. Then, this option resets, so that subsequent restarts will not probe for configuration changes.
Physical configuration changes include:
-
Adding or removing modules, rotational CAPs, or drive arrays.
-
Converting a Cartridge Module into a Parking Module or vice versa.
Physical configuration changes do not include:
-
Adding, removing, or moving tape cartridges or drive trays.
-
Adding or removing robots or controller cards.
-
-
Enable redundant electronics – Enables redundant electronics (RE) (feature not available at initial release). If you enable RE with only one controller installed, the library will assume the absent standby controller has failed. This will result in a fault for the missing controller. The library will remain in a "Degraded" state until you install the second controller.
-
System Cell Volume Label Format – Controls the presentation of system cell volsers (see "Volume Label Format Options"). To change the label format of tapes in storage cells, you must change the partition attributes (see "Partition Attributes").
-
Park Robot(s) - The robots move to the ends of the library, into the service area of the Parking Module or Access Module. This option is only available when you power down the library from the GUI status bar.
-
IPv4 HTTP Listening Port - Default is 80. Valid custom values are 10000-22000. IPv6 HTTP listens only on port 7102.
-
IPv4HTTPS Listening Port - Default is 443. Valid custom values are 10000-22000. Pv6 HTTPS listens only on port 7103.
What Occurs to Partitions When the Physical Configuration Changes
In a partitioned library, changing the physical configuration causes the library to:
-
Remove storage cells and drive bays that no longer exist from the partition they were in.
-
Remove CAPs that no longer exist from the CAP pool they were in.
-
Place new storage cells and drive bays into a newly created partition (the library does not assign a CAP pool or SCSI hosts to this new partition).
-
Place new CAPs into a newly created CAP pool (the library does not assign this CAP pool to a partition).
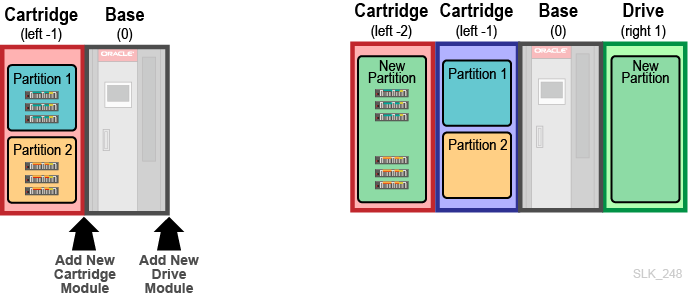
The library will assume that all configuration changes occur at the ends of the library, even if you add a module to the middle. For example:
-
Initial configuration — Cartridge (left -1), Base (0)
-
New configuration — Cartridge (left -2), new Cartridge (left -1), Base (0), new Drive (right 1)
Even though you install the new Cartridge Module between the old Cartridge Module and Base Module, the library assumes that the old Cartridge Module (now left -2) is the new module, since it is closer to the end. The library places cells in Cartridge (left -2) into a new partition. The library partitions the newly added Cartridge (left -2) the same as before. The library assumes that the Drive Module is new, so it places all storage cells and drive bays into the new partition.
Volume Label Format Options
You can select the system cell volume format when configuring the library settings (see "Library Settings Options") and the storage cell volume format when defining a partition (see "Partition Attributes"). The volume format controls how the library presents the volser to external applications and within the GUI tables. For the examples listed below, the tape barcode is ”STA015L4”.
-
Prepend Last Two Characters - Moves the last two characters of the barcode to the front. For example, "L4STA015".
-
Full Label - Presents the full eight-character label, also known as the raw label. For example, "STA015L4".
-
Trim Last Character - Removes the last character of the barcode. For example, "STA015L".
-
Trim Last Two Characters (default) - Removes the last two characters of the barcode. For example, "STA015".
-
Trim First Character - Removes the first character of the barcode. For example, "TA015L4".
-
Trim First Two Characters - Removes the first two characters of the barcode. For example, "A015L4".
View the Library Configuration Properties
Click Library in the left navigation area of the GUI. The page displays library properties, such as library name, model, serial number, state, cell counts, and disk usage. For more information on a total tape count warning, see "How to Fix a Tape Count Warning".
You can also view the library properties by clicking Hardware in the left navigation area. Then select All Devices on the Device Status tab. Right click Library, and select Properties.
Add or Remove Optional Library Features
Hardware activation files are .jar files that enable library features such activated tape capacity or redundant control path (multi-port) networking. After purchasing a feature, you must download the hardware activation file and then upload it to the library before you can use the feature.
Download a Hardware Activation File
-
Go to the Oracle Software Delivery Cloud at:
-
Click Sign In /Register.
-
Read the terms and restrictions. Indicate your acceptance.
-
Search for SL4000, and then select the hardware activation file. Click Select Platform.
-
Select GENERIC (All Platforms), and then click Select.
-
Verify the correct hardware activation file is listed under Selected Products, and then click Continue.
-
Select the available release. Click Continue.
-
Read the terms and restrictions. Indicate your acceptance, and then click Continue.
-
Save the zip file, and then extract it to a location accessible to the GUI browser.
Upload or Delete Hardware Activation Files on the Library
You cannot upload hardware activation files through the local operator panel. You must upload using a remote connection.
-
Click Configuration in the left navigation area of the GUI.
-
Click the Features tab.
-
To add a feature: click Upload
 , and browse to the activation file (.jar).
To remove a feature: select the feature in the table, and then click Delete
 .
.
What Occurs When You Delete a Feature Activation File
Deleting a Capacity Activation File
After deleting a capacity activation file, the activated tape capacity decreases by the capacity of the activation file. If there are more tapes in the library than remaining activated capacity, a Storage Cells alert ![]() will appear on the Library page (see "View the State of the Library, Devices, and Partitions in the Status Bar"). To correct this, either eject tapes or re-install a capacity activation file (see "How to Fix a Tape Count Warning").
will appear on the Library page (see "View the State of the Library, Devices, and Partitions in the Status Bar"). To correct this, either eject tapes or re-install a capacity activation file (see "How to Fix a Tape Count Warning").
Deleting the Multiport FC or Dual TCP/IP Activation File
After deleting the Multiport FC activation file, the library powers off the unavailable FC ports, which are port 2 and port 4 (for a library with a second library controller card).
How to Fix a Tape Count Warning
If the library contains more tapes than the activated capacity, a warning ![]() displays on the Library page. The library will continue to function normally, however, it is illegal to use unactivated capacity. Either eject tapes or purchase and install another capacity activation file (see "Add or Remove Optional Library Features").
displays on the Library page. The library will continue to function normally, however, it is illegal to use unactivated capacity. Either eject tapes or purchase and install another capacity activation file (see "Add or Remove Optional Library Features").
Capacity activation files determine the number of tapes allowed in the library. For example, if you install a 100 capacity activation file and a 200 capacity activation file, the library has a activated capacity of 300 and can legally store a maximum of 300 tapes. Tapes in system cells do not count toward licenced capacity.
View the History of Feature Activation Activity
You can view a list of when and who installed or removed activation files.
-
Click Configuration in the left navigation area of the GUI.
-
Click the Features tab.
-
Click Feature History
 .
.
Import or Export the Library Configuration
You can export or import a library configuration .xml file. You can use the file to clone the configuration of one library to another library with the same module configuration, or restore the configuration of an existing library. Oracle recommends exporting the configuration after any major configuration changes and saving the file in a safe location in case of a failure.
Export a Library Configuration File
-
Click Configuration in the left navigation area of the GUI.
-
From the Settings tab, click Import/Export Configuration
 .
. -
Select Export Configuration to File. If changes are made in another window or by another user after you click export, the changes will not be contained in the export file.
-
Download the file.
What is Exported in the Configuration File
-
Library settings
-
Hardware activation files
-
Network settings
-
NTP settings
-
GUI usernames and preferences
-
Partition configuration and mapping
-
CAP pool configuration and mapping
-
SCSI host configuration and partition mapping
-
Notification destinations
-
Notification users and passwords (SNMP and SCI)
-
ASR settings
-
Logging levels
What is NOT Exported in the Configuration File
-
GUI user passwords
Import a Library Configuration File
The library you are importing to must have the same module configuration as the library in the configuration file.
CAUTION:
Importing a configuration file is disruptive and replaces the current settings with the values in the configuration file. The library must restart.-
Stop all library activity.
-
If importing partitioning information, complete the checklist in "What to Check Before Importing a Configuration with Partition Information" below.
-
Click Configuration in the left navigation area of the GUI.
-
From the Settings tab, click Import/Export Configuration
. -
Select Import Configuration from File.
-
Browse to the libraryConfigSettings.xml file.
-
Review the configuration (the library will require a restart to apply the configuration). Click Apply.
-
After a clone, perform the following actions:
-
Network Settings: On a clone, the duplicated network configuration will conflict with the network configuration of the original library. To avoid network conflict, after the configuration import, you should unplug the library controller customer port Ethernet cable. You will then need to manually change the network settings of the cloned library locally at the op panel or through an attached monitor, keyboard, and mouse.
-
Library Settings: Create a unique library name and verify the time settings. Run through the complete Library Configuration Wizard to update the settings (see "Configure the Library with the Configuration Wizard").
-
SCSI Host Configuration: Review and update the SCSI host and SCSI host mapping.
-
Partitioning and CAP Pool Configuration: Review and update partitioning and CAP pools.
-
-
After either a clone or restore, perform the following actions:
-
User Passwords: The configuration file does not transfer GUI user passwords. The administrator that performed the configuration import must create a temporary password and notify each user to reset their passwords.
-
Notification Settings: Verify the notification settings (email, SNMP, SCI, ASR) are still valid and test each of the notification types to confirm connectivity.
-
What to Check Before Importing a Configuration with Partition Information
Importing partition mapping can result in tapes being "owned" by an unintended partition, unless you verify the following:
-
Verify all drives, CAPs, and robots are fully initialized.
-
If the library state is "Operative" the library hardware is in a good state to continue.
-
If the library state is not "Operative", scan the Hardware Device Status tree to for failed components. Verify the issue will not impact the Import Configuration Partition Mapping.
-
-
Close all CAPs.
-
Click CAPs. Verify the "Physical State" of all CAPs is "Closed".
-
To close a CAP, see "Open or Close a CAP Using the GUI".
-
-
Move all tapes out of CAP or Drive cells:
-
Click Cells/Tapes. From the Tapes tab, filter for !Storage in the Cell Type column.
-
Verify that the list shows only System cells. Move any tapes out of CAP or Drive cells.
-
Upload and Manage Library Firmware
You can upload new firmware, activate new firmware, or revert to an older version.
CAUTION:
Changing the library firmware is disruptive and can take up to 20 minutes. You will be logged out of the GUI, and will not be able to log in or use the library until the activation completes. Activating new firmware resets the library time to UTC time. You may need to reconfigure the library time.Download Firmware from My Oracle Support
-
Go to My Oracle Support (MOS):
https://support.oracle.com/ -
Sign in to your MOS account.
-
Click the Patches & Updates tab near the top of the screen.
-
In the Patch Search section under the Search tab, click Product or Family (Advanced).
-
In the Product field, enter SL4000 and then select StorageTek SL4000 Modular Library System from the drop-down list.
-
In the Release field, select the firmware version.
-
Click Search.
-
Click the link under Patch Name column.
-
Click Download and save the file to a location on your system. Unzip the downloaded file. The unzipped folder should contain files similar to the ones listed below:
-
summit-1.0.0.65.27052.tar
-
ReleaseNotes1.0.0.65.27052.pdf
-
LicenseAgreement.txt
-
-
Verify the integrity of the firmware file using the md5 checksum file (summit-1.0.0.65.27052.tar.md5).
-
For Linux: Use the command
md5sum -c summit-1.0.0.65.27052.tar.md5in the directory containing the unzipped files. -
For Windows: Use a third party tool such as WinMD5 or the file checksum integrity verifier Windows-KB841290-x86-ENU.exe (available from
https://www.microsoft.com/en-us/download/details.aspx?id=11533).
-
Upload and Activate New Firmware
Before uploading, download the firmware to a location accessible to your browser (see "Download Firmware from My Oracle Support"). You can only upload firmware when connected remotely. You cannot upload firmware from the front touch screen or if connected using a monitor and keyboard attached to the back of the library.
-
You should export the library configuration before activating new code (see "Export a Library Configuration File"). If you need to revert to a previous version of code, the library configuration does not transfer.
-
Click Firmware in the left navigation area of the GUI.
-
Click the Library Firmware tab.
-
Click Upload.
-
Click Choose File and then browse to the firmware .tar file that you downloaded previously (such as summit-1.0.0.65.27052.tar). Click Open, and then click Upload.
-
Once the upload completes, click OK.
-
Click Activate. Activating code will reset the library time to UTC. Confirm the activation.
Revert to the Previous Firmware Version
-
Export the library configuration (see "Export a Library Configuration File"). Reverting to a previous version of firmware erases the library configuration.
-
Click Firmware in the left navigation area of the GUI.
-
Click the Library Firmware tab.
-
Click Revert. Confirm the activation.
-
Import the library configuration (see "Import a Library Configuration File").
Manage the Library's SSL/TLS Certificate for HTTPS
A certificate encrypts SSL/TLS traffic to and from the library. At initial installation, the library has a default certificate. At a minimum, you should replace the default certificate with a new self-signed certificate. Then, optionally, you can installed a certificate signed by a certifying authority (CA). See the SL4000 Security Guide for more information.
Generate a Self-Signed Certificate
A self-signed certificate is secure, but will require you to manually tell the browser to trust the certificate before you can view the login screen. To eliminate this browser security exception, you can install a certificate signed by a certifying authority (CA) (see "Install a Third-Party Signed Certificate").
-
Click Configuration in the left navigation area of the GUI.
-
Click the Certificate tab, and then click New Certificate
 .
. -
Enter in the certificate information.
Install a Third-Party Signed Certificate
The library must have a self-signed certificate before you can install a third-party signed certificate. You cannot go directly from the default certificate to a third-party certificate. Installing a third-party certificate is a multistep process of submitting a certificate signing request (CSR) to the CA, obtaining the certificate from the CA, combining the certificates into a single file, and then importing the certificate file to the library.
- Task 1 Export CSR File
-
-
Click Configuration in the left navigation area of the GUI.
-
Click the Certificate tab, and then click Export CSR
 .
. -
Submit the CSR to the third-party certifying authority (CA).
-
- Task 2 Combine the Certificates into a Single File
-
Once obtain a certificate from the CA, use any text editor to assemble the following certificates into a single file for upload:
-
Primary certificate of the trust anchor CA (such as VeriSign's public primary root CA)
-
Intermediate certificate of the issuing SSL CA. In cases where there is no intermediate issuer, you can omit the intermediate certificate portion of the combined file. This is highly site-specific, so check with your company's security experts for requirements.
-
Your newly issued SSL certificate
The combined certificate file should look like:
-----BEGIN CERTIFICATE-----
(Encoded Primary certificate)
-----END CERTIFICATE-----
-----BEGIN CERTIFICATE-----
(Encoded Intermediate certificate)
-----END CERTIFICATE-----
-----BEGIN CERTIFICATE-----
(Your encoded SSL certificate)
-----END CERTIFICATE-----
-
- Task 3 Import the Certificate File and Restart the Library
-
-
Click Configuration in the left navigation area of the GUI.
-
Click the Certificate tab, and then click Import Certificate
 .
. -
Browse to the combined certificate file, and then click Ok.
-
Restart the library.
The GUI may show the new certificate immediately, but the certificate will not take affect until after the library restarts.
-
Default Port Numbers
By default, the library uses the port numbers listed in the table below. If using a firewall, configure it to allow traffic to use these ports. Enable the ports listed below on each of the network interfaces that are in use (except for the OKM interface — you only need to enable the OKM ports on the network interface used to connect to the OKM cluster. See "Oracle Key Manager (OKM) Ports").
| Port | IP | Protocol | Description | Direction |
|---|---|---|---|---|
| 22 | TCP | SSH | SSH access to Linux running on library. Only enabled for 72 hours after an "Escalation" role service user is created. | To library |
| 25 | TCP | SMTP | Connection to external SMTP (Simple Mail Transfer Protocol) server. Required if you have configured any e-mail destinations. | From library |
| 53 | TCP & UDP | DNS | DNS (domain name server) lookup. | From library |
| 80 | TCP | HTTP | Default port for browser access. | To library |
| 161 | UDP | SNMP | Inbound GET requests using SNMP. | To library |
| 162 | UDP | SNMP | Outbound SNMP TRAPs. | From library |
| 123 | TCP | NTP | Connection from library to an external NTP server. | From library |
| 443 | TCP | HTTPS | Default port for browser and web services interfaces. | To library |
| 7104 | TCP | HTTP | Alternate port for browser access. | To library |
| 7102 | TCP | HTTPS | Alternate port for browser and web services interfaces. | To library |
| 7104 | TCP | HTTP | Browser GUI based access to WebLogic console running on the library. Only accessible by an "Escalation" user. | To library |
| 7105 | TCP | HTTPS | Browser GUI based access to WebLogic console running on the library. Only accessible by an "Escalation" user. | To library |
| Externally Defined | TCP | HTTP & HTTPS | Servers that are configured to receive outbound SCI calls will listen for SCI calls on ports of their choice. Open these port number in any firewalls and provided the port numbers configuring the destination on the library. | From library |
| Externally Defined | TCP | OKM | If the library is configured to retrieve tape drive encryption keys from a OKM cluster, open the ports used for OKM (see the OKM documentation). | From library |
Browser and Web Services Interface Ports
The GUI can use both HTTP and HTTPS. The SCI protocol uses only HTTPS to secure for the credentials passed in each request. By default, these two protocols are on their standard port number of 80 for HTTP and 443 for HTTPS. You can modify these ports in the GUI (see "Configure the Library with the Configuration Wizard").
Service Access Ports
Under normal library operations only customer-created users may log in to the library However, the administrator can enable service access when necessary (see "Add a Service User"). Creating a service user with an Escalation role enables access to the library that is not normally allowed. Specifically, an Escalation user can log in to Linux on the library using SSH on port 22 and can access the WebLogic console function using port 7104 for HTTP or 7105 for HTTPS. Service users expire 72 hours after creation. The library disables port 22 if there are no enabled service users. The library always enables ports 7104 and 7105, but unless an Escalation user exists, there are no valid users that can log in to the WebLogic console.
SNMP Ports
The library supports SNMP v3 protocol. The library uses ports 161 (inbound) and 162 (outbound) for SNMP GET commands and SNMP traps respectively.
E-mail Ports
The library can send e-mail messages when certain events occur (see "Configure Email Notifications"). If you configure e-mail destinations, you must also configure an SMTP server and open port 25.
DNS Ports
DNS configuration is optional. You only need to configure DNS if destinations (SNMP, E-mail, Outbound SCI) use host names. You can add up to three DNS servers (see "Configure the Library with the Configuration Wizard"). DNS uses port 53.
NTP Ports
The library can use an external NTP server to control the library clock (see "Date and Time Configuration Options"). If using an external NTP server, you must open port 123.
Oracle Key Manager (OKM) Ports
You can connect an OKM cluster to the library's customer interface, service interface, or OKM interface. You select the interface during network configuration of the library (see "Configure the Library with the Configuration Wizard"). Unlike legacy tape libraries, the SL4000 only requires a single connection to OKM, rather than individual connections to each encrypted tape drive. You must open the ports used by OKM appliance on the selected connection. See the OKM documentation for details on which port numbers to use.