Configure Logical Groups
Some configuration tasks only apply to manual groups, some apply only to logical groups, and some apply to both.
All tasks in this section require Operator or Administrator privileges.
Manual Logical Groups Only
Dynamic Logical Groups Only
All Logical Groups
Create a Manual Logical Group
Create a logical group and manually assign drives and media to it. Resources included in the group do not change unless you manually add or remove them.
-
In the left navigation, expand Setup & Administration, select Logical Groups.
-
Click Add Logical Group
 .
. -
Complete the Create Logical Group screen:
-
Logical Group Name — a unique name using a maximum of 249 alphanumeric characters.
-
Logical Group Type — Select Manual
-
-
Click Save.
-
Initially the group will be empty, showing a drive and media count of 0. You must add drives and media to it.
Proceed to Add Drives and Media to a Manual Logical Group or if creating a group for media validation drive calibration, see Create the Calibration Media Logical Group.
Logical Group Ownership
The STA username that created the logical group also owns that group. The ownership cannot be changed except when the owner is deleted. The logical group owner is displayed on the Logical Groups screen.
When the administrator deletes an STA username, all logical groups owned by that username are automatically deleted or made public, according to the selection made by the administrator (see Add, Modify, or Delete a User).
Add Drives and Media to a Manual Logical Group
When you first create a manual logical group it will be empty. You must manually add drives and media to the group.
-
The logical group must already exist.
-
In the left navigation, expand Tape System Hardware. Select either:
-
Drives – Overview to add drives
-
Media – Overview to add media
-
-
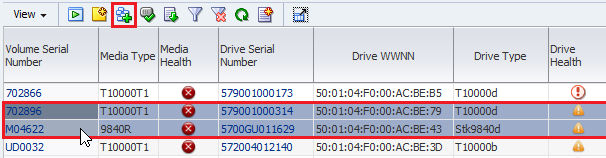
Within the table, select drives or media to add (shift- or ctrl-click to select multiple). Click Logical Groups
 .
.
-
Select the group from the drop-down. Only manual groups appear in the list. You cannot manually add drives and media to a dynamic group.
-
Click OK.
Remove Drives and Media From a Manual Logical Group
Remove selected drives and media from a manual logical group.
-
In the left navigation, expand Setup & Administration, select Logical Groups.
-
Within the Defined Logical Groups table, select the manual group to modify.
-
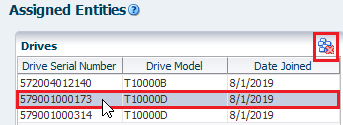
Within the Assigned Entities section, select the drives or media you want to remove from the group, and then click Unassign Entities
 .
.You can select multiple records at once, but they must all be from the same table (either Drives or Media).
-
Verify and click Yes.
Create and Define a Dynamic Logical Group
A dynamic group uses selection criteria (filters) to automatically determine which drives and media to include in the group.
When drives and media meet the selection criteria for a group, they are automatically added to the group, and when they no longer meet the criteria, they are automatically removed. Dynamic groups update automatically every hour.
-
In the left navigation, expand Setup & Administration, select Logical Groups.
-
Click Add Logical Group
. -
Complete the Create Logical Groups dialog:
-
Logical Group Name — Enter a unique name for the group using up to 250 alphanumeric characters (for example "LTO5- Drives").
-
Logical Group Type — Select Dynamic.
-
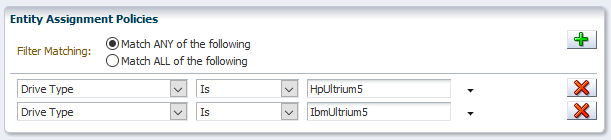
Entity Assignment Rules — Select filter criteria for the group (Dynamic Group Selection Criteria). See Filter Using the Dialog Box on how to define a filter.
For example, if you wanted all LTO5 drives, you would create this filter:
-
-
Verify that your criteria are correct and click Save.
-
Initially, the media and drive counts for the group are 0. Click Refresh Table
 to update the drive and media counts.
Depending on the size of your tape library system and the complexity of the selection criteria, it may take several minutes to add all drives and media to the group. Leaving the Logical Groups screen does not interrupt this process.
Dynamic Group Selection Criteria
A variety of drive and media attributes are available for creating selection criteria. Some attributes apply only to drives, some only to media, and some to both.
The following table identifies the available criteria and whether it applies to drives, media, or both.
| Selection Criteria Attribute | Applies to: |
|---|---|
| Cleaning Media | Media |
| Drive Firmware Version | Drives |
| Drive Health Indicator | Drives |
| Drive Serial Number | Drives |
| Drive Type | Drives |
| Drive Suspicion Level | Drives |
| HLI Address | Both |
| Library Complex Name | Both |
| Library Model | Both |
| Library Name | Both |
| Library Number | Both |
| Library Serial Number | Both |
| Media Health Indicator | Media |
| Media Suspicion Level | Media |
| Media Type | Media |
| Partition Name | Both |
| Partition Number | Both |
| Partition Type | Both |
| Physical Address | Both |
| Rail Number | Both |
| SCSI Element ID | Both |
| STA Start Tracking (Number of Fays) | Both |
| STA Start Tracking (Date) | Both |
| Volume Serial Number | Media |
Change the Selection Criteria for a Dynamic Logical Group
Change the selection criteria for an existing dynamic logical group to modify the drives and media included to the group.
-
In the left navigation, expand Setup & Administration, select Logical Groups.
-
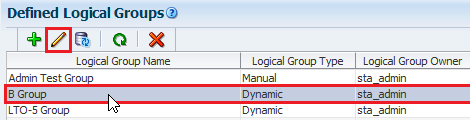
Select a dynamic group from the list, and then click Edit Logical Group
 .
.
-
Add, delete, and modify selection criteria as necessary.
See Filter Using the Dialog Box for instructions.
Force a Dynamic Logical Group Update
Dynamic groups update automatically every hour, but you can force an update between cycles to reflect any changes to the library contents.
-
In the left navigation, expand Setup & Administration, select Logical Groups.
-
Select a dynamic group from the list, and then click Refresh Dynamic Group
 .
.
-
STA begins updating the group in the background. Click Refresh Table
to update the in-progress drive and media counts.Depending on the size of your tape library system and the complexity of the selection criteria, it may take several minutes to add all drives and media to the group. Leaving the Logical Groups screen does not interrupt this process.
View Logical Group Assignments for Selected Drives or Media
View the logical groups to which selected drives or media have been assigned.
-
In the left navigation, expand Tape System Hardware. Select either:
-
Drives – Overview
-
Media – Overview
-
-
Select the records you want to display, and click Detail View.
-
Near the bottom of the details view, the User-Provided Information section lists all logical group assignments.
List All Drives and Media Assigned to a Logical Group
Display a list of all drives and media assigned to a selected logical group.
-
In the left navigation, expand Setup & Administration, select Logical Groups.
-
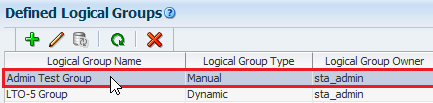
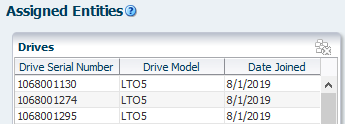
Within the Defined Logical Groups table, select the group.

-
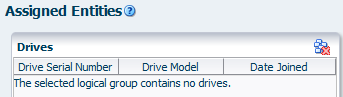
All assigned drives and media display within the Assigned Entities section.
Rename a Logical Group
Change the name of an existing manual or dynamic logical group.
-
In the Navigation Bar, select Setup & Administration, then select Logical Groups.
-
Select the group from the list, and then click Edit Logical Group
. -
Enter the new Logical Group Name, and then click Save.
-
The Assigned Entities table indicates the group contains no drives nor media. This is just lag in the table display.
To update the Assigned Entities table display, click refresh
and then re-select the logical group again. The display updates with the assigned drives and media.
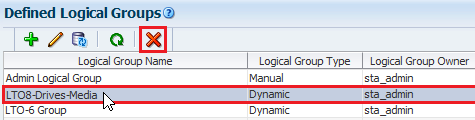
Delete a Logical Group
Delete a manual or dynamic logical group to remove the group from STA.
This procedure deletes the entire logical group. To delete just selected drives or media from a manual group, see Remove Drives and Media From a Manual Logical Group.
-
In the left navigation, expand Setup & Administration, select Logical Groups.
-
Select the group from the list, and then click Delete Logical Group
 .
.
-
Verify that you have selected the correct logical group, and then click Yes.
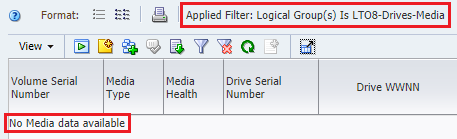
Any screens, dashboard panes, or templates filtered by the group now show "No data to display" or "No data available."