3.5 Working with Ticket Templates
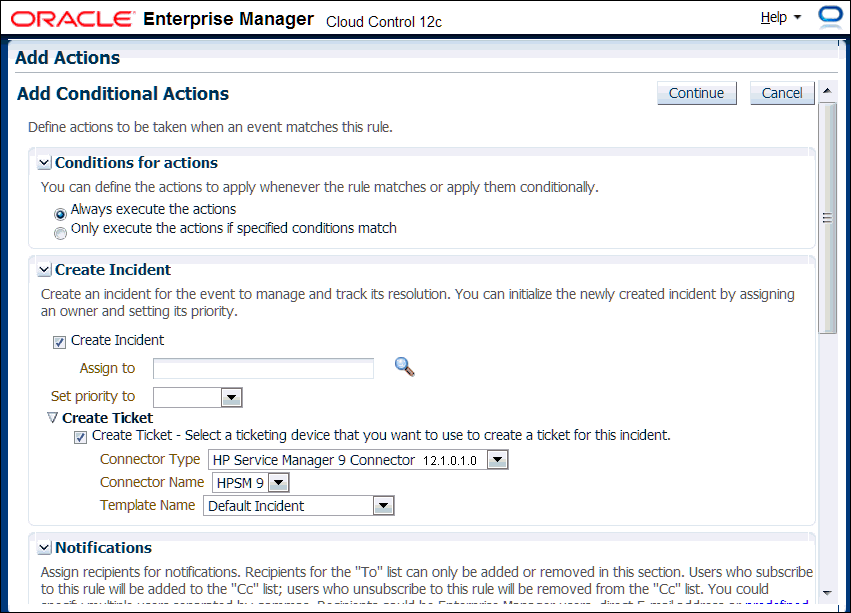
When a connector instance is created in Enterprise Manager, all associated templates are available for ticket create/update operations. For Auto Ticketing, a notification method is created based on the ticket template selected while creating an incident rule. For manual ticketing, you select a ticket template while creating a ticket from the Enterprise Manager console, as shown in Figure 3-3.
Figure 3-3 Adding Conditional Actions

There are two default templates for each of the HP Service Manager Connectors. The default templates for the HP Service Manager 9 connector are:
-
ServiceManager_9_Default_Incident_AutoClose.xsl
-
ServiceManager_9_Default_Incident.xsl
Tip:
See Out-of-Box HP Service Manager Templates for detailed information about these templates.
3.5.1 Adding Ticket Templates
If you want to create a custom template, you need to add ticket templates before they are recognized in Enterprise Manager. For each new custom template, run the following emctl register_template connector command as a user with execute privilege on emctl and the ability to read the ticket template:
$ORACLE_HOME/bin/emctl register_template connector
-t <template.xsl> -repos_pwd <reposPassword>
-cname <connectorName> -iname <internalName>
-tname <templateName> -ttype 2 [-d <description>]
Where —
<template.xsl> is the full path name of the template file.
<reposPassword> is the Enterprise Manager root (SYSMAN) password.
<connectorName> is the name of the connector instance installed in step 3 of Creating a Connector Instance.
<internalName> is the internal name to use for the template.
<templateName> is the name to display for the template.
<description> is the description of the template.
For example, the following command adds a new outbound template (newTemplate.xsl) for the connector instance with the HP Service Manager 9 Connector Instance:
emctl register_template connector
-t /home/oracle/custom_templates/template.xml
-repos_pwd sysmanpass
-cname "HPSM 9"
-iname "newTemplate"
-tname "New Template"
-ttype 2
-d "Demo template"
3.5.2 Viewing Template Code
To view template code, do the following:
- Select the connector instance and go to the Configure Management Connector page.
- Select the Template tab.
- Click a template name or click View to view the XSLT code for the template.
The ticket templates are in XSLT format. A basic knowledge of XSLT is required to understand the code.
3.5.3 Removing a Template
To remove a template, do the following:
- Select the connector instance and go to the Configure Management Connector page.
- Select the Template tab.
- Select the template and click Delete.
- Click Yes to confirm the delete operation.
Note:
If the template you delete has an incident rule associated with it, ticketing will not function for this particular incident rule after the deletion.
3.5.4 Editing Templates
Note:
The Edit Template feature is available in Oracle Enterprise Manager Release 12.1.0.2 and later.
To edit an existing ticket template for Release 12.1.0.2 and later, do the following:
- Select the connector instance and go to the Configure Management Connector page.
- Select the Template tab.
- Select the template and click Edit.
- Edit the Description and Template Contents fields as needed, then click Save.
The ticket template is automatically registered. Saving the registered template updates it in the repository.
3.5.5 Restoring Templates
After you edit or customize a template, you can restore it to its previous default contents if needed by performing the following steps.
Note:
The Restore feature is available in Oracle Enterprise Manager Release 12.1.0.2 and later.
You can restore out-of-box templates that you have may edited or customized to their default values. You cannot restore new templates that you have created (using the emctl register_template command).
- Select the connector instance and go to the Configure Management Connector page.
- Select the Template tab.
- Select the template and click Restore.
- Click Yes in the confirmation page that appears in order to restore.