18Configuring Lists and Pick Applets
Configuring Lists and Pick Applets
This chapter describes how to configure lists and pick applets. It includes the following topics:
About Lists and Pick Applets
This topic describes lists and pick applets. It includes the following information:
A list is a type of user interface element that allows the user to choose values from a list to update a field instead of entering values into a field. You can define the following types of lists:
Static list. Gets data from the Siebel list of values table that an administrator maintains. The data in the list of values table is static. For more information, see Creating a List of Values.
Dynamic list. Gets data from tables that the user maintains, such as S_CONTACT or S_ORG_EXT. The data in these tables are dynamic.
About Static Lists
A static list is a type of list that displays a list of predefined values. If the user clicks the arrow that Siebel CRM displays after a field in an applet, then it displays a list that contains a single column. The user chooses a value from the list, and then clicks Save to enter the value for the field. You can define the values in the list to store them in the list of values table.
A list can be bounded or unbounded:
A bounded list is a type of list that allows the user to choose a value only from the list.
An unbounded list is a type of list that allows the user to choose a value from the list or to type a value directly into the field.
You cannot delete the lookup value. You can set the field that the user chooses back to empty, unless it is required. Lead Quality is an example of a chosen field.
For more information, see Using the Pick List Wizard to Create a Static List and Creating a List of Values.
Viewing an Example of a Static List
You can view an example of a static list.
To view an example of a static list
In the Siebel client, choose the Contacts screen.
Choose the Contacts List link.
Choose an existing record in the Contacts list.
Choose the Mr/Ms field.
Click the down arrow.
The list that Siebel CRM displays is an example of a static list. It includes static values, such as Miss, Mr., Ms., Mrs. and Dr.
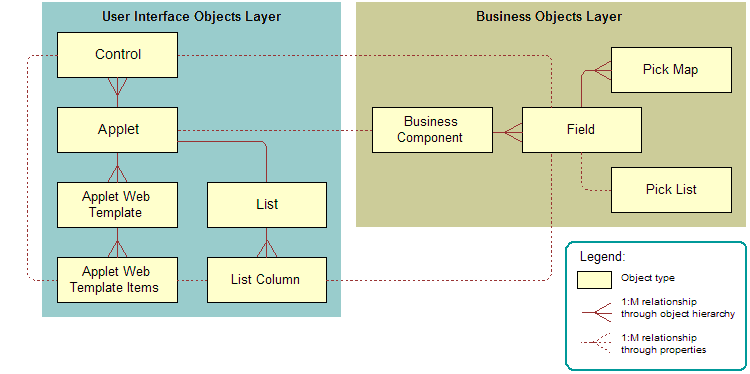
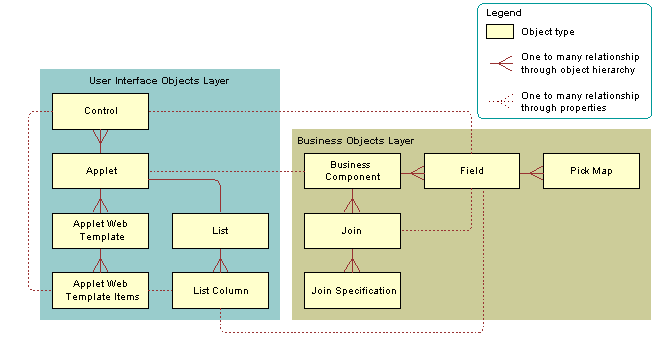
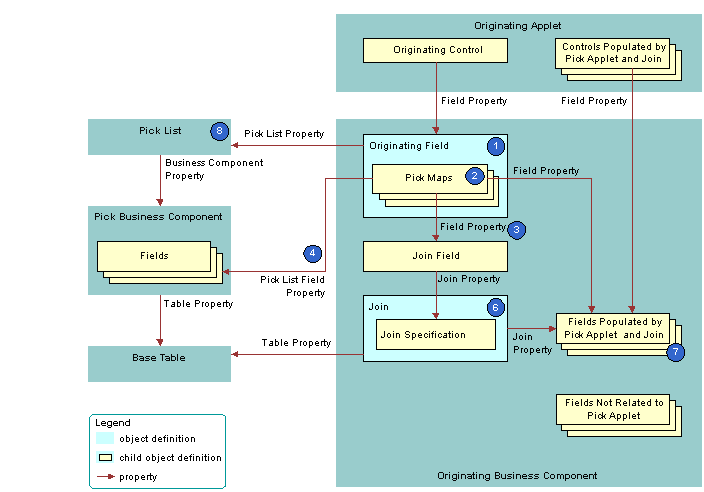
How Siebel CRM Creates a Static List
The following figure describes the relationships and objects that Siebel CRM uses to create a static list.
The following figure includes an example of how Siebel CRM creates a static list. This example implements the Quality list that is described in the preceding figure.
Explanation of Callouts
Siebel CRM uses the following objects to create a static list:
Originating control or list column. The control or list column that the user clicks to call the list. In this example, Quality is the originating control.
Originating applet. The applet that contains the originating control or list column. After the user chooses a value from the list, the originating control displays a revised value. In this example, the Opportunity form applet is the originating control. The Business Component property of the originating applet identifies the originating business component.
Originating business component. Business component that the originating applet references. This business component supplies the data that Siebel CRM displays in the originating applet. It updates one field in the current record in this business component after the user chooses a value in the list. In this example, the Opportunity business component is the originating business component.
Originating field. Field in the originating business component that the originating control represents. This field typically contains one pick map child that defines how the field from the PickList Generic business component maps to the originating business component. In this example, Quality is the originating field.
PickList Generic business component. Business component that provides the lists in a static list. You use the List of Values view in the Administration - Data screen in the Siebel client to administer the PickList Generic business component. For more information, see About the Picklist Generic Business Component.
Pick list. Identifies the business component that the pick applet references and the field that provides data for the pick applet. This business component is always PickList Generic. In this example, the Pick List is named Picklist Quality. The field of the originating control references the list.
Pick map. Defines a relationship between the Value field in the PickList Generic business component and the originating field. If the user chooses a value from the list, then this relationship provides the information that Siebel CRM requires to update the record in the current originating business component with information from the PickList Generic business component. The pick map is a child of the originating field.
Sequence property. Defines the sequence that Siebel CRM uses to update fields in the current record of the originating business component. It updates these fields with information from the pick business component. If you do not define sequence numbers on the pick map, then it updates fields in the order that it uses to create these fields.
About the Picklist Generic Business Component
The PickList Generic business component is a specialized business component that Siebel CRM reserves for lists of values for static lists. The following fields in the Picklist Generic business component define and group the lists of values:
Type. Groups together all records that Siebel CRM includes in one list of values. For example, the LEAD_QUALITY type identifies a record as a member of the Lead Quality list of values. Each list of values includes a type. For more information, see Creating a List of Values.
Value. The value that Siebel CRM displays in the static list. For example, values for Lead Quality include Excellent, Very Good, High, Fair, and Poor.
For more information, see Caution About Using Specialized Classes.
The following table lists example data in the Picklist Generic business component.
Table Example of Data in the Picklist Generic Business Component
| Type Field | Value Field |
|---|---|
LEAD_QUALITY |
Excellent |
LEAD_QUALITY |
Very Good |
LEAD_QUALITY |
High |
LEAD_QUALITY |
Fair |
LEAD_QUALITY |
Poor |
PERSON_TITLE |
Mr. |
PERSON_TITLE |
Ms. |
PERSON_TITLE |
Dr. |
ACCOUNT_TYPE |
Commercial |
ACCOUNT_TYPE |
Competitor |
ACCOUNT_TYPE |
Customer |
Comparison of a Static List to a Dynamic List
A static list differs from a dynamic list in the following ways:
A static list is a static list of values. It does not get values dynamically from a pick business component. An administrator defines these values in the List of Values view in the Administration - Data screen.
A static list typically does not call a dialog box with multiple list columns and buttons. Instead, it uses a simple pop-up list that contains one column and no buttons. It is possible to use a pick applet rather than a simple list to display a static list of values, but Siebel CRM does not frequently use this configuration.
A static list does not provide data for multiple controls in the originating applet. It provides data for a single control in the applet and the corresponding field in the business component that the applet references.
For more information, see About Dynamic Lists, and Creating a List of Values.
About Pick Applets
A pick applet is a type of applet that Siebel CRM calls if the user clicks the Select button that Siebel CRM displays next to some fields. A pick applet contains a scrolling table that lists choices in one list column and more information in adjacent columns. Each row corresponds to a business component record in the pick business component. If the user chooses a row in the scrolling table, and then clicks OK, then Siebel CRM hides the pick applet, and then enters data into the column cell and other controls and cells in the originating applet. This data includes information according to the choice the user makes in the pick applet. For more information, see Using the Pick Applet Wizard to Create a Pick Applet.
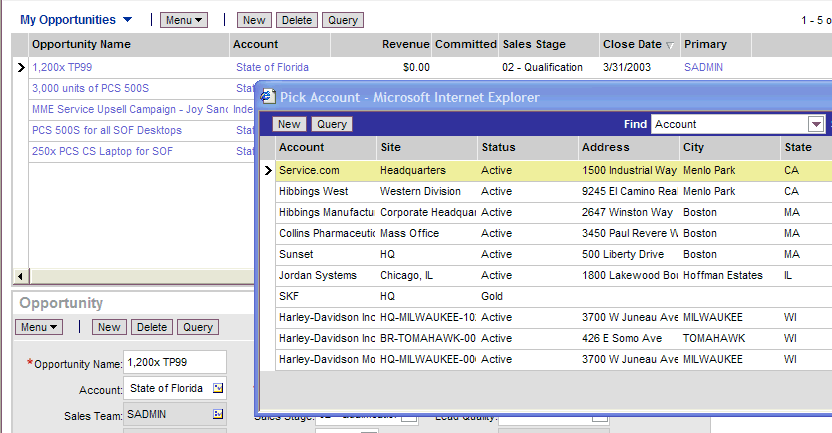
Example of a Pick Applet
Assume the user navigates to the Opportunities screen, and then clicks Select in the Account field in the Opportunity Form applet. Siebel CRM displays the Pick Account dialog box. This dialog box is a pick applet. The user then chooses an account and clicks OK. It hides the Pick Account dialog box, and then enters data into the Account field in the Opportunity Form applet. This data includes the account that the user chose in the Pick Account dialog box. Siebel CRM might update other fields and controls, such as the Site field. It enters data into the Account and Site fields only if a pick map is defined.
How Siebel CRM Creates a Pick Applet
The following figure describes how Siebel CRM creates a pick applet.
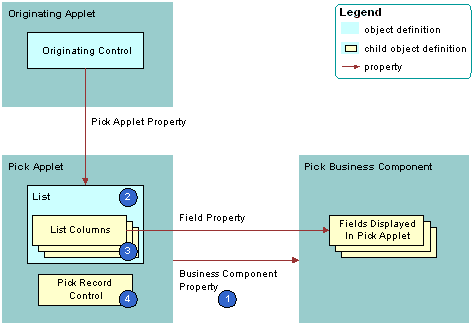
Explanation of Callouts
A pick applet is a child of an applet. It includes the following properties:
Business component. Identifies the business component.
Class. Set to CSSFrameList, which indicates that this is a list applet.
Type. Set to Pick List, which indicates that this is a pick applet. This property determines the behavior of the dialog box and button controls.
Title. Set to the name of the pick applet that Siebel CRM displays in the title bar.
The pick applet includes the following child objects:
List. List columns that Siebel CRM attaches to the list.
List columns. Each list column displays the contents of one field in the business component.
Pick Record control. Calls the PickRecord method if clicked. The PickRecord method locates the pick map child objects of the originating field. The PickRecord method uses these child objects to identify the fields that Siebel CRM updates in the originating business component. The record that the user chooses from the pick business component determines how it updates these fields.
Web templates. Defines the layout for each of the defined modes. Example layout includes the position of the list columns and controls.
Web template items. Maps list columns and controls to placeholders in the web template. Web template items exist for each list column and control that is defined for the applet.
Pick Applet Usage in Query Mode
If a pick map operates in query mode, then the fields that Siebel CRM copies includes the source field that the following items use:
The list
Any other list field that is part of the primary key
The source field is the business component field that the Business Component property of the list defines. Siebel CRM uses multiple fields for the query, so it is not possible to only copy back a single field.
For example, assume the user does a query through the list that Siebel CRM displays for the Parent Account Name field of the account list in the Account screen. Siebel CRM uses the name and location for the query because these fields are part of the U1 index of the underlying S_ORG_EXT table. The Location field is a primary key field for the Account business component and Siebel CRM includes it in the query.
You can define a pick applet so that Siebel CRM correctly enters data into the Subarea field according to the choice that the user makes, such as the Area field of the Service Request Detail Applet. You can use this configuration in edit mode but not in query mode. For more information, see Options to Control How the User Creates, Edits, Queries, and Deletes CRM Data and Creating a Hierarchical List.
About Dynamic Lists
This topic describes the dynamic list. It includes the following information:
Similar to a static list, a dynamic list is a type of list that allows the user to choose a value from a list, and then Siebel CRM uses the value to update a field. Rather than getting the values from the list of values table, a dynamic list gets values from another business component that the user maintains. A field that uses a dynamic list is typically a joined field that displays data from a table other than the base table of the business component. The dynamic list allows the user to update the joined field.
You use a pick applet to display a dynamic list in the Siebel client. The pick applet allows the user to choose a value from a list, and then enter the value into a control or the cell of a list column. For more information, see Using the Pick List Wizard to Create a Dynamic List.
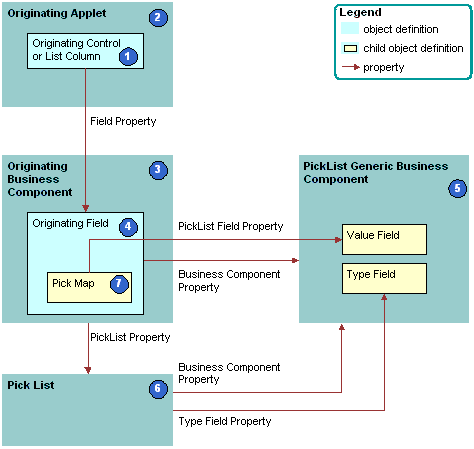
Example of How Data Flows in a Pick Applet
The following figure describes how data in the pick applet typically originates from a different business component than the business component that supplies data to the originating applet.
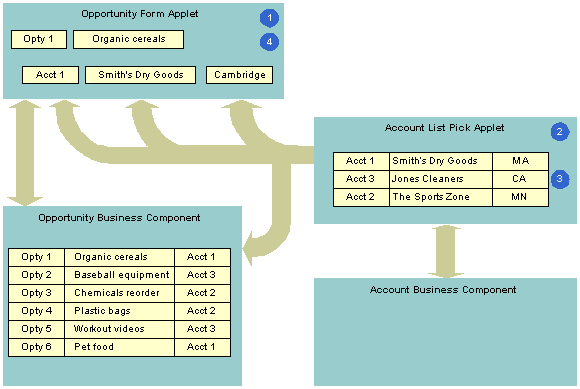
Explanation of Callouts
The following steps occur in this example:
The user enters information for the Organic Cereals opportunity in the Opportunity Form applet, and then clicks Select.
Siebel CRM displays the Account List pick applet and displays rows from the Account business component.
The user chooses Account 1, Smith’s Dry Goods, and then clicks OK.
Siebel CRM enters Account data for Smith’s Dry Goods into the Opportunity Form applet.
A dynamic list maintains the foreign keys that facilitate a join relationship. In the opportunity and account example, a foreign key in the Opportunity business component identifies the account for each opportunity. If the user chooses an account in the pick applet, then Siebel CRM enters data into this foreign key field. This choice associates the account with this opportunity for future use by the join that uses the foreign key. For example, if the user chooses a record in the pick applet, then it copies values in some list columns in the chosen record to corresponding list columns in the originating applet. In this example, the user chooses a parent account for an account record.
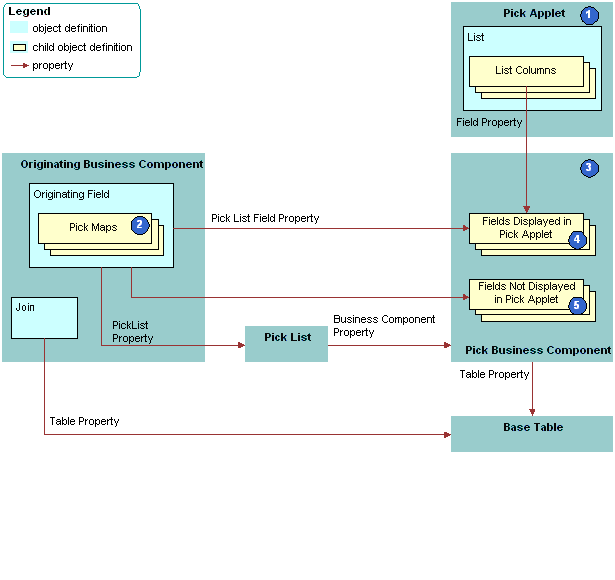
How Siebel CRM Creates a Dynamic List
The following figure describes the relationships between object types that Siebel CRM uses to create a dynamic list.
The following figure describes the objects that Siebel CRM uses to create a dynamic list.
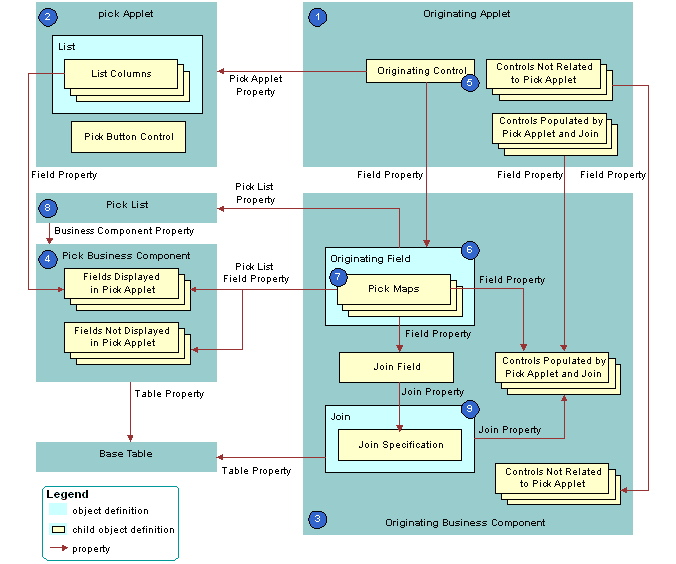
Explanation of Callouts
Siebel CRM uses the following objects to create a dynamic list:
Originating applet. Contains the control or list column that calls the pick applet. After Siebel CRM calls the pick applet and chooses a value, it displays revised values in specific controls in the originating applet. In the example, the Opportunity Form Applet is the originating applet. For more information, see Originating Applet of a Dynamic List.
Pick applet. Dialog box that Siebel CRM calls to choose a value. The dialog box is a list applet that contains a scrolling list table of rows. Each row corresponds to a business component record. In the example, the Account applet is the pick applet.
Originating business component. Business component of the originating applet. This business component supplies the data that Siebel CRM displays in the originating applet. The selection process in the pick applet causes Siebel CRM to update the current record in this business component. In the example, the Opportunity Form Applet is the originating applet and it references the Opportunity business component.
Pick business component. Business component of the pick applet. Data from fields in this business component display in the list columns of the pick applet. In the example, the Account business component is the pick business component.
Originating control or originating list column. If the user clicks the originating control or list column, then the originating control or list column calls the pick applet. In the example, the Account control is the originating control.
Originating field. Field in the originating business component that the originating control references. It includes child pick maps that define how Siebel CRM maps fields from the pick business component to the originating business component. In the example, the Account field is the originating field.
Pick maps. Each pick map defines a relationship between a field in the pick business component and a field in the originating business component. If the user chooses a record, then these relationships provide the information that Siebel CRM requires to update the current, originating business component record with information from the pick business component record.
If the user chooses a value from an unbounded list, then Siebel CRM uses the corresponding pick map that references the same field that it uses to copy the value to the field that it associates with the list. If the list is bounded, then Siebel CRM only enters data into fields that it associates with other child pick maps.
Entering a new value in an unbounded list does not cause Siebel CRM to display the value in the list of values that the user can choose. It does not update fields in a pick map if the user chooses a value from an unbounded list. An applet that references the CSSBuscomp or the CSSBCBase class with an unbounded list does not map all the values in the pick map. To map all the values in a pick map, the list must be bounded.
Pick list. References the business component of the pick applet. In the example, the PickList Opportunity Account pick list is the list.
Join and join specification. The join is a child of the originating business component. The join specification is a child of the join. The join field references this child object. One of the pick maps updates the join field. If Siebel CRM modifies the value in the join field, then it updates all fields whose values it gets from the join. This update is not as immediate as the update that it does through the pick map. If the other pick maps are absent, then Siebel CRM does not update the data until the user navigates away from the view, and then returns to the view. In the example, S_ORG_EXT is the join and Account Id is the join specification.
Originating Applet of a Dynamic List
The originating applet contains the control or list column that calls the pick applet. It can contain other controls or list columns into which Siebel CRM enters data if the user chooses a value from the list applet. The originating applet does not require special configuration.
The following figure describes the details of the originating applet that How Siebel CRM Creates a Dynamic List includes.
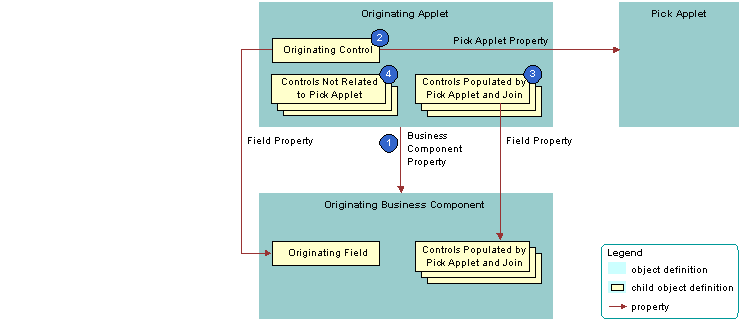
Explanation of Callouts
Siebel CRM uses the following objects in the originating applet of a dynamic list:
Business component property. Creates the association between the originating applet and the originating business component.
Originating control. Calls the pick applet if the user clicks the arrow. The Pick Applet property of the originating control defines the name of the pick applet. The Field property of the originating control defines the originating field. It includes definitions for the pick map child object. For more information, see Originating Business Component of a Dynamic List.
The Runtime property of the control or list column must be TRUE.
Controls that contain data from a pick applet and join. If the user chooses a value from the pick applet, then Siebel CRM updates each control that contains data from a pick applet and join.
Controls not related to pick applet. Other controls in the applet.
Originating Business Component of a Dynamic List
The originating business component of a dynamic list is the business component that the Business Component property of the originating applet references. This business component supplies the data that Siebel CRM displays in the originating applet.
The following figure describes how Siebel CRM defines the originating business component of a dynamic list. This list is described in Originating Applet of a Dynamic List.
Explanation of Callouts
Siebel CRM uses the following objects in the originating business component of a dynamic list:
Originating field. Provides data to the originating control. The originating field is the parent of the pick map. The Pick List property of the field specifies the pick list. A pick map is a child of an originating field. It supports pick applets on more than one field in the business component.
The originating field must reference a database column. You cannot associate a pick applet or list with a read-only field, including a calculated field.
Pick maps. Creates a relationship between a field in the pick business component and a field in the originating business component. This relationship provides the information that Siebel CRM requires to update the active record of the originating business component with information from the pick business component. One of the pick maps updates the join field. The join updates the business component fields that depend on the join.
It is recommended that you test your pick map after you create it. If the value in the originating field remains the same after you choose a value from the pick applet, then you must check the pick map definition for that field.
Field property. Identifies a field in the originating business component that contains data from a field in the pick business component when Siebel CRM calls the PickRecord method.
Pick List Field property. Identifies a field in the pick business component that provides data for the field in the Field property of the pick map. Siebel CRM does the following:
If the user picks a value from an unbounded list, then it updates the fields in the pick map.
If the user types in a new value, then it does not update fields in the pick map.
If the user types a new value into a field that references an unbounded list, then it does not add the value to the list of values that the user can choose.
You must not define more than one multi-value field in an originating business component that references the same destination field that the pick applet references in the Pick List Field Property. If you do this, then Siebel CRM does not display the arrow for the list and the user cannot use the list. For more information, see About the Multi-Value Field.
Join field. Works as a foreign key in the join that the pick applet references. Typically, the name of the join field includes the Id, such as Account Id or Key Contact Id. Siebel CRM defines it in the Source Field property of the join specification. The join field is one of the fields defined in a pick map. If the user chooses a record from the pick applet, then Siebel CRM updates the join field and all fields that reference the join.
The pick maps initially update fields in the originating business component and the controls or list columns that reference these fields. The join and join specification do not update the contents of the applet until the user navigates away from the view, and then returns to the view.
Join and join specification. Sets up the join between the base table of the originating business component and the base table of the pick business component. Siebel CRM uses this join to update fields in the originating business component that include the name of the join in the Join property of the field.
Fields that get data from the pick applet and join. If Siebel CRM modifies the value in the join field, then it updates fields that include the name of the join in the Join property. If the user chooses a value from the pick applet, then it updates the fields that it defines in the Field property of the pick maps.
A pick map and a join update the same fields, but an update that involves a pick map is immediate. An update that involves a join is somewhat delayed. if the user picks a record, then a pick map can update the display value of a joined field. For example, with the Account Name joined field. A pick map does not physically copy a value to the joined fields. It only writes to the foreign key field. For example, Account Id.
Pick list. The field of the originating control references the pick list. The Business Component property of the pick list references the pick business component.
If you define a pick applet that a multi-value group applet calls, then define the list and the pick maps on the originating field in the originating business component. Do not define the list and the pick maps on fields in the child business component that the multi-value group applet references. For more information, see How Siebel CRM Creates a Multi-Value Group.
How Siebel CRM Constrains a Dynamic List
You can configure Siebel CRM to dynamically filter a pick applet to display only records that include a field value that matches a corresponding field in a record of the originating business component. This configuration is known as constraining a list. For example, you can define the pick applet for a contact that an applet that displays quotes calls so that the pick applet only displays contacts that Siebel CRM associates with the account for the current quote. For more information, see Constraining a Dynamic List.
The following figure describes how Siebel CRM constrains a dynamic list. It includes details of the pick business component that the second figure in the section About Dynamic Lists describes.
Explanation of Callouts
Siebel CRM uses the following objects to constrain a dynamic list:
Pick applet. Displays only contacts that contain the same account, account Id, and account location as the quote. To do this, you define a constraint pick map as a child of the Contact Last Name field. This is in addition to the predefined copy pick map object definitions that define pick behavior.
Pick map. The following types of pick maps are available:
Copy pick map. Updates the current record in the originating business component with information from the pick business component. For more information, see Originating Business Component of a Dynamic List.
Constraint pick map. Displays only the records that contain a matching value in a corresponding field in the originating and the pick business component. A constraint pick map causes Siebel CRM to filter the records that it displays in the pick applet. For more information, see How Siebel CRM Constrains a Dynamic List
.
If the Constrain property of the pick map is:
TRUE. The pick map is a constraint pick map.
FALSE. The pick map is a copy pick map.
Pick business component. The business component that the pick applet references. Siebel CRM displays data from fields in this business component in the list columns of the pick applet.
Fields that Siebel CRM displays in the pick applet. Enters data into the list columns in the pick applet. The Field property of the corresponding list columns in the pick applet reference these list columns. Siebel CRM includes some of the same fields in the Pick List Field property of Pick Map object definitions. These fields have a role in updating corresponding fields in the originating business component.
Fields that Siebel CRM does not display in the pick applet. Siebel CRM does not display these fields in list columns that reside in the pick applet, but it does include some of these fields in the Pick List Field property of the object definitions for a Pick Map. Such fields have a role in updating corresponding fields in the originating business component.
Constraint Pick Map Acts as a Predefault Value
A constraint pick map uses the new record that Siebel CRM adds from a pick applet as a predefault value. For example, assume the user chooses a record in the Quotes list that is associated with an account, and then clicks the Opportunities control in the form for the quote. The user then adds a new opportunity in the Pick Opportunity dialog box with no account included. Siebel CRM assigns the new opportunity to the constrained account. This situation occurs if the Constrain property of the Account Id pick map of the Opportunity field in the Quote business component is TRUE.
Foreign Key Field Must Be Constrained
If the constrained field references a joined table in the pick business component, then the foreign key field must be constrained. If the foreign key field is not constrained in this situation, and if the user creates a new record in the pick applet, then Siebel CRM displays an error that is similar to the following:
This operation is not available for read-only fieldAbout Hierarchical Lists
A hierarchical list constrains values according to the value that the user chooses in another list. For example, in the Service Request Detail Applet, the Area and Subarea fields are lists that get their values from the S_LST_OF_VAL list of values table. The value that the user chooses in the Area list determines the values that Siebel CRM displays in the Subarea list. For more information, see Creating a Hierarchical List.
The list of values table creates the hierarchical relationship between these values. Siebel CRM uses the same LOV Type to determine the values for the lists in the hierarchy. For example, for Area and Subarea, the LOV Type named SR_AREA determines the values. For more information, see Creating a List of Values.
How Siebel CRM Creates a Hierarchy
Siebel CRM uses the Parent LIC (language-independent code) field to define a parent value. For example, consider the example list of values described in the following table.
Table Example List of Values for a Hierarchical List
| Type | Display Value | Language Independent Code | Parent LIC |
|---|---|---|---|
SAMPLE_LOV |
1 |
1 |
None |
SAMPLE_LOV |
A |
A |
1 |
SAMPLE_LOV |
B |
B |
1 |
SAMPLE_LOV |
2 |
2 |
None |
SAMPLE_LOV |
C |
C |
2 |
SAMPLE_LOV |
D |
D |
2 |
Assume Siebel CRM displays the values listed in the previous table in the following lists in a hierarchical relationship:
Parent list. Displays the values 1 and 2.
Child list. Displays values depending on the following value that the user chooses in the parent list:
1. Siebel CRM displays the values A and B in the child list.
2. Siebel CRM displays the values C and D in the child list.
For more information, see Creating a List of Values.
Creating a Hierarchical List of Values
You can create a hierarchical list of values.
To create a hierarchical list of values
Configure the following lists:
Configure the parent list to reference the PickList Hierarchical business component.
Configure the child list to reference the PickList Hierarchical Sub-Area business component.
Configuring Lists and Pick Applets
This topic describes how to configure lists and pick applets. It includes the following information:
Using the Pick List Wizard to Create a Static List
You can use the Pick List Wizard to create a static list.
To use the Pick List Wizard to create a static list
In Siebel Tools, click the File menu, and then click New Object.
Click the Pick List icon, and then click OK.
In the Pick List dialog box, enter the following information, and then click Next:
Project.
Business Component. Choose the originating business component. This is the parent business component of the field whose values display in the list.
Field.
In the Pick List Type dialog box, choose Static, and then click Next.
In the Pick List Definition dialog box, do one of the following:
If you must create a new list, then choose Create New Pick List, and then click Next.
If you must use a predefined list, then choose the list and the associated list of values you must use, click Next, and then proceed to Step 8.
If you must create a new list of values (LOV), then do the following:
Enter a unique name for the list.
Click Create New List of Values, and then click Next.
In the List of Values dialog box, enter a name for the list of values, and then enter the values.
For more information, see Creating a New List of Values Locally.
Click Next.
If you must use a predefined list of values, then do the following:
Enter a unique name for the list.
Choose the Use Predetermined List of Values option.
Choose the List of Values Type, and then click Next.
-
In the third Pick List Definition dialog box, enter a search specification, enter a comment, and then choose to bind or not bind the list. For more information, see Options to Filter Data That Siebel CRM Displays in an Applet.
Click Next.
In the Finish dialog box, review the specifications for the list, and then click Finish.
Creating a New List of Values Locally
If you use the Picklist Wizard to create a list of values, and if you store this list of values on your local database, then you cannot use Check In to copy this list of values to the server database. To avoid this situation, you can do one of the following:
Use Siebel Remote to synchronize your modifications to the Siebel Server:
On the computer where the S_LOV_OF_VAL records exist, open the Developer Web Client, and then connect to the local database.
Click the File menu, and then click Synchronize Database.
Make sure you clear the cache in the List Of Values view.
Create the list of values on the Siebel Server instead of on your local development computer.
For more information, see Creating a List of Values and Siebel Applications Administration Guide.
Creating a Static List Manually
It is highly recommended that you use the Pick List Wizard to create a static list, but you can create a static list manually. For more information, see Using the Pick List Wizard to Create a Static List and How Siebel CRM Creates a Static List.
To create a static list manually
In Siebel Tools, click Applet in the Object Explorer.
In the Applets list, locate the originating applet.
In the Object Explorer, expand the Applet tree, and then click Control.
In the Controls list, add an originating control using values from the following table.
Property Description Field
Specify the originating field that resides in the originating business component.
Pick Applet
Leave empty.
Runtime
Set to TRUE. This setting indicates that Siebel CRM attaches and activates a static list if the user clicks the control or list column.
Click Business Component in the Object Explorer, and then locate the originating business component in the Business Components list.
In the Object Explorer, expand the Business Component tree, click Field, locate the originating field in the Fields list, and then modify the field using values from the following table.
Property Description PickList
Specify the pick list.
If the originating field is a custom field, then make sure that it can accommodate the LOV table values. If the originating field is shorter than the values that exist in the LOV table, then Siebel CRM truncates the values from the LOV table when it displays these values in the Siebel client or when it stores them in the Siebel database.
In the Object Explorer, expand the Field tree, click Pick Map, and then add a pick map in the Pick Maps list using values from the following table.
Property Description Field
Choose the originating field.
Pick List Field
Enter
Value.This value references the Value field in the PickList Generic business component.
If you use a multiple column selection list, then configure more pick maps, as required.
In the Object Explorer, click Pick List, and then create a new pick list in the Pick Lists list using values from the following table.
Property Description Business Component
Choose PickList Generic.
This value indicates that Siebel CRM gets the list of values from a system table. For more information, see About the Picklist Generic Business Component.
Type Field
Choose Type.
This value configures Siebel CRM to search the Type field in the PickList Generic business component for types. Each list of values includes a type that uniquely identifies the list and each value in the list.
Type Value
Enter the relevant type for the list of values.
For example, the values that display in the Lead Quality list in the table in the section About the Picklist Generic Business ComponentAbout the Picklist Generic Business Component include a Type Value property whose value is LEAD_QUALITY.
Search Specification
In most situations, you can leave the Search Specification property empty. For more information, see How Siebel CRM Handles a Hierarchy of Search Specifications.
Sort Specification
Do one of the following:
To use the sort specification that is defined for the business component, leave the Sort Specification property empty.
To override the sort specification that is defined for the business component, define a value in the Sort Specification property.
For more information, see Creating a Sort Specification for a Static List.
No Insert
Make sure the No Insert property contains a check mark.
If the No Insert property does not contain a check mark, then Siebel CRM creates an error that is similar to the following:
Unable to create list popup applet
Creating a Sort Specification for a Static List
You can define a Sort Specification on a list to override the sort specification that is defined on the business component. The default value for the Sort Specification property in a list is empty, so Siebel CRM uses the sort that is defined on the business component. It uses the Order By field in a Type to sort the list of values in ascending order, by default. If the Order By values are empty, then it sorts the entries for the Type alphabetically in ascending order according to the Value field.
You can specify a sort specification on a static list to modify this behavior. This modification applies only to the static list. A sort specification on a list object sorts values in the static list that references the list of values in the PickList Generic business component. For more information, see How a Business Component Sorts Records.
Using Calculated Fields with Bounded Lists
It is recommended that you do not configure a list of values that references a calculated field if this field references another field that the user can update. For example, Siebel CRM comes predefined with a list named PickList Activity Priority that resides on the Priority field in the Action business component. The following properties of this list include a check mark:
No Insert
Static
Bounded
This list references the ACTIVITY_PRIORITY list of values that includes the following values:
1-ASAP
2-High
3-Medium
4-Low
This configuration requires the user to choose a value from the list of values. The user cannot manually add a value. However, if you configure the ACTIVITY_PRIORITY list of values to reference a calculated field, and if this field references another field that the user can update, and if the Predefault property of the business component contains a check mark, then Siebel CRM might allow the user to choose any value that the user enters in this updatable field. In this example, the user could add to the Priority field any value that the updatable field contains.
Using the Pick Applet Wizard to Create a Pick Applet
You can use a predefined pick applet to display a dynamic list in the Siebel client. You can use the Pick Applet Wizard to create a custom list.
To use the Pick Applet Wizard to define a pick applet
Click the File menu, and then click New Object.
Click the Applets tab, click the Pick Applet icon, and then click OK.
In the General dialog box, define the following properties, and then click Next:
Project.
Pick business component.
Name for the Picklist Applet:
Use the following format to name a pick a applet: business component name Pick Applet.
Use the following format to name an association applet: business component name Assoc Applet.
Display Name.
In the Web Layout General dialog box, choose the templates to use for the Base and Edit List modes, and then click Next.
For more information, see Options to Control How the User Creates, Edits, Queries, and Deletes CRM Data.
In the Web Layout - Fields dialog box, choose the fields that Siebel CRM must display in the pick applet, and then click Next.
In the Second Web Layout - Fields dialog box, choose the controls that Siebel CRM must display in the pick applet, and then click Next.
Siebel Tools displays all controls in the Selected Controls, by default. These controls reference the Model Pick Applet in the Siebel repository. To move a control to the Available Controls window, choose the control, and then click the left arrow.
In the Finish dialog box, review the information, and then click Finish.
The Pick Applet Wizard creates the pick applet object, and then opens the Web Layout editor that you can use to map list columns and controls to placeholders in the web template.
For more information, see #c_appletlayout.
Using the Pick List Wizard to Create a Dynamic List
You can use the Pick List Wizard to create a dynamic list and related objects. These objects include the following:
Pick List. Defines the properties of the list, including the originating business component and the pick business component. For more information, see How Siebel CRM Creates a Dynamic List.
Pick Map. Child object of a business component field that maps the source field in the pick business component with the target field in the originating business component.
Pick Applet. Pop-up applet that allows you to display the list of records where the user can choose a value.
The values of the Visibility Type and Visibility Auto All properties of the list object override the pop-up visibility properties on the business component. For more information, see Siebel Security Guide.
To use the Pick List Wizard to create a dynamic list
In Siebel Tools, click the File menu, and then click New Object.
Click the Pick List icon, and then click OK.
In the Pick List dialog box, enter the following information, and then click Next:
Project.
Business Component. Define the originating business component. This is the parent business component of the field that displays the list.
Field.
In the Pick List Type dialog box, choose Dynamic.
Note the following:
A static list gets values from a predefined list of values.
A dynamic list gets values from a business component.
For more information, see Using the Pick List Wizard to Create a Static List.
In the Pick List Definition dialog box, choose to use a new list or a predefined list:
If you must create a new list, then do the following:
Choose Create a New Pick List.
Click Next, and then proceed to Step 6.
If you must use a predefined list, then do the following:
Choose Use Existing Pick List.
Choose the predefined list from the Existing Pick Lists window.
Click Next, and then proceed to Step 8.
- In the Pick List Definition dialog box, enter information using values from the following table, and then click Next.
Property Description Business component
Choose the pick business component.
Business component field
Choose the field that Siebel CRM must use to sort the list.
Name
Enter a name for the new PickList object. Use the following format:
ABC PickList entity
It is not necessary to repeat the entity name if the name already includes a prefix. For example, a PickList object that reference the MS Subsegment business component is ABC PickList Subsegment. It is not MS PickList MS Subsegment.
Search specification
As an option, you can specify a search specification. For more information, see Options to Filter Data That Siebel CRM Displays in an Applet.
In the Pick List Specifications dialog box, define the actions, such as No Delete, that the user can perform on Siebel data.
You can leave all options without a check mark.
In the Pick Map dialog box, do the following:
Choose the source field in the originating business component.
Choose the target field in the pick business component.
Click Add.
Click Next, verify the information in the Finish Dialog box, and then click Finish.
Constraining a Dynamic List
The Constrain property of a pick map defines a constraint for a pick applet. For example, to configure a Country list to display only states that are part of that country, you must indicate the relationship between each state and the country where the state resides. Siebel CRM displays the State list after the user chooses a value from the Country list. The value that the user chooses from the Country list constrains the values in the State list. It uses the value that the user chooses from the Country list to filter the values that it displays in the State list. It only displays values in the State list if the Description field contains the value that the user chooses from the Country list.
To constrain a dynamic list
To define the constraint, do one of the following:
Use the predefined Description field in the Picklist Generic business component.
Extend the table and use a new column.
To update the Description field with valid country values, do one of the following:
Do the following in the Siebel client:
Navigate to the Administration - Data screen, List Of Values view.
Enter valid country values in the Description field.
Do the following in Siebel Tools:
In the Object Explorer, click Business Component, and then locate the Account business component in the Accounts list.
In the Object Explorer, expand the Business Component tree, click Field, and then locate the State field in the Fields list.
In the Object Explorer, expand the Field tree, and then click Pick Map.
In the Pick Maps list, add a new record using values from the following table.
| Property | Value |
|---|---|
Field |
Country |
Constrain |
True |
Pick List Field |
Description |
Creating a Hierarchical List
This topic describes how to create a hierarchical list.
To create a hierarchical list
In Siebel Tools, define a parent list using values from the following table.
Property Value Business Component
Picklist Hierarchical
Create a child list using values from the following table.
Property Value Business Component
PickList Hierarchical Sub-Area
In the Object Explorer, click Business Component.
In the Business Components list, locate the business component that contains the fields that you must associate with the hierarchical list.
In the Object Explorer, expand the Business Component tree, and then click Field.
In the Fields list, locate the parent field, and then set properties using values from the following table.
Property Description Picklist
Set to the parent list.
Immediate Post Changes
Make sure this property contains a check mark.
In the Fields list, locate the child field, and then set properties using values from the following table.
Property Description Picklist
Set to the child list.
In the Object Explorer, expand the Field tree, and then click Pick Map.
In the Pick Maps list, create a new pick map using values from the following table.
Property Description Field
Choose the name of the parent field.
PickList Field
Choose the name of the parent field.
Constrain
Make sure this property contains a check mark.
In the Pick Maps list, create another new pick map using values from the following table.
Property Description Field
Choose the name of the child field.
PickList Field
Choose the Value field.
Constrain
Leave empty.
Compile your modifications.
To designate the parent value, add LOV values to the Parent LIC column.
For more information, see the table in the topic About Hierarchical Listsand the topic about constrained lists of values in Siebel Applications Administration Guide.
Test the hierarchical list.
Creating a List of Values
A list of values is a set of values that Siebel CRM uses to enter values in a static list. If the user chooses a static list, then it displays a list of values. The user can choose a value from the list to cause Siebel CRM to enter values into the field.
Siebel CRM stores the values in a list of values as records in the S_LST_OF_VAL table. A list of values includes the following parts:
Header Row. Defines the name of the type grouping. For example, the first row in the following table. This type grouping name is the value of the Display Value property, such as ACCOUNT_STATUS. The row includes a Display Value property, but Siebel CRM does not display the header row in the list of values. The Display Value property for a header row defines only the name for the list of values. It does not display any strings in the Siebel client.
Display Value Rows. Includes the values that Siebel CRM displays in a list that references the list of values. The rows in the following table where Type is ACCOUNT_STATUS are examples of display value rows. These rows contain the display values that Siebel CRM displays in the Siebel client. The Type property for each display value row is ACCOUNT_STATUS, which is the same as the Display Value of the Header Row.
The Type field groups List of Value records. For example, the Type value is ACCOUNT_STATUS for values that the Status field of the Account Entry Applet includes.
A picklist object includes a Type property that identifies the LOV Type that is associated with the list. Siebel CRM reads this information to determine the list of values that it displays for a list in the Siebel client. For more information, see About Static Lists.
The following table lists the values that belong to the LOV Type defined as ACCOUNT_STATUS.
Table Example Values from the ACCOUNT_STATUS LOV Table
| Type | Display Value |
|---|---|
LOV_TYPE |
ACCOUNT_STATUS |
ACCOUNT_STATUS |
Candidate |
ACCOUNT_STATUS |
Qualified |
ACCOUNT_STATUS |
Active |
ACCOUNT_STATUS |
Inactive |
Creating a New List of Values
Siebel CRM comes with many predefined lists of values that support the static lists that it displays in the Siebel client. You can modify a predefined list of values, or you can create a new one:
You can use the List of Values view in the Administration - Data screen in the Siebel client to modify a list of values in Siebel Tools. In Web Tools, you can do the same from List of Values in the Tools menu. You can add, modify, or deactivate LOV values for LOV types for predefined list of values. For example, you can add another value to the ACCOUNT_STATUS LOV type. For more information, see Siebel Applications Administration Guide.
You can create a new list of values in Siebel Tools and Web Tools. If you must add a new set of values that you define as a new LOV Type, then you must use Siebel Tools or Web Tools.
To create a new list of values
In Siebel Tools, click the Screens application menu, click System Administration, and then click the List of Values menu item.
Note: In Web Tools, click the Tools menu and then click the List of Values menu item.In the List of Values list, create a header record for the new LOV Type using values from the following table.
Field Description Type
Enter
LOV_TYPE.Display Value
Enter the name of the LOV Type. For example,
ACCOUNT_STATUS.Do not use single quotes in the Display Value property. Single quotes cause search specifications that reference the Display Value field to fail. For more information, see Options to Filter Data That Siebel CRM Displays in an Applet.
Translate
Do not modify this property. For more information, see Modifying the Translate Property.
Language Independent Code
In most cases, enter the same value that you enter for the display value. For more information, see Overview of Language-Independent Code.
Enter a new record for the LOV value using values from the following table.
Property Description Type
Choose the name of the LOV type that you created in Step 2. For example ACCOUNT_STATUS.
The value you define for this property must match the value you define in the Type property of the list that you configure to display these values.
Display Value
Enter the value that Siebel CRM must display in the list.
Language Independent Code
In most cases, enter the same value that you enter for the display value.
Translate
Do not modify this property. For more information, see Modifying the Translate Property.
Language Name
Choose the name of the language for the Display Value.
You use some properties only for a multilingual list of values, such as Translate, Multilingual, and Language-Independent Code. For more information, see Defining Properties of an MLOV. For a complete description of LOV fields, see Siebel Applications Administration Guide.
Repeat Step 3 for each LOV value.
Create a list to display the LOV Type.
For more information, see Configuring Lists and Pick Applets.
Compile and test your modifications.
Make sure you clear the cache. For more information, see Step 7 in Associating an Organization with a List of Values .
Associating an Organization with a List of Values
This topic describes how to associate an organization with a list of values. It includes the following information:
Guidelines for Associating an Organization witha List of Values
Guidelines for Using Script to Associate a Listof Values with an Organization
Using the Organization Specifier Property to Display Custom Lists of Values
You can define a list of values to display for some organizations but not for other organizations. For example, assume your company includes several subsidiary companies and each subsidiary is defined as an organization in your Siebel deployment. For a list, you can display a different list of values for each member of each organization. To do this, you associate each list of values to an organization.
For example, the organization associated with the active position of a user might be Org ABC, but the primary organization that is associated with the record that the user is viewing might be Org XYZ. In this situation, Siebel CRM displays the list of values that it associates with Org XYZ.
For more information, see Guidelines for Associating an Organization witha List of Values. For more information about organizations and access control, see Siebel Security Guide.
To associate an organization with a list of values
In the Siebel client, choose the site map, click Administration - Data, and then click LOV Explorer.
Siebel CRM displays the LOV types in a tree. You can expand each LOV type to view the LOV values it associates with each LOV type.
In the List of Values - Type list, query the Type field for the LOV type that requires LOV values that are specific to the organization.
Click the Organization field, and then click Select.
In the Organizations dialog box, choose the organizations you must add, click Add, and then click OK.
In the LOV explorer, expand the Types folder, and then expand the Values folder.
In the List of Values list, create a set of LOV values for each organization:
In the List of Values list, click New.
Enter a value in the Display Name field and Code field.
The code is typically the same as the display name.
Choose an organization to associate with the LOV value.
-
Repeat for each LOV value that you must associate with an organization.
You can associate each LOV value with only one organization. If you must associate a value with more than one organization, then you must create a duplicate value for each organization.
If a LOV Value is not associated to an organization, then it is available to all organizations, except the organizations that Siebel CRM associates with the LOV Type in Step 4.
Click Clear Cache.
The list of value modifications take effect after you clear the cache.
Guidelines for Associating an Organization witha List of Values
If you associate an organization with a list of values, then use the following guidelines:
Identify all LOV types that require lists of values that Siebel CRM associates with an organization. For each of these LOV types, do the following:
Identify and use predefined lists of values. These are the values that all organizations use. They do not require custom lists of values.
Identify the organizations that require custom lists of values. For each organization, define the custom lists of values for the organization.
For a large deployment, use Enterprise Integration Manager to load list of values data that is specific to an organization. Make sure to associate the appropriate organizations with the LOV types and a single organization with each LOV value. For more information, see Siebel Enterprise Integration Manager Administration Guide.
Explicitly associate each list of values with each organization. A list of values that is associated with an organization is associated with only one organization. Organization hierarchy does not determine inheritance between lists of values. For example, a list of values that is associated with a parent organization does not mean that all child organizations inherit access to the list of values.
After an upgrade, review your custom lists of values to make sure that any predefined lists of values that come with the upgrade do not interfere with your custom lists of values.
If you associate an MLOV with an organization, then make sure one of the following situations is true:
The values for the Language Independent Code property and the Display Value property are distinct from all other records.
The values for the Language Independent Code property and the Display Value property are the same as another record that belongs to another organization.
Guidelines for Using Script to Associate a Listof Values with an Organization
If you use script to associate a list of values with an organization, then use the following guidelines.
If you use LookupValue or LookupName as an expression in a script, and:
Data does not exist. Siebel CRM uses the organization that is associated with the current position of the user to determine visibility of the list of values. Creating a new record is an example where data does not exist.
Data does exist. Siebel CRM uses the primary organization that is associated with the record to determine visibility of the list of values.
If you use LookupValue or LookupName as a function in a repository configuration or a script, then Siebel CRM uses the organization that is associated with the primary position of the user to determine visibility of the list of values.
Creating a Value to Display for More Than One Organization
If you require the same value to display for more than one organization that is associated with the LOV type, then you must create duplicate values for each organization. Siebel CRM displays a list of values that is associated with an organization to members of that organization only. For example, assume the following:
Value 1 is associated with Org ABC.
Value 2 is associated with Org XYZ.
Value 3 is not associated with any organization.
In this example, Siebel CRM displays value 3 for all organizations except for Org ABC and Org XYZ. For Value 3 to display for Org ABC and Org XYZ, you must create duplicate values, and then add them to the lists of values that are specific to the organization, one assigned to Org ABC and one assigned to Org XYZ.
To create a value to display for more than one organization
Create duplicate values.
Add these values to the lists of values that are specific to each organization.
Using the Organization Specifier Property to Display Custom Lists of Values
If the user chooses an existing record, then Siebel CRM uses the primary organization that is associated with the record to determine the organization context. It does not use the organization that is associated with the position of the user. The Owner Organization Specifier property of the base table that the business component references specifies the column that contains the organization Id. Siebel CRM defines this property on the primary extension table for business components that reference the S_PARTY table.
The Organization Specifier property in most tables reference the column that contains the primary organization Id. For example, the S_ORG_EXT table references BU_ID. You can define this property in several levels. This configuration allows you to define a child business component so that it uses the organization context from the row in the parent business component. For example, if the user creates a child record, then the value of the column defined as the Owner Organization Specifier determines the lists of values that Siebel CRM displays.
The following is an example of the Organization Specifier property defined with several levels:
[S_TAB_X][S_TAB_COL1][S_TAB1_COL2]
In this example, each element is one of the following:
A column in the current table
The name of an extension table
The name of an FK column
The name of the column that contains the BU_ID
To use the organization specifier property to display custom lists of values
Identify the objects involved in the configuration.
For example, the columns, extension tables, and FK columns.
Define the Organization Specifier property.