17Configuring Special-Purpose Applets
Configuring Special-Purpose Applets
This chapter describes how configure special-purpose applets such as chart, tree, attachment, and pop-up applets. It includes the following topics:
Configuring a Chart Applet
This topic describes how to configure a chart applet. It includes the following topics:
About Chart Applets
A chart applet is a type of applet that graphically displays data from a business component in various formats that allow the user to analyze trends, compare categories, and examine other relationships in the data. Note the following about charts:
You can include any data in a business component in a chart. Aggregated data based on period, multiple attributes, a particular attribute, multiple value fields, a selected record, calculated field or ranges can all be displayed in chart format.
The data in a chart applet reflects the current query for the business component. The following aggregated functions are supported when building your query: MIN, MAX, SUM, AVG, COUNT, and GROUPBY.
You can click in the chart to update it with modifications to the query.
The JavaScript D3.js (Data Driven Documents) charting engine renders charts in the UI.
The following figure displays a chart applet in a view.
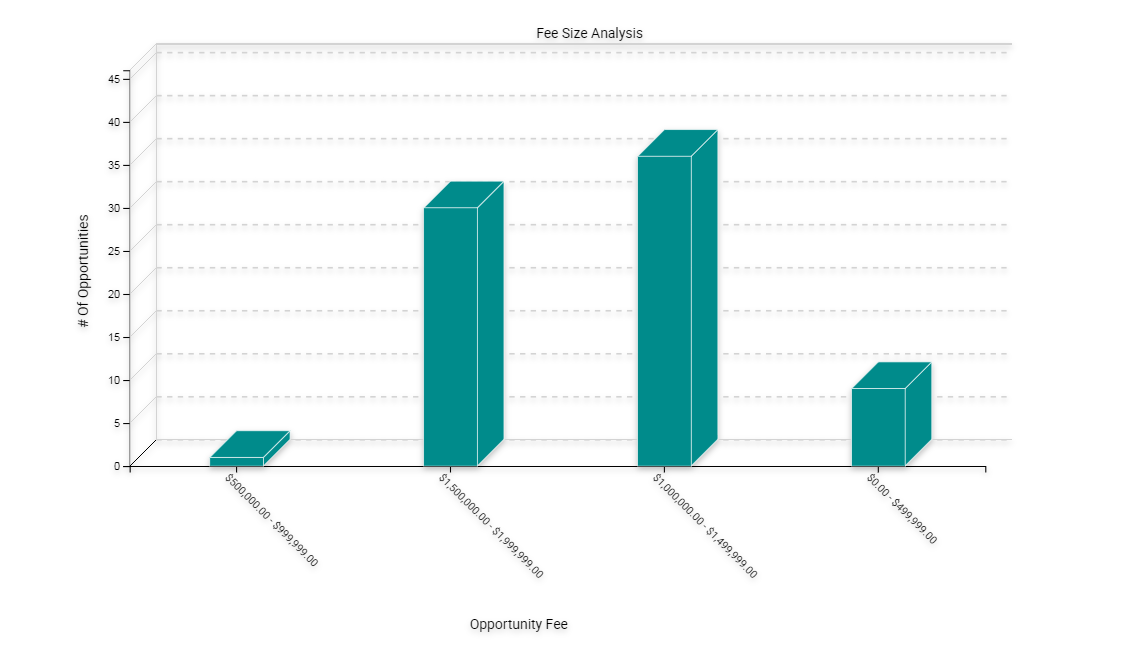
This view is named Opportunity Fee Size Analysis. The object definition for this view is named FINCORP Deal Chart View - Fee Size Analysis. It includes a list and a chart applet. It lists opportunities in the list applet and aggregates them by size in the FINCORP Deal Chart View – Fee Size Analysis chart applet. The chart applet in this view displays the data in the three dimensional bar chart format, by default. The user can choose different chart types from the Type list that Siebel CRM displays in the chart applet. To modify the size of the legend for a chart applet, the user can right-click the legend, and then choose one of the menu items. For more information, see Types of Charts, and Considering Factors That Affect Chart Performance.
Example of a Chart That Includes Three Axes
The following figure displays the Project Revenue Analysis chart, which is an example of a chart that includes three axes. In this chart, Siebel CRM does the following:
Plots the amount of revenue on the Y data values axis
Displays quarters on the X category axis
To identify a different project, uses each bar color for Z, series, and axis.
In a chart that contains two Y axes, the first Y-axis refers to the vertical axis in the first quadrant of the chart, and the second Y-axis refers to the vertical axis in the second quadrant of the chart.
Axis Terminology
The following table describes each axis in a chart.
Table Axis Terminology
| Axis | Name | Usage in Bar Chart | Usage in Line Chart | Usage in Pie Chart |
|---|---|---|---|---|
X-axis |
Category |
The horizontal axis, except in a horizontal bar chart, where the X-axis is the vertical axis. |
The horizontal axis. |
The set of pie slice labels. |
Y-axis |
Data Values |
The vertical axis, except in a horizontal bar chart, where the Y-axis is the horizontal axis along the lower level of the chart. |
The vertical axis. |
The percentage of the circle that each pie slice occupies, and the corresponding numeric value. |
Z-axis |
Series |
A set of labels in the legend. In the stacked bar or cluster bar charts, each series label corresponds to a bar segment or bar of a color that Siebel CRM displays in each stack or cluster. |
A set of labels in the legend. In a line chart, each series label in the legend corresponds to one line. |
Siebel CRM charts only the first entry in each series. Do not use a series field with a pie chart. |
Types of Charts
This topic describes different types of charts. It includes the following topics:
Siebel CRM does not support all styles for all chart applets. It uses data from the CHART_TYPE list of values to enter values in a chart type list.
The user can choose different chart types from the Type list that Siebel CRM displays in most chart applets. A chart type includes the following layout options:
-
Horizontal bar
-
Stacked bar
-
Pie
-
Line
-
Scatter
-
Spline
-
Combo, which is a combination of a line chart and a bar chart
Several of these charts can display data in two or three dimensions. The functionality for a three dimension chart is the same as the functionality of the corresponding two dimensional chart except that the three dimensional chart displays thickness for the bar, line, or pie.
Bar Charts
A bar chart compares the difference in data from one category to another category. This topic includes examples of different bar charts.
Three Dimensional Bar Chart
The following figure includes a three dimensional bar chart that divides data from source records into categories and displays the total for each category as a vertical bar.
The following figure includes a cluster of bars for categories rather than a single bar if the chart is configured with a Z series axis.
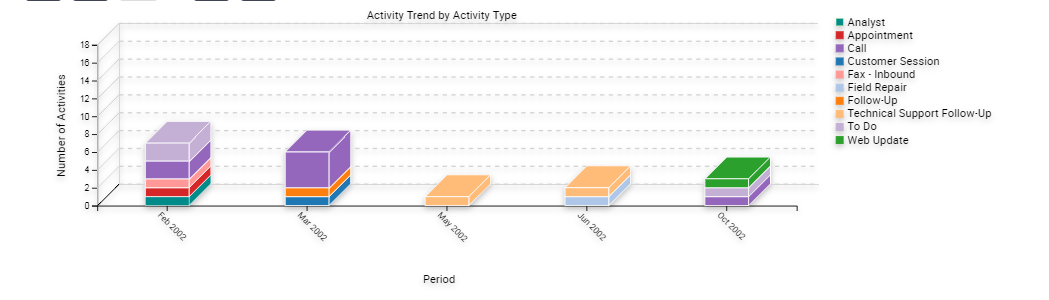
Three Dimensional Stacked Bar Chart
The following figure includes a three dimensional stacked bar chart that normally includes a series axis. The chart displays a single stack of bars for each category. A bar with a different color for each series displays in this stack of bars. A stacked bar chart displays the individual value for each series in the category and the total for the category. In this example, the Project Revenue Analysis chart displays data in the following ways:
Data in the values axis corresponds to project revenue.
Data in the category axis corresponds to a quarter.
Data in the series axis corresponds to the project name.
Each quarter along the X-axis includes a stack of bars. Each bar in the stack indicates the revenue reached in a quarter. The stacks in each bar indicate individual projects.
Two Dimensional Bar Chart
The following figure includes a two dimensional bar chart that is functionally equivalent to a three dimensional bar chart except it displays data without the illusion of depth. A two dimensional chart is typically easier to read accurately but might be less visually attractive than the three dimensional chart. If a series axis is present, then the two dimensional bar chart displays bars in a cluster.
Two Dimensional Horizontal Bar Chart
The following figure includes a two dimensional horizontal bar chart that is functionally equivalent to a two dimensional bar chart except the X-axis and Y-axis are switched.

Two Dimensional Stacked Bar Chart
The following figure includes a two dimensional stacked bar chart that is functionally equivalent to the three dimensional stacked bar chart except it displays without the illusion of depth.

Line Charts
A line chart is a type of chart that displays trends across categories or over time. This topic incudes examples of different line charts.
Two Dimensional Line Chart
The following figure includes a two dimensional line chart that displays one or more lines plotted against an X-Y grid. If a series axis does not exist, then Siebel CRM displays a single line. If a series axis does exist, then Siebel CRM displays one line for each color in the legend.
Two Dimensional Spline Line Chart
The following figure includes a two dimensional spline line chart that displays one or more lines plotted against the X-Y grid with the points plotted accurately but the line between points smoothed mathematically:
If a series axis does not exist, then Siebel CRM displays a single line and set of points.
If a series axis exists, then Siebel CRM displays one line and the corresponding set of points for each color in the legend.
Combo Line Chart
The following figure includes a Combo line chart that displays a single bar chart with superimposed dots. The two charts share the category axis but each chart includes separate data points axes that Siebel CRM displays in the following ways:
On the start of the graph for the bar chart
On the end of the graph for the line chart
Pie Charts
A pie chart is a type of chart that compares the relative difference across categories. It divides a circle into segments that represents the percentage of the whole for each category. This topic includes examples of pie charts.
Two Dimensional Pie Chart
The following figure includes a two dimensional pie chart that aggregates data in the records according to category and displays each category as a separate segment in the pie chart.
The category constitutes the X-axis. It is the set of pie slices and corresponding labels.
The data points constitute the Y-axis. It determines the relative size of each pie slice as a percentage of the total.
You cannot define a series axis for a pie chart.
Scatter Charts
A scatter chart is a type of that displays the distribution of data across two dimensions, which is useful for probability distribution and other uses. The category axis must contain only numeric data, so you cannot convert the two dimensional scatter chart to other chart types, such as the bar chart, line chart, or pie chart. For this reason, the following conditions apply for the two dimensional scatter chart:
Does not display in the Type list
Does not include a Type list
The following figure includes a two dimensional scatter chart.
How Siebel CRM Creates a Chart Applet
Siebel CRM builds a chart as an applet that contains one or more Chart object definitions. A Chart is a child of an applet. The Business Component property of a chart applet identifies the business component that provides data that Siebel CRM displays in a chart applet. Records in this business component are subject to the current view, the current query, and visibility requirements. Business component fields provide the data for the category, data point, and series axes in a chart applet. The properties of the chart object define the relationship between axes and fields. Siebel CRM also supports the building of charts based on Virtual Business Components (VBC). This allows charts to be built using data from external data sources.
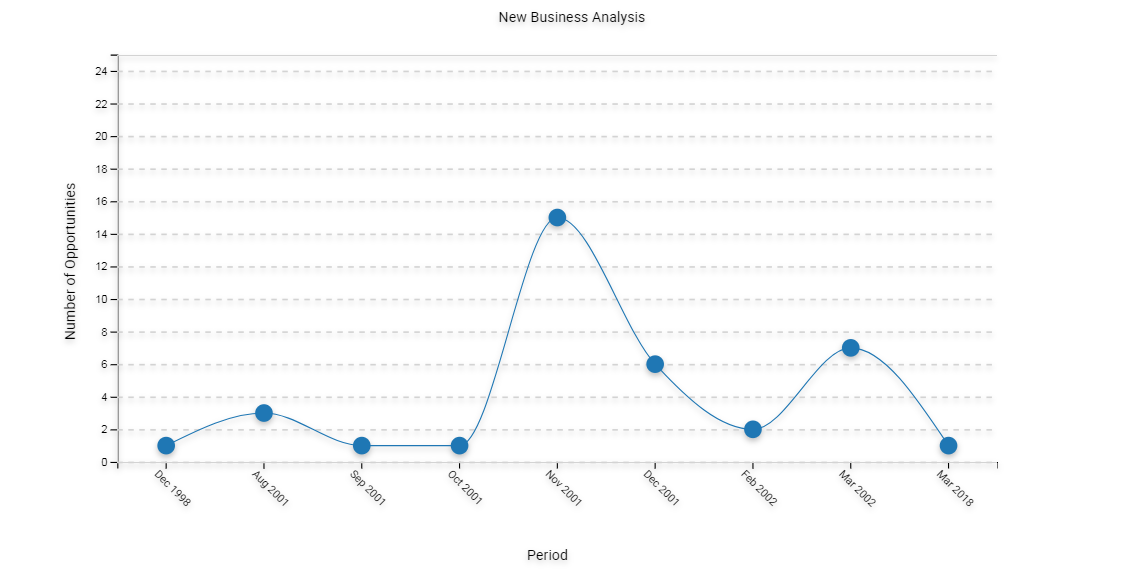
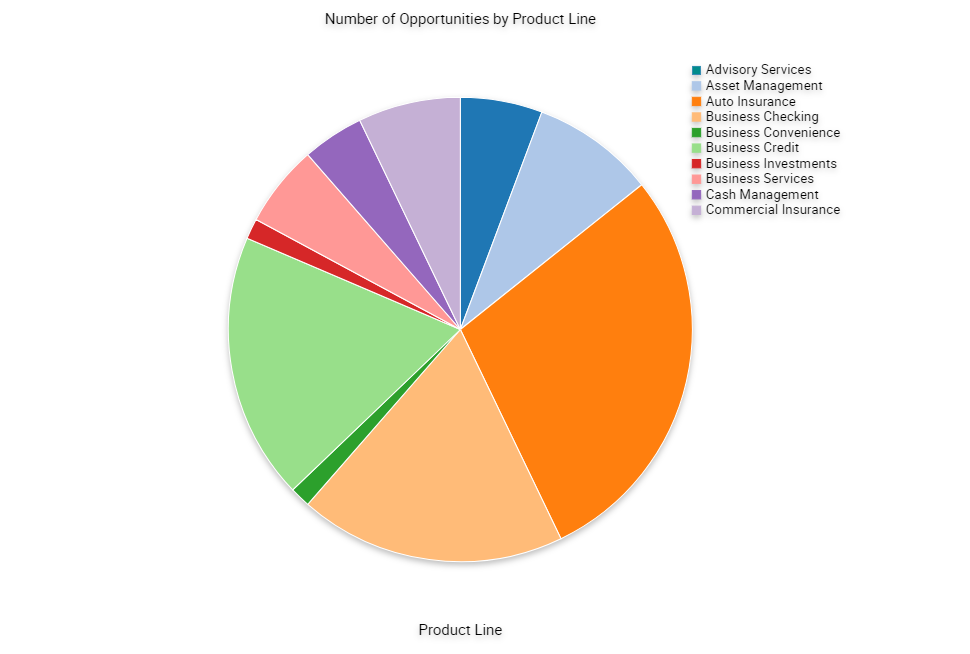
A single bar or line graph is the simplest form of chart applet. It contains no series axis and only a category field and a data point field are defined. Siebel CRM plots pairs of category and data point field values as points or bars. If multiple records use the same category value, then Siebel CRM adds together their data point values.
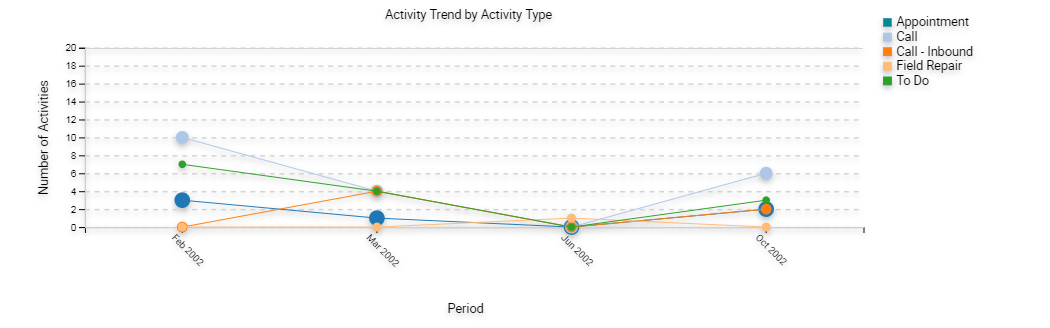
The following figure includes opportunities on the data point axis that Siebel CRM plots against the source of the opportunity on the category axis. Example sources include referral, magazine article, Web site, and so on. To create the data required for the line, Siebel CRM checks the Source field in each record and tallies the number of opportunities for each distinct source value.
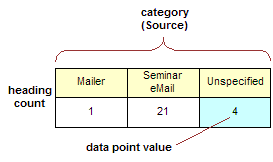
The following figure includes the result, which is a two row temporary table that includes a column for each source.
The following figure includes a multiple line chart where Siebel CRM adds a row to the temporary table for each line in the series.
The following figure includes the temporary table for a multiple line chart.
Properties of the Chart Object
To create the data mapping from the business component to the chart applet, you must define the properties of the Chart object that this topic describes. For situations where these properties are configured differently, see How Siebel CRM Creates a Chart Applet and Siebel Object Types Reference.
The following table describes properties of the Chart Object.
Table Properties of the Chart Object
| Property | Description |
|---|---|
Category Field |
Contains the name of a text or date field in the business component except for a scatter chart that uses a numeric category field. When Siebel CRM scans the business component records, it maps the different values in this field to different categories. It displays values on the X-axis labels of the chart. |
Data Point Field |
Can contain the name of a numeric field in the business component or is not defined:
These counts or totals determine the height along the Y-axis of a bar or line point for each unique category field value in the line. Rather than a total or a count, some other function that is defined in the Data Function property can determine how to use the data in the Data Point Field property. |
Series Field |
Contains the name of a text field in the business component, or is not defined. When Siebel CRM scans the business component records, it maps the different values in this field to different lines. It displays these values on the legend labels of the chart. If the number of series exceeds 50 when the user runs the chart, then Siebel CRM displays an error message. The user might be required to run another query that results in a display that does not exceed 50 series. |
Function |
Determines how Siebel CRM converts data point field values into the cell values of the new table. The following values are available:
|
Using the Chart Applet Wizard to Create a Chart
You can use the Chart Applet Wizard to create a new chart applet. For more information, see Example of a Chart That Includes Three Axes.
To use the Chart Applet Wizard to create a chart
In Siebel Tools, click the File menu, and then click New Object.
In the New Object Wizards dialog box, Click the Applets tab, click the Chart Applet icon, and then click OK.
In the General dialog box of the Chart Applet Wizard, define the following properties, and then click Next:
Project
Business Component
Name
Display Name
In the Y Axis dialog box, define the properties for the Y-axis, and then click Next.
Follow the instructions in the dialog box.
When you define the Data point field, Siebel Tools enters values in the Titles section of the dialog box. For more information, see Properties of the Chart Object.
In the X-axis dialog box, define the properties for the X-axis, and then click Next.
For more information, see Properties of the Chart Object.
Optional. In the Z Axis dialog box, define the properties for the Z-axis, and then click Next.
For more information, see Properties of the Chart Object.
In the Chart Title dialog box, enter a title, and then click Next.
In the Web Layout - General dialog box, choose the Siebel Web Template to use for the base read-only mode, and then click Next.
In the Finish dialog box, review the information, and then click Finish.
The Chart Applet Wizard creates the required object definitions and sets the property values according to the information you entered in the wizard. The Web Applet Layout Editor opens and allows you to map controls to placeholders in the web template.
For more information, see Editing the Layout of a Web Page.
Add list controls to the web template for the applet.
Siebel CRM displays these controls in the chart applet in the Siebel client. For more information, see Configuring Lists in Chart Applets.
Add the applet to a view.
For more information, see Editing the Layout of a View.
Compile and test your modifications.
For more information, see Using Siebel Tools.
Configuring Lists in Chart Applets
A chart applet typically provides one or more lists that allow the user to determine how Siebel CRM displays or uses data.
The following figure includes these lists.
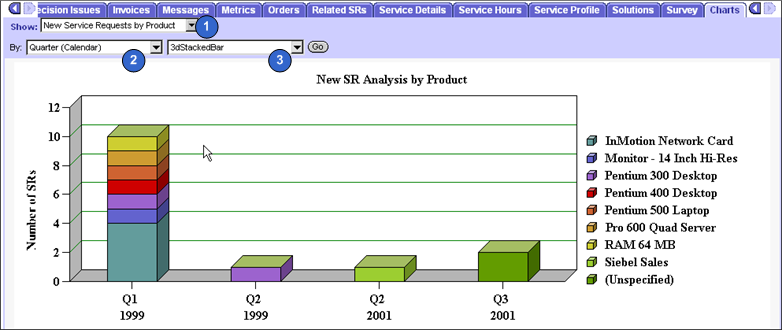
Explanation of Callouts
The following types of lists are available:
Show list. Allows the user to modify data that Siebel CRM displays on the Y-axis. For more information, see Configuring the By List of a Chart Applet.
By list. Allows the user to modify data that Siebel CRM displays on the X-axis. For information, see Configuring the By List of a Chart Applet.
Second By list. Allows the user to choose the source field that provides data for the Z-axis. For more information, see Configuring the Second By List of a Chart Applet.
Type list. The most common of the four lists. Siebel CRM displays it in most chart applets and allows the user to choose a different type of chart for the same data, such as a pie chart instead of a bar chart, or a two-dimensional line chart instead of a three-dimensional chart. For more information, see Types of Charts.
You can use a comma separated list of chart type names in the Picklist Types property of the chart object definition to define options for the type list. For example:
3dBar,3dStackedBar,3dPie,3dHorizBar,2dBar,2dStackedBar,2dPie,2dHorizBar
Siebel CRM does not allow spaces between the elements in the comma separated list.
The default type is the chart type that Siebel CRM displays the first time it displays the chart. This default is defined in the Type property. A chart that does not include a type list uses the Type property to define the chart type. The user cannot modify a chart that does not include a type list.
Required Properties of the Lists
Each list in a chart applet requires a corresponding ComboBox control that is a child object of the chart applet. The following table describes the required properties for each type of list.
Table Types of Lists and Their Required Property Values
| Type of List | Control Name Property | MethodInvoked Property |
|---|---|---|
Type |
ChartPicktype |
PickChartType |
Show |
ChartPickfunction |
PickYAxis |
By |
ChartPickby |
PickXAxis |
Second By |
ChartPickby2 |
PickZAxis |
Configuring the Show List of a Chart Applet
The show list allows the user to modify data that Siebel CRM displays on the Y-axis. It displays a list of field and function combinations that determine the values that Siebel CRM plots along the Y-axis. The title of the Y-axis mirrors the label of the show list.
To configure the show list of a chart applet
In Siebel Tools, display the Chart object type and all child objects of the Chart object type. A chart is a child of an applet.
For more information, see Displaying Object Types You Use to Configure Siebel CRM.
In the Object Explorer, click Applet.
In the Applets list, locate the applet you must modify.
In the Object Explorer, expand the Applet tree, and then click Chart.
In the Charts list, locate the chart you must modify.
Define chart properties using values from the following table.
| Property | Description |
|---|---|
Data Point Field |
Enter a comma separated list of source fields:
|
Data Function |
Enter a comma separated list that includes the following values: SUM, COUNT, AVERAGE, or PLOT. PLOT configures Siebel CRM to get Y values from the values in the source field. The order of items in this list determines the association with a data point field and title, which is the list function. If the Data Function property contains fewer elements than the list of names that the Picklist Functions property defines, then Siebel CRM substitutes the values in the Data Function property with the following values: |
Picklist Functions |
Enter a comma separated list of Y-axis titles, which is the text that Siebel CRM displays in the list. The order of values in the Picklist Functions property determines the association with a data point field and data function. |
Example of a Show List That Is Defined Explicitly
You can define a show list with an explicit format that displays the following choices:
Number of Opportunities
Opportunity Revenue
Opportunity Expected Revenue
The following table describes the properties and their values that are required to implement this example.
Table Properties of the Show List for the Sales Method Bar Chart
| Property | Value |
|---|---|
Picklist Functions |
Number of Opportunities, Opportunity Revenue, Opportunity Expected Revenue |
Data Function |
Count,Sum,Sum |
Data Point Field |
Name,Revenue,Expected Revenue |
In this example, the values in each comma separated list creates the following relationships between the properties:
Number of Opportunities performs a Count function on the Name field.
Opportunity Revenue performs a Sum function on the Revenue field.
Opportunity Expected Revenue performs a Sum function on the Expected Revenue field.
Example of a Show List That Is Defined Implicitly
It is recommended that you explicitly define the show list. Siebel CRM retains the ability to implicitly define the Show list for backwards compatibility with earlier versions of Siebel CRM. It is more restrictive.
The Lead Source Analysis chart in the Opportunity New Business Analysis view in Siebel Sales (Oppty Chart Applet - New Business) is an example of a Show list that Siebel CRM defines with an implicit format and function list. This list displays the following choices:
Number of Opportunities
Opportunity Revenue
Average Opportunity Revenue.
The following table describes the properties and their values that are required to implement this example.
Table Properties of the Show List for the Lead Source Analysis Chart
| Property | Value |
|---|---|
Picklist Functions |
Number of Opportunities,Opportunity Revenue, Avg Opportunity Revenue |
Data Function |
Count |
Data Point Field |
Revenue |
The value of Revenue in the Data Point Field property applies to all entries in the list.
In this example, the values in each comma separated list creates the following relationships between the properties:
Number of Opportunities performs a Count function on the Revenue field.
Opportunity Revenue performs a Sum function on the Revenue field.
Avg Opportunity Revenue performs an Average function.
The value of the Count in the Data Function property is not required. It can be empty.
If the number of entries in the Data Function property is not the same as the number of entries in the Picklist Functions property, then Siebel CRM supplies the following predefined list in the Data Function property:
Count,Sum,Average,Plot
Configuring the By List of a Chart Applet
The by list allows the user to modify data on the X-axis:
-
In a period chart, Siebel CRM enters data into the by list with different date periods. The user can choose from a list of possible X-axis date periods for calendar data. This calendar data includes day, week, month, quarter, and year. You can define these options in the Picklist Periods property of the chart object.
-
If you define a list of source fields rather than a single source field, then the list allows the user to choose the source field that provides data for the X-axis.
-
The user can invert the X-axis and the Z-axis. The user can view the data from a source field in a business component that displays along the X-axis or Z-axis according to the selection the user makes in the list.
To configure the by list of a chart applet
-
Define the Category Field property of the chart object.
Calendar Increments in the List and the X-Axis
If the Category Field property contains the name of a single field that is a DTYPE_DATE data type, then the X-axis displays calendar increments and the chart is a period chart. In this situation, Siebel CRM enters data into the list with calendar increment options, including user defined periods, such as Day, Week, Month, Quarter, and Year. You can administer these increments in the Periods view of the Administration - Data screen.
For example, in the New Business Analysis chart the category field is Created, which is the date that Siebel CRM created the opportunity record. The increment that the user chooses in the by list determines the date increments that the category axis contains.
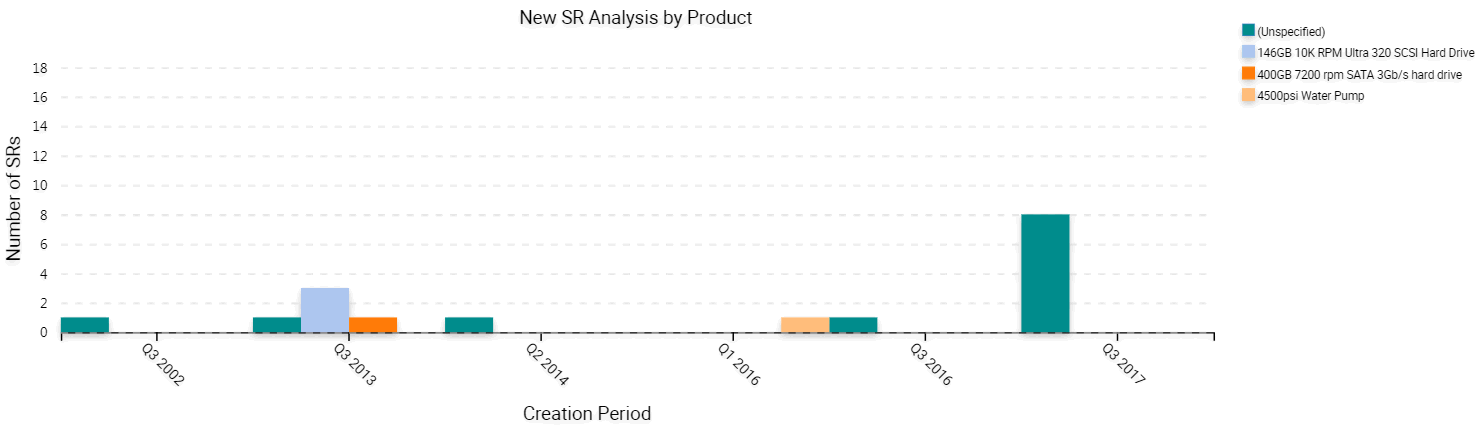
Text labels in the X-Axis and Category and Series Field Names in the List
If the Category Field property contains the name of a single text field from the business component, and if a series field is defined in the Series Field property, then the by list includes the names of the category field and the series field. The user can choose either field to update the X-axis with labels from the contents of that field. The unchosen field provides labels for the legend box. The legend box is the Z-axis. The default value is the category field and Siebel CRM initially displays it on the X-axis.
For example, the chart in the Service Request Product Analysis view in the Siebel Service application includes a Product category field and a Severity series field. When Siebel CRM initially displays the chart, the X-axis labels are product names and the legend labels are severity levels. Siebel CRM displays the Product and Severity field names in the by list. The severity allows the user to display severity levels in the X-axis and product names in the legend.
Text Labels in the X-Axis and Multiple Field Names in the List
If the Category Field property contains a comma separated list of field names, then Siebel CRM displays this list in the by list. The user chooses the field that provides data for the X-axis. The default value is the first value in the list. You must not include an empty space before or after a field name in the list.
Numeric Values in the X-Axis and No List
If the Category Field property contains the name of a single numeric field, then the X-axis includes numeric increments, similar to the process of creating increments for the Y-axis. In this situation, Siebel CRM does not display the by list.
For example, the Probability Cluster Analysis chart in the Opportunity Probability Cluster Analysis view includes the Rep% category field, which is the probability of a sale. In this chart, Siebel CRM plots probability against the X-axis, the X-axis increments are percentages from 0% to 100%, and Siebel CRM displays no by list.
Configuring the Second By List of a Chart Applet
You can configure the second by list.
To configure the second by list of a chart applet
Define the Series Field property of the chart object.
The following values in the Series Field property in the chart object determines the behavior of the second by list:
If the Series Field property is empty, then Siebel CRM maps all records into a single series.
If the Series Field property contains the name of a field from a business component, then Siebel CRM includes labels on the Z-axis that it gets from the contents of that field.
If the Series Field property contains a comma separated list of field names, then Siebel CRM displays this list of fields in the second by list. The user chooses the field that provides data for the Z-axis. The default value is the first value in the comma separated list.
Configuring a Chart That Includes Multiple Lines Against One Y-Axis
This topic includes an example that defines different combinations of the source field and function to determine how Siebel CRM plots a chart with multiple lines against the same Y-axis. Siebel CRM displays the name for each line in the legend. For example, it can display revenue, expected revenue, and net profit as superimposed lines on the same line graph.
To configure a chart that includes multiple lines against one Y-axis
Complete Step 1 through Step 5 in the procedure Configuring the Show List of a Chart Applet.
Define properties of the chart object, using values from the following table.
Property Description Data Point Field
Create a comma separated list of source fields, one for each line that Siebel CRMdisplays in the graph.
Data Function
Create a comma separated list that includes some of the following function names: SUM, COUNT, AVERAGE, or PLOT.
PLOT indicates that Siebel CRM gets the Y values directly from the values in the source field.
The list of function names must include the same number of entries that the Data Point Field list includes. The order in the list in the Data Function property determines the association with the data point field and title.
Picklist Functions
Create a comma separated list of Y-axis titles. Items in this list define the individual lines in the Legend. The list of titles must include the same number of entries that Siebel Tools displays in the list in the Data Point Field property. The order in the list determines the association with the data point field and data function.
Series Field
This property must be empty. Remove any existing values from the Series Field property. If the Series Field property contains a value, then Siebel CRM converts the multiple lines to a Z-axis.
Multi Data Point
Set to TRUE to plot multiple lines.
In the Applet Web Editor, remove the Show combo box and the label for the Show combo box.
Configuring a Chart That Includes Two Y Axes
You can define a chart that includes two lines that Siebel CRM plots against different Y axes. Siebel CRM displays one line at start of the graph and the other line at end of the graph. You can use any field or function combination for the first Y-axis or for the second Y-axis.
To configure a chart that includes two Y axes
Complete Step 1 through Step 5 in Configuring the Show List of a Chart Applet.
Define properties of the chart object, using values from the following table.
| Property | Description |
|---|---|
Data Point Field |
Define two fields that are separated by a comma:
|
Data Function |
Define two functions that are separated by a comma:
|
Type |
Set to Combo. |
Limiting and Sorting Axis Points
You can limit the number of X-axis or Z-axis labels to a predefined number. The X-axis defines the category and the Z-axis defines the series. You can use this feature to display only the N highest or N lowest values for a field or calculated Y value. For example, to display the 10 highest revenue accounts, you can chart the Revenue field in descending order and limit the X-axis to 10 data points.
To limit and sort axis points
Complete Step 1 through Step 5 in procedure Configuring the Show List of a Chart Applet.
In the Object Explorer, expand the Chart tree, and then click Chart Element.
In the Chart Elements list, define properties of the axis label chart element, using values from the following table.
| Property | Description |
|---|---|
Divisions |
Defines the X-axis or the Z-axis. Enter an integer to limit the number of X-axis or Z-axis labels. Siebel CRM limits the number of labels it displays to the number you enter. Note the following:
|
Sort Specification |
Defines the Y-axis. Enter
|
Sorting the Y-Axis
You can sort the Y-axis.
To sort the Y-axis
Create a sort specification on the Y-axis.
This sort specification is independent of limiting the number of X-axis or Z-axis divisions. A sort specification on Y orders the data points regardless of if you limit or do not limit the display to the first N points. You cannot set a number of X-axis or Z-axis divisions without setting a sort specification on Y.
Sorting on the X-Axis or Z-Axis
You can sort the X-axis or Z-axis labels.
To sort on the X-axis or Z-axis
Complete Step 1 through Step 5 in Configuring the Show List of a Chart Applet.
In the Object Explorer, expand the Chart tree, and then click Chart Element.
Set the Sort Specification of the chart element in the X-axis or Z-axis label.
For example, if the X-axis displays country names, then sort the names so that they are in alphabetical order. This is different from sorting on Y-axis values from a business component field or function according to the field where these values are numeric.
Defining the Physical Appearance of a Chart
You can define the physical appearance of a chart.
To define the physical appearance of a chart
Complete Step 1 through Step 5 in Configuring the Show List of a Chart Applet.
In the Object Explorer, expand the Chart tree, and then click Chart Element.
Define the Type property using values from the following table.
Property Description AxisLabel
Displays an axis label along each axis with one label for each division of the axis. You cannot define more than 49 labels on the X-axis. If you define more than 49 labels, then Siebel CRM does not display any of these additional labels.
AxisTitle
Displays a title along each axis with one title for each axis.
Title
Displays a large text string. typically displays this text at the start of the chart.
(Optional) Change the chart color by using a custom theme.
Siebel Open UI does not read the color or property of the Charts control. Charts are rendered using SVG, hence you can specify or change the chart color by modifying the custom theme. To configure and control the color and font information for charts using CSS, the chart control provides the CSS class name at every level. For more information on how to add a custom theme, see the topic about customizing themes in Configuring Siebel Open UI.
For example, to modify the default color provided by Siebel Open UI to color code AFAFAE for the first series in the Bar Chart Applet, then modify the CSS by adding the following to the custom theme:
.siebui-charts-barchart .siebui-barchart-bar1 {
    fill: #AFAFAE;
}
Note that you can configure series color up to 20 bar. Siebel Open UI inserts the CSS class again from siebui-barchart-bar1 for anything greater than 20 bar and so on.
Using Properties of the Chart Element That Apply To the X-Axis Label
If you define a list of X-axis source fields, then do not use the following properties of the Chart Element that apply to the X-axis label. These properties are relevant only for one X-axis field:
Coordinates
Display Format
Divisions
List Of Values
Sort Specification
Text
Defining the Text of the X-Axis or Z-Axis Title
If the by combo box includes a list of source fields, then Siebel CRM determines the text of the X-axis or Z-axis title dynamically from the combo box selection. It overrides the value in the Text property in the AxisTitle chart element for the X-axis or Z-axis when it displays the chart in the client.
Making an X-Axis Label Vertical
You can make an X-axis label vertical so that one label does not overlap another label.
To make an X-axis label vertical
Complete Step 1 through Step 5 in the procedure in Configuring the Show List of a Chart Applet.
In the Object Explorer, expand the Chart tree, and then click Chart Element.
In the Chart Elements list, locate the chart element that contains properties described in the following table.
Property Value Axis Id
XAxis
Type
AxisLabel
More than one XAxis element might exist. The Vertical property only applies to an element whose Type property is set to AxisLabel.
Set the Vertical property to TRUE.
Defining the Size of a Chart Control
You can define the size of a chart control.
To define the size of a chart control
Define properties for the chart control using values described in the following table.
| Property | Value |
|---|---|
HTML Width |
Set the value in pixels. The default value is 1012. |
HTML Height |
Set the value in pixels. The default value is 560. |
Configuring a Tree Applet
This topic describes how to configure a tree applet. It includes the following information:
For more information, see About Tree Applet Templates, and Configuring Icons in a Tree Applet.
Overview of Configuring a Tree Applet
A tree applet is a type of applet that you can use to create an explorer view that allows the user to navigate hierarchically through a structured list of records of related business components. It displays hierarchically structured information in an expandable tree control. Siebel CRM displays the tree control in a frame at start of the applet. It displays detailed information for a chosen tree node in the details applet. Separate vertical frames allow the user to scroll through the contents of the tree applet independently from the detail applet. This is important because the tree structure can grow very large in length and width.
A tree item includes any of the following objects. Siebel CRM displays these objects in a tree:
Root
Branch
Leaf
A tree node is a repository tree node. The <div od-type="node> tag specifies the placeholder for a tree item. For more information, see About Siebel Tags.
A tree control can include repository tree nodes and field values as elements in the tree. Siebel CRMdisplays the following:
Name for a tree node
Field values for tree items
Example of a Tree Applet
To view an example of a tree applet, do the following:
Open Siebel Call Center.
Click the Service screen tab, and then the Explorer link.
Siebel CRM displays the SR Tree Applet in a frame before the interface and the Service Request List Applet in a frame after the interface.
A tree applet in an explorer view operates in a way that is similar to how the Object Explorer and Object List Editor operates in Siebel Tools. The user can expand and collapse folders in the tree applet and view the records in the folder in the list applet. The hierarchy in the tree applet represents a parent-child relationship between records of different business components.
For example, if the user expands a document tree in the Service Requests tree, such as the 1-49119-Claim-New Claim document, then Siebel CRM displays a set of folders that it positions hierarchically beneath the service request. Note the following:
These folders include Activities, Attachments, Change Requests, Solutions, and so on.
If the user expands one of these child folders, then Siebel CRM displays a list of records that represent the corresponding business component.
If the user expands the folder for a service request, and then expands the Activities folder beneath it, then Siebel CRM displays a list of records that constitute the set of activities for that service request. In the parent-child relationship between service requests and activities, these activity records are child records of the parent service request record that is expanded.
The user can add or associate child records of various kinds to a parent record. For example, to associate a solution record from an association applet, the user can navigate down through the hierarchy to the Solutions folder, click the list applet, and then choose New Record from the applet menu. The product solution record becomes a detail record of the service request.
Relationships Between Business Components, Business Objects, and Tree Applets
A tree applet in an explorer view uses the set of parent-child relationships defined in the business object that Siebel CRM assigns to the view. A business object represents a business model or entity-relationship diagram and specifies the set of parent-child relationships with the business components that the business object references. This configuration makes it possible to arrange the records of these business components hierarchically. For more information, see About Business Objects.
The following figure describes the relationships and objects that the Service Request business object contains.
The following figure describes relationships and objects in the Service Request business object that Siebel CRM uses in the Service Request Explorer View.
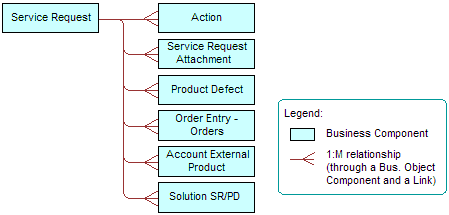
The following table describes the relationship between business components in the Service Request business object and folder names in the tree applet.
Table Relationship Between Business Component and Folder Name
| Business Component | Folder Name in Tree Applet |
|---|---|
Account External Product |
Service Profile |
Action |
Activities |
Order Entry - Orders |
Service Orders |
Product Defect |
Change Request |
Service Request |
Service Requests |
Service Request Attachment |
Attachments |
Solution SR/PD |
Solutions |
You can configure the tree applet and explorer view for service requests to include more business components. For example, you can add the Contacts, Customer Surveys, and Service Agreements folders as child folders of Service Requests. You can add a Line Items folder as a child of RMAs and Service Orders. You can only add business components from the business object in an explorer view that references the business object. In this example, that business object is Service Request. You can only add a business component as the immediate child folder of the business component that is the parent of this business component in the business object. For example, you can add Order Entry Line Items as a child of RMAs and Service Orders. You cannot add Order Entry Line Items as a child of Activities.
Objects of a Tree Applet
A tree is a child of an applet. It includes the child tree node. Each tree node defines one folder symbol. The tree object includes the following:
Only provides a named reference point. A tree is similar to the List object type that Siebel CRM uses in a list applet because the tree works only as a reference for child objects.
Always includes the text Tree in the Name property.
The following table describes properties of an applet that implement a tree applet.
Table Properties of an Applet That Implement a Tree Applet
| Property | Description |
|---|---|
Class |
Must be set to CSSFrameTree to support a tree applet. |
Business Component |
Must reference the same business component as the highest level tree node. |
Siebel CRM does not support a search specification on a tree applet. For more information, see Options to Filter Data That Siebel CRM Displays in an Applet.
A tree applet references an explorer view as a view web template item. A list applet does not reference an explorer view. If the user chooses a folder, then Siebel CRM determines the list applet dynamically. The folder in a tree applet represents a tree node. The Business Object property of the view determines the business component data that Siebel CRM displays.
Using the Tree Applet Wizard to Create a Tree Applet
It is recommended that you use the Tree Applet Wizard to create a new tree applet.
To use the Tree Applet Wizard to create a tree applet
In Siebel Tools, click the File menu, and then click New Object.
In the New Object Wizards dialog box, click the Applets tab, and then click the Tree Applet icon.
In the General dialog box, define the following properties, and then click Next:
Project
Business Component
Name
Display Name
In the Web Layout - General dialog box, choose the web template to use for the tree applet, and then click Next.
The following are some templates that you can use for a tree applet:
Applet Tree
Applet Tree 2
Applet Tree Marketing
In the Finish dialog box, review the information, and then click Finish.
The Tree Applet Wizard creates the tree object and sets the required properties according to the information you entered.
Add a tree node for each applet that Siebel CRM must display in the Explorer section of the view, including the top (highest) level node.
The Tree Applet Wizard does not create child objects for the tree node. You must add a tree node for each applet that Siebel CRM must display in the Explorer section of the view, including the top level node, such as Service Requests. For more information, see Configuring a Tree Node.
Configuring a Tree Node
One tree node defines one folder icon. This includes the top (highest) level node, such as Service Requests. Each tree node is a child of the tree. No hierarchy of child and grandchild tree nodes exist under the tree. The hierarchy of these object definitions does not reflect the hierarchy in the tree applet. Instead, the Position property of the tree node defines the hierarchical position of each tree node in the tree applet.
To configure a tree node
In the Object Explorer, click Applet.
In the Applets list, locate the applet you must modify.
In the Object Explorer, expand the Applet tree, and then click Tree.
In the Trees list, locate the tree you must modify.
In the Object Explorer, expand the Tree tree, and then click Tree Node.
In the Tree Nodes list, add a new tree node using values from the following table.
| Property | Description |
|---|---|
Display Name |
Define the name of the tree node.Siebel CRM displays this name in the tree applet after the folder icon. |
Applet |
Specify the applet that Siebel CRM displays in the second portion of the view if the user opens the corresponding folder. Typically, you specify a list applet. Make sure the applet references a business component that is in the appropriate hierarchical position in the business object. |
Position |
Do the following:
For more information, see Defining the Position Property of a Tree Node. |
Business Component |
Specify the same business component that is defined for the applet that Siebel CRM displays in the second portion of the view. Make sure each tree node in the hierarchy references a unique business component. You cannot use one business component for multiple tree nodes because Siebel CRM will not properly refresh the business component. |
Label Field |
Specify the name of the field that provides the names in the list that Siebel CRM displays if the user expands the node. For example:
|
Selected Bitmap Index |
Specify the number 5. This number identifies the folder symbol. |
Defining the Position Property of a Tree Node
The value in the Position property of a tree node includes an integer or a set of integers that are separated by periods, such as 1.1.2. Use the following format:
Define the top (highest) level node with a position of 1. For example, x.1.2, where x specifies the top level node.
Define immediate child nodes of the top level node with a value of 1.x, where x specifies the order of the node relative to other nodes that reside on the same level.
For example, to display the Activities folder after the Attachments folder rather than before the Attachments folder:
Set the Position value for the Activities folder to 1.2.
Set the Position value for the Attachments folder to 1.1.
To attach a child node at the third level, you can define the Position property for the new node so that the first two integers match the position of the parent node. For example, assume you define the RMAs and Service Orders node at position 1.4. To attach a node to the RMAs and Service Orders node, you define the new node with a position of 1.4.1. The farthest digit in a position typically specifies the order relative to other nodes that exist on the same level.
Using the Applet Web Template Editor to Add a Tree Control
You can use the Applet Web Template Editor to add a tree control to a tree applet.
To use the Applet Web Template Editor to add a tree control
In the Object Explorer, click Applet.
In the Applets list, locate the applet you must modify.
In the Object Explorer, expand the Applet tree, and then click Applet Web Template.
In the Applet Web Templates list, right-click the template you must modify, and then click Edit Web Layout.
Move a TreeControl control from the palette to the applet layout.
Siebel Tools creates the required controls and the object definition for the tree.
To modify your configuration, right-click the tree control, and then click a menu item from the pop-up menu using values from the following table.
| Menu Item | Description |
|---|---|
Select Tree |
Allows you to copy and paste the tree control to another applet. |
Create New Tree Node |
Adds a new tree node to the tree. Siebel Tools creates the tree node at the highest level. You can then use the Move Selected Tree Node menu item to move the new node. |
Move Selected Tree Node |
Allows you to modify the position of the tree node in the tree. Press and hold down the SHIFT key, and then use the following keys on your keyboard:
|
Siebel Tools updates the Position property of each node according to each operation you perform in the Applet Web Template Editor.
If you press the DELETE key when Siebel Tools displays the tree in the Applet Web Template Editor window, then Siebel Tools deletes the currently chosen tree node. You can use the Undo and Redo menu items in the Edit menu of the Applet Web Editor to modify your modifications.
Configuring a Recursive Tree Applet
A recursive tree applet is a type of tree applet where all levels in the hierarchy are of the same object type. For example, the Account Explorer Applet includes a tree applet where the only node is for the Account business component. Siebel CRM displays subaccounts beneath accounts. A recursive tree can contain almost any number of levels of subrecords. Predefined recursive trees exist in Siebel CRM for the following objects:
Accounts
Activities
Campaigns
Opportunities
Positions
Various other business components where records contain subrecords
A recursive tree applet is defined with a tree object where only one tree node is attached. The business component in a recursive tree must reference the record of the same type at the next level up in the hierarchy. In the accounts tree example, the Account business component includes a Parent Account Id field that references the parent account. A link object must exist that references this field in the Destination Field property of the link. In the accounts example, this link is Account/Account.
To configure a recursive tree applet
Set properties for the tree node using values from the following table.
| Property | Description |
|---|---|
Recursive |
Set to TRUE to indicate that this is a recursive tree. |
Recursive Link |
Specify the link that references the one-to-many relationship that exists between the parent business component and the child business component. For example, Account/Account. The Account business component is the parent business component and the child business component defines the recursion. |
Root Search Spec |
Create a search specification that configures Siebel CRM how to get the list of top level records. The top level records typically contain nothing in the parent Id field, so you can use the following format: [Parent xxx Id] is NULL where:
For example: [Parent Account Id] is NULL For more information, see Options to Filter Data That Siebel CRM Displays in an Applet. |
Configuring the Graphic Elements of a Tree Applet
A tree control includes reusable graphic elements and text that Siebel CRM gets from a business component record, as defined in the tree and tree node. Siebel CRM defines the graphic elements in a tree applet, such as elbows, folder symbols, and so on, as parameters of the Application Object Manager. You can use these parameters to configure how Siebel CRM displays the folder and document symbols, expand icons, collapse icons, elbows, spacers, and so on. For more information about Application Object Manager, see Siebel System Administration Guide.
You can use an HTML hierarchy bitmap to configure some graphic elements. For more information, see Configuring Icons in a Tree Applet.
To configure the graphic elements of a tree applet
In the Siebel client, navigate to the Administration - Server Configuration screen, and then the Servers view.
In the Siebel Servers list, locate the Siebel Server of interest.
Click the Components tab.
In the Components list, locate the Application Object Manager of interest.
For example, Call Center Object Manager (ENU).
Click the Parameters subview tab, and then click Hidden.
In the Component Parameters list, query the Parameter field for the parameter you must modify, and then set the values.
For more information, see Parameters You Can Modify That Determine How Siebel CRM Displays Graphic Elements in a Tree Apple.
Parameters You Can Modify That Determine How Siebel CRM Displays Graphic Elements in a Tree Apple
The following information lists parameters you can modify that determine how Siebel CRM displays graphic elements in a tree applet.
Table Parameters You Can Modify That Determine How Siebel CRM Displays Graphic Elements in a Tree Applet
| Type of Tree Element | Application Object Manager Parameters |
|---|---|
Elbows and Trees |
Siebel CRM supports the following parameters:
|
Root, Leaf, Open Folder, and Closed Folder Icons |
Siebel CRM supports the following parameters:
|
Indentation Graphics |
Siebel CRM supports the following parameters:
|
Text Style Parameters |
Siebel CRM supports the following parameters:
|
Using the Configuration File to Specify Parameters
You can use the configuration file to specify parameters that determine how Siebel CRM displays graphic elements in a tree applet.
To use the configuration file to specify parameters
Open the relevant configuration file in a text editor.
Add a separate line for each parameter you must specify.
Use the following format:
parameter_name = "<param1 param2>"
where:
param1 and param2 are the names of the parameters.
For example:
TreeNodeCollapseCaption = "<img src='images/tree_collapse.gif' alt='-' border=0
align=left vspace=0 hspace=0>"
You can use the alt parameter in the img tag to replace an image with text. This configuration is useful to support a browser that only displays text.
Configuring How Siebel CRM Displays Text From Field Values
You can configure how Siebel CRM displays text that it gets from field values.
To configure how Siebel CRM displays text from field values
Open the relevant configuration file in a text editor.
Add a separate line for each parameter you must specify, using the following format:
parameter_name = value
where:
parameter_name is one of the following parameters:
TreeNodeFontStyle
TreeNodeFontSize
TreeNodeSelectBgColor
TreeNodeSelectFgColor
The term caption that Siebel CRM displays in the parameter refers to an icon or graphic. It displays the caption as an image and positions it in one of the following ways:
Precedes the text that Siebel CRM creates from a field value
Precedes another caption
Configuring a Hierarchical List Applet
This topic describes how to configure a hierarchical list applet. It includes the following information:
Configuring Indentation and Order of a Hierarchical List Applet
Limiting the Number of Records That Siebel CRM Returns in a Hierarchical List Applet
A hierarchical list applet is a type of applet that displays records that include a hierarchical relationship. It is similar to a list applet, but you can display a hierarchical list applet in a way that is similar in appearance to a tree control. For example, the Categories list that the user accesses to create and manage a catalog category in Siebel Web Sales.
The Hierarchy Parent Field property of the business component creates the hierarchy.
The HTML Hierarchy Bitmap object that is defined in the HTML Hierarchy Bitmap property of the list defines the icons that Siebel CRM uses to display the list applet. You must define the following bitmaps for the HTML Hierarchy Bitmap:
Expand Bitmap
Collapse Bitmap
Space
Siebel CRM can display a hierarchical list applet in Base or Edit List mode.
It is recommended that the number of columns that Siebel CRM displays in a hierarchical list applet be small because the width of the column expands as the user navigates down the hierarchy. It is recommended that it only display fields that contain small values in a column that includes an expand control and a collapse control.
Running a Query on a Hierarchical List Applet
If you run a query on a hierarchical list applet, then Siebel CRM only returns the root layer of records. It returns no child records. This situation does not cause a problem in the Siebel client because the user can expand the root level record to view child records. If you run a query in a script, then it only returns the top level records.
Viewing an Example of a Hierarchical List Applet
You can view an example of a hierarchical list applet in the Siebel client.
To view an example of a hierarchical list applet
In the Siebel client, click the Quotes screen tab, and then click the List link.
Click a link in the Quote # column.
Click the Line Items tab.
Siebel CRM displays the Quote Item List Applet. This applet is an example of a hierarchical list applet.
Expand the hierarchy in the Line # column.
Siebel CRM displays an expanded hierarchy that includes indented document icons and sequence numbers.
Configuring Indentation and Order of a Hierarchical List Applet
If you call an Indent or Outdent applet method menu item on a record, then Siebel CRM demotes or promotes the child records. It does not modify the relationship to the child records of the called record.
Modifications that the MoveUp and MoveDown applet method menu items make are temporary. Siebel CRM does not save these modifications to the Siebel database.
You can define other bitmaps to create an applet that resembles the tree applet. The tree applet is not defined for a hierarchical list applet in the Siebel client. Siebel CRM uses the Arrow Down and Arrow Up bitmap only in a tree control. For more information, see Configuring a Tree Applet.
To configure indentation and order of a hierarchical list applet
In the Object Explorer, click Applet.
In the Applets list, locate the applet you must modify.
In the Object Explorer, expand the Applet tree, and then click Applet Method Menu Item.
In the Applet Method Menu Items list, create a new record and set properties using values described in the following table.
The following table describes the applet method menu items you can call from a control. These methods allow you to edit the indentation and order that Siebel CRM uses to display objects in the hierarchical list applet.
Table Applet Method Menu Items That Control the Hierarchy of a Hierarchical List Applet
| Item | Description |
|---|---|
Indent |
Moves the current record to a position that is indented from the peer record. |
Outdent |
Moves the current record to a position that is at the same level as a peer record of the parent. |
MoveUp |
Moves the current record to a position that is prior to the position of the peer record. |
MoveDown |
Moves the current record to a position that is after the position of the peer record. |
Limiting the Number of Records That Siebel CRM Returns in a Hierarchical List Applet
If you define a hierarchical list applet, then the business component returns all the records that make up the hierarchy. It does this to create the hierarchy of records. Siebel CRM cannot typically return more than ten thousand records. If a query returns more than ten thousand records, then it does not display the applet and the user might encounter an error that is similar to the following:
There were more rows than could be returned. Please refine your query to bring back fewer rows.
To limit the number of records that Siebel CRM returns in a hierarchical list applet
Use one of the following configurations to make sure that the applet does not return more than ten thousand rows:
Create a search specification on the business component or on the applet. For more information, see Options to Filter Data That Siebel CRM Displays in an Applet.
Use a predefined query for the view. For more information, see Guidelines for Modifying a Predefined Query.
Configuring a Hierarchical List Applet to Use External Data
This topic describes how to configure a hierarchical list applet to use external data. To develop this example, do the following tasks:
You can configure a hierarchical list applet to get external data from a virtual business component. A hierarchical list applet does not require special configuration on a business component other than a properly set Hierarchy Parent Field property. More configuration is required for a virtual business component.
Creating the Virtual Business Component
You start by creating the virtual business component.
To create the virtual business component
In the Object Explorer, click Business Component.
- In the Business Components list, create a new business component using values from the following table.
Property Value Hierarchy Parent Field
Id
In Business Components list, right-click the record you created in Step 2, and then click Edit Server Scripts.
In the Scripting Language dialog box, choose eScript, and then click OK.
In the BusComp Script window, expand the BusComp tree, and then click BusComp_PreInvokeMethod.
In the script editing window, remove the existing script, and then enter the following script:
function BusComp_PreInvokeMethod (MethodName)
{
TheApplication().Trace(this.Name() + ".PreInvoke." + MethodName + "()");
 return (ContinueOperation);
}
In the BusComp tree, click BusComp_InvokeMethod, remove the existing script, and then enter the following script:
function BusComp_InvokeMethod (MethodName)
{
TheApplication().Trace(this.Name() + ".Invoke." + MethodName + "()");
}
In the Object Explorer, expand the Business Components tree, and then click Field.
In the Fields list, add fields to your virtual business component using values from the following table.
Name Type Has Children
DTYPE_BOOL
Is Expanded
DTYPE_BOOL
Last Child Info
DTYPE_TEXT
Outline Number
DTYPE_TEXT
Creating the Business Service for the Hierarchical List Applet
In this topic, you create the business service for the hierarchical list applet.
To create the business service for the hierarchical list applet
Display the Business Service Server Script object type.
The business service server script is a child of the business service. For more information, see Displaying Object Types You Use to Configure Siebel CRM.
In the Object Explorer, click Business Service.
In the Business Services list, add a new business service using values from the following table.
Property Value Name
Hierarchical List Service
Server Enabled
Check mark
In the Object Explorer, expand the Business Service tree, and then click Business Service Server Script.
In the Business Service Server Scripts list, add a new record using values from the following table.
Property Value Name
Init
Program Language
JS
Sequence
1
Script
Enter the following script:
function Init (Outputs)
{
  with( Outputs )
  {
     SetProperty ("Parent Row Id", "");
     SetProperty ("Amount", "");
     SetProperty ("Description", "");
//     SetProperty ("Has Children", "N");
//     SetProperty ("Is Expanded", "N");
//     SetProperty ("Outline Number", "0");
//     SetProperty ("Last Child Info", "");
  }
  return( CancelOperation );
}
You can copy the text from this book, and then paste it into the Script property. To view the correctly formatted script, right-click Hierarchical List Service in the Business Services list, choose Edit Service Scripts, expand the general tree, and then click Init.
In the Business Service Server Scripts list, add a new record using values from the following table.
Property Value Name
Query
Program Language
JS
Sequence
2
Script
For more information, see Extensive Code Examples That This Book Uses.
In the Business Service Server Scripts list, add a new record using values from the following table.
Property Value Name
Service_PreInvokeMethod
Program Language
JS
Sequence
3
Script
Enter the following script:
function Service_PreInvokeMethod (MethodName, Inputs,
Outputs)
{
TheApplication().Trace( this.Name() +".PreInvokeMethod(
" + MethodName + " )");
  switch( MethodName )
  {
     case "Init":
        return( Init (Outputs) );
     case "Query":
        return( Query (Inputs, Outputs) );
  }
  return (ContinueOperation);
}
Add code to the Query method of the business service so that the method provides output that is meaningful for these fields:
Has Children. Y or N, depending on if the record references children or does not reference children.
Is Expanded. Y or N, depending on if Siebel CRM displays the record as expanded or not expanded in the applet.
Outline Number. A string that describes the position of the record in the hierarchy. For example. 1.2 or 2.1.1.
Last Child Info. A string that represents a binary sequence that indicates if the record and the parent of the record is the last record in the list of children. For more information, see the following section.
The code can be similar to the code that you added in the previous step.
To maintain the values appropriately, add code to the Update method.
The Update method is specific to your custom implementation and requires a mechanism to update the records of the virtual business component. The exception is if all records are read-only, then no Update method is required.
About Last Child Info
The output for Last Child Info in this example is a string of three bits that Siebel CRM displays for each level in the hierarchy if more records exist. Consider the test values in the Query method for this example. The following situations apply for a tree that includes three levels:
If an item exists in the tree that is at position 1.3.2, and if item 1.3.3 does not exist, then the third bit is 1, which you can think of as xx1. Otherwise the third bit is 0, which you can think of as xx0.
If the parent record at position 1.3 is the last child, then the second bit is 1, which you can think of as x1x. If item 1.4 does not exist in the tree, then Siebel CRM considers the record as the last child.
If the grandparent record at position 1 is the last child, and if item 2 does not exist in the tree, then the first bit is 1, which you can think of as 1xx.
Implementing the Customization
In this topic, you implement the customization.
To implement the customization
Apply any modifications that you made in the base table to the Siebel runtime repository.
If you defined a new screen, then add the screen to the application screen object.
Compile your modifications.
In the Siebel client, add the view to the list of views, and then add an appropriate responsibility so that the user can access this view.
Test your modifications.
Configuring a File Attachment Applet
This topic describes how to configure a file attachment applet. It includes the following information:
A file attachment applet is a type of applet that provides access to an external document, such as a spreadsheet, word processing document, or slide presentation in Siebel CRM. It provides the following capabilities:
Allows the user to click the name of a file from a list to open a document.
Allows the user to add a document file to a list, edit it, or remove it.
Provides synchronization and shared access support for attached documents.
You can use any file type that Windows supports.
To view an example of a file attachment applet in the Siebel client, navigate to the Account screen, drill down on an account, and then click the Attachments tab. The client displays the Account Attachment view:
The form applet is the predefined Account Form Applet.
The list applet is the Account Attachment Applet. This attachment applet displays attachments for the account.
A parent-child relationship exists between the account and the list of account attachments. A row in the attachments list represents each document. Siebel CRM displays the following information in this applet:
File name for the document. Siebel CRM underlines and uses colored font to display each file name. This style indicates that the user can click the name to open the file in a Windows application.
Local and server status.
File size.
File name extension that identifies the file type.
Date of last update.
To add a document to the attachment list, the user clicks New File, and then clicks the select button in the Attachment Name field. Siebel CRM searches for files that it must attach in the directory that it last used to attach a file. If the user chooses a different folder while attaching a file, then it searches for the file in the different folder the next time the user attaches a file.
A file attachment applet uses specialized objects and methods in the Siebel File System. For more information, see Caution About Using Specialized Classes.
To configure a file attachment applet
If necessary, configure an attachment business component.
For more information, see Configuring an Attachment Business Component.
Create a file attachment applet using values from the following table.
Property Description Business Component
Specify the required business component. For more information, see Configuring an Attachment Business Component.
Class
Set to one of the following values:
CSSFrameListFile for an attachment list applet
CSSFrameFile for an attachment form applet
Add a new child list column or control to the applet for each row in the following table.
Display Name Field Type Name
prefix FileName
TextBox
Local
Dock Status
CheckBox
Request
prefix FileDockReqFlg
CheckBox
Size
prefix FileSize
TextBox
Type
prefix FileExt
TextBox
Modified
prefix FileDate
TextBox
Auto Update
prefix FileAutoUpdFlg
CheckBox
For the prefix, enter the required prefix for the business component. For more information, see Prefix for the Field Name.
These list columns or controls reference fields in the attachment business component. For more information, see Configuring an Attachment Business Component.
Make sure the value in the Detail Applet property of each list column or text box control you added in the previous step is File Popup Applet.
This value references the dialog box that Siebel CRM displays if the user clicks the ellipsis in the list column or text box.
Prefix for the Field Name
Siebel CRM displays a consistent prefix in the field name for each field in the attachment business component. These fields reference the base table for the business component. Fields that reference a joined table use a different prefix. For example, the prefix for account attachments is Accnt. The field names are AccntFileName, AccntFileDockReqFlg, and so on.
Configuring an Attachment Business Component
The Business Component property of the attachment list applet identifies the business component that the Siebel File System uses to store the attachment list data. For example, this business component for the Account Attachment Applet is named Account Attachment.
To configure an attachment business component
In Siebel Tools, in the Object Explorer, click Business Component.
In the Business Components list, locate the attachment business component you must modify.
Make sure the value in the Class property is CSSBCFile or a subclass of CSSBCFile, such as CSSBCSalesTool or CSSBCEventFile.
Make sure the Table property references an attachment table.
For example, the attachment table is S_ACCNT_ATT in the Account Attachment Applet. For more information, see Configuring an Attachment Table.
In Siebel Tools, in the Object Explorer, expand the Business Component tree, and then click Business Component User Prop.
In the Business Component User Props list, create a new business component user property using values from the following table.
Name Value DefaultPrefix
Specify the prefix. For more information, see Prefix for the Field Name.
In the Business Component User Props list, create a new business component user property using values from the following table.
Name Value FileMustExist
Use one of the following values:
TRUE. If the file does not exist, then the user cannot enter the name of the file. TRUE is the typical value.
FALSE. If the file does not exist, then the user can enter the name of the file.
Make sure the Predefault property of the FileDockReqFlg business component field is N.
The FileDockReqFlg references the required FILE_DOCK_REQ_FLG column in the attachment table.
Add the required business component fields.
For more information, see Fields in an Attachment Business Component.
Fields in an Attachment Business Component
The following table describes each field name that the file engine supplies. These names must use a special format and reference a column name in the attachment table. The name includes the prefix followed by a required suffix. The DefaultPrefix user property defines the prefix.
Table Fields in an Attachment Business Component
| Name | Column | Type | Text Length |
|---|---|---|---|
prefix FileAutoUpdFlg |
FILE_AUTO_UPD_FLG |
DTYPE_BOOL |
1 |
prefix FileDate |
FILE_DATE |
DTYPE_DATETIME |
7 |
prefix FileDeferFlg |
FILE_DEFER_FLG |
DTYPE_TEXT |
1 |
prefix FileDockReqFlg |
FILE_DOCK_REQ_FLG |
DTYPE_TEXT |
1 |
prefix FileDockStatFlg |
FILE_DOCK_STAT_FLG |
DTYPE_TEXT |
1 |
prefix FileExt |
FILE_EXT |
DTYPE_TEXT |
10 |
prefix FileName |
FILE_NAME |
DTYPE_TEXT |
200 |
prefix FileRev |
FILE_REV_NUM |
DTYPE_ID |
15 |
prefix FileSize |
FILE_SIZE |
DTYPE_NUMBER |
22 |
prefix FileSrcPath |
FILE_SRC_PATH |
DTYPE_TEXT |
220 |
prefix FileSrcType |
FILE_SRC_TYPE |
DTYPE_TEXT |
30 |
The following table describes a field that the file engine does not supply. This field is typically present but is not required.
Table Field in an Attachment Business Component That the File Engine Does Not Supply
| Name | Column | Type | Calculation |
|---|---|---|---|
Dock Status |
(calculated) |
DTYPE_BOOL |
IIf ([AccntFileDockStatFlg] = "N" OR [AccntFileDockStatFlg] IS NULL,"N","Y") |
You can include more fields. For a special use of an attachment, such as an image control, the file engine fields can be present in addition to the fields from a predefined business component. Siebel CRM typically gets the fields from the predefined business component through a join. For example, a Product or Literature business component can contain file engine fields to support how Siebel CRM displays a product picture or a brochure picture from a bitmap image.
You can include multiple sets of file engine fields from different tables in the same business component. For example, a literature attachment can include subattachments where Siebel CRM gets the subattachments from an intersection table or an extension table. Make sure the prefix for the field name is different for each table.
Configuring an Attachment Table
An attachment table is a type of table that provides the underlying data storage for the attachment business component. The attachment business component can support uses in addition to file engine functionality. The attachment table stores only file engine data.
The user does not directly update the attachment table. Siebel CRM provides the user an empty attachment table. The user then uses the relocate functionality, using the mouse, or the browser dialog box in the corresponding file attachment applet to bring data into the empty table one file at a time.
The following table describes required file columns in an attachment table.
Table File Columns in an Attachment Table
| Name | Default | User Name | Type | Physical Type | Length |
|---|---|---|---|---|---|
FILE_AUTO_UPD_FLG |
N |
File Auto Upd Flg |
Data (Public) |
Character |
1 |
FILE_DATE |
None |
File Date |
Data (Public) |
Date Time |
7 |
FILE_DEFER_FLG |
R |
File Defer Flg |
Data (Public) |
Character |
1 |
FILE_DOCK_REQ_FLG |
N |
File Dock Req Flg |
Data (Public) |
Character |
1 |
FILE_DOCK_STAT_FLG |
N |
File Dock Stat Flg |
Data (Public) |
Character |
1 |
FILE_EXT |
None |
File Ext |
Data (Public) |
Varchar |
10 |
FILE_NAME |
None |
File Name |
Data (Public) |
Varchar |
200 |
FILE_REV_NUM |
0 |
File Rev Num |
Data (Public) |
Varchar |
15 |
FILE_SIZE |
None |
File Size |
Data (Public) |
Number |
22 |
FILE_SRC_PATH |
None |
File Src Path |
Data (Public) |
Varchar |
255 |
FILE_SRC_TYPE |
None |
File Src Type |
Data (Public) |
Varchar |
30 |
You must use the value described in the previous table for the Name property. You are not required to use the value described in the previous table for the User Name property.
Various system columns that are not related to the file engine are present, such as CREATED, LAST_UPD_BY, and ROW_ID.
If the table includes a file engine column, then you must make sure the File property in the corresponding table is TRUE.
Configuring an Organization Analysis Applet
This topic describes an example of how to configure an Organization Analysis Applet. The contacts that Siebel CRM associates with each opportunity determines how Siebel Sales creates organization charts. Siebel CRM reflects these modifications in the organization chart when it updates contact information. To view an organization chart, you can open the Siebel client, navigate to the Accounts screen, and then the Organization Analysis view. Siebel CRM displays the organization chart in the Account Organization Analysis Applet.
Siebel CRM uses the CSSFrameContactOrgChart class for predefined applets in an organization chart. It displays the following fields:
Full Name
Job Title
Work Phone#
To require one or more fields to display in the box of an organization chart, you can add a new list column for each field. For more information, see Siebel Applications Administration Guide.
To configure the organization analysis applet
In Siebel Tools, in the Object Explorer, click Applet.
In the Applets list, locate the Account Organization Analysis Applet.
In the Object Explorer, expand the Applets tree, expand the List tree, and then click List Column.
In the List Columns list, add a new record using values from the following table.
Property Description Name
Enter any text that describes the content of the field.
Field
Choose the field that contains the information for the contact that you must display in the organization chart.
Display Name - String Reference
Choose an appropriate value.
HTML Sequence
Enter a value to define the sequence that Siebel CRM uses to display the field. A lower sequence causes the field to display higher in the box in the organization chart.
If you set the sequence, then make sure the ClientConfigurationMode parameter is not set to All. For more information, see Setting Up the Configuration File for Siebel Tools.
Repeat the previous step for each additional field that Siebel CRM must display in the applet.
Compile and test your modifications.
For more information, see Using Siebel Tools.