14Configuring Views, Screens, and Applications
Configuring Views, Screens, and Applications
This chapter describes tasks you perform to configure views, screens, and applications. It includes the following topics:
Process of Creating a View
To create a view, do the following tasks:
Creating a View
This task is a step in Process of Creating a View.
You typically create a new view to display a new business component, business object, or applet. The New View Wizard assists you with creating a view.
To create a view
Make sure the ClientConfigurationMode parameter is not set to All.
For more information, see Setting Up the Configuration File for Siebel Tools.
In Siebel Tools, click the File menu, and then click New Object.
In the New Object Wizard, in the General Tab, click View, and then click OK.
In the New View dialog box, do the following, and then click Next:
Choose the project.
Enter a unique name for the new view.
Choose the business object whose data the view displays.
Enter the title for the view.
In the View Web Layout - Select Template dialog box, choose the template you must use for your new view, and then click Next.
For more information, see About Siebel Web Templates and Siebel Developer's Reference.
In the Web Layout - Applets dialog box, choose the applets that Siebel Tools must include in the Web layout, and then click Next.
In the Finish dialog box, review your choices, and then click Finish.
Siebel Tools displays the Web Layout Editor. It allows you to edit the view layout if necessary. For more information, see Editing the Layout of a View.
Editing the Layout of a View
This task is a step in Process of Creating a View.
You edit the layout of a view in the View Web Template Editor. This editor allows you to edit the mapping between applets in the view and placeholders in the template.
To edit the layout of a view
In Web Tools, in the Object Explorer, click View.
Locate the view web template you must modify in the View Web Template list.
Click the view in the Views list, and then click the preview button.
If a template is associated with the view, then Web Tools displays the View Web Template Editor. The View Web Template Editor displays mapped and unmapped placeholders from the underlying view web template.
If Web Tools does not display the applets properly in the editor, then exit the editor and make sure that the Applet Mode property for each view web template item includes a valid value. To do this, open the pick applet for the property of each applet. Open the editor again to make sure the applets display properly.
Optional. Do the following:
To add an applet to the View Web Template, select an applet from the Applets window and, with the mouse button depressed, move the selected applet onto an applet placeholder in the template then release the mouse button.
To delete an applet from the View Web Template, click the applet, and then press the DELETE button at the far end of the applet.
Deliver your modifications from Workspace Dashboard in the application.
Registering and Associating a View with a Responsibility
This task is a step in Process of Creating a View.
Registering a view adds a new record for the view in the Siebel database and associates a responsibility with the view. The user who is assigned this responsibility can access the new view the next time the user logs in to Siebel CRM. In a development environment, a developer typically registers the view. In a production environment, the administrator typically registers the view.
If you define a view but do not provide the user access to the view, then Siebel CRM does not display the view in the Siebel client for that user.
To register and associate a view with a responsibility
In the Siebel client, navigate to the Administration - Application screen, Views view.
In the View Name field, click the down arrow.
In the View list, choose the name of the view, and then click OK.
Navigate to the Administration - Application screen, Responsibilities view.
Choose the responsibility that you must associate to the view.
You cannot modify the SADMIN responsibility that Siebel CRM provides as seed data.
In the Views list, enter a new record for the view.
Depending on the nature of the new view and the users who access it, you might need to do the following:
Add new responsibilities.
Add employees to the new responsibilities.
Make views read-only for a responsibility.
The read-only feature allows you to use the Siebel client to define a read-only view instead of creating objects in the Siebel repository.
For more information about responsibilities and employees, see Siebel Security Guide.
Configuring a View
This topic describes options for configuring a view. It includes the following information:
Using the Views List to Create a View
You can use the Views list to create a new view. It is recommended that you use the New View Wizard because it prompts you for all necessary information and it defines all the required objects. For more information, see Creating a View.
To use the Views list to define a view
In the Object Explorer, click View.
In the Views list, add a new view, using values from the following table.
Property Description Name
Required. Enter the name of the view. References to the view are defined through the name.
Business Object
Required. Enter the name of the business object that the view references. The business object determines the relationship between business components that the applets reference.
Screen Menu
If TRUE, then Siebel CRM includes the view in the Site Map.
Title
Enter a text string. Siebel CRM displays this string in the window title when it displays the view in the Siebel client.
In the Views list, right-click the record, and then click Edit Web Layout.
In the Select Template dialog box, choose a view web template, and then click Next.
In the Applet dialog box, choose the applets that Siebel CRM must display on the view, and then click Next.
Review your choices, and then click Finish.
For information about configuring visibility, see Siebel Security Guide.
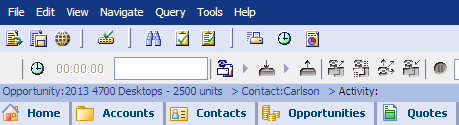
Configuring the Thread Bar
The thread bar is a navigation device that Siebel CRM displays immediately after the application toolbar. It helps the user track the navigation path among views. For more information, see Using Web Templates to Configure the Thread Bar.
The following image displays the following example of the thread bar:
Opportunity:2013 4700 Desktops - 2500 units > Contact:Carlson > Activity
To configure the thread bar
In the Object Explorer, click View.
In the Views list, locate the view you must modify, and then set properties for the view using values from the following table.
Property Description Thread Applet
The applets in the view that supply a value for the thread field.
Thread Field
The name of the field that Siebel Tools displays after the greater than sign (>) in the thread bar. This field is in the business component that the Thread Applet references.
Thread Title
The text that Siebel Tools displays before the greater than sign (>) in the thread bar. This text identifies the view. For example, the Thread Title property is Acct for most views that display accounts, such as Account List view and Account Detail - Contacts view.
Repeat the last step for each view that requires a thread bar.
Compile and test your modifications.
For more information, see Using Siebel Tools.
Defining the Drilldown Sequence to Configure Search for an Account
If the user sends a query for an Account from the Account Home page, then the visibility that the user possesses determines how Siebel CRM does the search in the following sequence:
All Across
All
My Team
My
The Sequence property of the drilldown objects that Siebel CRM defines for the Account Home Search Virtual Form Applet determines the sequence.
To define the drilldown sequence to configure search for an account
In Siebel Tools, in the Object Explorer, click Applet.
In the Applets list, locate the Account Home Search Virtual Form Applet.
In the Object Explorer, expand the Applet tree, and then click Drilldown Object.
In the Drilldown Objects list, modify the Sequence property according to your required search sequence.
Siebel Tools lists several predefined drilldowns, such as Account List View, All Account List View, and All Accounts across Organization. Siebel CRM begins the search in the view that is defined for the drilldown object that contains the highest sequence.
It is not necessary to define other properties, such as Hyperlink Field.
Compile and test your modifications.
For more information, see Using Siebel Tools.
Configuring Search When No Drilldown Object Is Defined
If no drilldown object is defined, then the Mirror Search GotoView applet user property on the Account Home Search Virtual Form Applet determines the view that Siebel CRM searches. Siebel CRM predefines the value for this user property to Account List View, but you can modify it to configure search if no drilldown object is defined. For example, modifying the value of the Mirror Search GotoView applet user property to All Account List View causes Siebel CRM to search all accounts.
Creating an Applet Toggle
Assume you use the Contact business component to store information about the preferred payment method that your customers use. Payment methods are cash, credit card, or check.
The following table describes the data requirements for each payment method.
Table Payment Methods and Data Requirements for the Applet Toggle Example
| Payment Method | Data Requirement |
|---|---|
Cash |
No special data requirements exist. The default payment method is Cash. |
Credit Card |
The following data is required:
|
Check |
The following data is required:
|
You can use a static toggle applet or a dynamic toggle applet for this example:
To allow the user to toggle between the different applets, a static toggle applet requires the user to choose the applet from the Show list.
A dynamic toggle toggles between applets that reference the value in the Payment Type field.
For more information, see Options to Toggle Between Applets in a View.
To create an applet toggle
In Siebel Tools, display the Applet Toggle object type.
For more information, see Displaying a System Field in an Applet.
Create the following fields in the Contact business component:
Payment Method. Use a static, bound list that contains Cash, Credit Card, and Check.
Credit Card Type.
Credit Card Number.
Expiry Date.
Checking Account Number.
Routing Number.
Driver License Number.
Driver License State.
Display the Payment Method Field in the Contact Form Applet.
This applet is the default applet that Siebel CRM uses if the preferred payment method of the contact is Cash.
Create two copies of the Contact Form Applet.
Name one applet Contact Form Applet - Credit Card and the other applet Contact Form Applet - Check.
Display the following fields in the Contact Form Applet - Credit Card applet:
Credit Card Type
Credit Card Number
Expiry Date BC Fields
If the preferred payment method of the contact is Credit Card, then the Contact Form Applet - Credit Card applet allows the user to enter credit card information for the contact.
Display the following fields in the Contact Form Applet - Check applet:
Checking Account Number
Routing Number
Driver License Number
Driver License
State BC Fields
If the preferred payment method of the contact is Check, then the Contact Form Applet - Check applet allows the user to enter checking account information for the contact.
In the Object Explorer, click Applet, and then locate the Contact Form Applet in the Applets list.
In the Object Explorer, expand the Applet tree, click Applet Toggle, and then create a new applet toggle in the Applet Toggles list using values from the following table.
Property Value Applet
Contact Form Applet - Check
Auto Toggle Field
Payment Method
Auto Toggle Value
Check
Name
Contact Form Applet - Check
Parent Name
Contact Form Applet
To create this example with a static toggle applet, leave the Auto Toggle Field and Auto Toggle Value properties empty.
Create another new applet toggle in the Applet Toggles list using values from the following table.
Property Value Applet
Contact Form Applet - Credit Card
Auto Toggle Field
Payment Method
Auto Toggle Value
Credit Card
Name
Contact Form Applet - Credit Card
Parent Name
Contact Form Applet
To create this example with a static toggle applet, leave the Auto Toggle Field and Auto Toggle Value properties empty.
Set the Immediate Post Changes property of the Payment Method business component field to TRUE.
If the Immediate Post Changes property is FALSE, then the toggle does not occur until the user saves the record.
Compile and test your modifications.
For more information, see Using Siebel Tools.
Defining Whether a View Is Cachable
In order for Siebel CRM to be able to display a view, the High Interactivity Enabled property of the underlying class of an applet in the view must be set to 2, 3, 4, or 5. Values 2 or 4 specify that views with applets that use this class are cachable. Values 3 or 5 specify that views with applets that use this class are not cachable. The value 1 has been deprecated.
To define whether a view is cachable
Display the Class object type.
For more information, see Displaying Object Types You Use to Configure Siebel CRM.
In the Object Explorer, click Applet.
In the Applets list, locate an applet that Siebel CRM displays in the view.
Note the value in the class property.
In the Object Explorer, click Class.
In the Classes list, locate the class you noted in step 4.
Set the High Interactivity Enabled property of the class to one of the appropriate values.
Repeat step 3 through step 7 for each applet that Siebel CRM must display in the view.
Compile and test your modifications.
For more information, see Using Siebel Tools.
Creating a Secure View
You can use the HTTPS protocol to define a secure view for your Siebel application. If a view is marked as secure, then the Siebel Web Engine verifies that the current request uses the HTTPS protocol, thereby preventing a user from entering HTTP into the browser to access a secure view instead of entering HTTPS.
To create a secure view
In Siebel Tools, click View in the Object Explorer.
In the Views list, locate the view you must modify.
Set the Secure property to TRUE.
For the Siebel client, the Siebel Web Engine specifies the HTTPS protocol when it creates URLs to the view.
The implementation of the HTTPS protocol is external to the Siebel Web Engine. The browser and the Web Server negotiate the HTTPS. The Siebel Web Engine only specifies that HTTPS must be used for a specific view. HTTPS must be allowed on any server that provides a secure view.
Creating a View That Requires an Explicit User Login
The user can log in to a Siebel Web Engine application in the following ways:
Explicitly entering the username and password in the login dialog box.
With a cookie after the user logs in and if this user chooses Save My Username and Password.
To display a view that provides access to a sensitive part of the Web site, you can require the user who logs in with a cookie to explicitly supply the user name and password.
To create a view that requires an explicit user login
In Siebel Tools, click View in the Object Explorer.
In the Views list, locate the view you must modify.
Set the Explicit Login property to TRUE.
If a user logs in with a cookie, and if this user attempts to access this view, then Siebel CRM prompts the user to enter the user name and password. Siebel CRM requires this user to perform this login only one time for each session. All subsequent visits that the user makes to this view during the session do not require the explicit login.
Restricting Access to Records in a View
The Read Only View field of the Responsibilities list in the Administration - Application screen allows you to restrict access to records in a view according to responsibility. If Read Only View contains a check mark, then Siebel CRM does the following:
Disables New and Delete buttons in the view. Only the Query button remains active. Siebel CRM does not disable other buttons that it might display in the applet, such as New Contact Call or other custom buttons.
If the Siebel Mobile Web Client is connected to the server database, then it makes the view read only.
If the Siebel Mobile Web Client is connected to the local database, then it makes the view not read only.
For more information, see Article ID 484433.1 on My Oracle Support.
To restrict access to records in a view
In the Siebel Mobile Web Client, navigate to the Administration - Application screen, and then the Views list.
In the Views list, locate the view where you must limit access.
In the Responsibilities list, locate the responsibility where you must limit access.
In the Responsibilities list, make sure the Read Only View field contains a check mark.
Troubleshooting a View That Siebel CRM Does Not Display in the Siebel Client
To resolve a problem with a view that Siebel CRM does not display in the Siebel client, look for it in the list of Diagnostic Steps or Cause column in the following table.
Table Problems with a View That Siebel CRM Does Not Display in the Siebel Client
| Diagnostic Steps or Cause | Solution |
|---|---|
The view does not exist in the Siebel runtime repository. The spelling of the view name does not match the view name in the Siebel runtime repository. |
A view name that you do not spell correctly when you register the view in the Views view of the Administration - Application screen might cause this problem. Make sure the spelling is correct, then deploy your changes to the Siebel runtime repository. |
The view belongs to a screen that is not included in the Siebel application that is currently running. |
In Siebel Tools, make sure the screen is defined as a child screen menu item of the Siebel application. Make sure the name of the Siebel application is spelled correctly in the configuration file of the Siebel application. |
The view is not included in one of the responsibilities for the user who is currently logged in. |
Use the Administration - User screen, Employees view to identify the responsibilities that Siebel CRM assigns to the user. Use the Administration - Application screen, Responsibilities view to determine to include or not include the view. |
The view is hidden using personalization rules. |
Use the Administration - Personalization screen, Views view to determine whether the view is hidden. For testing purposes, you can switch off the EnablePersonalization parameter in the configuration file for Siebel Tools. For more information, see Setting Up the Configuration File for Siebel Tools. |
Siebel CRM does not display the view in the menu or in the view tabs. The user must drill down from another view to access the view. |
In Siebel Tools, make sure the Screen Menu property of the View object is TRUE. It must be TRUE in order for Siebel CRM to include the view in the Site Map. Make sure the view is included in a screen and that the Viewbar Text property of the Screen View child object of the screen is set appropriately. Make sure the Visibility Applet and Visibility Applet Type properties of the view are set correctly. For more information, see Siebel Security Guide. |
The view does not belong to the same business object as the default view for the screen. |
Make sure the view references the same business object. |
Siebel CRM does not translate the screen menu item or page tab into the appropriate language. |
Make sure a translated string is available for each language for each screen menu item and each screen menu item locale. If a translated string is not available, then Siebel CRM does not display the screen in the Site Map. For a page tab to display, the page tab must include a translated string and a page tab locale that contains the appropriate language code. For example, if Siebel CRM runs in Norwegian, then the Language Code property of the screen menu item locale and page tab locale must be NOR. For more information, see Localizing Siebel Business Applications |
The view is not available because of an upgrade problem. |
If you performed an upgrade, then examine the log files that Siebel CRM created during the upgrade to make sure the upgrade was successful. These log files are located in the |
The view is not included in your license keys. |
Make sure the view is included in your license keys. Send the license keys to Oracle for examination. For more information, see Article ID 475818.1 on My Oracle Support. This document was previously published as Siebel Alert 41. |
Process of Creating a Screen
To create a screen, perform the following tasks:
A screen includes groups of related views. A screen view identifies the views and categories that you must associate to the screen. You create a screen view for each category and each view that Siebel CRM must display in a screen.
Creating a Screen
This task is a step in Process of Creating a Screen.
You create a new screen in the Screens list in Siebel Tools.
To create a screen
In the Object Explorer, click Screen.
In the Screens list, add a new screen using values from the following table.
Property Description Name
Name of the screen. Other objects use this name to reference the screen.
Default View
View that Siebel CRM displays if the user clicks a page tab in the screen.
You must add the view to the screen before you can define the view as the default view.
Creating a Page Tab
This task is a step in Process of Creating a Screen.
For more information, see Page Tab and Troubleshooting a View That Siebel CRM Does Not Display in the Siebel Client.
To create a page tab
In the Object Explorer, expand the Application tree, and then click Page Tab.
In the Page Tabs list, create a new record using values from the following table.
Property Description Screen
The screen you must display through a page tab.
Sequence
The order that Siebel CRM uses to display the page tabs in the Siebel client.
Text
Text string that Siebel CRM displays in a screen tab in the Siebel client. For more information, see Modifying the Text Style of a Control or List Columnin an Applet.
Creating a Screen Menu Item
This task is a step in Process of Creating a Screen.
Siebel CRM does not display on the Site Map a view that filters data according to a visibility rule. Example visibility rules include My Accounts, My Team’s Accounts, and so on. Siebel CRM displays screen menu items on the Site Map in alphabetical order. For more information, see Screen Menu Item.
To create a screen menu item
Make sure Siebel Tools is configured to allow you to modify a text string.
For more information, see Setting Up the Configuration File for Siebel Tools.
In the Object Explorer, expand the Application tree, and then click Screen Menu Item.
In the Screen Menu Items list, add a new record using values from the following table.
Property Description Screen
The screen that Siebel CRM displays if the user clicks the menu item.
Text
The text string that Siebel CRM displays in the Site Map in the Siebel client.
For more information, see the description for the Text property in Creating a Page Tab.
Creating a Screen View
This task is a step in Process of Creating a Screen.
If you define a screen view, then consider the following:
Use categories to group views, where appropriate.
Use the Screen View Sequence Editor to define the sequence. Do not edit the Sequence property of the screen view. For more information, see Defining the Sequence That Siebel CRM Uses to Display Screen Views.
For more information, see About Screen Views.
To create a screen view
In the Object Explorer, click Screen.
In the Screens list, locate the screen you must modify.
In the Object Explorer, expand the Screen tree, and then click Screen View.
In the Screen Views list, add a new record.
When you create a new record, Siebel Tools sets the type property to Detail View and the Category Name and Category Default View properties to read-only.
Create a value for the Type property.
Define values for other properties.
For more information, see Properties of a Screen View.
Defining the Sequence That Siebel CRM Uses to Display Screen Views
This task is a step in Process of Creating a Screen.
You can use the Screen View Sequence Editor to define the sequence that Siebel CRM uses to display views and categories in the Siebel client. The editor is a visual design tool that allows you to view and edit the hierarchy of screen views at each level of navigation. It displays the hierarchy in a tree format and allows you to move individual screen views or categories to different positions in the sequence. You cannot move an item out of the current category of the item or to another level in the hierarchy. If you do not define a sequence, then Siebel CRM orders views alphabetically.
The Sequence property of a screen view displays a number to indicate the sequence in the hierarchy. Siebel Tools updates this field if you open the Screen View Editor, make modifications, and then save these modifications. To view the hierarchy that Siebel CRM displays in the Siebel client, you can sort on the Sequence column in the Screen Views list. If the Sequence property is empty, then Siebel CRM displays that Screen View as the last item in the sequence.
A screen view sequence does not affect how Siebel CRM displays the view in the Site Map. It displays screen views in Site Map in alphabetical order after the screen name.
To define the sequence that Siebel CRMuses to display screen views
In the Object Explorer, click Screen.
In the Screens list, locate the screen you must modify.
Right-click, and then click Edit Screen View Sequence.
Siebel Tools displays the Screen View Editor and uses a tree to display the screen and the child screen views. A screen view that Siebel CRM displays in bold indicates that it is the Category Default View for the category.
In the Screen View Editor, choose a screen view, then right-click and use options described in the following table to move the screen view up or down in the tree.
Option Description Move to Next Higher Position
Moves the screen view up one position.
Move to Next Lower Position
Moves the screen view down one position.
Move to Highest Position
Moves the screen view to the highest position in the current level of the hierarchy.
Move to Lowest Position
Moves the screen view to the lowest position in the current level of the hierarchy.
Save your modifications, and then exit the Screen View Editor.
Compile and test your modifications.
For more information, see Using Siebel Tools.
Process of Creating a Screen Home Page View
To create a screen home page view, do the following tasks:
This process describes guidelines that you can use to create a screen home page view. The actual tasks you perform and the sequence that you use to perform them will vary depending on your implementation requirements.
A screen home page view allows the user to access data in a screen. Typically, a screen home page view contains applets that help the user search and add records, and applets that display iHelp items, view links, and recent records. A screen home page view exists for various entities, such as accounts, contacts, opportunities, service, and households. You can define a screen home page view for other entities.
Defining Business Components for the Screen Home Page View
This task is a step in Process of Creating a Screen Home Page View.
The Rapid Search and Rapid Add applets reference virtual business components that reference the parent business component of a business object. For example, the Account Home Search Virtual and the Account Home Add Virtual business components reference the Account business component.
To improve performance, you can use a virtual business component for each applet. When Siebel CRM loads the screen home page view, it does not run an SQL query until the user submits a query or adds a record. It allows applets to access data from business components, and avoids display problems that might occur if the applets reference the same nonvirtual business component.
For more information, see About Business Components, Fields, Joins, and Links.
To define business components for the screen home page view
In the Object Explorer, click Business Component.
In the Business Components list, define the Home Search Virtual business component:
Create a virtual business component using values from the following table.
Property Value Name
Use the following naming format to keep similar records in the Siebel repository consistent:
business component name Home Search Virtual
For example, Account Home Search Virtual.
Class
CSSBCVMirrorAdd.
This class uses rapid add and rapid search to improve performance.
This virtual business component represents the data that the target business component presents. You must use the Business Components list in Siebel Tools to define a virtual business component. You cannot use the Business Component New Object Wizard because it forces you to associate the business component with a table.
In the Object Explorer, expand the Business Component tree, and then click Field.
In the Fields list, define the fields that represent fields from the target business components that Siebel CRM must display in the search applet on the home screen.
The field names in the virtual business component must match the field names in the target business component. Siebel CRM does not support a multi-value group on a rapid search or rapid add applet.
In the Object Explorer, click Business Component User Prop.
- In the Business Component User Props list, create a new record using values from the following table.
Property Value Name
Mirror Search Target BusComp
Value
Enter the name of target business component. For example, Account.
In the Business Component User Props list, create a new record using values from the following table.
Property Value Name
Mirror Search Target BusObj
Value
Enter the name of target business object. For example, Account.
Create the Home Add Virtual business components:
- Repeat Step 2a through Step 2c. Use business component name Home Add Virtual as the business component name.
In the Object Explorer, click Business Component User Prop.
In the Business Component User Props list, create a new record using values from the following table.
Property Value Name
Mirror Add Target BusComp
Value
Enter the name of target business component. For example, Account.
In the Business Component User Props list, create a new record using values from the following table.
Property Value Name
Mirror Add Target BusObj
Value
Enter the name of target business object. For example, Account.
- Optional. In the Business Component User Props list, create a new record using values from the following table.
Property Value Name
Mirror Field field name
For example, Mirror Field Account.
Value
Pick, target field, mirror pick Id field
For example, Pick, Account, Account Id.
You use this business component user property to display a dynamic list that does not use a list of values. It identifies a pick field, the corresponding field in the target business component, and the base table Id field in the virtual business component.
Optional. Complete this step only if you complete Step 2f. In the Business Component User Props list, create a new record using values from the following table.
Property Value Name
Mirror Add mirror pick Id field name
For example, Mirror Add Account Id.
Value
Ignored
Prevents Siebel CRM from adding the Mirror Pick Id Field to the target business component, which might cause a record insertion failure.
Creating Links to Frequently Accessed Data
This task is a step in Process of Creating a Screen Home Page View.
The View Links area on a screen home page displays links to the frequently accessed lists of data. Administrators and users can define view links. For more information, see Siebel Fundamentals and Siebel Applications Administration Guide.
To create links to frequently accessed data
Display the Business Component User Prop object type.
For more information, see Displaying Object Types You Use to Configure Siebel CRM.
In the Object Explorer, click Business Component.
In the Business Components list, locate the SRF Vlink Screen business component.
In the Object Explorer, expand the Business Component tree, and then click Business Component User Prop.
In the Business Component User Properties list, add a new record using values from the following table.
Property Value Name
VlinkScreen: name of the screen home page
For example, VlinkScreen: Accounts Screen.
Value
Y
In the Business Components list, enter the following query in the Name property:
*Private View Link
Choose the Public and Private View Link business component.
In the Business Component User Properties list, add a new record using values from the following table.
Property Value Name
Enter
Vlink Bo Screen Mapname of the screen home pageFor example, Vlink Bo Screen Map Account Home.
Value
Enter the name of the screen home page.
For example, Accounts Screen.
This user property is required. It uses the business object to associate the view link you define for a screen to the View Link Applet.
Make sure the Siebel application in which the view links are checked contains the home page that you defined in step 5.
Requirements for a View Link
A view link must comply with the following requirements:
An aggregate category link can include multiple aggregate view, detail category, and detail view links.
A detail category link can only include detail links.
You can define an aggregate view link in the following ways:
Without a parent category
With an aggregate category as the parent category
You cannot define a detail category as the parent category of an aggregate view link.
You must define an aggregate category or detail category as the parent category of a detail view link.
You cannot use a detail category as the parent category of an aggregate view.
An aggregate category cannot define a parent category.
Determining How Siebel CRM Displays Recent Records
This task is a step in Process of Creating a Screen Home Page View.
The Recent Records area on a screen home page view displays a list of the last five records in the current screen that the user created, modified, or accessed.
Recent Records only works with business components that reference the CSSBCBase class or subclasses of the CSSBCBase class.
To determine how Siebel CRM displays recent records
In the Object Explorer, click Business Component.
In the Business Components list, locate the Recent Record business component.
In the Object Explorer, expand the Business Component tree, and then click Business Component User Prop.
In the Business Component User Props list, add a record using values from the following table.
Property Value Name
Recent Record Track BC-screen home page business object name
For example, Recent Record Track BC-Account Home.
Value
Name of the target business component.
For example, Account.
This business component user property associates a tracked business component to a screen home page view through the business object.
In the Business Components list, locate the target business component, such as Account.
In the Business Component User Props list, add a record using values from the following table.
Property Value Name
Recent Record Enabled
Value
Y
In the Business Component User Props list, add a record using values from the following table.
Property Value Name
Recent Record Name Field
Value
Enter the business component field that tracks recent records.
This business component user property specifies the field that tracks recent records. Siebel CRM displays this field in the Recent Record applet in the screen home page view. You can use a calculated field.
Optional. In the Business Component User Props list, add a record using values from the following table.
Property Value Name
Recent Record Type Field
Value
Enter the field that Siebel CRM uses in the dynamic drilldown.
The value must reference a field in the parent business component. For example, Order Type LIC in Order Entry - Orders.
This business component user property specifies the field to track. Siebel CRM does not display this field in the Recent Record applet. You can use it to define a dynamic drilldown so that the user can navigate to a different view according to a value. If you configure dynamic drilldown in the recent record applet, then the dynamic drilldown destination objects must reference the Type field in the Recent Record business component.
For example, if the Recent Record Order Entry - Orders List Applet is the recent record applet, then the Sales Order and Web Order dynamic drilldown destination objects must reference the Type field in the Recent Record business component.
Defining the Business Object for the Screen Home Page View
This task is a step in Process of Creating a Screen Home Page View.
A screen home page view uses a separate, simplified copy of the business object that the other views in a screen reference. For example, in the Accounts screen the Account Screen Home Page View references the Account Home business object. Other views in the screen reference the Account business object. For more information, see About Business Objects.
To define the business object for the screen home page view
In Siebel Tools, create a new business object using information from the following table.
Property Value Name
name of the target business component Home
For example, Account Home.
Project
ScreenHomePage
In the Object Explorer, expand the Business Object tree, and then click Business Object Component.
In the Business Object Components list, create a new business object component for each of the following business components:
Name of the target business component. For example, Account.
Name of the target business component Home Add Virtual. For example, Account Home Add Virtual.
Name of the target business component Home Search Virtual. For example, Account Home Search Virtual.
Recent Record.
Public View Link.
Private View Link.
Salutation (eApps).
Screen Home Task Assistant.
Associating iHelp Items to Business Objects
A screen home page view references a different business object than the other views in the screen reference, so you must associate iHelp items to the business objects. For example, to display the Create a New Account iHelp task in the Activities screen home page view and in the Activities screen views, you must associate the Action Home and the Action business objects with the iHelp item. My Activities, My Team’s Activities, are examples of Activities screen views.
Creating Simplified Screen Home Page Applets
This task is a step in Process of Creating a Screen Home Page View.
An applet that Siebel CRM displays in a screen home page view is a simplified version of the same applet that Siebel CRM displays in another view. These simplified predefined applets result in a screen home page view that is simple to use and easy to manage. For more information, see About Applets, Controls and List Columns.
To create simplified screen home page applets
Copy a predefined banner applet.
Define properties for the new applet using values from the following table.
Property Value Name
Name of the target business component Home Screen Homepage Banner
For example, Account Home Screen Homepage Banner.
Title
Name of the home screen. Siebel CRM displays this value in the middle area of the home screen and prior to the list of view links.
The Account Home Screen Homepage Banner applet is an example of a banner applet.
Create a copy of a predefined rapid search applet, such as the Account Home Search Virtual Form Applet.
Define properties for the new applet you created using values from the following table.
Property Value Name
Name of the target business component Home Search Virtual Form Applet
For example, Account Home Search Virtual Form Applet.
Business Component
Name of the target business component Home Search Virtual
For example, Account Home Search Virtual.
You created this business component in Defining Business Components for the Screen Home Page View.
Create a copy of a predefined rapid add applet, such as the Account Home Add Virtual Form Applet.
Define properties for the new applet using values from the following table.
Property Value Name
Name of the target business component Home Add Virtual Form Applet
For example, Account Home Add Virtual Form Applet.
Business Component
Name of the target business component Home Add Virtual
For example, Account Home Add Virtual.
You created this business component in Defining Business Components for the Screen Home Page View.
Do the following for each applet you defined:
Remove existing controls from the applet that represent fields from the original business component.
Add new controls to represent fields from the target business component that you must display in the search applet.
Make sure that the controls reference fields defined in the business component. You can reuse each control that does not represent a field. You do not need to remove them.
Do the following for each applet you defined:
Remove existing web template items that represent controls from the original applet.
Add new web template items to represent controls for the new applet.
Repeat for each applet web template mode.
For example, add and remove web template items for Base and Edit Mode. For more information, see Options to Control How the User Creates, Edits, Queries, and Deletes CRM Data.
For the Item Identifier property, use a number between 1300 and 1340. This range is available for Rapid Add and Rapid Search applets. For more information about the item identifier, see Properties of the Applet Web Template Item.
Optional. Identify the target view that Siebel CRM displays when the user clicks Go:
If a drilldown object is defined on the source applet, then modify the drilldown object in the new applet. For more information, see Options to Drill Down to Another View.
If the Mirror Add GotoView or the Mirror Search GotoView applet user property is defined on the source applet, then modify this value in the new applet.
Creating a Screen Home Page View
This task is a step in Process of Creating a Screen Home Page View.
After you define the business components, business objects, and applets, you can define the screen home page view to display the objects and data in the Siebel client. For more information, see Options to Control How the User Creates, Edits, Queries, and Deletes CRM Data and see Creating a View.
To create a screen home page view
In Siebel Tools, click the File menu, and then click New Object.
In the New Object Wizards dialog box, click the General tab, click View, and then click OK.
Complete the New View dialog box using values from the following table, and then click Next.
Property Description Project
Choose ScreenHomePage.
Name
Use the following format:
Name of the target business component Screen Homepage View
For example, Account Screen Homepage View.
Title
Use the following format:
Name of the target business component Home
For example, Account Home.
Business Object
Choose the business object for the home page.
For example, Account. For more information, see Defining the Business Object for the Screen Home Page View.
In the View Web Layout - Select Template dialog box, choose View 25 50 25, and then click Next.
The View 25 50 25 view web template provides a three column layout.
In the Web Layout - Applets dialog box, move the following applets to the Selected Applets window:
Layout Controls Applet
Name of the target business component Home Screen Homepage Banner
Public and Private View Link List Applet
Recent Record Name of the target business component List Applet
Screen Home Task Assistant List Applet
Name of the target business component Home Search Virtual Form Applet
Name of the target business component Home Add Virtual Form Applet Rapid Search Virtual
For more information about the Rapid Add and Rapid Search applets, see Creating Simplified Screen Home Page Applets.
Click Next, and then click Finish.
In the View Web Layout editor, verify the layout of the screen home page view using values from the following table.
Applet Location Rapid Search
First quadrant of the screen
Rapid Add
Third quadrant of the screen
Homepage Banner
Upper middle of the screen
Public and Private View Link
Lower middle of the screen
Screen Home Task Assistant List Applet
Second quadrant of the screen
Recent Record
Fourth quadrant of the screen
Close the Web Layout Editor.
In the Object Explorer, expand the View tree, expand the View Web Template tree, and then click View Web Template Item.
In the View Web Template Items list, verify that the Applet Mode and Item Identifier properties are set correctly for each applet. Use values from the following table.
Applet Applet Mode Item Identifier Rapid Search
Query
102
Rapid Add
Edit
103
Homepage Banner
Base
202
Public and Private View Link
Base
203
Screen Home Task Assistant List Applet
Base
302
Recent Record
Base
303
- For more information, see Properties of the Applet Web Template Item.
Adding the Screen View to the Screen
This task is a step in Process of Creating a Screen Home Page View.
To display the new screen home page view in Siebel CRM, you must create a new Screen View object to represent it.
To add the screen view to the screen
In the Object Explorer, click Screen.
In the Screens list, locate the screen you must modify.
In the Object Explorer, expand the Screen tree, and then click Screen View.
In the Screen Views list, create a new record using information from the following table.
Property Value View
Choose the name of screen view.
For example, Accounts Screen Homepage View.
Type
Aggregate View
Viewbar Text
Enter the text that Siebel CRM must display in the viewbar.
For example, Accounts Home.
Right-click in the Screen Views list, click Edit Screen View Sequence, and then define the sequence for the screen view.
For more information, see Defining the Sequence That Siebel CRM Uses to Display Screen Views.
Compile and test your modifications.
For more information, see Using Siebel Tools.
Creating and Deploying an Application
This topic describes how to define and deploy an application. It includes the following information:
Creating a New Application
You can modify a predefined application to meet most of your business requirements. You can create a new application, if necessary. For more information, see About Applications and Reusing Predefined Objects
To create a new application
In Siebel Tools, click Application in the Object Explorer.
In the Applications list, create a new record.
To create a new application, you can copy a predefined application, and then modify the properties and child objects of the new application. A field in an applet that is specific to the original application is not available in the new application, as determined by the application name.
Enter values for the Project and Name properties.
For more information, see Guidelines for Creating an Application.
Add a page container template to the application for your home page.
For more information, see About the Container Page.
For each of the following properties, choose a value from the list of available Web pages:
Login Web Page
Error Web Page
Acknowledgement Web Page
For more information, see How Siebel CRM References Web Pages.
Associate the application with screens.
Configuring Keyboard Shortcuts for an Applicationor Applet
This topic describes how to configure keyboard shortcuts. It includes the following information:
About Keyboard Shortcuts
A keyboard shortcut is a series of key sequences that Siebel CRM runs in reply to a user action. For example, the user can simultaneously press the CTRL and N keys to create a new record. For more information, see Siebel Applications Administration Guide.
Objects That Siebel CRM Uses with a Keyboard Shortcut
To create a keyboard shortcut, you configure an accelerator, which is a child of a command. Siebel CRM maps a shortcut directly to a command, so the scope of the actions that the shortcut represents applies to one of the following contexts:
The active applet
The entire application
For example, a shortcut that starts a new query uses a context on the current applet. A shortcut that calls the Site Map is independent of the current application context.
Siebel CRM must load commands into the active menu structure for the Siebel client. The command that each shortcut represents must be available to the user. For a command to be available to the user, it must be associated with the application menu or the applet menu for the currently active applet.
For more information, see Creating a Command Object.
Guidelines for Creating Keyboard Shortcuts
If you create a keyboard shortcut, then use the following guidelines:
If the Siebel application runs in extended keyboard mode, then do not override browser functionality that the user already uses. For example, CTRL+C is a common shortcut that many users already use. For example, in Microsoft Internet Explorer, this shortcut copies a text string to the clipboard.
Group related shortcuts according to the key sequence. For example, to assist the user in remembering shortcuts that perform similar roles, group key sequences that start with CTRL+ALT for query management.
Do not map a frequently used command to a key sequence that is similar to a sequence that does a significant action that the user cannot reverse. For example, assume CTRL+SHIFT+X performs a log out. In this situation, do not map the CTRL+ALT+X sequence because the user might accidently press Crtl+SHIFT+X.
You use the administration screens in the Siebel client to configure a keyboard shortcut that is related to the Siebel Communications Server. If you define a shortcut through the views in the Administration - Communications screen, and if this shortcut uses the same key sequence as a shortcut defined in Siebel Tools and compiled to the Siebel runtime repository, then the shortcut defined through the Administration - Communications screen takes precedence. For more information, see Siebel CTI Administration Guide.
Creating a Keyboard Shortcut
This topic describes how to create a keyboard shortcut.
To create a keyboard shortcut
In Siebel Tools, display the Command object type and all child objects of the Command object type.
For more information, see Displaying Object Types You Use to Configure Siebel CRM.
Make sure the command that you require for the shortcut exists.
If the command does not exist, then you must add it. For more information, see Creating a Command Object.
Make sure the command is included as part of the active menu hierarchy at the application or the applet level for the application contexts where the shortcut is active.
In the Object Explorer, click Command.
In the Commands list, locate the command you must modify.
In the Object Explorer, expand the Command tree, and then click Accelerator.
In the Accelerators list, add a new record using values from the following table.
Property Description Name
Enter a name that describes the action that the shortcut performs.
Key Sequence
Enter the key sequence. For example,
Ctrl+Shift+O.Display Name
Enter the display name.
Browser Platform
Choose one of the following values:
Extended. For extended mode only.
Basic. For basic mode only.
All. For Extended and Basic modes.
Compile and test your modifications.
For more information, see Using Siebel Tools.
Modifying or Hiding the Key Sequence
You can modify or hide the key sequence for a shortcut.
To modify or hide the key sequence for a shortcut
In Siebel Tools, in the Object Explorer, click Command.
In the Commands list, locate the command you must modify.
In the Object Explorer, expand the Command tree, and then click Accelerator.
Optional. In the Accelerators list, modify the Key Sequence property.
For more information, see Guidelines for Creating Keyboard Shortcuts.
Optional. Hide the key sequence:
In the Object Explorer, expand the Accelerators tree, and then click Accelerator Locale.
In the Accelerator Locales list, make sure the Display Name property is empty.
You can hide the key sequence so that it does not display in the Siebel client. The Display Name property of the accelerator locale defines the key sequence for a shortcut. To hide the key sequence, leave this property empty.
Compile and test your modifications.
For more information, see Using Siebel Tools.