Go to primary content
Oracle® Communications EAGLE Database Administration - GTT User's Guide
Release 46.7
E97332-02
Go To Table Of Contents
Contents

Previous
Previous
Next
Next

Activating the GTT Load Sharing with Alternate Routing Indicator Feature

This procedure is used to enable and turn on the GTT Load Sharing with Alternate Routing Indicator feature using the feature’s part number and a feature access key.

The feature access key for the GTT Load Sharing with Alternate Routing Indicator feature is based on the feature’s part number and the serial number of the EAGLE, making the feature access key site-specific.

The enable-ctrl-feat command enables the feature by inputting the feature’s access key and the feature’s part number with these parameters:

:fak – The feature access key generated by the feature access key generator. The feature access key contains 13 alphanumeric characters and is not case sensitive.

:partnum – The Oracle-issued part number of the GTT Load Sharing with Alternate Routing Indicator feature, 893027401.

To enable the GTT Load Sharing with Alternate Routing Indicator feature, the IGTTLS feature must be enabled and turned on, and the Flexible GTT Load Sharing feature must be enabled. Perform Activating the IGTTLS feature to enable and turn on the IGTTLS feature. Perform Activating the Flexible GTT Load Sharing Feature to enable the Flexible GTT Load Sharing feature.

The enable-ctrl-feat command requires that the database contain a valid serial number for the EAGLE, and that this serial number is locked. This can be verified with the rtrv-serial-num command. The EAGLE is shipped with a serial number in the database, but the serial number is not locked. The serial number can be changed, if necessary, and locked once the EAGLE is on-site, with the ent-serial-num command. The ent-serial-num command uses these parameters.

:serial – The serial number assigned to the EAGLE. The serial number is not case sensitive.

:lock – Specifies whether or not the serial number is locked. This parameter has only one value, yes, which locks the serial number. Once the serial number is locked, it cannot be changed.

Note:

To enter and lock the EAGLE’s serial number, the ent-serial-num command must be entered twice, once to add the correct serial number to the database with the serial parameter, then again with the serial and the lock=yes parameters to lock the serial number. You should verify that the serial number in the database is correct before locking the serial number. The serial number can be found on a label affixed to the control shelf (shelf 1100).

This feature cannot be temporarily enabled (with the temporary feature access key).

Once this feature is enabled, provisioning for this feature can be performed, but the feature will not work until the feature is turned on with the chg-ctrl-feat command. The chg-ctrl-feat command uses these parameters.

:partnum – The Oracle-issued part number of the GTT Load Sharing with Alternate Routing Indicator feature, 893027401.

:status=on – used to turn the GTT Load Sharing with Alternate Routing Indicator feature on.

Once the GTT Load Sharing with Alternate Routing Indicator feature has been turned on, it be can be turned off. For more information on turning the GTT Load Sharing with Alternate Routing Indicator feature off, perform Turning Off the GTT Load Sharing with Alternate Routing Indicator Feature.

The status of the features in the EAGLE is shown with the rtrv-ctrl-feat command.

When the GTT Load Sharing with Alternate Routing Indicator feature is turned on, loadsharing between MAP sets and MRN sets can be performed. This is done by allowing MRN sets to be provisioned in MAP sets, and MAP sets to be provisioned in MRN sets. When the search in the current set (MAP or MRN) is successful but all the destinations in that set are unavailable/prohibited, the extended search is performed in the other set (MRN or MAP) that is assigned to the current set. The extended search from the MAP set to the MRN set, or from the MRN set to the MAP set, is performed only once to prevent the endless searching of a loadsharing node.

  1. Display the status of the controlled features by entering the rtrv-ctrl-feat command. The following is an example of the possible output.
    rlghncxa03w 09-02-28 21:15:37 GMT EAGLE5 40.1.0
    The following features have been permanently enabled:
    
    Feature Name              Partnum    Status  Quantity
    Command Class Management  893005801  on      ----
    LNP Short Message Service 893006601  on      ----
    Intermed GTT Load Sharing 893006901  on      ----
    XGTT Table Expansion      893006101  on      400000
    XMAP Table Expansion      893007710  off     ----
    Large System # Links      893005910  on      2000
    Routesets                 893006401  on      6000
    HC-MIM SLK Capacity       893012707  on      64
    
    The following features have been temporarily enabled:
    
    Feature Name              Partnum    Status  Quantity     Trial Period Left
    Zero entries found.
    
    The following features have expired temporary keys:
    
    Feature Name              Partnum
    Zero entries found.

    If the GTT Load Sharing with Alternate Routing Indicator feature is enabled and turned on, no further action is necessary. This procedure does not need to be performed.

    If the GTT Load Sharing with Alternate Routing Indicator feature is enabled and but not turned on, continue the procedure with 8.

    If the GTT Load Sharing with Alternate Routing Indicator feature is not enabled, continue the procedure by performing one of these steps.
    • If the rtrv-ctrl-feat output shows the HC-MIMSLK Capacity feature with a quantity of 64 and other features, continue the procedure with 6.
    • If the rtrv-ctrl-feat output shows only the HC-MIMSLK Capacity feature with a quantity of 64, continue the procedure with 2.
  2. Display the serial number in the database with the rtrv-serial-num command. This is an example of the possible output.
    rlghncxa03w 09-02-28 21:15:37 GMT EAGLE5 40.1.0
    System serial number = nt00001231
    
    System serial number is not locked.
    
    rlghncxa03w 09-02-28 21:15:37 GMT EAGLE5 40.1.0
    Command Completed.

    Note:

    If the serial number is correct and locked, continue the procedure with 6. If the serial number is correct but not locked, continue the procedure with 5. If the serial number is not correct, but is locked, this feature cannot be enabled and the remainder of this procedure cannot be performed. Contact My Oracle Support (MOS) to get an incorrect and locked serial number changed. Refer to My Oracle Support (MOS) for the contact information. The serial number can be found on a label affixed to the control shelf (shelf 1100).
  3. Enter the correct serial number into the database using the ent-serial-num command with the serial parameter.

    For this example, enter this command.

    ent-serial-num:serial=<EAGLE’s correct serial number>

    When this command has successfully completed, the following message should appear.

    rlghncxa03w 09-02-28 21:15:37 GMT EAGLE5 40.1.0
    ENT-SERIAL-NUM:  MASP A - COMPLTD
  4. Verify that the serial number entered into 3 was entered correctly using the rtrv-serial-num command. This is an example of the possible output.
    rlghncxa03w 09-02-28 21:15:37 GMT EAGLE5 40.1.0
    System serial number = nt00001231
    
    System serial number is not locked.
    
    rlghncxa03w 09-02-28 21:15:37 GMT EAGLE5 40.1.0
    Command Completed.

    If the serial number was not entered correctly, repeat 3 and 4 and re-enter the correct serial number.

  5. Lock the serial number in the database by entering the ent-serial-num command with the serial number shown in 2, if the serial number shown in 2 is correct, or with the serial number shown in 4, if the serial number was changed in 3, and with the lock=yes parameter.

    For this example, enter this command.

    ent-serial-num:serial=<EAGLE’s serial number>:lock=yes

    When this command has successfully completed, the following message should appear.

    rlghncxa03w 09-02-28 21:15:37 GMT EAGLE5 40.1.0
    ENT-SERIAL-NUM:  MASP A - COMPLTD
  6. To enable the GTT Load Sharing with Alternate Routing Indicator feature, the IGTTLS feature must be enabled and turned on, and the Flexible GTT Load Sharing feature must be enabled.

    If the rtrv-ctrl-feat output in 1 that the IGTTLS is enabled and turned on (shown by the entry Intermed GTT Load Sharing), and the Flexible GTT Load Sharing feature is enabled (shown by the entry Flexible GTT Load Sharing), continue the procedure with 7.

    If the IGTTLS feature is not enabled and turned on, perform Activating the IGTTLS feature to enable and turn on the IGTTLS feature.

    If the Flexible GTT Load Sharing feature is not enabled, perform the Activating the Flexible GTT Load Sharing Feature to enable the Flexible GTT Load Sharing feature.

    After the IGTTLS has been enabled and turned on, and the Flexible GTT Load Sharing feature has been enabled, continue the procedure with 7.

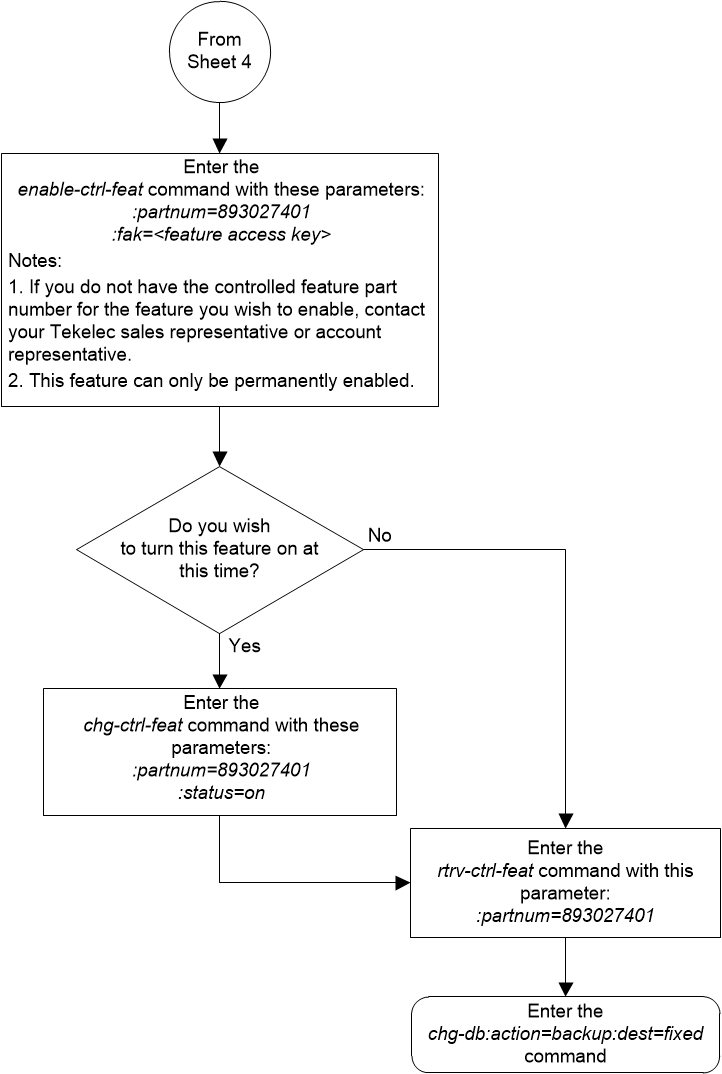
  7. Enable the GTT Load Sharing with Alternate Routing Indicator feature with the enable-ctrl-feat command specifying the part number for the GTT Load Sharing with Alternate Routing Indicator feature and the feature access key. Enter this command.

    enable-ctrl-feat:partnum=893027401:fak=<GTT Load Sharing with Alternate Routing Indicator feature access key>

    The GTT Load Sharing with Alternate Routing Indicator feature cannot be enabled with a temporary feature access key.

    The values for the feature access key (the fak parameter) are provided by Oracle. If you do not have the feature access key for the GTT Load Sharing with Alternate Routing Indicator feature, contact your Oracle Sales Representative or Account Representative.

    When the enable-crtl-feat command has successfully completed, this message should appear.

    rlghncxa03w 09-02-28 21:15:37 GMT EAGLE5 40.1.0
    ENABLE-CTRL-FEAT: MASP B - COMPLTD

    Caution:

    Once the GTT Load Sharing with Alternate Routing Indicator feature is enabled, provisioning for GTT Load Sharing with Alternate Routing Indicator feature can be performed, but load sharing using alternate routing indicators will not be performed, until the GTT Load Sharing with Alternate Routing Indicator is turned on in 8.
  8. Turn the GTT Load Sharing with Alternate Routing Indicator feature on with the chg-ctrl-feat command specifying the part number for the GTT Load Sharing with Alternate Routing Indicator feature and the status=on parameter. Enter this command.

    chg-ctrl-feat:partnum=893027401:status=on

    When the chg-crtl-feat command has successfully completed, this message should appear.

    rlghncxa03w 09-02-28 21:15:37 GMT EAGLE5 40.1.0
    CHG-CTRL-FEAT: MASP B - COMPLTD
  9. Verify the changes by entering the rtrv-ctrl-featcommand with the GTT Load Sharing with Alternate Routing Indicator feature part number. Enter this command.

    rtrv-ctrl-feat:partnum=893027401

    The following is an example of the possible output.

    rlghncxa03w 09-02-28 21:15:37 GMT EAGLE5 40.1.0
    The following features have been permanently enabled:
    
    Feature Name              Partnum    Status  Quantity
    GTT LS ARI                893027401  on      ----
    
    The following features have been temporarily enabled:
    
    Feature Name              Partnum    Status  Quantity     Trial Period Left
    Zero entries found.
    
    The following features have expired temporary keys:
    
    Feature Name              Partnum
    Zero entries found.
  10. Backup the new changes using the chg-db:action=backup:dest=fixed command. These messages should appear, the active Maintenance and Administration Subsystem Processor (MASP) appears first.
    BACKUP (FIXED) : MASP A - Backup starts on active MASP.
    BACKUP (FIXED) : MASP A - Backup on active MASP to fixed disk complete.
    BACKUP (FIXED) : MASP A - Backup starts on standby MASP.
    BACKUP (FIXED) : MASP A - Backup on standby MASP to fixed disk complete.

Figure 5-52 Activate the GTT Load Sharing with Alternate Routing Indicator Feature - Sheet 1 of 5
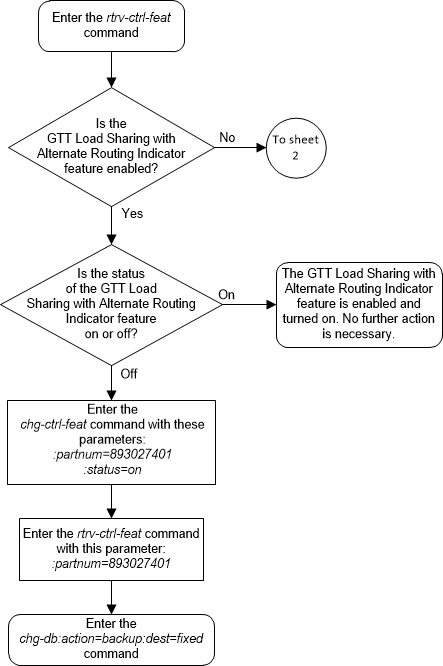
Figure 5-53 Activate the GTT Load Sharing with Alternate Routing Indicator Feature -Sheet 2 of 5
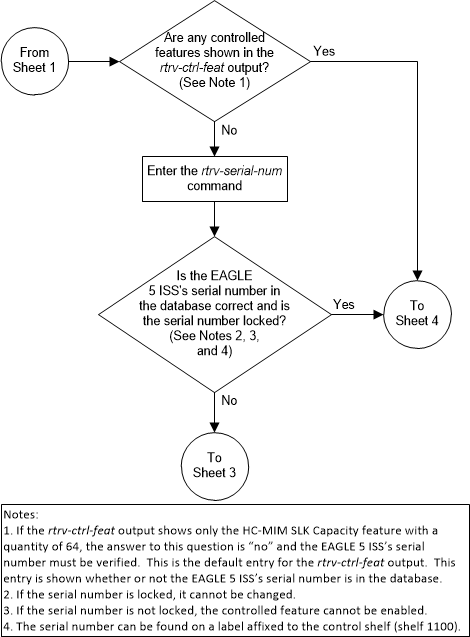
Figure 5-54 Activate the GTT Load Sharing with Alternate Routing Indicator Feature -Sheet 3 of 5
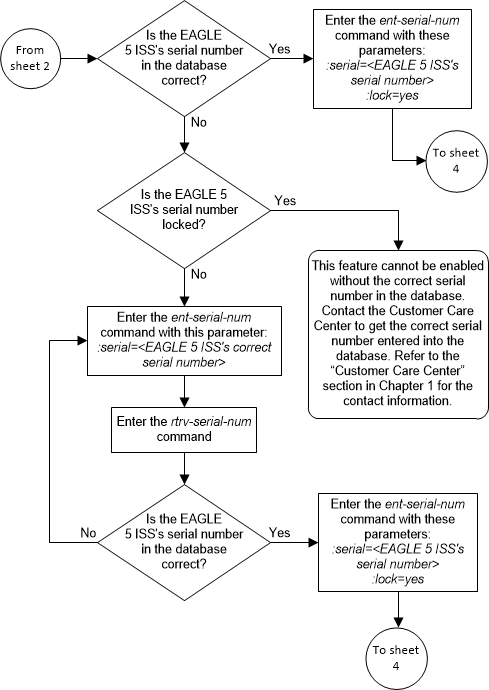
Figure 5-55 Activate the GTT Load Sharing with Alternate Routing Indicator Feature -Sheet 4 of 5
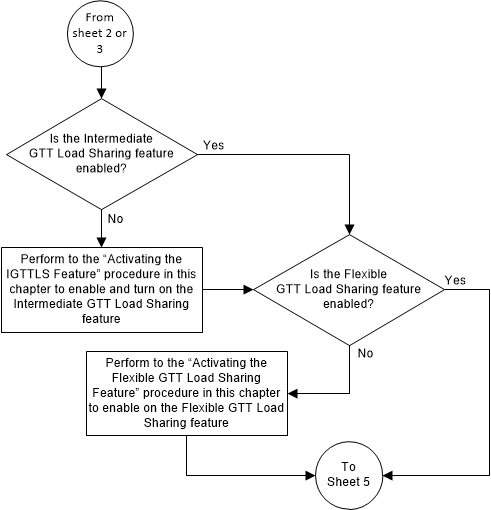
Figure 5-56 Activate the GTT Load Sharing with Alternate Routing Indicator Feature -Sheet 5 of 5