User Management
This section of the configuration allows to administer the access control over the web interface. The Operations Monitor web resources can be accessed concurrently from multiple network locations. This is done using a traditional user access mechanism.
A user is a data set whose most important elements are: a log-in name, a password, a set of access rights, the set of relations to other users, and the realm the user has access to; other less significant elements are name, email address, logo image.
The users are organized into a hierarchy, having admin as root user (with the default password 'oracle'). Any user can create a set of additional sub-users (provided the permission to add extra users is granted). A user has total control over the sub-users that he created, he can change any of the elements that constitute a sub-user.
The access to the web interface is fragmented into individual, non-overlapping domains. In order to access such a domain, a user needs to have the permission (or right) to do so. These rights, that control which parts of the web interface a user can see, are granted by the parent user that created it. Of course, the user admin has unrestricted access.
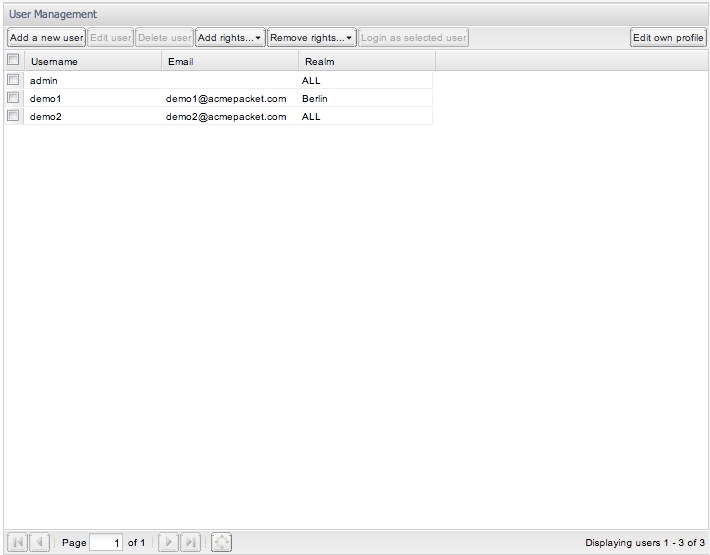
The User Management panel features seven buttons, as shown in Figure 7-38.
The left most three of them allow a user to manage his sub-users: Add a new, edit an already added one, or remove a no longer needed user. To modify or delete a sub-user, its parent-user needs to select a row out of the table and press the corresponding button. Both the Add a new user and the Edit user buttons invoke a wizard (in a new window) asking for the needed detail in order to set-up a new or change an existing user. The Add rights...and the Remove rights... buttons make it possible to add selected rights to selected or all users created by the current user, respectively to remove selected rights from selected or all users created by the current user. The rights to add or remove can be selected in a wizard, that is in accordance with the last two pages of the wizard. The Login as selected user button allows a parent user to login as a sub-user without having to enter a password. The Edit own profile button to the right of the page allows the current user to edit one's own profile information.
Add a New User
We'll next walk through the steps needed to add a new user. The same steps need to be performed for editing a user, with the difference that a field for the name of the new user is present when adding. When editing one's own profile, only the first step of this process is necessary.
User Information
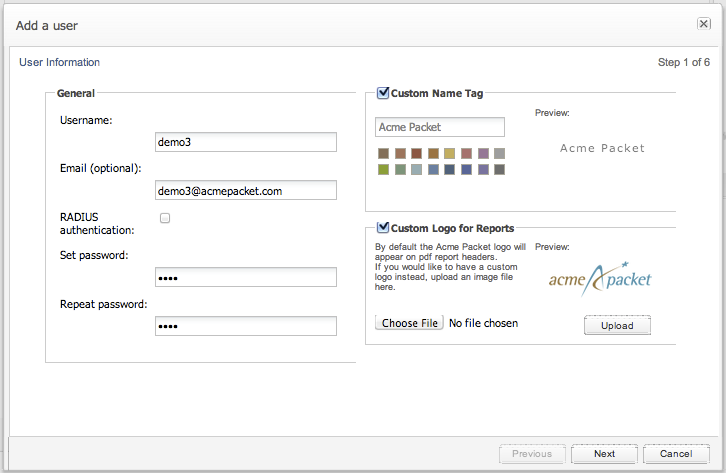
The first step, named User Information, requires providing the log-in name (the username), an optional email address, and a password (asked two times to prevent accidental mistyping) as can be seen in Figure 7-39. Instead of entering a password, it is also possible to opt for RADIUS authentication, if RADIUS authentication has been set up for this Operations Monitor instance. To learn more about Operations Monitor's RADIUS authentication feature, see "Requirements for RADIUS Authentication".
Figure 7-39 Setting User Information for a New User
Description of "Figure 7-39 Setting User Information for a New User"
A logo image is located in the upper left corner of the interface. By default, this is the Oracle logo, but it can be customized for each individual user; this is useful when the web interface is accessed by multiple clients of the same provider, sharing the same Operations Monitor setup. The Custom Logo for Reports section provides an upload field where the user can insert the picture to use as a logo.
Note:
The following logo formats are supported: TIF, TIFF, EPS, PDF, JPG, JPEG, GIF, and PNG.
After specifying the path, one must upload the file by pressing on the Upload image button.
Selecting a Role
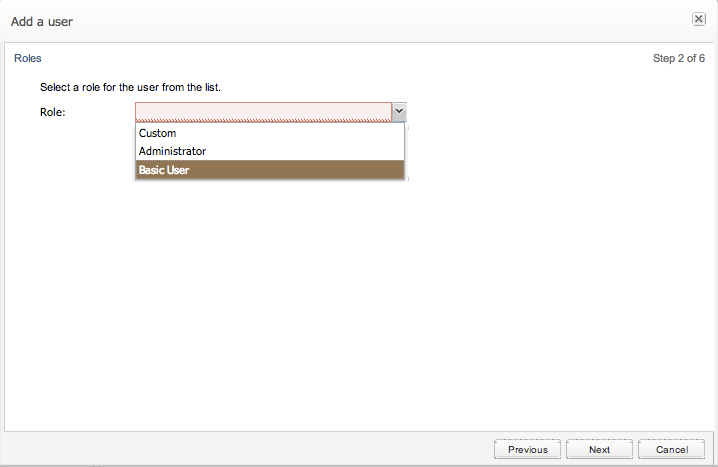
After choosing a username and password, the user is given the option of selecting a role (See Figure 7-40) providing roles have been defined in addition to the custom role. If no roles are available, the dialogue will continue directly to the realms selection if they exist, otherwise onto the individual permissions selection.
Figure 7-40 Setting a Role for a New User
Description of "Figure 7-40 Setting a Role for a New User"
User Permissions
In case User Roles is enabled (see Figure 7-40), a role is set for the user that gives the user a predefined set of permissions that are tied to the role. For more information on role management, see "Role Management".
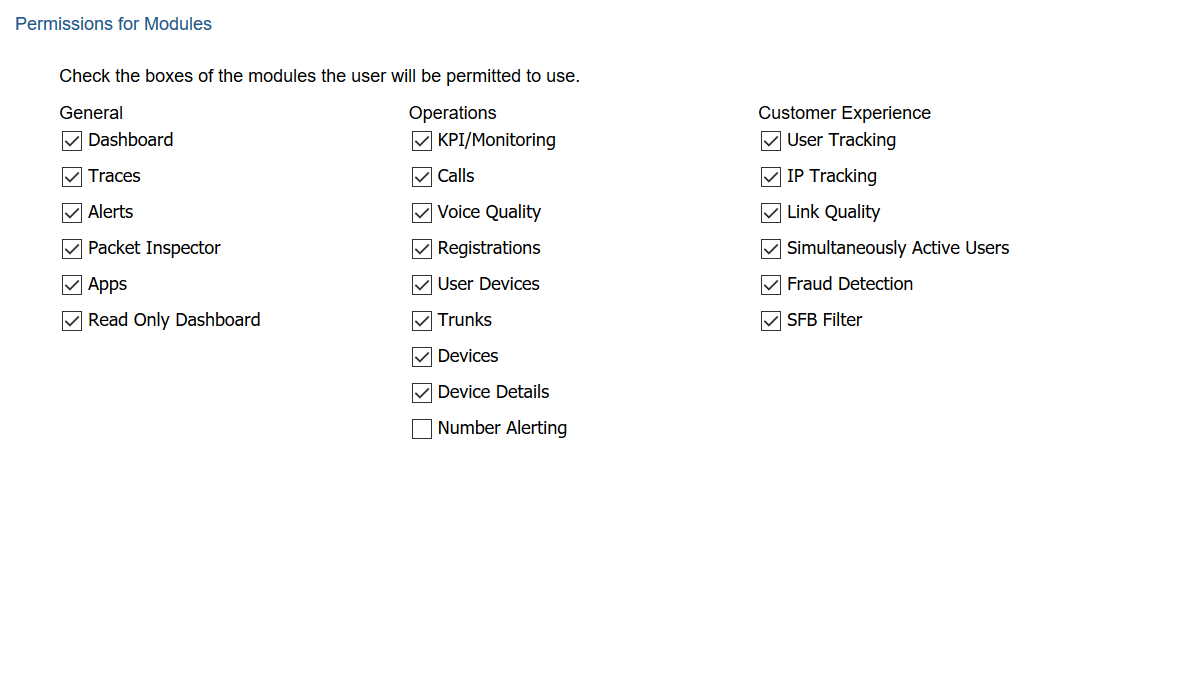
In case User Roles is disabled, the permissions need to be set individually for each module (see Figure 7-41) and for each setting.
The Permissions for Modules page, is where the parent user can control what the new user will be able to access. The set of permissions are grouped in four, reflecting the grouping of functionality on the actual web interface:
-
General
-
Operations
-
Customer Experience
-
Control Plane Monitor
Each check box in these groups corresponds to a menu item in the main menu of Operations Monitor. If it is checked, the new user will have the corresponding menu item in his main menu.
Figure 7-41 Setting Permissions for Modules for a New User
The Permissions for Settings page can control what settings the created user will be allowed to modify. The access right to some advanced functionality of Operations Monitor can also be controlled here.
The check boxes in the Settings group to the left of the section roughly correspond to sections in the settings dialog.
Table 7-9 describes the user setting options.
Table 7-9 User Settings Options
| Field | Description |
|---|---|
|
Changing of platform settings |
If checked, the created user is allowed to access the Platform Settings section in the Operations Monitor settings dialog. |
|
Changing of prefix tags |
If checked, the user is allowed to change the number prefix tags in the Platform Settings. However, the user will still be able to view them even without this permission. |
|
Create users |
If checked, the created user is allowed to create and manage new users himself using the User Management section of the Operations Monitor settings dialog. |
|
Grant create users |
If checked, the created user can grant the 'Create users' permission described above. |
|
View/Edit all users |
If checked, the user is able to see and modify users created by other users. |
|
Create roles |
If checked, the user is able to view and modify the roles management section in the user management folder. For more information, see "Role Management". |
|
Changing of external devices |
If checked, the created user is allowed to access the External Devices section in the Operations Monitor settings dialog. |
|
Changing the system settings |
If checked, the created user is allowed to access the Settings section in the Operations Monitor settings dialog. |
|
Modify realms |
If checked, the created user is able to view and modify the realms management section of the settings. If the user is assigned a realm, on a previous screen, he will only be able to modify realms that intersect or are contained within the user's own realm. |
Table 7-10 describes the user interface setting options.
Table 7-10 User Interface Settings Options
| Field | Description |
|---|---|
|
View SIP messages |
If checked, the created user can see only the SIP message headers in the messages tab of the Call Details window and in the Registration Details window. For more information, see "Calls" and "Registrations". |
|
View SIP message bodies |
If checked, the created user can view SIP message bodies in the messages tab of the Call Details window and in the Registration Details window. For more information, see "Calls" and "Registrations". Message bodies cannot be captured in packet capture downloads unless they are set as viewable to the user. |
|
Create PDF reports |
If checked, the new user can create PDF call reports on the Calls page. For more information, see "Calls". |
|
View registration history |
If checked, the new user is allowed to see the registration history of a platform user in the User Tracking page. For more information, see "User Tracking". |
|
Incremental User Search |
If checked, the new user is allowed to use the incremental user search on the User Tracking page. For more information, see "User Tracking". |
|
Read the OCSM manual |
If checked, the new user is allowed to see the online version of the Operations Monitor User's Guide. |
|
Change the dashboard page |
If checked, the new user is allowed to add and remove items from the Dashboard page. |
|
May always log in |
If checked, the new user is always allowed to log in, even if the concurrent session limit for one user or the global concurrent session limit is surpassed. In case the global concurrent session limit is surpassed, another user will be logged out in order to allow this user to log in. |
|
Save calls |
If checked, the new user is allowed to save calls for further debugging. |
|
View saved calls from other users |
If checked, the new user is allowed to view the saved calls created by other users. |
|
View all realms |
If checked, the new user is allowed to view all the realms not only the ones created by itself. |
|
RTP Header Recording |
If checked, the new user is allowed to record the header part of RTP packet in a call. |
|
RTP Payload Recording |
If checked, the new user is allowed to record the entire RTP packets of a call. This includes audio, video, and image data, voice quality data, and DTMF tones. |
|
RTCP Recording |
If checked, the new user is allowed to record RTCP voice quality data. |
|
View DTMF Tones |
If checked, the new user is allowed to view DTMF tones in the call flow diagram and to see the presence of DTMF tones in a call in the calls grid. |
User Realm
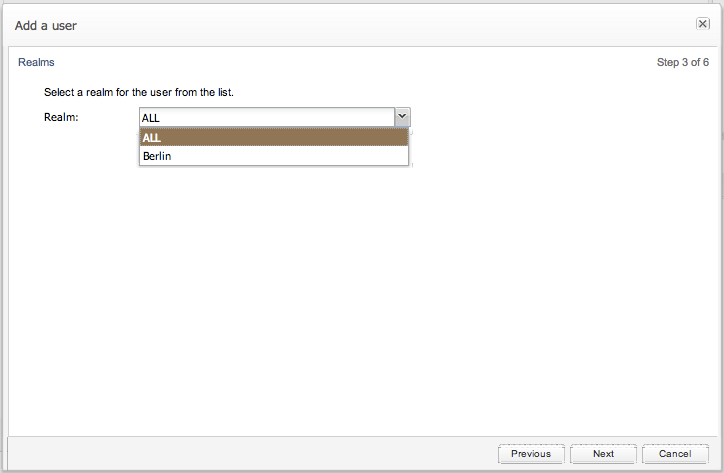
The second step sets the realms that the future user will be able to access.
A user assigned to a realm can only see devices that are also assigned to that realm. Users assigned to the realm ALL are unrestricted and can see all devices, regardless of the realm the device is assigned to. For more information about the realm concept in Operations Monitor, see Realms Definitions
On the KPI/Metrics page, users also only see the devices listed in their assigned realm. For more information, see KPI/Metrics
A user can access either one or ALL the realms (see Figure 7-42).
Overview Information
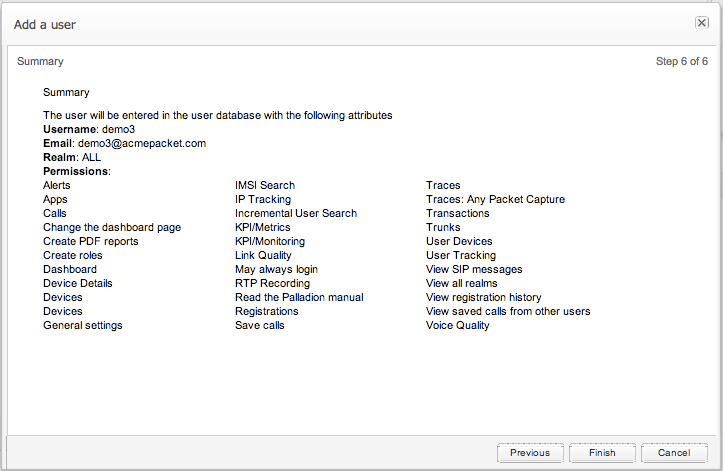
The summary as shown in Figure 7-43 gives a brief overview of the new user. Included is the username, email address (if entered), role, realm and permissions bitmask.
Requirements for RADIUS Authentication
When a user logs in, Operations Monitor supports RADIUS authentication if it has been enabled in the RADIUS Authentication section of the Settings dialog box. RADIUS authentication is performed if it has been enabled for the user.
For RADIUS authentication to work, the RADIUS server has to respond to the Operations Monitor access request sent with the set of required user attributes. Operations Monitor sends its access request with a configurable NAS_Identifier attribute, which can be used to identify requests from Operations Monitor on the server side, and with the encrypted password as the Password attribute. Upon successful authentication, Operations Monitor expects the following user attributes:
Table 7-11 RADIUS Authentication User Attributes
| Attribute | Description |
|---|---|
PLD-User-First-Name |
Not applicable. |
PLD-User-Last-Name |
Not applicable. |
PLD-User-Email |
(Optional) The e-mail address of the user. |
PLD-User-Realm |
The integer realm ID of the user's realm. |
PLD-User-Creator |
The user ID of the parent user for the user. |
PLD-User-Permissions |
A bitmask describing the permissions of the user. |
PLD-User-Logo |
(Optional) A field containing the logo image for the user. |
PLD-User-Options |
A JSON-encoded object describing per user options. |
The numeric IDs for these user attributes are defined in a RADIUS dictionary file, which is delivered together with Operations Monitor.
Note:
The PLD-User-First-Name and PLD-User-Last-Name fields in the radius definition are not used.
The PLD-User-Permissions attribute deserves special explanation. It contains a bitmask describing the permissions that a user has. Each of the permissions introduced above has a position in the bitmask. To generate a specific permissions bitmask you can use the wizard for adding users (choose RADIUS authentication on the first page of the wizard, then select the appropriate permissions, and the permissions bitmask will be displayed on the last page of the wizard).
Role Management
Note:
User Roles cannot work together with RADIUS Authentication.
In this folder of the Operations Monitor settings, the user roles are administered to define default sets of permissions for users. It is not required to assign a role to a user, however it is recommended as it simplifies the user creation process. An example of this panel is seen in Figure 7-44.
For instance an administrator role would generally contain all permissions, a power user may contain most screens and a subset of system permissions, and a basic user a subset of screens. During the user creation process if a role other 'custom' is selected, then later on the individual permission check boxes will be skipped.
Note:
Regarding role management, the terms permissions and rights are used interchangeably.
Note:
By default, the roles feature is disabled. In order to make use of the roles, the User Roles system setting must be enabled.
Adding a Role
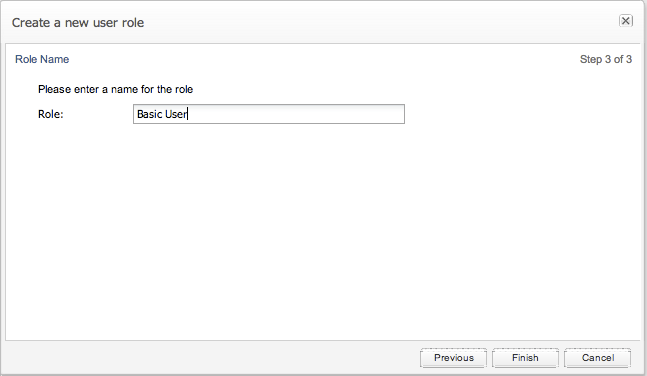
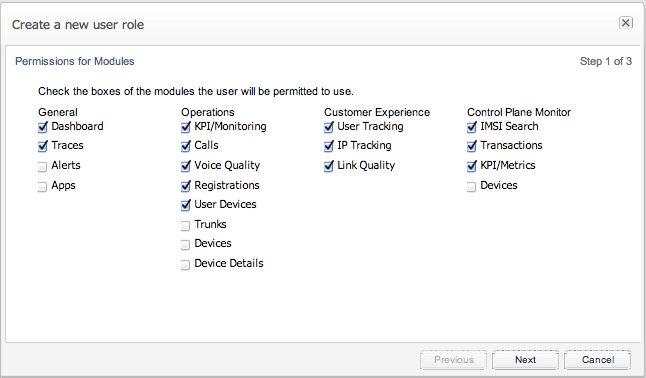
Adding a role is performed after selecting the Add a new role button. As shown in Figure 7-45, Figure 7-46, and Figure 7-47. This is equivalent to the permissions screens of adding a new user, however after setting the permissions there is a prompt for the role name, see Figure 7-47. The role name is mandatory.
Figure 7-45 Setting Permissions for Modules for a New Role
Description of "Figure 7-45 Setting Permissions for Modules for a New Role"
Figure 7-46 Setting Permissions for Settings for a New Role
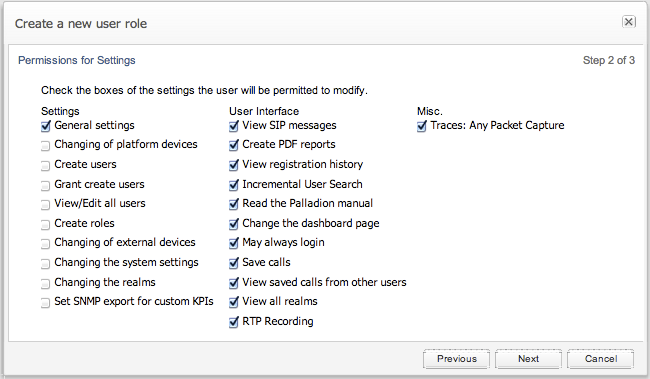
Description of "Figure 7-46 Setting Permissions for Settings for a New Role"
Editing a Role
After selecting only one role, it may be edited by selecting the Edit option in the role management panel. When multiple roles are selected this option is not available.
Deleting a Role
Deleting a role may also only be performed after selecting a single role. There is a confirmation prompt that must be confirmed before the role is deleted.
Adding Rights to a Role
One can either add rights to a selected role or generally to all roles. This can be selected as demonstrated in Figure 7-48 and Figure 7-49. The following dialogue is equivalent to the normal role dialogue, only without the option to change a role name. The selected check boxes designate which rights will be added to the selected role(s).
Figure 7-49 Adding Rights to Selected Roles

Description of "Figure 7-49 Adding Rights to Selected Roles"
Removing Rights from a Role
Likewise, one can remove rights from individual roles or generally across all roles. This is selected as shown in the images Figure 7-50 and Figure 7-51. Removing rights is the mirror process to adding rights, with the selected check boxes will be removed from the selected role(s).
Figure 7-50 Removing Rights from All Roles

Description of "Figure 7-50 Removing Rights from All Roles"
Figure 7-51 Removing Rights from Selected Roles

Description of "Figure 7-51 Removing Rights from Selected Roles"
External Authentication Authorization
The Mediation Engine Connector supports authenticating users using an external authentication provider, such as LDAP, RADIUS, or single sign-on authentication. This authentication must be configured on the reverse proxy (NGINX or Apache), which acts as a gateway for the Mediation Engine. Authorization for the user must be done using Mediation Engine permissions, as described in the section, "Add a New User".
External authentication is controlled by the system setting, External authentication enabled. When enabled, the X-Forwarded-User HTTP header set by the reverse proxy must contain the authenticated user's login name.
Password Settings
In this folder of the Operations Monitor settings, you can define the password settings that are followed by users.
To modify the password settings:
From the Settings screen, click Password Settings.
To enforce users to change their password regularly, set the time period by doing the following:
Select Force users to change their password regularly.
Enter the number of days in the Period in days to force password change for users with access to sensitive data field. The default setting is 90 days
Enter the number of days in the Period in days to force password change for users without access to sensitive data field. The default setting is 180 days.
Click Save to save the changes or click Cancel.
Note:
The entries in these fields are applied when the user changes the password next time.
Enforce stringent password rules by doing the following:
Select Enforce stringent password rules to increase the level of security required in user passwords.
Note:
A stringent password:
Should not begin with a digit
Must contain at least one uppercase letter
Must contain at least one lower case letter
Must contain at least one digit
Must contain a special character such as @, #, $, -, _
Must be different from the previous password
The account locking is enabled.
By default, the account gets locked after three unsuccessful attempts for 15 minutes. To change the default account locking time, open the /etc/iptego/vsp.conf file, in the usermanagement section, enter the value in seconds against the unlock_admin_timeout key after which accounts get unlocked.
Click Save.
Enabling or Disabling User Accounts
To enable or disable the user accounts:
Login to Operations Monitor as admin.
From Settings, click User Management.
Select the user you want enable or disable the account and click Edit.
Do one of the following:
To enable the suspended user account:
Deselect the Account disabled check box and click Next.
The Permission for Modules screen appears.
Assign the required permissions for modules by selecting the check box and click Next.
The permissions for Settings screen appears.
Assign the required permissions for settings by selecting the check box and click Next.
The Summary screen appears.
Verify the summary and click Finish.
The user account is enabled.
To suspend an user account:
Select the Account disabled check box and click Next.
The Permission for Modules screen appears.
Click Next.
The permissions for Settings screen appears.
Click Next.
The Summary screen appears.
Verify the summary and click Finish.
The user account is disabled.
