10Advanced Siebel Assignment Manager Configuration
Advanced Siebel Assignment Manager Configuration
This chapter includes the following topics:
Requirements for Completing Advanced Configuration for Siebel Assignment Manager
Setting the Lock Assignment Default Value for Activity Assignment Objects
Configuring Assignment Objects to Copy Additional Columns to the Team Table
Configuring Siebel Assignment Manager to Use Reporting Tables and Columns
Scenarios for Using Multitiered Assignment with Sales Assignment Rules
Configuring Siebel Assignment Manager to Add Scores Across Rules
Requirements for Completing Advanced Configuration for Siebel Assignment Manager
Before beginning any advanced configuration procedures, obtain background knowledge in the Siebel software architecture, Siebel Tools, and Siebel Workflow Manager. Consult the following documentation for this information:
Using Siebel Tools
Configuring Siebel Business Applications
Siebel Developer's Reference
Siebel Business Process Framework: Workflow Guide
Siebel Installation Guide for the operating system you are using
Creating Assignment Objects
To create an assignment object
Start Siebel Tools.
In the Object Explorer, expand Workflow Policy Object, and select Assignment Object.
Tip: If Workflow Policy Object is not visible in the Object Explorer, then you can enable it by selecting View, then Options, then Object Explorer in the Development Tools Options dialog box.In the Workflow Policy Objects window, select the workflow policy object type for which you want to add the new assignment object.
Select the Assignment Objects window and choose Edit, then New Record.
Configure the assignment object by setting values in the appropriate fields for each property.
For a list of assignment object properties and their default values, see Siebel Object Types Reference.
If you are running dynamic assignment, then activate an assignment policy for the assignment object.
For more information about dynamic assignment, see Process of Defining Assignment Policies for Dynamic Assignment.
Update your deployment with the new configurations.
For instructions, see Updating Your Siebel Assignment Manager Deployment with New Configurations.
Creating New Skills
Skills are assignment criteria values attributed to specific assignment rules, objects, employees, positions, and organizations. Siebel Assignment Manager uses skills to match assignment rules, objects, employees, positions, and organizations.
The Siebel Business Applications provide several predefined skills, however, you can create new skills using Siebel Tools. This topic explains how to view the predefined skills and create new skills.
For most deployments, the predefined skills are sufficient. However, you can create new skills using Siebel Tools. The following procedure explains how to create a new skill that can be used in any of the Siebel Business Applications.
To create a new skill
Create an assignment attribute.
Create an assignment criterion.
You must check the Employee Skill field because you are configuring the criterion as a skill.
Add the assignment attribute created in Step 1 as a child object to the assignment criterion created in Step 2.
For more information about creating assignment attributes, assignment criteria, and assignment criteria attributes, see Process of Creating Assignment Criteria for Use in Assignment Rules.
Note: To perform assignments based on skills, further configuration is required using Siebel Tools. For more information about configuring criteria as skills, see Process of Defining Criteria Values as Skills with Expertise Codes and Weighting Factors.
Example of Using Skill Tables
The skill and skill item tables are child and grandchild tables, respectively, of the object used to store skills and skill items for assignment objects that are not stored as columns in the parent table itself. The employee skill table is used to store skills possessed by employees, such as languages spoken, product expertise, and so on. For example, for an employee who speaks English and Spanish, there is one record in the employee skill table that specifies the skill name as Language. There are also two records in the child employee skill item table that correspond to this skill record: one record for English, and another record for Spanish.
For more information about how to assign skills to candidate objects, see Scenarios for Using Siebel Assignment Manager.
For example, the following procedure explains how to configure Assignment Manager so that only employees who speak Spanish are assigned a service request.
To configure Assignment Manager to assign a service request only to employees who speak Spanish
Create a service request with Language as the skill and Spanish as the skill item.
In the Service Request skill table for the service request, create one record and specify Language as the skill.
In the child Service Request skill item table, create one record and specify Spanish as the skill item.
For more information about how to perform this step, see Process of Defining Criteria Values as Skills with Expertise Codes and Weighting Factors.
Create an assignment rule that filters employees based on their language skills.
Create an assignment rule and apply the Service Request assignment object.
Create a criterion called Language and use the Compare to Person assignment rule comparison method.
This criterion, and therefore the rule, passes only employees who have the Spanish language skill.
Note: You can also perform skill matching with other comparison methods. For more information about the comparison methods, see Assignment Criteria Comparison Methods.
Assignment Manager can also perform skill matching with expertise codes and can use weighting factors to assign weighted scores to different expertise codes. For more information about these topics, see About Assignment Skills, Expertise Codes, and Weighting Factors.
Assigning Objects Based on the Primary Address
To assign objects based on the primary address
Start Siebel Tools.
Select the assignment object.
In the Object Explorer, expand Workflow Policy Object.
In the Workflow Policy Objects list, select Account.
Select the workflow policy component to change the Source Column and Target Column fields.
In the Object Explorer, select Workflow Policy Component.
In the Workflow Policy Component window, select Account Address.
Change Source Column Name to ROW_ID (from OU_ID).
Change Target Column Name to PR_ADDR_ID (from ROW_ID).
Repeat the previous steps for the Contact and Opportunity assignment objects.
Check in the projects to the server.
For more information about checking in projects, see Using Siebel Tools.
If using dynamic assignment or workflow policies, then drop and regenerate triggers by running the Generate Triggers server component.
For more information about stopping and restarting this server component, see Generating Triggers for Dynamic Assignment Using the GUI or Generating Triggers for Dynamic Assignment Using the Server Manager Command-Line Interface. Alternatively, see Siebel System Administration Guide.
Assigning Child Accounts Based on Parent's Primary Address
A common business requirement involves the configuration of Siebel Assignment Manager to assign child accounts based on the primary account's address. This configuration is completed through Siebel Tools using the following procedure.
To assign child account objects based on the parent's primary address
In the Object Explorer, select the Workflow Policy object, and click the Account record.
Expand the Workflow Policy object in the Object Explorer, and select the Workflow Policy Components object.
-
Create two new workflow policy components, Parent Account and Parent Account Address, with the following properties.
Name
Parent Account
Parent Account Address
Source Table Name
S_ORG_EXT
S_ADDR_PER
Source Column Name
ROW_ID
ROW_ID
Target Component Name
Account
Parent Account
Target Column Name
PAR_OU_ID
PR_ADDR_ID
While the new Parent Account Address record is selected, expand the Workflow Policy Component object, and click the Workflow Policy Component Column object.
Create a new record with the following properties:
Alias: Parent Account State
In the Object Explorer, select the Assignment Attributes object, and create a new record with the following properties:
Data Type: Varchar
Pick List: PickList State
Pick Field: Value
While the new assignment attribute Parent Account State is selected, expand the Assignment Attributes object, and click the Assignment Attributes Column object.
Create a new record with the following properties:
Assignment Object: Account
Workflow Object: Account
Workflow Component: Parent Account Address
Workflow Component Column: Parent Account State
Sequence: 1
In the Object Explorer, select the Assignment Criteria object and create a new record with the following properties:
Display Name: Parent Account State
Use Expertise: FALSE
While the new assignment criteria Parent Account State is selected, expand the Assignment Criteria object and click the Assignment Criteria Attribute object; create a new record with the following properties:
Assignment Attribute: Parent Account State
Store Column: 1
Display Sequence: 1
Display Name: Parent Account State
After the configurations are complete, the project must be checked into the server, and various server administration procedures must be run. To update your deployment with these new configurations, see Viewing Predefined Skills.
For more information about deploying projects, see Using Siebel Tools.
An assignment rule can now be created that assigns child accounts based on the parent's primary address.
Reassigning Accounts to a Different Primary Position
To reassign accounts to a different position
Start Siebel Tools.
In the Object Explorer, select the Workflow Column object and create a new record with the following properties:
Name: Account Primary Position Id
Table: S_ORG_EXT
Column: PR_POSTN_ID
Select Workflow Policy Object, then Account, then Workflow Policy Component, and then Account. Select an account record.
Drill down on the Workflow Policy Component Column and add a new record called Account Primary Position Id.
In the Object Explorer, select Assignment Attribute and create a new record called Account Primary Position.
Drill down on the Assignment Attribute Column and add a new record with the following properties:
Name: Account: Account Primary Position Id
Assignment Object: Account
Workflow Policy Object: Account
Workflow Component: Account
Workflow Policy Component Column: Account Primary Position Id
Sequence: 1
In the Object Explorer, select Assignment Criteria and create a new record called Account Primary Position.
Drill down on the Assignment Criteria Attribute and create a new record called Account Primary Position Id with the following properties:
Name: Account Primary Position Id
Assignment Attribute: Account Primary Position Id
Store Column: 1
Display Sequence: 1
Display Name: Id
Check in the project to the server, deploy the changes to the Siebel runtime repository, and distribute it to your users.
In the updated Client, create a new assignment rule based on the assignment object Account; add a new criterion for this rule, and select the Account Primary Position; under the values applet, select the row ID of the position that you want to reassign.
Navigate to the Positions view of this new Assignment Rule; select the new position that is to replace the previous position.
Release assignment rules by clicking Release in the Assignment Rules List view.
Run a Batch Assignment against a test account that includes the old position; use the following parameters:
Object: Account
Object WHERE clause:
WHERE ROW_ID='your_value'
Confirm that the test account is reassigned and then run a Batch Assignment to reassign the other accounts to the new position; use the following parameters:
Object: Account
Object WHERE clause:
WHERE PR_POSTN_ID='your_value'Thoroughly test this assignment rule before applying it to your production environment. After your accounts have been reassigned, it is recommended that you expire this rule.
Depending on your situation, run Contact Denormalization to update the contact access list.
For information about running Assignment Manager in denormalization mode, see Running Siebel Assignment Manager in Denormalization Mode.
To set up Position in the Values applet as a picklist, select the appropriate picklist and applet when configuring the Workflow Column and Assignment Criteria Attribute for the Account Position Id.
Maintaining the Manually Assigned Primary Position
Siebel Assignment Manager maintains an object's manually assigned primary position when the Keep Manual Primary Position property in Siebel Tools for the object is set to TRUE. Assignment Manager identifies the manually assigned primary position when the PR_REP_MANL_FLG field = Y on the object. By default, the PR_REP_MANL_FLG value is set to N, which indicates that the candidate is not a manually added primary.
When the primary position is updated in the GUI, the PR_REP_MANL_FLG flag is updated to Y. If Siebel EIM imports opportunities where PR_REP_MANL_FLG=TRUE and S_OPTY.PR_POSTN_ID=NULL, then running the batch assignment in this case assigns the opportunities that sets PR_REP_MANL_FLG to FALSE. For this position to be recognized as the manually assigned primary by Assignment Manager, manually set the Primary Assignment Manual flag, that is, PR_REP_MAN_FLG, to make that position the manually assigned primary.
To maintain the object's primary position
Navigate to the Opportunities screen, and then the Opportunity List view (or another assignment object).
Query for and select the item of interest.
Click the Sales Team select button to launch the Team Members dialog box.
Click the Primary check box of another position in the list; then reselect the Primary check box of the original position and click OK.
This process changes the system PR_REP_MANL_FLG value to Y and updates PR_REP_SYS_FLG to N.
This procedure can also be used to add positions to the object or delete system-assigned positions from the object.
About the Keep Creator Property
The purpose of the Keep Creator property is for Assignment Manager to either maintain an object's creator or delete an object's creator.
For primary position assignment:
If the Keep Creator property in Siebel Tools for an object is set to FALSE, then Assignment Manager deletes the creator.
If the Keep Creator property in Siebel Tools for an object is set to TRUE, then Assignment Manager maintains the object's creator, but does not delete the creator of the assignment object from the team.
Assignment Manager currently retains the existing primary position whereby it matches the current primary position of the creator. However, if the primary position of the employee is changed after the creation of the assignment object, then the original primary position is removed during the assignment. This behavior persists even when the Keep Creator property is set to TRUE.
Routing Assignments to Mobile Users
The component parameter Log txn only on change (LogTxnChgOnly) controls whether transactions with no change to Assignment primary or team members are routed to mobile or remote users. This parameter has a default setting of TRUE for Batch Assignment, for Interactive Assignment (Assignment Manager), and, implicitly, for Dynamic Assignment (Workflow Monitor Agent).
When this parameter value is TRUE, transactions with no change to the assignment primary or teams are not routed to mobile users. To change the LogTxnChgOnly parameter for dynamic assignment, use the following steps. This procedure requires configuration in Siebel Tools.
For more information about this parameter, see Modifying the Siebel Assignment Manager Component Parameters.
To route assignments to mobiles users by changing the LogTxnChgOnly parameter
Stop the Workflow Monitor Agent processing the assignment policies.
Start Siebel Tools.
For more information about proper Siebel Tools configuration procedures, see Configuring Siebel Business Applications.
In the Object Explorer, select the Workflow Policy Program, and then select Assignment Request (In Process).
Drill down on Workflow Policy Program Arguments in the Object Explorer, and select the LogTxnChgOnly parameter.
Change the value to TRUE or FALSE.
If TRUE, then transactions with no change to the assignment primary or teams are not routed to mobile users.
Check in the project to the server.
Restart the Workflow Monitor Agent.
Note: You do not have to redeploy the Siebel runtime repository.
Stopping Assignment of the Default Organization
If you want to override the assignment of all organizations to an assignment object, then you must remove the assignment property Org Primary Column from a selected assignment object. The default value is set to BU_ID. After this value is set to NULL, Assignment Manager does not assign any organization to the assignment object. The following procedure details this configuration. The Account assignment object is used as an example.
To stop assignment of the default organization to the Account assignment object
Start Siebel Tools, and select the appropriate project.
In the Object Explorer, expand Workflow Policy Object.
Select Assignment Object.
Select the Account Record.
In the Properties Window, find the property called Org Primary Column.
Delete the value for this property. (The default value is BU_ID.)
After the assignment object is modified, various server administration procedures must be run to make sure that your configurations are recognized by Assignment Manager.
If you are using Batch Assignment, then start a new task.
If you are using Dynamic Assignment, then stop and restart the Workflow Monitor Agent.
If you are using Interactive Assignment, then stop and restart the Assignment Manager server component.
Note: It is not necessary to redeploy the Siebel runtime repository when configuring an assignment object to stop assignment of the default organization.
Stopping Assignment of Organizations for Accounts
If you do not want Siebel Assignment Manager to reassign the organizations that you have set up for an account, then you must change the default property values for the Account assignment object in Siebel Tools.
To stop reassignment of organizations for accounts
Start Siebel Tools.
In the Object Explorer, expand Workflow Policy Object.
In the Workflow Policy Object list, select Account.
In the Object Explorer, click Assignment Object.
In the Assignment Objects list, set the following values:
Default Organization = blank
Org Primary Column = blank
Org Table = blank
Set Primary Org = FALSE
where blank is a null value.
After these values are set, Assignment Manager does not reassign any organizations for accounts.
Run various server administration tasks.
For instructions, see Steps Updating Your Siebel Assignment Manager Deployment with New Configurations.
Note: It is not necessary to redeploy the Siebel runtime repository. However, you must check in the changes to the server database.
Setting the Lock Assignment Default Value for Activity Assignment Objects
Assignment objects contain a lock assignment feature that, when activated by checking the Lock Assignment column on the assignment object's list applet in Siebel Tools, prevents Siebel Assignment Manager from assigning or reassigning a position or candidate to that object. You can use this feature to exclude an object (such as Account or Opportunity object) from being reassigned by Assignment Manager. By setting the column defined in the Exclude Column for the assignment object, Assignment Manager excludes (ignores) the object for assignment.
The Lock Assignment parameter for activity objects is, by default, set to TRUE. This setting does not allow Assignment Manager to assign these objects. Therefore, Assignment Manager does not assign activity records.
However, the Field Service Activity object is the one exception and is, by default, available for assignment (the Lock Assignment parameter is set to FALSE). Other activity objects must have the Lock Assignment parameter set to FALSE or NULL for assignment to occur. (The lock assignment feature for activity records, except those for Siebel Field Service, defaults to Y.)
The behavior for the Field Service Activity object is due to a setting in the Post Default Value property for the Action business component's Assignment Excluded field (Business Component, then Field, then Assignment Excluded). The value in the property is:
Expr: "If ([Class] = LookupValue(""FS_ACTIVITY_CLASS"", ""Field Engineer
Activity"") OR [Class] = LookupValue (""FS_ACTIVITY_CLASS"", ""Repair Activity"")
OR [Class] = LookupValue(""FS_ACTIVITY_CLASS"", ""Preventive Maintenance""),
""N"", ""Y"")"
Using Siebel Tools, you can implement assignment of all types of activities by setting the default value of the Assignment Excluded field to FALSE at the business component level.
The following procedure explains how to set the Lock Assignment default value so that Assignment Manager assigns activity objects. A similar procedure can be used for other assignment objects.
To set the lock assignment default value to assign activity objects
Start Siebel Tools.
In the Object Explorer, expand the Business Component object.
In the Business Components list, select Action.
In the Object Explorer, click Field.
In the Fields list, select Assignment Excluded, and change the Post Default Value field to N.
Check in the changes to the server.
For more information about checking in changes, see Using Siebel Tools.
Redeploy the Siebel runtime repository.
For more information about redeploying the Siebel runtime repository, see Updating Your Siebel Assignment Manager Deployment with New Configurations.
Make sure that all Siebel clients that create activity records have the new Siebel runtime repository by copying the newly deployed Siebel runtime repository to:
For Siebel Server (for Siebel Web Clients), the
objects\language directory, where language is the appropriate language code, such as ENU for U.S. English.For Siebel Developer Web Clients, the
objects\language directory, where language is the appropriate language code, such as ENU for U.S. English.Note: This step applies only to the Siebel Web Client or Developer Web Client.
Assignment Manager now assigns activity records based on the defined assignment rules.
Configuring Assignment Objects to Copy Additional Columns to the Team Table
When an item, such as an account or opportunity, is assigned to a team of people, the team field (the actual name of the field varies depending on the view) for that record shows a list of the people assigned to that item. This list of names is known as the team table for the given record. When making assignments, Siebel Assignment Manager passes information about the team members to the team table, such as the name of the person, that person's position and user ID, and so on.
This topic explains how to configure assignment objects to add additional information about team members to the team table.
Using Siebel Tools, you configure assignment objects to copy additional columns to the team table. Use the PositionTeamDenormN user property (where N is any number) to copy additional columns from the S_ASGN_GRP_POSTN assignment rule position candidate table to the team table.
To configure an assignment object to copy additional columns to the team table
Start Siebel Tools.
Select the assignment object for which you want to copy additional columns to the team table.
In the Object Explorer, expand Workflow Policy Object.
In the Workflow Policy Object window, select the object.
In the Object Explorer, expand Assignment Object, and then select Assignment User Prop.
In the Assignment User Properties window, choose Edit, then New Record, to define user properties for the assignment object.
In the Name field, type a name for the property, starting with PositionTeamDenorm followed by a digit (for example, PositionTeamDenorm1, PositionTeamDenorm2).
-
In the Value field, use the following syntax to enter values:
SrcCol,DestCol,UserKeyBool,DefaultValue
The following table provides descriptions for each field these values.
Value |
Description |
|---|---|
SrcCol |
The name of the source column in the assignment rule group position table whose value is copied to the destination column of the team table. Source columns available for copying use Boolean, string, number, and date data types. |
DestCol |
The name of the destination column in the team table where the values are copied. The destination column must be one of the user data columns in the team table of the assignment object. |
UserKeyBool |
If this flag is set to Y (TRUE), then this indicates that the respective destination column is part of the user key of the team table. Without this flag specified, duplicate positions cannot be inserted in the team table. For more information about duplicate positions, see the description for the AllowDupPostn parameter in Additional Information About Assignment Manager and Batch Assignment Component Parameters. |
DefaultValue |
Specifies the values that are inserted in the destination columns if the default position is assigned. In this case, you cannot specify the values to be copied in the ASGN_GRP_POSTN table.
Note: This value is optional if the default position is not specified. That is, if the value for a position is NULL, then the default value is set to NULL as well.
|
At run time, Assignment Manager copies the user property values to the team table.
Example of Copying Additional Columns to the Team Table
This topic is part of Configuring Assignment Objects to Copy Additional Columns to the Team Table.
The following procedure gives one example of copying additional columns to the team table. In this example, you copy data from the S_ASGN_GRP_POSTN rule group position table to the S_ORD_CRDT_ASGN team table of the Order (Sales Credit Assignment) assignment object.
You might use this feature differently, depending on your business model.
To configure the Order assignment object to copy the S_ORD_CRDT_ASGN column to the S_ASGN_GRP_POSTN team table
Start Siebel Tools.
Select the Order assignment object, which is the object for which you want to copy additional columns to the team table.
In the Object Explorer, expand Workflow Policy Object.
In the Workflow Policy Object window, select Order.
In the Object Explorer, expand Assignment Object, and then select Assignment User Prop.
In the Assignment User Properties window, choose Edit, then New Record, to define user properties for the assignment object.
In the Name field, type a name for the property, starting with PositionTeamDenorm followed by a digit (for example, PositionTeamDenorm1, PositionTeamDenorm2).
-
In the Value field, use the following syntax to enter values (for value descriptions, see the following table):
SrcCol,DestCol,UserKeyBool,DefaultValue
For this example, SrcCol copies values come from the S_ASGN_GRP_POSTN table. The following table shows some of the valid user properties for the Order (Sales Credit Assignment) assignment object.
Name |
Value |
|---|---|
PositionTeamDenorm1 |
DATE1,START_DT,N |
PositionTeamDenorm2 |
CHAR2,SLS_TERR_ID,Y |
PositionTeamDenorm3 |
CHAR1,CRDT_RULE_ID,N |
PositionTeamDenorm5 |
CHAR3,FROM_BTM_NODE_FLG,N |
PositionTeamDenorm6 |
NUM2,ROLLUP_PCT,N |
PositionTeamDenorm8 |
CHAR5,ROLLUP_FRMLA,N |
PositionTeamDenorm21 |
BOOL5,QTA_RLP_ACNTED_FLG,N |
Process of Configuring Assignment Objects for Team Scoring
You can configure Siebel Assignment Manager to save candidates' scores to the team table for those candidates who are assigned to an assignment object. These scores can be then used by multiple Siebel Business Applications or exposed through the user interface.
To configure an assignment object for team scoring, perform the following tasks:
Extending an Object's Base Table for Team Scoring
Before configuring an assignment object for team scoring, make sure that the object has the necessary columns in its database table.
This task is a step in Process of Configuring Assignment Objects for Team Scoring.
To extend an object's base table for team scoring
Start Siebel Tools.
In the Object Explorer, expand the Table object, and then query for the table that you want to configure.
Lock the project for the object by choosing Tools, then Lock Project (or Alt+L).
The pencil icon appears in the W field to indicate that the project for the object is locked.
In the Object Explorer, select Column.
In the Columns window, choose Edit, then New Record, to add new records.
For more information about adding new column records, see Using Siebel Tools.
Select each new record and click the Apply button.
Enter the appropriate value for the table owner password.
The table is now extended.
Note: There are specific considerations depending on the platform that you are using. For more information about this, see the note in the previous step.After the necessary base table columns are in place, you can configure the assignment object for team scoring.
Configuring Assignment Objects for Team Scoring
After extending an assignment object's base table for team scoring (see Extending an Object's Base Table for Team Scoring), you can then configure the assignment object.
This task is a step in Process of Configuring Assignment Objects for Team Scoring.
To configure an assignment object for team scoring
Start Siebel Tools.
In the Object Explorer, expand Workflow Policy Object, and select the object that you want to configure.
Lock the project for the object by choosing Tools, then Lock Project (or Alt+L).
The pencil icon appears in the W field to indicate that the project for the object is locked.
In the Object Explorer, select Assignment Object.
In the Assignment Objects window, set values for the properties in the following table.
Column |
Value |
|---|---|
Employee Team Score Column |
The table column that references a Number column in the assignment object's employee team table. |
Org Team Score Column |
The table column that references a Number column in the assignment object's organization team table. |
Position Team Score Column |
The table column that references a Number column in the assignment object's position team table. |
For information on modifying the appropriate components that expose the scoring information to the user interface, see Configuring Siebel Business Applications.
Example of Configuring the Opportunity Assignment Object for Team Scoring
This topic gives one example of configuring the Opportunity assignment object for team scoring. You might use this feature differently, depending on your business model. Use the following procedures to extend the Opportunity assignment object for team scoring.
This topic is part of Process of Configuring Assignment Objects for Team Scoring.
Extending the Opportunity Assignment Object’s Base Table for Team Scoring
Use the following procedure to extend the Opportunity assignment object’s base table for team scoring.
To extend the Opportunity object's base table for team scoring
Start Siebel Tools.
In the Object Explorer, expand the Table object, and then query for the S_OPTY table.
Lock the project for the object by choosing Tools, then Lock Project (or Alt+L).
The pencil icon appears in the W field to indicate that the project for the object is locked.
In the Object Explorer, select Column.
In the Columns window, add the records shown in the following table.
Property
Record 1
Record 2
Name
X_POS_SCORE
X_ORG_SCORE
Cascade Clear
Ignore
Ignore
Physical Type
Data(Public)
Data(Public)
Precision
22
22
Scale
7
7
Text Length
22
22
Txn Log Code
TRUE
TRUE
Note: The values and records shown are examples and can be modified, as appropriate, for your deployment.Select each new record and click the Apply button.
In the Apply Schema dialog box, enter the appropriate value for database user password, and click Apply.
The S_OPTY table is now extended with the following columns: X_POS_SCORE and X_ORG_SCORE.
Configuring the Opportunity Assignment Object for Team Scoring
Use the following procedure to configure the Opportunity assignment object for team scoring.
To configure the Opportunity assignment object for team scoring
Start Siebel Tools.
In the Object Explorer, expand Workflow Policy Object, and select the Opportunity object.
Lock the project for the object by choosing Tools, then Lock Project (or Alt+L).
The pencil icon appears in the W field to indicate that the project for the object is locked.
In the Object Explorer, select Assignment Object.
In the Assignment Objects window, set values for the properties in the following table.
Column |
Value |
|---|---|
Employee Team Score Column |
The name of the column that stores the score for each member of an employee team. |
Org Team Score Column |
The name of the column that stores the score for each member of an organization team. |
Position Team Score Column |
The name of the column that stores the score for each member of a position. |
About Configuring Siebel Assignment Manager to Copy Columns
Siebel Assignment Manager allows you to copy position- and employee-specific columnar data so that you can replace one position or employee with another and have the position or employee data stay intact. For example, you might have a sales representative who has been working on an account or contact for several days but find that you need another person to take on that work.
To enable this feature, first configure an assignment object's user properties so that Assignment Manager can find the lists of columns in the position or employee team tables. Then, you submit a component job request so that Assignment Manager retains the position- or employee-specific data in the team table for the new person. During assignment processing, the data from one position (or employee) is copied to the extension columns for the new position (or employee) before deleting the original position (or employee).
The logic that Assignment Manager uses to copy position- or employee-specific data is as follows:
Checks to see whether the position or employee already exists in the account team.
If yes, then do nothing
If no, then skip to the next step
Searches to find one of the following:
Any positions with position-specific data for the same rule group (or list of rule groups when merging sales forces) on the team.
Any employees with employee-specific data for the same rule group on the team.
If:
No, then do nothing
Yes, then do one of the following:
Find the position record that has the latest updated position-specific data, copy that position's data, and assign it to the new position.
Find the employee record has the lasted updated employee-specific data, copy that employee's data, and assign it to the new employee.
Process of Configuring Siebel Assignment Manager to Copy Columns
This topic is part of About Configuring Siebel Assignment Manager to Copy Columns.
By default, the TM Account assignment object is configured to copy columnar position or employee data. However, you can make this feature available for other assignment objects by configuring user properties using Siebel Tools, then initiating a server component job to process the information.
To copy columns for positions or employees, perform the following tasks:
Copying columns, by doing one of the following:
Configuring Assignment Objects to Copy Columns
Using Siebel Tools, you can configure assignment objects to copy position-specific or employee-specific data. Typically, you configure sales objects to copy position-specific data and you configure service objects to copy employee-specific data.
This task is a step in Process of Configuring Siebel Assignment Manager to Copy Columns.
By default, the TM Account assignment object is predefined to copy position-specific data. The following figure shows the TM Account assignment object configured to copy only a single column, ROLE_CD.

Use the following procedure to add either the Position Specific Columns or Employee Specific Columns user property to an assignment object for which you want to enable copying of data.
To configure an assignment object to copy position- or employee-specific data
Start Siebel Tools.
In the Object Explorer, expand Workflow Policy Object, and then query for the object that you want to configure.
Tip: If Workflow Policy Object is not visible in the Object Explorer, then you can enable it by selecting View, then Options, then Object Explorer in the Development Tools Options dialog box.Lock the project for the object by choosing Tools, then Lock Project (or Alt+L).
The pencil icon appears in the W field to indicate that the project for the object is locked.
In the Object Explorer, expand Assignment Object, and then select Assignment User Prop.
In the Assignment User Properties window, choose Edit, then New Record.
In the new record, enter values for the relevant information.
In the Name field, type either
Position Specific ColumnsorEmployee Specific Columns.In the Value field, type the names of the columns that you want copied.
For example, if you want to copy multiple columns, then type:
ROLE_CD, ROW_ID.In the Inactive field, click the drop-down arrow, and select FALSE.
After the assignment object is modified, you must run various server administration procedures to make sure that your configurations are recognized by Assignment Manager.
If you are using Batch Assignment, then start a new task.
If you are using Dynamic Assignment, then stop and restart the Workflow Monitor Agent.
If you are using Interactive Assignment, then stop and restart the Assignment Manager server component.
Copying Columns Using the GUI
You can set up Siebel Assignment Manager to copy columnar position or employee data using the graphical user interface (GUI) or by submitting a server component job from the Server Manager command-line interface (srvrmgr). This topic explains how to copy columns using the GUI.
This task is a step in Process of Configuring Siebel Assignment Manager to Copy Columns.
Requirements
The following procedure assumes that the Position Specific Columns and Employee Specific Columns properties are preconfigured for the assignment object and the Copy Candidate Specific Data (CopyCandSpecData) parameter is set to Yes. For information about how to configure these properties and this parameter, see Configuring Assignment Object Properties and Modifying the Siebel Assignment Manager Component Parameters, respectively.
To copy columns using the GUI
Navigate to the Administration - Server Management screen, and then the Jobs view.
In the Jobs list, click New.
A new record appears with a system-defined ID automatically generated with a status of Creating.
In the Requested Server field in the Job Detail subview, type the name of the Siebel Server on which you want to run the copy columns feature.
Note: Assignment Manager copies position- or employee-specific data only if the Use Key Value parameter value is set to either Rule Group or None. If None, then position-specific data is copied from any position in the ACCNT_POSTN table that was updated last, given every position in the team is for the same business reason.Tip: When merging sales forces in production mode, Assignment Manager takes into account the list of key values, that is, Assignment Manager gets the latest updated position in all the rule groups in the Replace Key Values list with position-specific data.
Copying Columns Using the Server Manager Command-Line Interface
After configuring an assignment object to copy columns, Siebel Assignment Manager can copy columnar position- and employee-specific data by initiating an Assignment Manager (AsgnSrvr) server component job from the Server Manager command-line interface (srvrmgr), using parameters described in Modifying the Siebel Assignment Manager Component Parameters.
This task is a step in Process of Configuring Siebel Assignment Manager to Copy Columns.
For more information about using the Server Manager command-line interface, see Siebel System Administration Guide.
To copy columns using the Server Manager command-line interface
From the Server Manager command-line interface, submit an assignment request using the CopyCandSpecData parameter to instruct Assignment Manager to retain the position- or employee-specific data in the team table.
For example:
start task for comp asgnbatch with asgnobjname="Account", objwhereclause="where row_id='88-1FC68'", CopyCandSpecData="Y"start task for comp asgnsrvr with asgnobjname="Account", objwhereclause="where row_id='88-1FC68'", CopyCandSpecData="Y"
Configuring Siebel Assignment Manager to Use Reporting Tables and Columns
Siebel Assignment Manager provides a special set of tables to which you can write assignment results for what-if analysis. These tables are known as reporting tables, and the environment in which you work with these tables is known as the reporting environment. When you work in the reporting environment, you work in reporting mode.
By default, reporting mode is turned off; Assignment Manager does not write to the reporting tables. Using Siebel Tools, you can configure Assignment Manager to use reporting tables and columns (in lieu of actual assignment tables) by defining Assignment Object and Assignment Object Extension object properties.
About Reporting Tables
You can think of the reporting tables as temporary draft tables that allow you to preview the results of Assignment Manager processing to see the changes that are going to be made before committing those changes to the actual database. Reporting allows you to run Assignment Manager multiple times without impacting current assignments. Assignment Manager can write to the reporting tables independently of whether results are written to actual assignment tables or not.
The reporting tables are especially useful when you want to filter and operate on a subset of candidates.
About Reporting Mode
When merging records in reporting mode, Assignment Manager runs in one of the following modes:
Snapshot mode. Assignment Manager reads from and writes to the reporting team tables only.
Running in snapshot mode is similar to running in production mode, except that the result tables are different. Assignment Manager stores the results tables in the Assignment Object Extension object in Siebel Tools. In snapshot mode, the reporting team tables store a snapshot of the results.
Delta mode. Assignment Manager reads from the current actual assignments but writes to the reporting team tables.
In delta mode, Assignment Manager stores the delta as compared with current actual assignments to the reporting tables. Assignment Manager also stores the delta information about whether a particular candidate was added or dropped, as compared with the same account or contact in actual assignments. You can later use this information to run reports.
Note: The values in the Assignment Object Extension object properties determine what columns are used to determine which candidates were added or dropped, which tables to use for reporting, which column to use as the key column, and which columns to use as the position, employee, or organization column.
Reporting mode is supported in default mode, that is, when Assignment Manager operates on one rule group at a time.
To configure an assignment object to use reporting tables and columns
Start Siebel Tools.
In the Object Explorer, expand Workflow Policy Object, and in the Workflow Policy Objects list, query for the object for which you want to enable reporting tables and columns.
Tip: If Workflow Policy Object is not visible in the Object Explorer, then you can enable it by selecting View, then Options, then Object Explorer in the Development Tools Options dialog box.Lock the project for the object by choosing Tools, then Lock Project (or Alt+L).
The pencil icon appears in the W field to indicate that the project for the object is locked.
In the Object Explorer, select Assignment Object Extension.
In the Assignment Object Extensions list, choose Edit, then New Record, and then click in the available fields to enter relevant information.
The following table shows some of the properties of the Assignment Object Extension object type.
Property |
Description |
|---|---|
Name |
The name of the assignment object extension, matching the assignment object name. |
Inactive |
Indicates whether the object extension is active or inactive. By default, this is set to FALSE. |
Position Reporting Table |
The name of the position reporting intersection table. If the assignment object can be assigned to multiple positions, then this intersection table stores the set of position IDs that are assigned to the assignment object IDs. |
Position Reporting Column |
The name of the column in the position reporting intersection table that points to rows in the S_POSTN position table. Required if Position Table property is non-NULL. |
Position Reporting Insertion Column |
This column marks the positions that are added to the team. Applicable in both snapshot and delta reporting modes. |
Position Reporting Deletion Column |
This column marks the positions that are removed from the team. Applicable in both snapshot and delta reporting modes. |
Position Reporting Key Column |
Stores the key values of the positions assigned to the team at run time. Note: The UseKeyVal parameter must also be set to TRUE. |
Employee Reporting Table |
The name of the employee reporting intersection table. If the assignment object can be assigned to multiple employees, then this intersection table stores the set of employee IDs that are assigned to the assignment object IDs. |
Employee Reporting Column |
The name of the employee reporting intersection table that points to rows in the S_POSTN position table. Required if the Employee Table property is non-NULL. |
Employee Reporting Insertion Column |
This column marks the employees that are added to the team. Applicable in both snapshot and delta reporting modes. |
Employee Reporting Deletion Column |
This column marks the employees that are removed from the team. Applicable in both snapshot and delta reporting modes. |
Employee Reporting Key Column |
Stores the key values of the employees assigned to the team at run time.
Note: The UseKeyVal parameter must also be set to TRUE.
|
Org Reporting Table |
The name of the organization reporting intersection table. If the assignment object can be assigned to multiple organizations, then this intersection table stores the set of organization IDs that are assigned to the assignment object IDs. |
Org Reporting Column |
The name of the organization reporting intersection table that points to rows in the S_POSTN position table. Required if Organization Table property is non-NULL. |
Org Reporting Insertion Column |
This column marks the organizations that are added to the team. Applicable in both snapshot and delta reporting modes. |
Org Reporting Deletion Column |
This column marks the organizations that are removed from the team. Applicable in both snapshot and delta reporting modes. |
Org Reporting Key Column |
Stores the key values of the organizations assigned to the team at run time.
Note: The UseKeyVal parameter must also be set to TRUE.
|
Configuring Assignment Objects for Multitiered Assignment
By default, Siebel Assignment Manager independently matches people and organizations to assignment objects. Activating Assignment Manager to use multitiered assignment, however, allows assignments based on the relationship between a person and their organization or an organization and its people.
The following table shows the multitiered assignment modes.
Multitier Mode |
Description |
|---|---|
Independent |
Assigns people and organizations that qualify, regardless of whether they are related or not. |
Person-Oriented |
Assigns people that qualify, then assigns only qualified organizations that the assigned people belong to. |
Organization-Oriented |
Assigns organizations that qualify, then assigns qualified people from those organizations. |
Organization and Person-Oriented |
Identifies qualified people and organizations, then assigns only those that have both a qualified person and related qualified organization. |
To configure an assignment object for multitiered assignment
Start Siebel Tools.
In the Object Explorer, expand Workflow Policy Object, and in the Workflow Policy Objects list, query for the assignment object for which you want to enable multitiered assignment.
Tip: If Workflow Policy Object is not visible in the Object Explorer, then you can enable it by selecting View, then Options, then Object Explorer in the Development Tools Options dialog box.In the Object Explorer, select Assignment Object.
Lock the project for the assignment object by choosing Tools, then Lock Project (or Alt+L).
The pencil icon appears in the W field to indicate that the project for the object is locked.
For the assignment object, change the Assignment Mode property to the multitiered assignment mode operation of interest.
Choices are: Independent, Org & Person-oriented, Organization-oriented, and Person-oriented.
Scenarios for Using Multitiered Assignment with Sales Assignment Rules
This topic gives one example of how multitiered assignment can be used with sales assignment rules. You might use multitiered assignment differently, depending on your business model.
Multitiered assignment is a logical assignment feature that considers the relationships between people and organizations before assigning an object, which makes this feature well-suited to sales organizations. To activate multitiered assignment, you must first use Siebel Tools to configure assignment objects. Then, after assignment objects are configured, multitiered assignment can function in various modes.
The following scenarios show how multitiered assignment functions in various modes. Each scenario is based on the same sales opportunity and the same assignment rules.
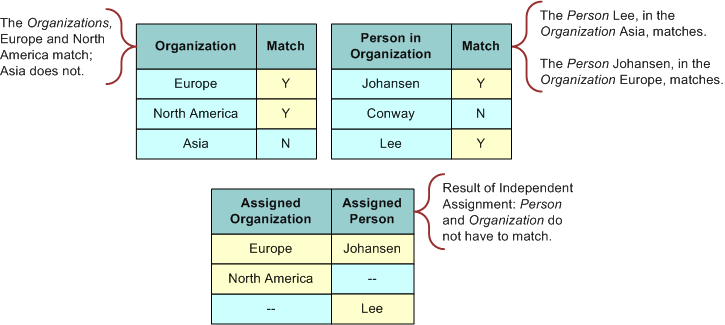
Independent Assignment
If multitiered assignment is disabled, then Assignment Manager assigns the object independently, resulting in the following scenario:
All people and organizations not matching assignment rule criteria are filtered out.
For each person who matches the assignment rule criteria, assign that person to the object.
For each organization that matches the assignment rule criteria, assign that organization to the object.
The European and Asian sales representatives independently are assigned to the same opportunity as well as the Europe and North America organizations, as shown in the following table.
Person |
Match |
Organization |
Match |
Assigned Person |
Assigned Organization |
|---|---|---|---|---|---|
European Sales Representative |
Yes |
Europe |
Yes |
European Sales Representative |
Europe |
North American Sales Representative |
No |
North America |
Yes |
Not applicable |
North America |
Asian Sales Representative |
Yes |
Asia |
No |
Asian Sales Representative |
Not applicable |
The following figure illustrates assignment in Independent mode, where qualified people and organizations are assigned, regardless of whether they are related.
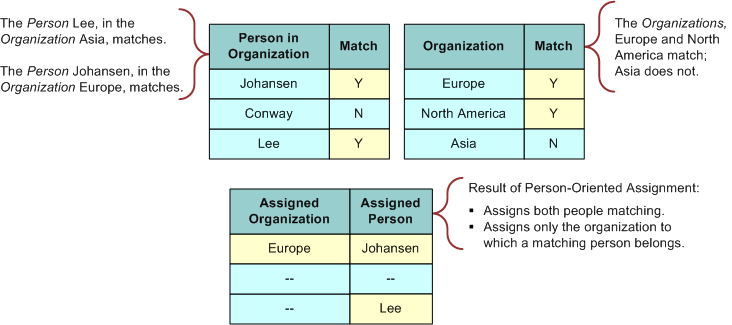
Person-Oriented Assignment
If multitiered assignment is set to Person-Oriented mode, then the following situation occurs:
All organizations and people not matching assignment rule criteria are filtered out.
For each person who matches the assignment rule criteria, assign that person to the object.
Evaluate organization candidates for the assigned people's organizations. If the organization matches, then assign that organization to the object.
The European and Asian sales representatives are assigned, but only the Europe organization is assigned, as shown in the following table.
Person |
Match |
Organization |
Match |
Assigned Person |
Assigned Organization |
|---|---|---|---|---|---|
European Sales Representative |
Yes |
Europe |
Yes |
European Sales Representative |
Europe |
North American Sales Representative |
No |
North America |
Yes |
Not applicable |
Not applicable |
Asian Sales Representative |
Yes |
Asia |
No |
Asian Sales Representative |
Not applicable |
The following figure illustrates assignment in Person-Oriented mode, where qualified people are assigned first, and then the qualified organizations that the assigned people belong to are assigned.
Organization-Oriented Assignment
If multitiered assignment is set to Organization-Oriented mode, then the following situation occurs:
All organizations and people not matching the assignment rule criteria are filtered out.
For each organization that matches, assign it to the object.
Evaluate each person candidate for the assigned organization's people. If a person matches, then assign that person to the object.
The Europe and North America organization are assigned, but only the European Sales Representative is assigned, as shown in the following table.
Person |
Match |
Organization |
Match |
Assigned Person |
Assigned Organization |
|---|---|---|---|---|---|
European Sales Representative |
Yes |
Europe |
Yes |
European Sales Representative |
Europe |
North American Sales Representative |
No |
North America |
Yes |
Not applicable |
North America |
Asian Sales Representative |
Yes |
Asia |
No |
Not applicable |
Not applicable |
The following figure illustrates assignment in Organization-Oriented mode, where qualified organizations are assigned first, and then the qualified people from those organizations are assigned.

Organization and Person-Oriented Assignment
If multitiered assignment is set to Organization and Person-Oriented mode, then the following situation occurs:
All organizations and people not matching the assignment rule criteria are filtered out.
For people and organizations that satisfy the assignment rule criteria, assign only those that have both a corresponding organization and person that meet the criteria (similar to a logical AND statement).
Only the European Sales Representative and the Europe organization are assigned, as shown in the following table.
Person |
Match |
Organization |
Match |
Assigned Person |
Assigned Organization |
|---|---|---|---|---|---|
European Sales Representative |
Yes |
Europe |
Yes |
European Sales Representative |
Europe |
North American Sales Representative |
No |
North America |
Yes |
Not applicable |
Not applicable |
Asian Sales Representative |
Yes |
Asia |
No |
Not applicable |
Not applicable |
The following figure illustrates assignment in Organization and Person-Oriented mode, where qualified people and organizations are identified first, and then only those that have both a qualified person and related qualified organization are assigned.

Configuring Siebel Assignment Manager to Add Scores Across Rules
You can configure Siebel Assignment Manager so that the same candidate (employee, position, or organization) can qualify from different assignment rules with different scores. By default, Assignment Manager treats passing candidates from different rules as if they were different candidates. However, it is possible for Assignment Manager to merge (add) the scores for the same candidate across rules and take the total score in the calculation of the primaries.
How you configure Assignment Manager to add scores across rules differs for each operating mode. You specify the Add scores across Rules (AddScores) parameter to determine Assignment Manager scoring behavior by way of the:
Assignment Manager (AsgnSrvr) component for interactive assignment
Batch Assignment (AsgnBatch) component for batch assignment
Assignment Request (In Process) workflow policy program for dynamic assignment
The information that follows describes configuration for each mode in detail.
Adding Scores Across Rules for Interactive Assignment
If you set the AddScores component parameter to TRUE, then all requests sent to AsgnSrvr add scores for the candidates. However, when interactive assignment is used, the <Assign> menu method by default sets AddScores to FALSE, and subsequently passes AddScores = FALSE to the AsgnSrvr task. To override this behavior so that interactive assignment passes AddScores = TRUE for the assignment, you must add a user property to the respective business component on which interactive assignment is running.
Alternatively, for requests sent to AsgnSrvr using a script or the Server Request business service, you can pass AddScores = TRUE as an input parameter to the AsgnSrvr task.
To configure Assignment Manager to add scores across rules for interactive assignment
Start Siebel Tools.
Configure the Action business component to add scores across rules.
In the Object Explorer, expand Business Component.
In the Business Components list, select Action.
Choose Tools, then Lock Project (or Alt+L), to lock the project.
In the Object Explorer, click Business Component User Prop, and add a new record with the following information:
Name = AddScores
Value = TRUE
Check in the changes to the server.
For more information about checking in changes, see Using Siebel Tools.
Deploy the changes to the Siebel runtime repository.
For more information about redeploying the Siebel runtime repository, see Updating Your Siebel Assignment Manager Deployment with New Configurations.
Make sure that all Siebel clients that create activity records have the new Siebel runtime repository by copying the newly deployed Siebel runtime repository to:
For the Siebel Server (for Siebel Web Clients), the
objects\language directory, where language is the appropriate language code, such as ENU for U.S. English.For Siebel Developer Web Clients, the
objects\language directory, where language is the appropriate language code, such as ENU for U.S. English.
Note: This step applies only to the Siebel Web Client or Developer Web Client.
This procedure allows control of AddScores = TRUE for interactive assignment based on the object being assigned.
Adding Scores Across Rules for Batch Assignment
If you set the AddScores component parameter to TRUE, then all tasks for batch assignment add the scores across rules for the candidates. Alternatively, you can also set Add Scores across Rules = TRUE at the task-level when starting a batch assignment task. For more information about running batch assignment, see Running Batch Assignment.
Adding Scores Across Rules for Dynamic Assignment
To add scores across rules for dynamic assignment, you must set the Add Scores program argument to TRUE for the Assignment Request (In Process) workflow policy program.
To configure Assignment Manager to add scores across rules for dynamic assignment
Start Siebel Tools.
Configure the Assignment Request (In Process) workflow policy program to add scores across rules.
In the Object Explorer, expand Workflow Policy Program.
In the Workflow Policy Programs list, select Assignment Request (In Process).
Choose Tools, then Lock Project (or Alt+L), to lock the project.
In the Object Explorer, click Workflow Policy Program Arg, select AddScores, and change the Default Value to TRUE.
Check in the changes to the server.
How the AddScores Parameter Affects Primaries
By default, if an assignment rule has a primary employee, primary position, or primary organization set, and one of these passes, then it is assigned as the primary if that rule passes and is the highest scoring rule for that object. However, if the AddScores parameter is set to TRUE, then the primaries are ignored because the AddScores parameter overrides the primaries on the rule. The AddScores parameter assigns the highest-scoring employee, position, or organization across all the rules that pass for that object, and has more weight than the primaries.
For example, assume that you have two rules (Rule 1 and Rule 2) that pass for a specific Account Z. Each rule has two positions that qualify, with scores as shown in the following table.
Rule |
Position A Score |
Position B Score |
|---|---|---|
Rule 1 |
100 |
120 |
Rule 2 |
50 |
20 |
Both rules combined |
150 |
140 |
If the AddScores parameter is not applied (set to FALSE), then Position B is the highest-scoring position, with a score of 120, and becomes the primary. However, if AddScores is set to TRUE, then Position A, with a score of 150, is the highest-scoring position and becomes the primary.