6Basic Configuration for Siebel Assignment Manager
Basic Configuration for Siebel Assignment Manager
This chapter describes basic Siebel Assignment Manager configuration.
This chapter includes the following topics:
About Performing Basic Configuration Tasks for Siebel Assignment Manager
About Siebel Assignment Manager Object Type Hierarchy and Relationships
Process of Creating Assignment Criteria for Use in Assignment Rules
Example of Using a Single Criterion for Two Assignment Objects
About Inactive Workflow Policy Components for Siebel Assignment Manager
Updating Your Siebel Assignment Manager Deployment with New Configurations
Note: Configuration tasks other than the basic topics are explained in a separate chapter. For those users already familiar with Assignment Manager basic features and who require further information on refining their Assignment Manager deployment, also see Advanced Siebel Assignment Manager Configuration
About Performing Basic Configuration Tasks for Siebel Assignment Manager
Using Siebel Tools, you can modify existing assignment object definitions or create new assignment object and assignment criteria definitions in the Siebel repository. After you deploy the changes, these definitions appear as criteria in the Criteria view or as skills in the candidate skills picklists in your Siebel Business Applications for assignment object selection.
Siebel Assignment Manager features that you can custom configure using Siebel Tools include:
List of assignment objects that can be assigned to assignment rules
List of attributes that can be incorporated in assignment criteria
Behavior of each available assignment object, including whether certain features are activated for the assignment object
Table and column mappings of assignment objects and attributes
Workflow policy component and workflow policy component column mappings of attributes used in assignment criteria
List of dynamic candidate objects for each assignment object
List of dynamic candidate component objects for each dynamic candidate (for team-based criteria)
Note: Criteria values, skills, and workload conditions are specialized. Do not attempt to reconfigure them.The following table lists the various configuration tasks that you might need to perform before creating your assignment rules. The steps are presented in no particular order, and some might not be applicable for your needs.
Task |
Required |
|---|---|
Yes |
|
Process of Creating Assignment Criteria for Use in Assignment Rules |
Yes |
No |
|
No |
|
No |
|
Updating Your Siebel Assignment Manager Deployment with New Configurations |
Yes |
Requirements for Configuring Assignment Manager
Before you can successfully configure Assignment Manager, you must have a thorough understanding of how to use Siebel Tools, Assignment Manager, and the Siebel Data Model. Also familiarize yourself with the basics of the underlying Siebel Business Applications architecture.
For information about:
Siebel Tools functionality, see Using Siebel Tools and Configuring Siebel Business Applications.
Siebel Business Applications architecture, see Siebel Deployment Planning Guide.
Workflow Manager functionality, see Siebel Business Process Framework: Workflow Guide. (Assignment Manager object types are related to Workflow Manager object types.)
Siebel Data Model, see Siebel Data Model Reference on My Oracle Support.
About Siebel Assignment Manager Object Types
Siebel Business Applications provide predefined definitions in the Siebel repository for several objects. Using Siebel Tools, you configure assignment object property values in the repository to control and customize the way objects are assigned.
Some properties specify the basic definition of an assignment object, such as the name of the primary table in which object rows for the assignment object are stored, the name of the employee team table, the name of the employee primary column, and so on.
Other properties control the behavior of Siebel Assignment Manager when processing rules. For example, the Add Team Members property controls whether to remove from the team any candidates that no longer qualify for an assignment rule or rules.
The following table provides the object types specific to Assignment Manager that you can configure using Siebel Tools.
Object Type |
Description |
|---|---|
Assignment Object |
An assignment object specifies a business entity to which a candidate can be assigned, what is updated to accomplish that assignment, and other assignment behavior parameters. Assignment objects are assigned to assignment rules in the Objects to Be Assigned field of assignment rule records.
Note: The Objects to Be Assigned field is a required field for assignment rules.
|
Assignment User Prop |
Assignment user properties allow you to optionally specify additional run-time characteristics for each assignment object. Each assignment object has its own set of user property values. |
Assignment Object Extension |
This object type is a child of the Assignment Object object type that you can use to perform configuration related to Reporting mode. |
Assignment Attribute |
An assignment attribute object definition defines an attribute that can be referenced in assignment criteria records. It specifies a logical attribute that can be chosen from a picklist for defining comparisons. |
Assignment Attribute Column |
An assignment attribute column object definition assigns an assignment attribute to an assignment object and a workflow policy component column. These mappings set up value matching within the assignment object and workflow policy object. |
Assignment Criteria |
An assignment criteria object definition comprises multiple assignment attributes. Assignment criteria appear in the picklist in the Criteria list column when you are editing an assignment rule record. |
Assignment Criteria Locale |
This object type is used to store translated versions of localizable properties on the parent object type. For more information about the Locale object types, see Using Siebel Tools. |
Assignment Criteria Attribute |
An assignment criteria attribute lists the assignment attributes that are part of an assignment criterion. Assignment criteria attributes make it possible for an assignment criteria to consist of multiple attributes, known as composite criteria. |
Assignment Criteria Attribute Locale |
This object type is used to store translated versions of localizable properties on the parent object type. For more information about the Locale object types, see Using Siebel Tools. |
Dynamic Candidate |
This object type is used to store a collection of joins from the base table to the team table that allows Assignment Manager to select potential candidates dynamically based on the current record. |
Dynamic Candidate Component |
A dynamic candidate component defines the tables and columns in an nth level join. The first level defines the primary table, and the last level identifies the candidate table. |
Dynamic Candidate Component Col |
The Dynamic Candidate Component Col definition references a column within a particular level of a join that is used to evaluate assignment criteria or used to copy columns. |
Dynamic Candidate Locale |
This object type is used to store translated versions of localizable properties on the parent object type. For more information about the Locale object types, see Using Siebel Tools. |
For descriptions of, usage comments for, and property values for each of the predefined assignment objects, see Siebel Object Types Reference, and search for these object types.
About Siebel Assignment Manager Object Type Hierarchy and Relationships
The following figure illustrates the hierarchical (parent-child) relationships of Siebel Assignment Manager object types, as well as two related object types in Workflow Manager configuration. You use the Object Explorer in Siebel Tools to view these relationships.
The Siebel Repository relationships shown in this figure are as follows:
Assignment Object, Assignment Object Extension, and Workflow Policy Component are children of Workflow Policy Object.
Dynamic Candidate and Assignment User Prop are children of Assignment Object.
Dynamic Candidate Component and Dynamic Candidate Locale are children of Dynamic Candidate.
Dynamic Candidate Component Col is a child of Dynamic Candidate Component.
Assignment Attribute Column is a child of Assignment Attribute.
Assignment Criteria Attribute is a child of Assignment Criteria.
In addition to the parent-child relationships between Assignment Manager object types, there are one-to-one and one-to-many relationships specified in property settings within the object definitions, as illustrated in the following figure.
This figure shows the following relationships:
Assignment Rule: The business component that holds assignment criteria is called Assignment Rule. The business component that holds assignment rules is called Assignment Group. Assignment rules have assignment criteria children. Assignment rules are actually records of the Assignment Group business component, and their child assignment criteria are records of the Assignment Rule business component.
Assignment Object: Each assignment rule points to one or more assignment object definitions, stored in the Assignment Objects multivalue group field (MVG) in the assignment rule record.
Note: Assignment Object is a required field for all assignment rules; however, Assignment Manager excludes rules that have no objects specified when upgrading.Dynamic Candidate is a child of Assignment Object and each assignment rule can point to one or more dynamic candidates.
Dynamic Candidate Component is a child of Dynamic Candidate. It maintains the relationship between different components from which dynamic candidates are derived.
Dynamic Candidate Component Column is a child of Dynamic Candidate Component and identifies component columns that need additional filtering. If your rule has dynamic candidates, then the Person Candidates Source, Organization Candidates Source fields, or both, point to a Dynamic Candidate object definition.
Assignment Criteria: Each assignment criteria record points to an assignment criteria object definition, by means of the value in the Criteria field.
Assignment Attributes are attached to an assignment object through a property setting in each Assignment Attribute Column object definition.
An Assignment Attribute Column object definition is mapped to a Workflow Policy Component Column object definition by means of a pair of property settings.
If your rule has dynamic candidates, then the Person Candidates Source, Organization Candidates Source fields, or both, point to a Dynamic Candidate object definition.
About Assignment Objects
An assignment object is a repository representation of a data item type. In Siebel Assignment Manager, objects represent assignment entities to which candidates are matched based on assignment rules. The concept is analogous to business objects in Siebel Business Applications.
You must associate every assignment rule with at least one assignment object. Several predefined assignment objects are available for use by Assignment Manager for the most commonly used business entities in Siebel Business Applications. Some of the predefined assignment objects are:
Account
Activity
Campaign
Campaign Contact
Contact
Opportunity
Order (Sales Credit Assignment)
Product Defect
Project
Project Team
Service Request
Configuring Assignment Objects
This topic describes various tasks for configuring assignment objects and skills. It contains the following information:
Configuring Assignment Object Properties
This topic is part of Configuring Assignment Objects.
Siebel Assignment Manager uses definitions in the Siebel repository to assign objects to assignment rules and candidates.
An assignment object specifies a business entity to which a candidate can be assigned and the entities that are updated to accomplish that assignment. For example, an employee or position can be assigned ownership of an opportunity or account or made a member of the opportunity's or account's sales team. Similarly, an employee can be assigned ownership of a service request or product defect. Each of the corresponding business components has one or more fields that specify the owner or team. An assignment rule includes one or more assignment objects. When the rule is satisfied, specific columns underlying these fields are updated with replaced or added employee IDs appropriate for the settings in the assignment object.
Workflow policy objects have a one-to-one or a one-to-zero relationship with assignment objects (the Order and Quote workflow policy objects do not have predefined child assignment objects). You cannot add more assignment objects to workflow policy objects that already have a child assignment object.
To configure assignment object properties
Start Siebel Tools.
In the Object Explorer, expand Workflow Policy Object, and select the object that you want to configure.
Objects are listed alphabetically by parent name in the Workflow Policy Objects window.Tip: Workflow policy objects are not included in the Object Explorer by default. Click View, then Options, then Object Explorer to add the workflow policy objects to the Object Explorer view.With the assignment object selected, choose Tools, then Lock Project (or Alt+L), to lock the project.
In the Object Explorer, select Assignment Object.
The property values of the assignment object appear in the Properties window as well as the Assignment Objects list, although naming conventions for the same property might differ.
In the Properties window, configure the assignment object by setting the appropriate values for each property.
Note: The default values provided in the Siebel repository for assignment objects are provided for guidance purposes and might not be applicable to your business requirements. Therefore, it is recommended that you review the configuration of the predefined objects before using them. For detailed information about assignment objects and their default values, see Siebel Object Types Reference.Update your deployment with the new configurations.
For instructions, see Steps Updating Your Siebel Assignment Manager Deployment with New Configurations.
Note: It is not necessary to redeploy the changes to the Siebel runtime repository when configuring an assignment object. For more information about when to redeploy, see Updating Your Siebel Assignment Manager Deployment with New Configurations and Using Siebel Tools.Note: If you are modifying the Default Employee, Default Position, or Default Organization properties, then make sure that the values specified exist in the appropriate base table. For example, if you change the default organization to My Organization, then there must be an entry called My Organization in the Administration - Group screen, Organizations view.
Configuring Assignment Objects for Interactive Assignment
This topic is part of Configuring Assignment Objects.
Interactive assignment allows users to invoke Siebel Assignment Manager immediately, view the list of assignees generated by Assignment Manager, and then override or confirm the assignees in the list. Users can invoke interactive assignment by clicking the appropriate object's form Menu button and choosing Assign, as shown in the following figure.
For example, you could choose the Assign option from the Menu button in the All Service Requests view after navigating to the Service screen, then Service Requests, and then Service Requests List view, and then choosing All Service Requests from the view drop-down list.
When you choose Assign to assign the current service request, the Siebel client contacts the Assignment Manager and creates a list of qualified employees sorted by descending scores. The list of qualified employees appears to the user in the Employees window. Then, you can select an employee from the list as the service request owner.

Alternatively, you can allow Siebel SmartScript to have Assignment Manager select the most qualified candidate from the list. In this case, a list of qualified employees does not appear in the Employees window, and the most qualified candidate is assigned. The following procedure has an optional step related to using Siebel SmartScript in this manner.
The Service Request assignment object is configured for interactive assignment by default. However, you can use Siebel Tools to configure interactive assignment for other assignment objects.
To configure interactive assignment for an assignment object
Verify that Assignment Manager is configured to perform assignment of values in the desired field, including the presence of the necessary assignment object and assignment rules and values.
Verify that the displayed business component is of the CSSBCBase class or one of its subclasses and add the Assignment Object business component user property to the business component.
In the Object Explorer, select Business Component.
In the Business Components window, select the business component.
In the Class property for that business component, verify that the value is CSSBCBase (such as in the Account business component).
Note: Business components based on other classes cannot be configured for interactive assignment. If the class is not CSSBCBase, then note the class name and locate it in the Object Explorer for the Class object type. Note the value in the Super Class property for this class. If the Super Class is CSSBCBase, then interactive assignment is permitted. If the Super Class is not CSSBCBase, then check the Super Class property for that class.Set the Name property to Assignment Object.
Set the Value property to the name of the assignment object that is to be used in the assignment process.
Verify that the appropriate applet is of the CSSFrameBase class or one of its subclasses.
In the Object Explorer, select Applet.
In the Applets window, select the applet that you want to verify.
In the Class property for that applet, verify that the value is CSSFrameBase (such as Account Entry Applet).
Note: Applets based on other classes (including CSSFrameListBase) cannot be configured for Interactive Assignment.
Add the Assignment Type business component user property to the business component.
In the Object Explorer, select Business Component.
In the Business Components window, select the business component, and then click Business Component User Prop.
Set the Name property to Assignment Type.
Set the Value property to:
People, if you are setting up an employee- or position-based assignment.
Organizations, if you are setting up an organization-based assignment.
Both, if you are setting up an employee- or position-based assignment but need passed organization to be assigned as well.
Note: The behavior for the value Both is the same as for the value People, except that the result applet displays the list of passed employees or positions, and along with the actual assignment of the selected position or employee, passed organizations are assigned to the record.
(Optional) If you want to enable Siebel SmartScript, then add the Assignment Interactive business component user property to the business component.
Set the Name property to Assignment Interactive.
Set the Value property to TRUE.
Add the Assign selection to the applet menu button.
In the Object Explorer, select Applet.
In the Applets window, select the applet to which you want to add the Assign functionality.
In the Object Explorer, select Applet Method Menu Item.
Select the Applet Method Menu Items window, choose Edit, then New Record, and set the following values:
Command = Assign(SWE)
Menu Text = Assign
Position number = 1 (or to the number corresponding to the preferred placement in the menu)
Add the business component that holds assignment results records to the business object of the view in which the reconfigured applet is used. This business component already exists, and is either:
Assignment Results (Position) or Assignment Results (Employee), if Assignment Type is set to People (depending on whether you are setting up an employee- or position-based assignment)
Assignment Results (Organizations), if Assignment Type is set to Organizations
In the Object Explorer, select Business Object.
In the Business Objects window, select the Business Object for which you want to add a child business object component.
In the Object Explorer, click Business Objects Components, and in the Business Objects Components window, choose Edit, then New Record.
In the new record, enter values in the appropriate fields with the BusComp name set to: Assignment Results (Position), Assignment Results (Employee), or Assignment Results (Organization).
(Optional) Define the business component user property called Assignment Results BusComp and the applet user property called Assignment Results Applet.
These user properties are desirable when you have to show additional information about the results. For example, the service request assignment results can be joined with the CTI tables, and can query only qualified service people who are not currently using their telephone:
The name of the business component that is used to hold data for the additional fields would be specified in an Assignment Results BusComp user property in the business component being assigned.
The name of the applet that is used to display the assignment results would be specified in an Assignment Results Applet user property in the applet from which assignment is invoked.
Add one of the following Business Components (depending on what is being assigned) to the relevant Business Object: Assignment Group Position, Assignment Group Employee, or Assignment Group Organization.
Update your deployment with the new configurations.
For instructions, see Step Updating Your Siebel Assignment Manager Deployment with New Configurations.
Note: Other than redeploying the changes to the Siebel runtime repository, there are no additional administrative tasks required for this procedure. For more information about when to redeploy, see Updating Your Siebel Assignment Manager Deployment with New Configurations and Using Siebel Tools.
Enabling Assignment Objects for Skills
This topic is part of Configuring Assignment Objects.
Siebel Assignment Manager uses standard skills or custom expertise values to compare an object being assigned directly to a person when processing assignment rules. Assignment Manager criteria and skills are related transparently in the Siebel Data Model. Skills are extensions to attribute data stored in designated skill and skill item tables. At a high level, you can think of an assignment criterion as a skill, and each criteria value as a skill item, as shown in the following figure.
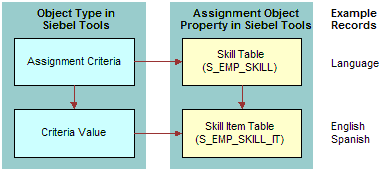
The Skill Table and Skill Item Table properties are child and grandchild tables, respectively, of the assignment object used to store skills, and skill items for assignment objects that are not stored as columns in the parent table itself. The S_EMP_SKILL employee skill table is used to store skills possessed by employees, such as languages spoken, product expertise, and so on.
For example, for an employee who speaks English and Spanish, there is one record in the employee skill table that specifies the skill name as Language. There are also two records in the child S_EMP_SKILL_IT employee skill item table that correspond to this skill record: one record for English, and another record for Spanish.
To enable assignment objects for skills
Start Siebel Tools.
-
Select the assignment object for which you want to enable skills.
In the Object Explorer, click Workflow Policy Object, and then in the Workflow Policy Objects list, query for an object.
In the Object Explorer, click Assignment Object.
Lock the project for the assignment object by choosing Tools, then Lock Project (Alt+L).
A pencil icon appears next to the Name field to indicate that the object's project is locked.
In the Assignment Objects list (or Properties window), enter values for the fields in the following table.
Field
Description
Skill Item Table
The name of the skill item table.
Skill Table
The name of the skill table.
Note: Choose the table name from the drop-down menu. This LOV (list of values) is derived from tables specified in the Siebel repository.Set the Employee Skill assignment criteria property to TRUE.
In the Object Explorer, select Assignment Criteria.
In the Assignment Criteria list, select the object that you selected in Step Enabling Assignment Objects for Skills.
Set the Employee Skill property to TRUE.
Example of Enabling an Assignment Object for Skills
This topic is part of Configuring Assignment Objects.
This topic gives one example of enabling skills for an assignment object. You might use this feature differently, depending on your business model.
The following procedure explains how to enable skills for the Contact assignment object.
To enable skills for the Contact assignment object
Start Siebel Tools.
Select the assignment object for which you want to enable skills.
In the Object Explorer, click Workflow Policy Object, and then in the Workflow Policy Objects list, query for Contact.
In the Object Explorer, click Assignment Object.
Lock the project for the Contact assignment object by choosing Tools, then Lock Project (Alt+L).
A pencil icon appears next to the Name field to indicate that the object's project is locked.
In the Assignment Objects list (or Properties window), enter values for the fields in the following table.
Field
Description
Skill Table
S_CON_SKILL
Skill Item Table
S_CON_SKILL_IT
Viewing Predefined Skills
This topic is part of Configuring Assignment Objects.
The Siebel Business Applications provide several predefined skills. The predefined skills for Assignment Manager are:
Language Code
Product Id
Product Line Id
Product Line Name
Product Name
Revenue
For most deployments, the predefined skills are sufficient. However, you can create new skills using Siebel Tools. For more information about creating new skills, see Creating New Skills.
To view predefined skills
Start Siebel Tools.
In the Object Explorer, click to select the Assignment Criteria object.
In the Assignment Criteria applet, query for criteria with Employee Skill equal to TRUE.
The predefined skills appear as well as any new skills that you have created.
Process of Creating Assignment Criteria for Use in Assignment Rules
Assignment criteria are the conditions that the candidates must satisfy in order to qualify for assignment to a particular work item. You usually define assignment criteria along with criteria values in assignment rules. Criteria values are the details associated with a criterion. There might be several criteria values for the same criterion.
Siebel Assignment Manager provides several predefined assignment criteria and criteria values. You can, however, create your own criteria and criteria values using Siebel Tools.
To create new assignment criteria for use in assignment rules, perform the following tasks in the order presented:
Creating Assignment Attributes
Assignment attributes are logical attributes of an object or candidate that can be used for matching. An assignment attribute allows you to associate a single attribute on an object or a person or an organization to multiple fields in the application.
For example, you can define an assignment rule that matches candidates based on the U.S. state. However, State is stored in a different field in the application for different objects. Assignment attributes map the places that State is defined into a single State attribute.
This task is listed previously.
Assignment attributes can be either column-based or skill-based. Column-based attributes are stored as columns in the object (such as Opportunity). You can use existing columns in the object, or use Siebel Database Extensibility to add new extension columns to the object. Skills-based attributes are stored as rows in the object's skill tables (if any).
For more information about Database Extensibility, see Configuring Siebel Business Applications.
The following figure shows a Product Line Wildcard assignment criterion that uses the Compare to Person comparison method. The assignment criterion also uses the Include All inclusion method and includes two criteria values, Monitors and Graphic Cards. Each criteria value includes two assignment attributes. In this example, only candidates that possess an Expert-level expertise in monitors and graphic cards qualify for the assignment criterion. Furthermore, 25 points are added to the qualifying candidate's score.

If you are adding an assignment attribute to a new table, then you must modify the existing Workflow Manager definitions in the Siebel repository. For more information about making modifications to Workflow Manager, see Siebel Business Process Framework: Workflow Guide.
An assignment attribute object definition defines an attribute that can be referenced in assignment criteria records. It specifies a logical attribute that can be chosen from a picklist for defining comparisons; it does not directly specify a particular database column or combination of columns. Column mapping is accomplished through the child assignment attribute column object definitions, one for each assignment object that uses the parent assignment attribute.
An assignment attribute also specifies the picklist that appears in the Values list in the Criteria subview when you are entering an attribute in a value record, as shown in the following figure.

An assignment criteria attribute object definition implements each list column in the Values applet, as described in Creating Assignment Criteria Attributes for Assignment Criteria. The assignment criteria attribute is based on an assignment attribute, as specified in its assignment attribute property. The referenced assignment attribute identifies a picklist, which is the same picklist that appears when you click the drop-down arrow next to the list column cell.
The Assignment Attribute object type functions as an intermediary between the assignment criteria and the assignment objects, as shown in the previous figure.
An assignment criteria attribute references an assignment attribute through its assignment attribute property. In turn, each of the assignment attribute's child assignment attribute columns specifies an assignment object and a workflow policy component and column combination.
An assignment attribute is a logical grouping of similar mappings to different assignment objects that can use the same picklist for value selection.
To create an assignment attribute
Start Siebel Tools.
In the Object Explorer, select the Assignment Attribute object.
Tip: If the Assignment Attribute object is not visible in the Object Explorer, then you can enable it in the Development Tools Options dialog box (choose View, then Options, and then Object Explorer).Lock the project for the object by choosing Tools, then Lock Project (or Alt+L).
The pencil icon appears in the W field to indicate that the project for the object is locked.
In the Assignment Attributes window, choose Edit, then New Record, and configure the assignment attribute object by setting values in the appropriate fields.
In the Name field, type the name of the new assignment attribute.
In the Project field, select a project.
(Optional) If the attribute supports a range of values (such as revenue), then check the Use Range field.
In the Data Type field, select a data type for the attribute.
(Optional) If you want a picklist for the attribute to allow users to select values for the assignment attribute, then enter a value in the Pick List field.
(Optional), Pick a field for the attribute to allow users to select values for the assignment attribute, enter a value in the Pick Field field.
For a description of these properties, see the following table.
Update the Siebel runtime repository and run various server administration tasks.
For instructions on updating your deployment with the new configurations, see Updating Your Siebel Assignment Manager Deployment with New Configurations.
The following table shows some of the properties of the Assignment Attribute object type.
Property |
Description |
|---|---|
Bounded |
When checked, the picklist is bounded (you can select a value from the picklist). When unchecked, you can enter a value that does not appear in the list. |
Data Type |
Data type for the assignment attribute. Number, UtcDateTime, and Varchar are supported. |
Name |
Name of the assignment attribute. Must be unique within the repository. |
Order By LOV Type |
Not used. |
Pick Field |
Name of the field to select from the picklist. |
Pick List |
Name of the picklist that supplies the selection values for populating any list column in the Values list (in the Assignment Criteria view) that is based on this assignment attribute. |
Use Range |
Specifies whether a single list column or a pair of list columns, indicating a range, appears for assignment criteria attributes based on this assignment attribute. For example, the Revenue assignment attribute, which has a TRUE value for Use Range, appears as two list columns, Revenue Low and Revenue High. You can enter 50000 in the former and 100000 in the latter in a value record to indicate a range of $50,000 to $100,000. |
Translate |
When checked, enables MLOV (multilingual list of values) capability for the attribute. For more information about enabling this feature, see Enabling Assignment Attributes for MLOV. |
Enabling Assignment Attributes for MLOV
Multilingual List of Values (MLOV) capability allows assignment attributes to be stored in a form that can be retrieved and displayed in a variety of supported client languages. To enable assignment attributes for MLOV, use the following procedure.
This task is an optional step in Process of Creating Assignment Criteria for Use in Assignment Rules.
To enable an assignment attribute for MLOV
Start Siebel Tools.
In the Object Explorer, select the Assignment Attribute object.
In the Assignment Attributes list, select the assignment attribute for which you want to enable MLOV.
Lock the project for the object by choosing Tools, then Lock Project (or Alt+L).
The pencil icon appears in the W field to indicate that the project for the object is locked.
Locate the Translate property for this attribute, and set the value to TRUE.
Locate the Translate Pick Field for the assignment attribute, and select from the Translate Pick Field dialog box the field in the Pick List Business Component that stores the Language Independent Code (in most cases this is the Name field).
Locate the Pick Field for the assignment attribute, and select from the Pick Field dialog box the field in the Pick List Business Component that stores the Display Value (in most cases this is the Value field).
You can also configure the application to enable MLOV for workload criteria, criteria values, and skills. For more information about configuring MLOVs, see Configuring Siebel Business Applications. See also Siebel Global Deployment Guide.
Mapping Assignment Attribute Columns to an Assignment Object and a Workflow Policy Component Column
An assignment attribute column is a child object type of the Assignment Attribute object in Siebel Tools. The parent assignment attribute is an abstract logical attribute to test for a value match, and attribute columns provide mapping of assignment attributes to workflow policy component columns.
Workflow policy component columns define the column and the table name from where Assignment Manager retrieves the data for the attribute from the database. The same assignment attribute can be used for different assignment objects.
For example, consider the Account State criterion. You can apply this criterion to many assignment objects. For account objects, it means the physical U.S. state in which the account resides. For opportunity objects, it might mean the U.S. state for the accounts associated with a specific opportunity. In these instances, you define multiple assignment attribute columns for the Account State attribute and define the assignment object and the workflow policy component column to indicate where to get the data.
An assignment attribute can have multiple attribute columns for the same assignment object. For example, for the Opportunity assignment object, Account City could either mean the primary city associated with the opportunity itself or the primary city associated with the account associated to the opportunity. In this instance, the Account City assignment attribute has two attribute column records for the Opportunity assignment object.
Also define the Sequence property on the assignment attribute column object. The sequence determines the order in which the data is retrieved in the event there are multiple attribute columns for the same attribute for the same assignment object.
An assignment attribute column object definition maps an assignment attribute to an assignment object and a workflow policy component column. These mappings set up value matching within the assignment object and workflow policy object for criteria that use the parent assignment attribute.
The parent assignment attribute is an abstract logical attribute to test for a value match, which you can specify in an assignment criteria. The child assignment attribute columns specify the actual mappings to assignment objects and workflow policy component columns. Each assignment attribute column can specify a different assignment object to search, or a different attribute within the same assignment object.
This task is a step in Process of Creating Assignment Criteria for Use in Assignment Rules.
To map assignment attributes to an existing assignment object
Start Siebel Tools.
In the Object Explorer, expand the Assignment Attribute object, and select the Assignment Attribute Column object.
In the Assignment Attributes window, select the assignment attribute for which you want to map the logical location in the database schema.
Lock the project for the object by choosing Tools, then Lock Project (or Alt+L).
The pencil icon appears in the W field to indicate that the project for the object is locked.
In the Assignment Attribute Columns window, choose Edit, then New Record.
Configure the assignment attribute object by setting values in the appropriate fields.
In the Name field, type the name of the new assignment attribute column.
In the Assignment Object field, select an assignment object to which the assignment attribute is applied.
In the Workflow Policy Component field, select a workflow policy component to which the workflow policy object is applied.
In the Workflow Policy Component field, select a workflow policy component column to which the workflow policy component is applied.
In the Sequence field, enter a sequence value.
For descriptions of these properties, see the following table.
Update the Siebel runtime repository and run various server administration tasks.
For instructions on updating your deployment with the new configurations, see Updating Your Siebel Assignment Manager Deployment with New Configurations.
The following table shows some of the properties of the Assignment Attribute Column object type.
Property |
Description |
|---|---|
Assignment Object |
Assignment object that is checked for a value match with the parent assignment attribute. |
Name |
Name of the assignment attribute column. The typical format is: assignment_object: workflow_component_column For example: Service Request: Account Area Code |
Sequence |
A unique sequence number for the assignment attribute column within the assignment attribute. If an assignment attribute has multiple assignment attribute columns, then Assignment Manager searches for attribute values in the order of the values in this property. |
Workflow Policy Component |
Name of the workflow policy component, within the specified workflow policy object, with which this assignment attribute column is associated. |
Workflow Policy Component Column |
Name of the workflow policy component column, within the specified workflow policy component, with which this assignment attribute column is associated. |
Workflow Policy Object |
Name of the workflow policy object with which the assignment attribute column is associated. When an assignment object is selected, the workflow policy object defaults to this selection. |
Creating Assignment Criteria
Assignment criteria define an object and are used in assignment criteria records in assignment rules. After you create and redeploy an assignment criteria object definition in Siebel Tools, it becomes available for selection from the Criteria list column picklist in assignment criteria records in Siebel Business Applications.
For static assignment, you use the Assignment Criteria object properties to specify the criteria name (internally and as displayed) and to configure skill tables. However, most of the behavior of assignment criteria is configured in the assignment criteria attribute children. For dynamic assignment, you use special team-based criteria. For more information about criteria for dynamic assignment, see Examples of Dynamic Candidate Assignment.
An assignment criteria can consist of one or more assignment attributes, such as the criteria Account City, Account State, and Account Country. These assignment attributes are grouped as assignment criteria. In this case, a single criterion, called a composite criterion, includes three assignment attributes. To add or change drop-down fields that define assignment criteria in an assignment rule, define or modify assignment criteria. Assignment criteria attributes enumerate assignment attributes for the assignment criteria.
The Criteria list column in an assignment criteria record specifies the assignment criteria that is tested for a match against one or more attributes of the assignment object or candidate. For example, in an assignment criteria that determines whether the state is California, the assignment item would be State, Home State, or Account State, and the value California (CA) would be specified in a child value record.
When you click the drop-down arrow button in the Criteria list column for an assignment rule, a picklist appears for selection of an assignment criteria. The picklist lists the available assignment criteria (assignment criteria object definitions in the repository). When you select an assignment criteria, its name is stored in the Criteria Name field in the current Assignment Rule business component record.
To create assignment criteria
Start Siebel Tools.
In the Object Explorer, select the Assignment Criteria object.
Lock the project for the object by choosing Tools, then Lock Project (or Alt+L).
The pencil icon appears in the W field to indicate that the project for the object is locked.
In the Assignment Criteria window, choose Edit, then New Record, and set values in the appropriate fields.
In the Name field, type the name of the new assignment criteria.
In the Project field, select the Assignment project.
In the Display Name field, type the name that appears for the assignment criteria.
(Optional) If you want the assignment criteria stored in the skill table, then check the Employee Skill field.
For information about skill tables, see Enabling Assignment Objects for Skills.
(Optional) If you want expertise codes stored for the skill, then check the Use Expertise field.
If you check this field, then Assignment Manager uses expertise codes to match objects to candidates.
(Optional) If you do not want the assignment criteria to appear in the Criteria picklist, then uncheck the Display Flag field.
If this is a team-based criterion, then check the Team flag. In this case, you define only one criteria attribute record and you do not define any attribute columns for the assignment attribute.
For more information about team-based criteria, see Examples of Dynamic Candidate Assignment.
For descriptions of these properties, see the following table.
Update the Siebel runtime repository and run various server administration tasks.
For instructions on updating your deployment with the new configurations, see Updating Your Siebel Assignment Manager Deployment with New Configurations.
The assignment criteria object definition has two properties to specify the name (internally and as displayed) and two properties that are used to configure skill tables (Employee Skill and Use Expertise). Most of the behavior of an assignment criteria is configured in the assignment criteria attribute children. The following table shows some of the properties of the assignment criteria object type.
Property |
Description |
|---|---|
Display Flag |
A check mark indicates that the assignment criteria appears in the Criteria picklist. |
Display Name |
Name that appears for this assignment criteria in the picklist and the Criteria list column in the Criteria list in the Criteria view (Assignment Rule, then Criteria). If it is not specified, then the value in the Name property is used instead. |
Employee Skill |
A TRUE or FALSE property that specifies whether the attribute is actually stored in the skill and skill item tables for the candidate or object. For more information about skill tables, see Enabling Assignment Objects for Skills. |
Name |
Name of the assignment criteria. |
Use Expertise |
A TRUE or FALSE property that applies to assignment criteria that are skills. It specifies whether expertise codes are stored for the skill. If so, then Assignment Manager uses the expertise code to match the assignment object to people. |
Creating Assignment Criteria Attributes for Assignment Criteria
An assignment criterion includes one or more assignment criteria attributes, stored as object definitions for child assignment criteria attributes. Assignment criteria attributes are implemented as object definitions of the assignment criteria attribute object type. Assignment Criteria Attribute is a child object type of Assignment Criteria.
The set of assignment criteria attributes in an assignment criterion determines the set of list columns that appear in the Values list. One list column appears in the Values list for each assignment criteria attribute in the assignment criteria. In Siebel Tools, for example, the Account Wildcard assignment criteria (the Account Name assignment criteria with a display name of Account Wildcard) has an Account Name and a Site Name list column in the display of its child Value records. Both the Account Name and Site Name list columns correspond to the Account Name assignment criteria attribute.
If there were more assignment criteria attributes for this assignment criterion, then each would have a list column in the Values list. The Score list column is automatically provided, and the Expertise Code list column appears in this instance because the assignment criteria has a Use Expertise property setting of TRUE.
Composite Criteria
Assignment criteria attributes make it possible for a single assignment criterion to consist of multiple attributes, known as composite criteria.
This task is a step in Process of Creating Assignment Criteria for Use in Assignment Rules.
To create an assignment criteria attribute
Start Siebel Tools.
In the Object Explorer, expand the Assignment Criteria object, and select the Assignment Criteria Attribute object.
In the Assignment Criteria window, select the assignment criteria for which you want to enumerate assignment attributes.
Lock the project for the object by choosing Tools, then Lock Project (or Alt+L).
The pencil icon appears in the W field to indicate that the project for the object is locked.
Select the Assignment Criteria Attributes window, then choose Edit, then New Record.
Configure the assignment criteria attribute by setting values in the appropriate fields.
In the Name field, type the name of the new assignment criteria attribute.
In the Assignment Attribute field, select the assignment attribute for this assignment criteria.
In the Display Name field, type the name for the assignment criteria attribute.
In the Store Column field, specify the column in the assignment factor items table where the value for the assignment criteria attribute is stored.
In the Display Sequence field, specify the sequence in which the assignment criteria attribute appears.
(Optional) In the Pick Applet field, choose a pick applet for the assignment criteria attribute to allow users to view or select values for the assignment criteria attribute.
Note: For composite criteria, repeat the previous steps as many times as is necessary.
For more information about these properties, see Composite Criteria.
You also must update the Siebel runtime repository and run various server administration tasks using the procedures in Updating Your Siebel Assignment Manager Deployment with New Configurations.
The following table shows some of the properties of the assignment criteria attribute object type.
Property |
Description |
|---|---|
Assignment Attribute |
Name of the assignment attribute that this assignment criteria attribute is based on. Selected from a drop-down list. |
Display Name |
List column label that appears for this assignment criteria attribute in the Values list. If it is omitted, then the Name is used in the list column label. |
Display Sequence |
Order in which the list column for this assignment criteria attribute appears in the list applet, relative to those of other assignment criteria attributes in the assignment item. A lower number places the list column closer to the inside margin. |
Name |
Name of the assignment criteria attribute, for identification. This name must be unique within the parent assignment criteria. |
Pick Applet |
If a picklist is defined for the associated assignment attribute, then you specify the name of a pick applet to display the picklist for selection of a value in the attribute's list column. |
Store Column |
Specifies the column in the assignment factor items table (S_ASGN_RULE_ITEM) in which to store the value for the assignment criteria attribute. There are four columns of each data type (Number, UtcDateTime, and Varchar) provided for storage of assignment criteria attribute values in each assignment criteria. You must specify a unique value, between 1 and 4 inclusive, for each assignment criteria attribute of the same data type. The data type can be determined from the Data Type property in the referenced assignment attribute object definition. Note: You can have up to four assignment criteria attributes for each assignment criterion (a composite criterion can have a maximum of four attributes). |
Using a Single Criterion for Multiple Assignment Objects
In some cases, you can create an assignment rule that assigns candidates to two or more assignment objects while using only one of the objects' criteria. For example, you might want the ability to assign both accounts and opportunities based on the criteria Opportunity Lead Quality. To configure Assignment Manager to assign accounts based on this criteria, you must first configure and expose the Opportunity Lead Quality column to the Account assignment object using Siebel Tools.
Use the procedures in this topic to create assignment rules that use a single criterion for multiple objects. You define an assignment rule for two objects using the criteria of one object, following the tasks in Process of Defining Assignment Rules.
For procedures using a specific example, see Example of Using a Single Criterion for Two Assignment Objects.
For more information about workflows in general, see Siebel Business Process Framework: Workflow Guide.
Creating a Workflow Policy Component for Two Assignment Objects
Use the following procedure to create a workflow policy component for two assignment objects.
To create a workflow policy component for two objects
Start Siebel Tools.
Select the workflow policy object for which you want to create a workflow policy component.
In the Object Explorer, select Workflow Policy Object.
In the Workflow Policy Objects window, select the object.
With the workflow policy object selected, choose Tools, then Lock Project (or Alt+L), to lock the project.
Add a new workflow policy component record.
In the Object Explorer, expand Workflow Policy Component.
In the Workflow Policy Component window, choose Edit, then New Record.
Enter information in the fields for the new record using the following substeps:
In the Name field, type the name of the workflow policy component.
In the Source Table Name field, select the source table for the workflow policy component.
In the Source Column Name field, select the source column for the workflow policy component.
In the Target Component Name field, select the target component for the workflow policy component.
In the Target Column Name field, select the target column for the workflow policy component.
Mapping a Column to the Workflow Policy Component
After you create the workflow policy components for both objects, you map the workflow policy component to the assignment criteria. You do this by mapping a column to one of the workflow policy components.
To map a column to the workflow policy component
With the new record still selected, expand the Workflow Policy Component object in the Object Explorer, and then select the Workflow Policy Component Col object.
In the Workflow Policy Component Columns window, choose Edit, then New Record.
In the Workflow Column Name field, select the workflow column for the workflow policy component.
Mapping the Workflow Policy Component to the Assignment Attribute
After you map a column to the workflow policy component, you map the workflow policy component to the assignment attribute.
To map the workflow policy component to the assignment attribute
In the Object Explorer, expand the Assignment Attribute object, and then select the Assignment Attribute Column object.
In the Assignment Attribute Columns window, choose Edit, then New Record.
Enter information in the fields for the new record using the following substeps:
In the Name field, type the name of the assignment attribute column.
In the Assignment Object field, select the assignment object to which candidates are assigned for the assignment rule.
In the Workflow Policy Component field, select the workflow policy component to map to this assignment attribute.
In the Workflow Policy Component Column field, select the workflow policy component column to map to this assignment attribute.
In the Sequence field, specify the sequence of this assignment attribute.
Update the Siebel runtime repository and run various server administration tasks.
For instructions on updating your deployment with the new configurations, see Updating Your Siebel Assignment Manager Deployment with New Configurations.Note: You must redeploy the changes to the Siebel runtime repository whenever you add, inactivate, or delete any assignment object types, assignment criteria, and assignment attributes. Make sure that all projects are redeployed (not only the locked projects) if you inactivate or delete a high-level object type or assignment criteria. For more information about when to redeploy the changes to Siebel runtime repository, see Updating Your Siebel Assignment Manager Deployment with New Configurations.
Example of Using a Single Criterion for Two Assignment Objects
This topic gives one example of configuring Siebel Assignment Manager to assign candidates to two objects (Account and Opportunity) using criteria from only one of the objects. You might use this feature differently, depending on your business model.
See also Using a Single Criterion for Multiple Assignment Objects.
The example is divided into the following procedures; perform each procedure in the order provided.
Creating a Workflow Policy Component Using the Account and Opportunity Assignment Objects
This topic is part of Example of Using a Single Criterion for Two Assignment Objects.
Use the following procedure to create a workflow policy component for two assignment objects.
To create a workflow policy component using the Account and Opportunity objects
Start Siebel Tools.
Select the workflow policy object for which you want to create a workflow policy component.
In the Object Explorer, select Workflow Policy Object.
In the Workflow Policy Objects window, select the object.
For this example, select Account.
With the Account assignment object selected, choose Tools, then Lock Project (or Alt+L), to lock the project.
Add a new workflow policy component record.
In the Object Explorer, expand Workflow Policy Component.
In the Workflow Policy Component window, choose Edit, then New Record.
Enter information in the fields for the new record using the following steps:
In the Name field, type the name of the workflow policy component.
For this example, type Account/Opportunity.
In the Source Table Name field, select the source table for the workflow policy component.
For this example, select S_OPTY.
In the Source Column Name field, select the source column for the workflow policy component.
For this example, select PR_DEPT_OU_ID.
In the Target Component Name field, select the target component for the workflow policy component.
For this example, select Account.
In the Target Column Name field, select the target column for the workflow policy component.
For this example, select ROW_ID.
Mapping the Opportunity Workflow Policy Component to the Opportunity Lead Contact Assignment Criteria
This topic is part of Example of Using a Single Criterion for Two Assignment Objects.
After you create the workflow policy components for both objects, you map the workflow policy component to the assignment criteria. You do this by mapping a column to one of the workflow policy components. In this example, you map the Opportunity workflow policy component to the Opportunity Lead Contact assignment criteria.
To map a column to the workflow policy component
With the Account or Opportunity record still selected, expand the Workflow Policy Component object in the Object Explorer, and then select the Workflow Policy Component Col object.
In the Workflow Policy Component Columns window, choose Edit, then New Record.
In the Workflow Column Name field, select the workflow column for the workflow policy component.
For this example, select Opportunity Lead Quality.
Mapping the Account or Opportunity Workflow Policy Component to the Lead Quality Code Assignment Attribute
This topic is part of Example of Using a Single Criterion for Two Assignment Objects.
After you map a column to the workflow policy component, you map the workflow policy component to the assignment attribute. In this example, you map the Account or Opportunity workflow policy component to the Lead Quality Code assignment attribute.
To map an assignment attribute to the workflow policy component
In the Object Explorer, select the Assignment Attribute object.
In the Assignment Attributes window, select Lead Quality Code.
In the Object Explorer, expand the Assignment Attribute object and select the Assignment Attribute Column object.
In the Assignment Attribute Columns window, choose Edit, then New Record.
Enter information in the fields for the new record as described in the following substeps:
In the Name field, type the name of the assignment attribute column.
For this example, type
Account: Lead Quality.In the Assignment Object field, select the assignment object to which candidates are assigned for the assignment rule.
For this example, select Account.
In the Workflow Policy Component field, select the workflow policy component to map to this assignment attribute.
For this example, select Account/Opportunity.
In the Workflow Policy Component Column field, select the workflow policy component column to map to this assignment attribute.
For this example, select Opportunity Lead Quality.
In the Sequence field, specify the sequence of this assignment attribute.
For this example, type
2.
Update the Siebel runtime repository and run various server administration tasks.
For instructions on updating your deployment with the new configurations, see Updating Your Siebel Assignment Manager Deployment with New Configurations.
Note: You must redeploy the changes to the Siebel runtime repository whenever you add, inactivate, or delete any assignment object types, assignment criteria, and assignment attributes. Make sure that all projects are redeployed (not only the locked projects) if you inactivate or delete a high-level object type or assignment criteria. For more information about when to redeploy the changes to the Siebel runtime repository, see Updating Your Siebel Assignment Manager Deployment with New Configurations.
The following figure shows an example of defining an assignment rule for the Account and Opportunity objects using only the Lead Quality Code assignment criteria. The figure shows:
An Account Opportunity assignment rule using the Opportunity and Accounts objects and One, Best Fit assignee filter.
Note: Only the Opportunity object appears in the Objects to Be Assigned field, even though the Accounts object is also assigned.The Account Opportunity assignment rule has the Lead Quality Code rule criterion applied and uses the Compare to Person comparison method and the Include inclusion method. This assignment rule is always required.

About Inactive Workflow Policy Components for Siebel Assignment Manager
The following table shows the Workflow Policy Components that are by default inactive for the Opportunity Workflow Policy Object for Siebel Assignment Manager.
Workflow Policy Object |
Workflow Policy Component |
|---|---|
Opportunity |
Indirect Account |
Opportunity |
Indirect Account Address |
Opportunity |
Indirect Account Industry |
Opportunity |
Indirect Account Primary Address |
Opportunity |
Indirect Account Synonym |
Opportunity |
Indirect Account/Industry |
Opportunity |
Opportunity/Indirect Account |
Opportunity |
Primary Account Address |
If these Workflow Policy Components are required for your deployment, then activate the components by following the procedures that describe defining a Workflow Policy Component in Siebel Business Process Framework: Workflow Guide.
About the Relationship Between Attributes and Skills
Attribute. An attribute is data that usually resides on a column on the base table. For example, Employee Salary resides on a column in the S_EMP_PER employee table and is an attribute. Similarly, Service Request Severity is an attribute on the Service Request object, because it is stored on the Service Request record.
Some attributes exist outside the base table. For example, Account Zip Code is an attribute on the account, but does not exist on the Account table itself. Instead, Account Zip Code exists on the common address table known as S_ADDR_PER. It does not exist on the account table. However, there is a link between a given account record and all the addresses that belong to it.
Skill. Skills are row-level extension attributes to objects (Opportunities, Service Requests, and so on) and candidates (employees, positions, and organizations). These are data stored in special child and grandchild tables of the base tables known as skill and skill item tables. For example, Language is an employee skill defined in the S_EMP_SKILL employee skill table and the S_EMP_SKILL_IT employee skill item table. The S_EMP_SKILL_IT table is a child table of the S_EMP_SKILL table. You can define skill and skill item tables for every assignment object through properties using Siebel Tools.
Skills and skill items are defined in a similar manner to criteria and criteria values. If an employee has expertise for two products, Product A and Product B, then you define one skill (Product) and define two skill items under the same skill (Product A and Product B). Skills provide a way to create new attributes for a candidate or an object without extending the database schema.
Objects also have skill and skill items. For example, you can define a Product skill with a Product A skill item for an activity to indicate that candidates must have the same product skill for assignment to that activity.
Attribute and skill. Data could reside on an object or a candidate in the form of an attribute and a skill. For example, you can link an opportunity to a product using either of the following:
Products subtab and associating the product to the opportunity
Skills subtab and creating a product skill and a skill item for the product that you want to associate
Note: When matching assignment criteria, Assignment Manager looks for column-based attributes first, and, if they are not found, then Assignment Manager looks for a skill value in the designated skill tables.
Assignment Manager checks the assignment object.
If the object to be assigned is the Opportunity assignment object, then Assignment Manager checks the value specified in Assignment Criteria, then Assignment Criteria Attribute in Siebel Tools. Then, Assignment Manager checks the Assignment Attribute, then Assignment Attribute Column value for the Opportunity object. In this case, this is Opportunity: Primary Account Primary State.
Assignment Manager checks the criteria attributes.
Since Opportunity is a team- and position-based, Assignment Manager checks the value specified in Assignment Criteria, then Attribute in Siebel Tools. From the Attribute, Assignment Manager then checks the Assignment Attribute Column for that assignee, which in this case is Position: State.
If no Assignment Attribute Column exists for the person chosen, then Assignment Manager checks the skill table.
Assignment Manager evaluates criteria by comparing two strings, numbers, or dates using a comparison method. One of these literals sets the requirement, and the other literal must match the first literal for the criterion to pass.
The following figure shows an example of a sales assignment rule and how position, skills, and skill items relate to that rule.

Disabling Assignment Attributes
In some cases, you might want to eliminate assignment criteria that appear in the Assignment Criteria view. To do so, you must first remove the unwanted criteria from the Assignment Criteria view. If you want to prevent the criteria from being used in any rule, then you must use Siebel Tools to also disable the corresponding assignment attribute, assignment attribute column, assignment criteria, and assignment criteria attribute object definitions.
Use the following procedure to disable an assignment attribute and avoid further use.
To disable an assignment attribute
In the GUI, delete criteria that you want removed from any assignment rules.
For a procedure, see Removing Assignment Criteria from Assignment Rules.
Start Siebel Tools.
Disable the assignment attribute definition.
In the Object Explorer, select the Assignment Attribute object.
Lock the project for the object by choosing Tools, then Lock Project (or Alt+L).
The pencil icon appears in the W field to indicate that the project for the object is locked.
In the Assignment Attributes window, select the assignment attribute that you want to disable.
Check the Inactive field.
Disable the assignment attribute column definition.
In the Object Explorer, expand the Assignment Attribute object, and then select the Assignment Attribute Column object.
In the Assignment Attribute Columns window, select the assignment attribute column that you want to disable.
Check the Inactive field.
Disable the assignment criteria definition.
In the Object Explorer, select the Assignment Criteria object.
In the Assignment Criteria window, select the assignment criteria that you want to disable.
Check the Inactive field.
Disable the assignment criteria attribute definition.
In the Object Explorer, expand the Assignment Criteria object, and then select the Assignment Criteria Attribute object.
In the Assignment Criteria Attributes window, select the assignment criteria attribute that you want to disable.
Check the Inactive field.
Redeploy all projects (not just the locked projects) in the Siebel runtime repository.
For instructions, see the previous steps.
Updating Your Siebel Assignment Manager Deployment with New Configurations
Configuration Process |
Deploy Siebel Runtime Repository |
Restart Assignment Manager |
Regenerate Triggers |
Restart Workflow Monitor Agent |
|---|---|---|---|---|
Add or inactivate assignment objects |
Yes |
Yes |
Yes |
Yes |
Configure assignment objects |
No |
Yes |
Yes |
Yes |
Add, configure, or inactivate assignment attributes |
Yes |
Yes |
Yes |
Yes |
Configure assignment attribute columns |
No |
Yes |
Yes |
Yes |
Add, configure, or inactivate assignment criteria |
Yes |
Yes |
Yes |
Yes |
Add, configure, or inactivate assignment criteria attributes |
Yes |
Yes |
Yes |
Yes |
Activate, inactivate, or modify assignment policies |
No |
No |
Yes |
Yes |
Use the following procedure to update your deployment with new configurations.
To update your deployment with new configurations
Deploy changes to the Siebel runtime repository, if necessary, and deploy it to the server.
Note: It is not necessary to redeploy the Siebel runtime repository whenever you configure an assignment object or an assignment attribute column, but you must redeploy the Siebel runtime repository whenever you add, inactivate, or delete any assignment object types, assignment criteria, or assignment attributes. Make sure that all projects are redeployed (not only the locked projects) if you inactivate or delete a high-level object type or assignment criteria.If you are running dynamic assignment, then perform the following steps:
Stop the Workflow Monitor Agent server component.
Regenerate triggers by running the Generate Triggers server component.
Release assignment rules (if rules have changed) by clicking Release in the Assignment Rules List view.
For more information about releasing assignment rules, see Releasing Assignment Rules.
Restart the Workflow Monitor Agent server component.
For more information about stopping and restarting server components, see Siebel System Administration Guide.
If you are running dynamic assignment, then stop and restart the Assignment Manager server component for the changes to take effect.
Stop the Workflow Monitor Agent server component.
Stop the Assignment Manager server component.
Start the Assignment Manager server component.
Start the Workflow Monitor Agent server component.
For more information about stopping and restarting server components, see Siebel System Administration Guide.
You must stop and restart the Assignment Manager server component whenever you add, inactivate, or delete any assignment object types, assignment criteria, or assignment attributes.