- DSR Cloud Installation Guide
- Application Configuration
- Configure iDIH Virtual Machines Networks
5.9 Configure iDIH Virtual Machines Networks
This procedure configures the iDIH guest VM external management networks. This
is an optional procedure.
- Log in to the Oracle VM console.
- Access the iDIH Oracle VM console.
- Log in as the admusr user.
- Verify the extra or second disk exists.
Note:
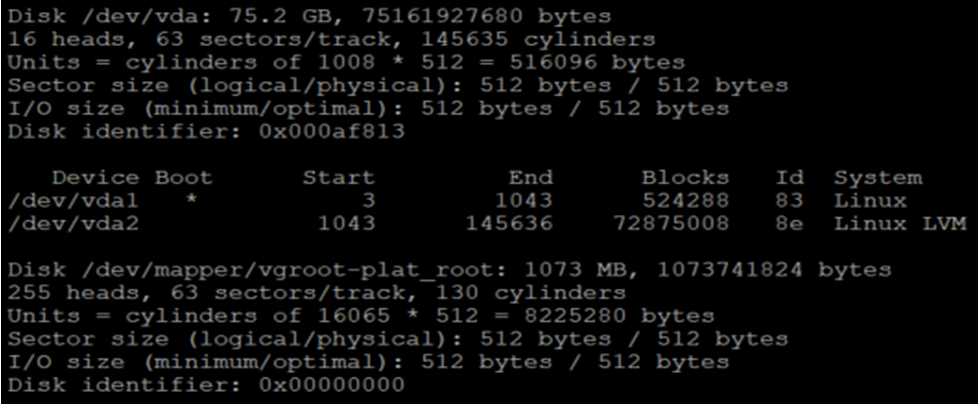
This step is required only for the Oracle VM.Check if the raw storage block device (external disk) exists by executing any of below commands (similar to the screenshot):$ ls /dev/[sv]dbNote:
The command [sv] db means, sdb and vdb, depending on the hardware.Example using,$ ls /dev/sdb
$ sudo fdisk –l
$ df –h If the extra disk does not exist, revisit the procedures for respective hypervisors. (Create iDIH Virtual Machines - VMware, Create iDIH Virtual Machines - KVM/OpenStack, and Create iDIH Virtual Machines - OVM-S/OVM-M).If you see it has been mounted, unmount it and completely remove the entry in the
Note:
Do not mount or format the added raw block device. Oracle ASM (Automatic Storage Management) automatically manages it. To verify it, run the following command:$ df/etc/fstab.For example:- If any external drive (such as,
/dev/vdb) is mounted, then unmount the external drive by executing the following command on oracle server:umount /dev/vdb - Edit the
/etc/fstabfile on oracle server and if any entry for/dev/vdbis present in the file, then remove the entry and save the file.
- If any external drive (such as,
- Delete the eth0 interface.
$ sudo netAdm delete -–device=eth0Note:
Note down the MAC address before the eth0 is deleted. This helps in identifying the MAC address of eth0 in case the persistence net rules file is not generated. - Trigger net rules file creation.Run the
udevadmcommand to recreate net rules file.$ sudo udevadm trigger --subsystem-match=netNote:
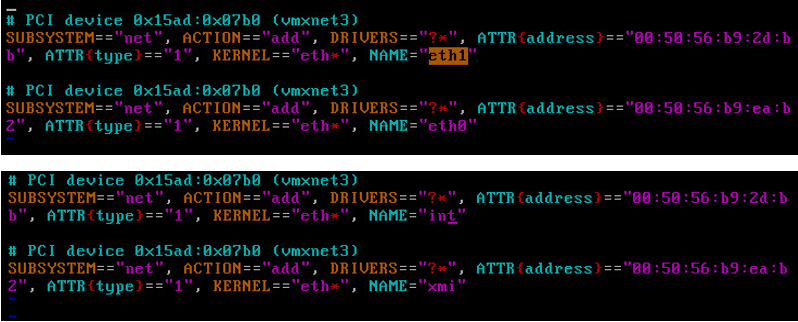
If this command does not create the net rules file, create it manually. Refer to Sample Net Rules File. - Modify the ethernet interface names in the net rules file.
- Update the net rules file to replace the default interfaces names ethX
with XMI and INT interfaces names. Replace eth0 with xmi
and eth1 with int interface. Also, respective MAC
addresses should be updated for each interface in lower case. MAC
addresses can be determined using
ifconfig -acommand from the console.Note:
The Mediation VM requires the user to rename a third interface: eth2 as imi interface. - Refer to Sample Net Rules File for a sample net rules
file.
$ sudo vi /etc/udev/rules.d/70-persistent-net.rules
- Reboot the VM.
$ sudo init 6
- Update the net rules file to replace the default interfaces names ethX
with XMI and INT interfaces names. Replace eth0 with xmi
and eth1 with int interface. Also, respective MAC
addresses should be updated for each interface in lower case. MAC
addresses can be determined using
- As admusr on the Oracle VM configure the networks with netAdm.
- Log in to the iDIH Oracle VM console as the admusr user.
- The XMI network should already exist, but it can be created with the
following
command.
$ sudo netAdm add --device=xmi --address=<IP Address in External Management Network> --netmask=<Netmask> --onboot=yes - Configure the int network IP address and
netmask.
$ sudo netAdm add -–device=int –-address=10.254.254.2 –-netmask=255.255.255.224Note:
It is advisable to use the following IP as internal IP addresses defined for: Oracle VM internal IP = 10.254.254.2; the Mediation VM internal IP = 10.254.254.3; and the application internal IP address = 10.254.254.4. The netmasks for all is 255.255.255.224. - Mediation Only. If this is a Mediation VM, configure the
Mediation internal management
network.
$ sudo netAdm add --device=imi --address=<IP Address in Internal Management Network> --netmask=<Netmask> - Configure the default
gateway.
$ sudo netAdm add --route=default --gateway=<gateway address for the External Management Network> --device=xmi
The VM network configuration has been completed. You should be able to ssh into the server through XMI interface.
- As admusr on the Oracle VM configure NTP and the Oracle VM hostname.
- On the Oracle VM console, launch the platform configuration
menu.
$ sudo su – platcfg - From the platform configuration menu configure ntpserver1 with the IP
address supplied for NTP.
- Navigate to Network Configuration, and then NTP, and then Edit, and then ntpserver1.
- Click Yes when asked to restart NTP.
Note:
Properly configure the NTP on the controller node to reference lower stratum NTP servers. - Exit the network configuration menu.
- Configure the Oracle VM hostname.
Navigate to Server Configuration, and then Hostname, and then Edit.
Note:
- Typically, we select hostname and identify the host as iDIH application, iDIH Mediation, and iDIH Oracle.
- Remove any occurrence of “.” and the “.<availability zone>” name, such as “.novalocal” from the hostname that might have got appended.
- Exit the platform configuration menu.
- On the Oracle VM console, launch the platform configuration
menu.
- Repeat Steps 1 through 7 for the following VMs. Use unique labels for the VM
names:
- iDIH Mediation
- iDIH Application
Note:
Logout and Login to each VM to update the environment variable before executing the next procedure (Create iDIH Virtual Machines - OVM-S/OVM-M for Post Installation Scripts on iDIH VMs).