Creating Payment Requests
This topic provides an overview of Payment Requests and discusses how to create payment requests.
|
Page Name |
Definition Name |
Usage |
|---|---|---|
|
PR_TEMPLATE_SETUP |
Set up and configure fields or functionality on the Payment Request pages |
|
|
PR_CENTER |
View Payment Requests, filter Payment Requests by date range and status, add/edit/cancel/ payment requests, and answer questions. |
|
|
PR_SUMMARY |
Create or Edit a payment request. |
|
|
PR_VNDR |
Enter supplier details for the payment request. |
|
|
PR_VNDR_ADD_SEC |
Enter a new supplier with details of address, contact Information, and new supplier questions. |
|
|
PR_LINE |
Enter invoice lines for the payment request. |
|
|
Add a New Line Page |
PR_LINE_SEC |
Add invoice lines for the payment request. |
|
PR_ SUBMIT |
Review the payment request and submit it for approval. |
|
|
PR_REVIEW_SEC |
Review the payment request. |
|
|
PR_APPROVAL |
Approve the payment requests. |
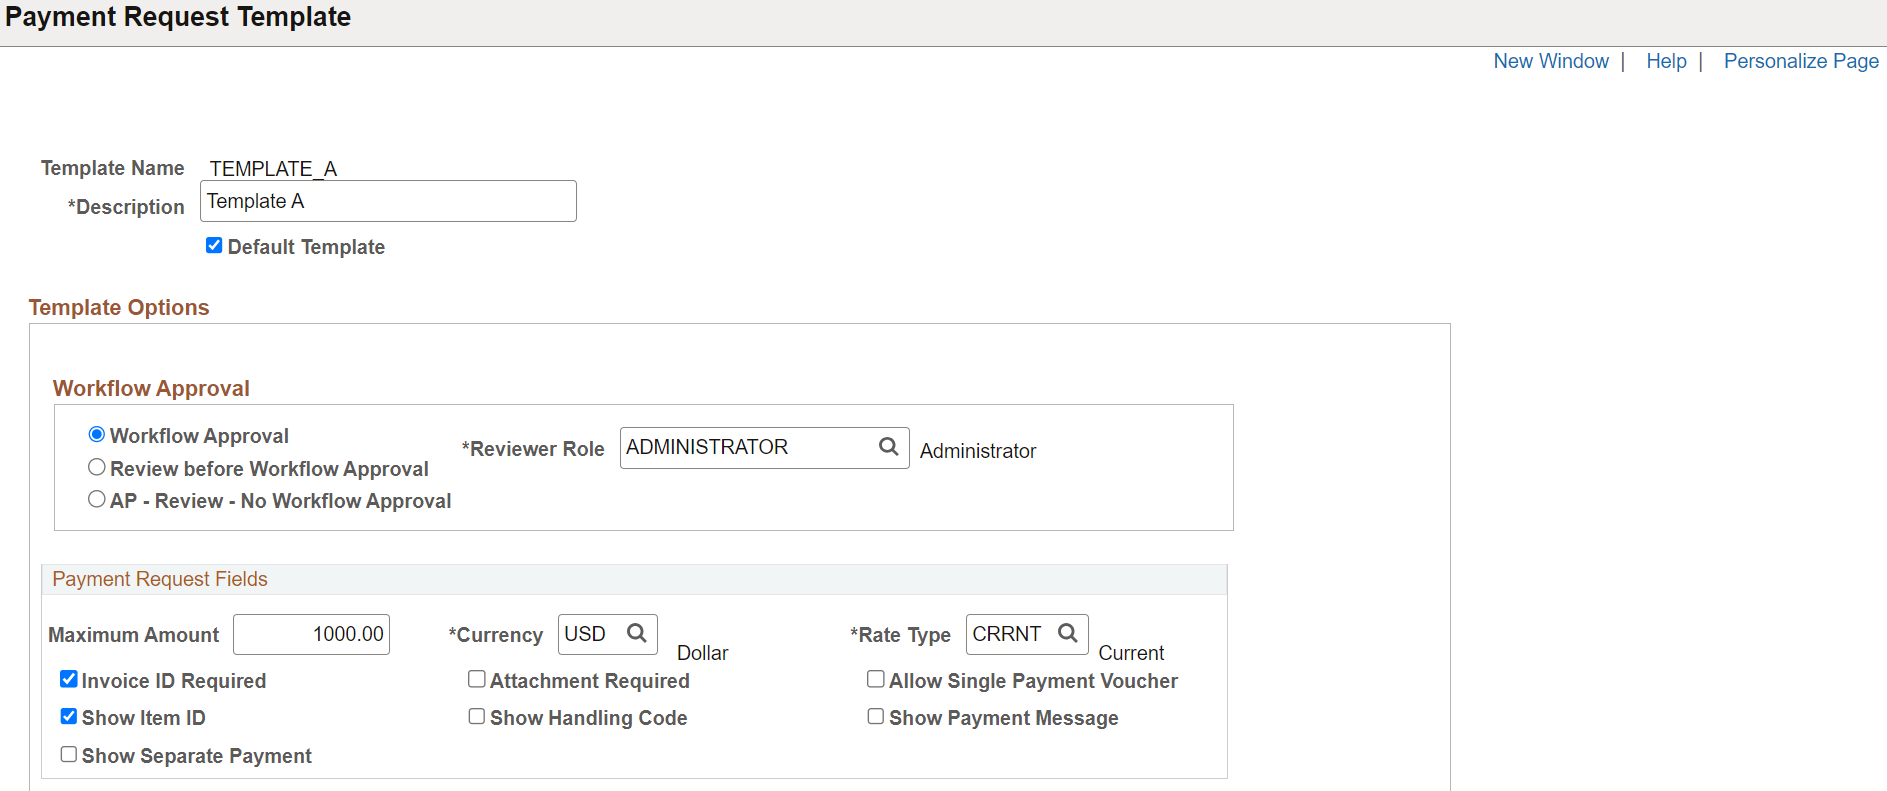
Use the Payment Request Template page (PR_TEMPLATE_SETUP) to set up Workflow Approval options, Business unit options, ChartField options, and user defined questionnaires.
Navigation:
This example illustrates the fields and controls on the Payment Request page (1 of 4). You can find definitions for the fields and controls later on this page.
This example illustrates the fields and controls on the Payment Request page (2 of 4). You can find definitions for the fields and controls later on this page.
This example illustrates the fields and controls on the Payment Request page (3 of 4). You can find definitions for the fields and controls later on this page.
This example illustrates the fields and controls on the Payment Request page (4 of 4). You can find definitions for the fields and controls later on this page.

Field or Control |
Description |
|---|---|
Default Template |
Select to make this template the default template to associate with the new payment request. Note: The template associated with the business unit set up at the User Preferences level is processed at the time of creating a payment request. When there is no template associated with the business unit at the User Preferences level or there is no default business unit set up at User Preferences, then the system processes the default template for the request. |
Workflow Approval |
The following are the various status changes that payment requests undergo during their lifecycle- New, Denied, Submitted, Pending, Approved, Vouchered, and Cancelled. Select the desired workflow approval method from the three options available: Workflow Approval: Select to enable the workflow framework to approve the Payment Request. The approver having Reviewer Role will have access to the Payment Request pages to make necessary changes to the request and then to return to approval framework to approve it. This is the default option. Note: The approver that has the Reviewer Role can be assigned as any one of the approvers in the approver list in the workflow approval framework. When this approver is assigned as the last approver in the list, the system will ensure that the payments that require approval first are processed before Accounts Payable department to make changes and approving. Review before Workflow Approval: Select to enable a review/edit process for users with Reviewer Role permissions before the Payment Request goes to workflow approval for approval. AP Review - No Workflow Engine: Select to enable a review/edit process for users with Reviewer Role permissions before the Payment Request proceeds to the Voucher Build process. Select this option if you do not have workflow approval implementation. |
Reviewer Role |
Select the desired reviewer role to determine who will be able to access the Payment Request, make changes, approve it, and how the status changes after submission. |
Payment Request Fields
Field or Control |
Description |
|---|---|
Maximum Amount |
Select the desired maximum amount for the payment request. Leave the field blank to have no maximum limit for the amount. |
Currency |
Select the desired currency. The default is taken from the Payables Business Unit. |
Rate Type |
Select the desired rate type. |
Invoice ID required |
Select to ensure that invoice ID is required at the time of creating a payment request. |
Attachment required |
Select to ensure that a document is attached at the time of creating a payment request. |
|
Allow Single Payment Voucher |
Select to allow single payment voucher at the time of creating a payment request. Available only for payment requests using PeopleSoft Fluid User Interface. |
Show Item ID |
Select to display the Item ID on the Payment Request page. |
|
Show Handling Code |
Select to display the Handling Code on the Payment Request page. Available only for payment requests using PeopleSoft Fluid User Interface. |
|
Show Payment Message |
Select to display the Payment Message on the Payment Request page. Available only for payment requests using PeopleSoft Fluid User Interface. |
|
Show Separate Payment |
Select to display the Separate Payment on the Payment Request page. Available only for payment requests using PeopleSoft Fluid User Interface. |
|
Field or Control |
Description |
|---|---|
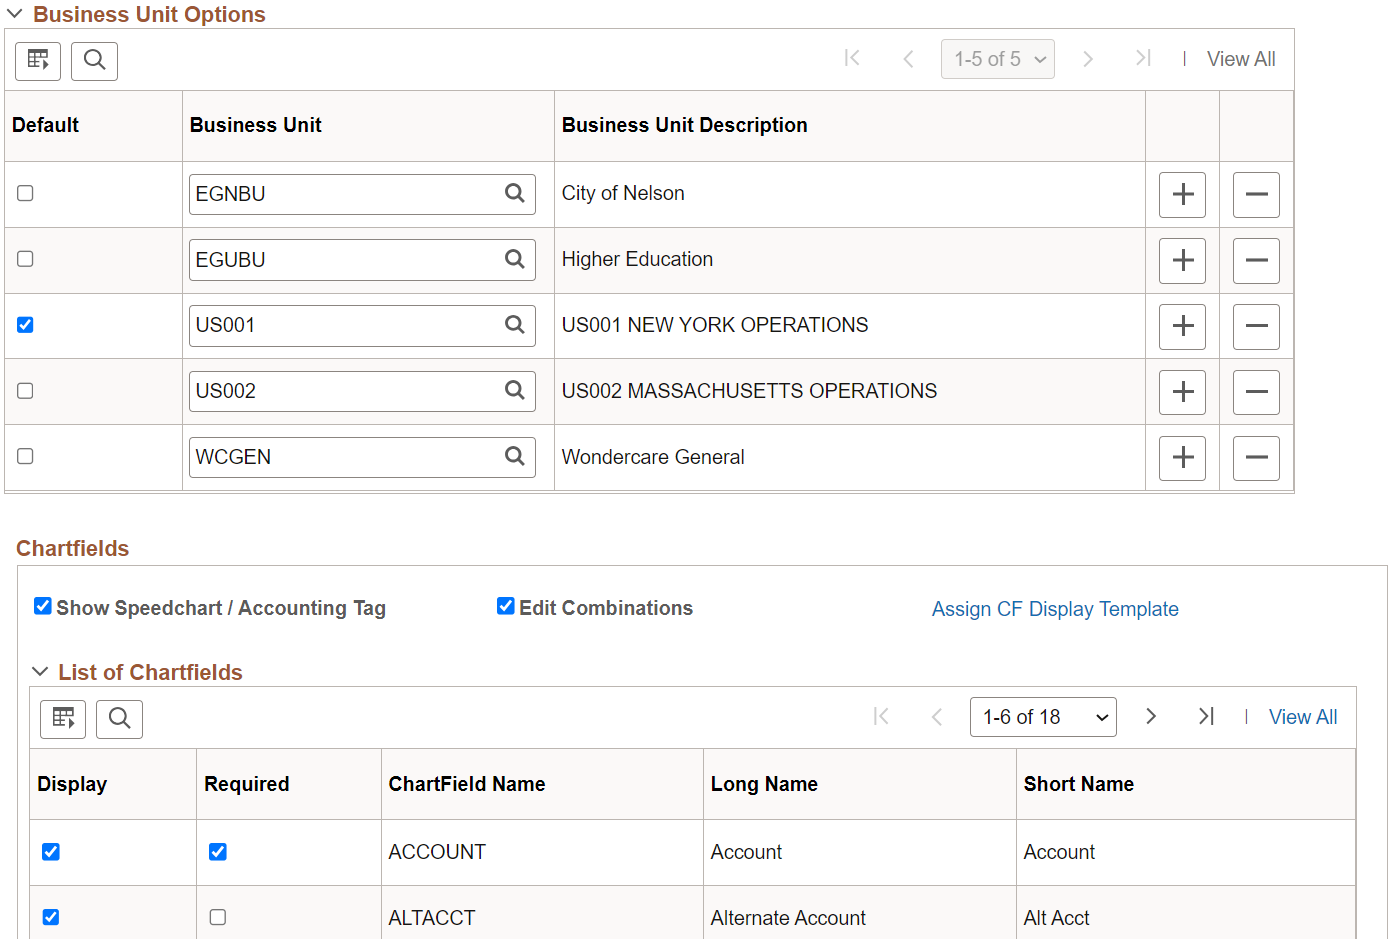
|
Business Unit Options |
Select a business unit that is unique to this template. The template associated with a Payment Request in the train stop is determined based on the business unit selected here. |
|
List of ChartFields |
Select the list ChartFields to be displayed on the Payment Request pages, when using the Classic user interface. The ChartFields you select as Required are taken into account at the time of Payment Request submission. Note: Fluid user interface uses the Assign CF Display Template page to determine which ChartFields you want to display of on the Payment Request pages. |
|
Show SpeedChart/Accounting Tag |
Select to show SpeedChart Key and Accounting Tag fields on the Accounting Details page so that you can select various SpeedCharts and Accounting Tags to use. Note: For the Accounting Tag to be available in the PeopleSoft Classic, in addition to selecting this check box you should have configured the Tag Registration by Products page by selecting the Use Accounting Tag for the Payables product. |
|
Edit Combinations |
Select to enable combination editing at the time of payment request. Combinations of ChartField values can be edited to determine such things as which accounts are valid with which departments, funds or operating units. Note: Edit Combinations must also be selected under the Payables Options level to enable combination editing. |
|
Assign CF Display Template |
When you are creating Payment Requests using PeopleSoft Fluid User Interface, you decide which ChartFields you want to display on the Payment Request pages by using the Assign CF Display Templates Page. Click the link to open the Assign CF Display Template page and determine the ChartField display template that the system should use for the designated component for all users, a permission list, or user ID. Note: This link is available only if you are using PeopleSoft Fluid User Interface to create Payment Requests. PeopleSoft Classic User Interface uses the List of ChartFields, as explained earlier. |
|
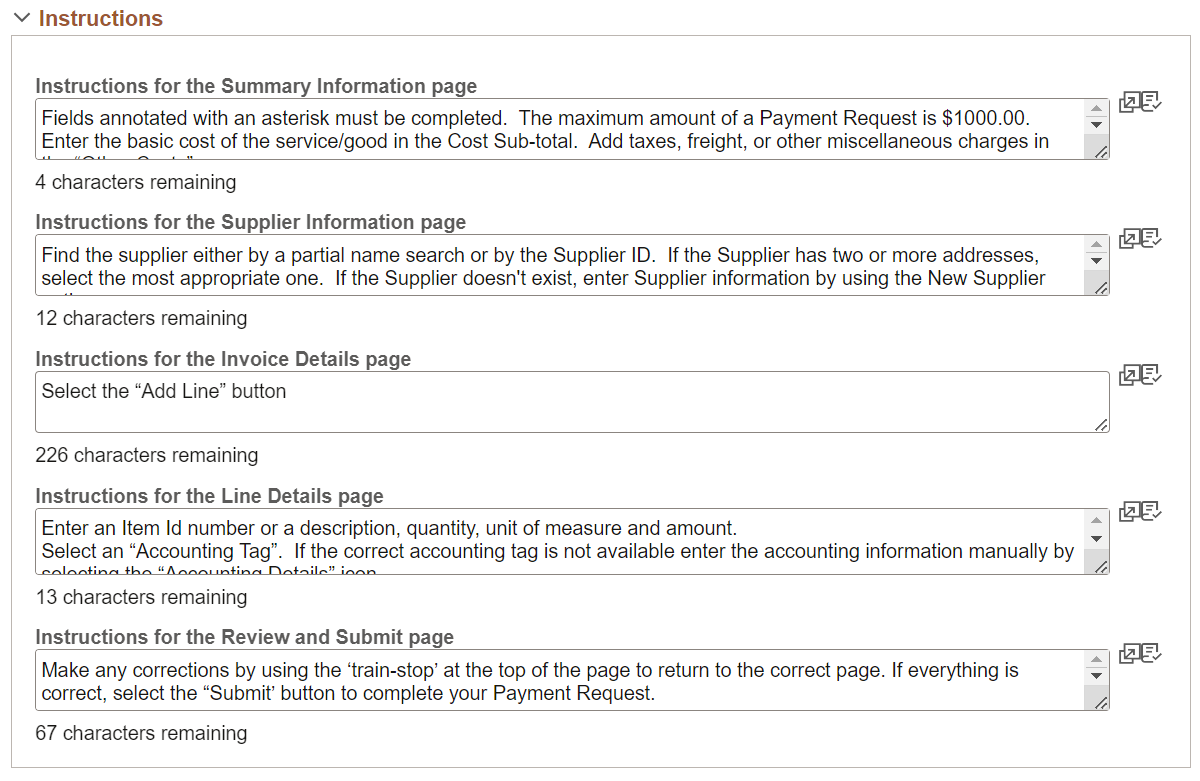
Instructions |
Enter the instructions for each of the page names that will appear on the corresponding pages of a Payment Request. If no entry is made for a particular page, the Information icon will not appear on the Payment Request page. |
|
New supplier Questions |
Enter the questions that will appear on the Add Supplier page when a new supplier is added on the Supplier Information page during a payment request. |
|
Answer Required for Question |
Select to ensure that the requester is required to answer the question at the time of payment request. |
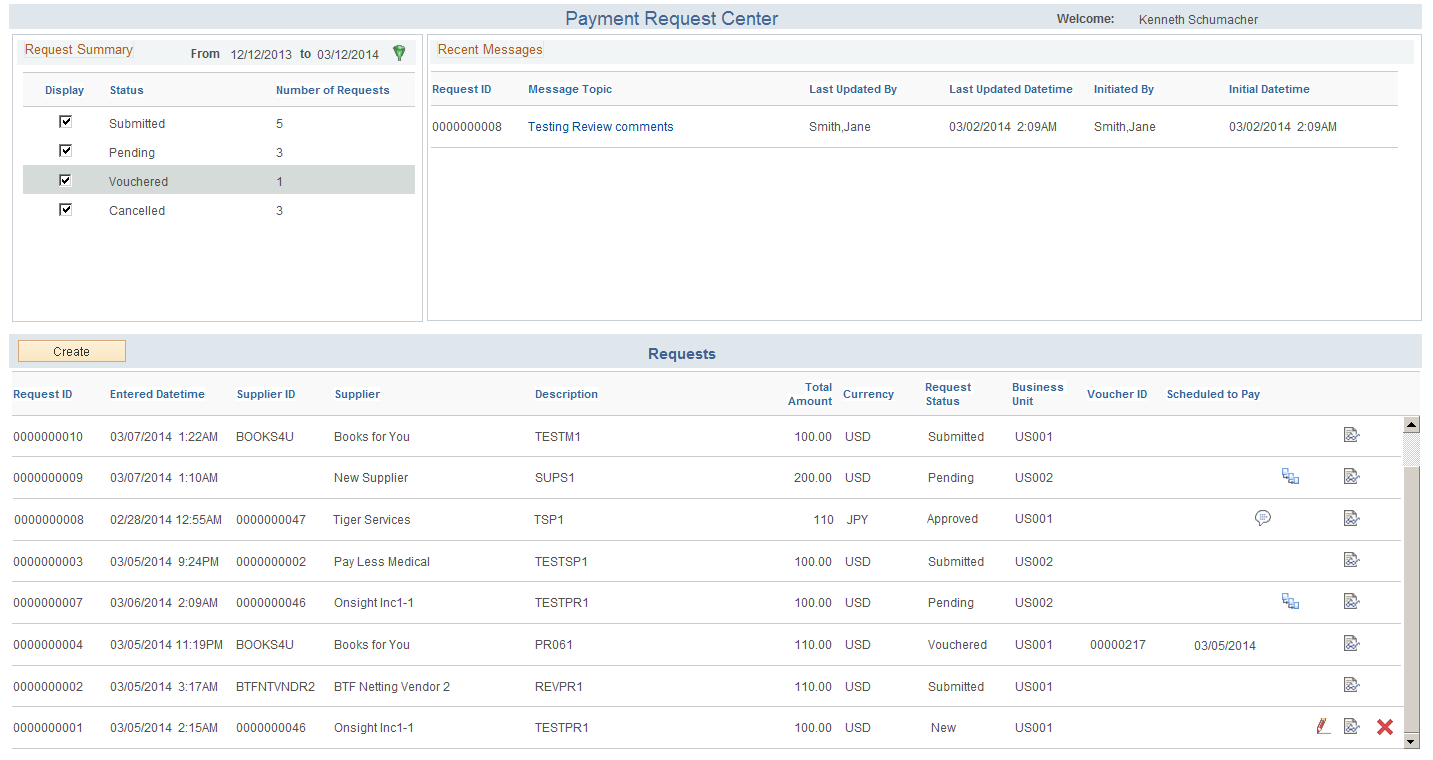
Use the Payment Request Center page (PR_CENTER) to view Payment Requests, filter them by date range and status, add/edit/cancel Payment Request, and answer questions using the Recent Messages section.
Navigation:
Requester:
Reviewer:
This example illustrates the fields and controls on the Payment Request Center page. You can find definitions for the fields and controls later on this page.
Field or Control |
Description |
|---|---|
Request Summary |
Displays a summary of payment requests along with their statuses and the number of rows. Select to display the statuses you want to be displayed. |
|
Click to open the Filters page and enter filter values to display the payment requests:
Note: The Filters page constitutes a mutually exclusive set of search criteria. In other words, the system enables search only based on the filter you select. |
Recent Messages |
Displays a list of all message topics, independent of the date range. With Requester permissions, you can click a topic to open the Review Messages page and answer any questions initiated by a Reviewer or an Approver. Note: Messages can only be initiated by a reviewer or an approver. Once a requester reviews and responds to the message, it will be removed from the Recent Messages list. |
Requests |
Displays a list of all Payment Requests with their statuses and details to edit. |
Voucher ID |
Displays the voucher ID of the voucher created out of a payment request. The value appears only after a payment request has been vouchered. |
Scheduled To Pay |
Displays the scheduled date for payment. The date appears only after a payment request has been vouchered. |
Create |
Click to create a new payment request. The system takes you to the Payment Request train-stop page, where you can enter details of the request. Create button is available only for requester roles and not for users with a reviewer role. Note: You can create a payment request even if the Accounts Payable and General Ledger business units are not in Open Periods. Once the request is vouchered, Voucher Build will put the voucher status to Recycled. See Defining and Updating Open Periods and Adjustment Periods |
|
Click to make changes to the request. The system takes you to the Payment Request Train Stop page, where you can make changes to your requests. Note: This icon is displayed only if the status is New or Denied. |
|
Click to view the message history for the request. You can enter the answer in the Your Response section of the Review Messages page. |
|
Click to open the Approval Flow page and view the approval history. This icon is displayed only if there is an approval involved with the payment request. |
|
Click to open the Review page and review the summary of the payment request. You cannot make any changes in this view. Use edit mode to make changes to the requests, by clicking the Edit icon. |
|
Click to cancel a Payment Request. This option is available only if the Request Status is New or Denied. Note: All cancelled Payment Requests are stored in the system with status Cancelled, which can be removed using the Archiving feature. See Archiving Data |


The Payment Request process consists of four steps of entering, editing, and submitting a request using a horizontal guided navigation process.
Payment Summary Information
Supplier Information
Line Details
Review and Submit
These pages will be accessible by both Requesters and Reviewers based on the Approval Workflow on the template setup and the status of the Payment Request. Users can use the Previous and the Next buttons to navigate among the train-stop pages. A Save For Later button will enable users to save their current changes and return at a later time to proceed from where they left off.
Three types of users – requesters, reviewers, and approvers - access the Payment Request pages as follows:
Requesters create requests by navigating from Employee Self-Service to access the Payment request Center: Employee Self-Service, Payment Requests Center.
Reviewers review the submitted requests by navigating from one of the following:
Accounts Payable to access a list of Payment Requests that are ready for review. The navigation is: Accounts Payable, Payments, Payment Requests, Payment Requests Center. Reviewer can view all requests raised by the requestor except Cancelled or New requests. Denied request is visible only when the Workflow Approval option is set as Review before Workflow Approval on the Payment Request Template page.
Note: Requester cannot view any request here unless having a reviewer role.
WorkCenter to access a list of Payment Requests that are ready for review. The navigation is: Accounts Payable, Accounts Payable WorkCenter, My Work, Payments, Payment Requests, Payment Requests for Review.
Email Notification: After a Requester submits a payment request, if the workflow option is Review before Workflow Approval or AP Review - No Workflow Engine, then an email notification is sent to the user that belongs to the Review Role setup in the template.
Approvers approve the submitted requests by navigating from one of the following:
Accounts Payable to access a list of Payment Requests that are ready for approval. The navigation is: Accounts Payable, Payments, Payment Requests, Payment Request Approval.
WorkCenter to access a list of Payment Requests that are ready for approval: Accounts Payable, Accounts Payable WorkCenter, My Work, Payments, Payment Requests, Payment Requests Pending Approval.
Email Notification: After a Requester submits a payment request with the workflow option as Workflow Approval, then the workflow approval engine sends an email to the approvers.
Use the Payment Request - Summary Information page (PR_SUMMARY) to create a new payment request.
Navigation:
Requester: Click the Create button or the Edit icon
Reviewer: Click the Edit icon.
This example illustrates the fields and controls on the Payment Request - Summary Information page. You can find definitions for the fields and controls later on this page.
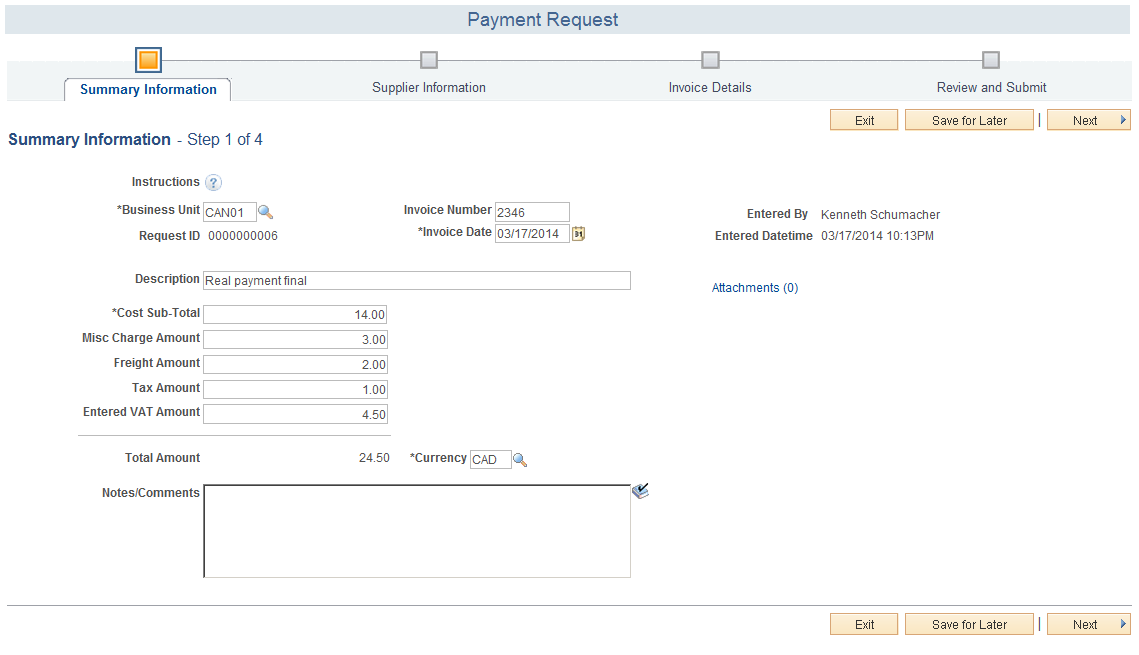
Field or Control |
Description |
|---|---|
|
The information icon is displayed if there are instructions entered for this page on the Payment Request Template page. Accordingly, the icon appears on all pages in the Payment Request train-stop. |
Business Unit |
The default business unit is displayed as per the settings in User Preference or the Payment Request Template. You may enter a different business unit, if you have access to multiple Payable Business Units. |
Request ID |
The system generates the request ID and assigns to the request after saving the payment request. |
Invoice Number |
Enter the desired invoice number. If left blank, the invoice number may be entered by the Reviewer at the time of review or it may be auto-generated at the time of Voucher Build. |
Invoice Date |
Enter the date on which the request is created. If left blank, current date is assigned after the request is saved. The Reviewer has the option to edit the date during review. |
Description |
Enter any desired information to describe the request. |
Cost Sub-Total |
Enter the desired cost amount. |
Miscellaneous Charge Amount |
Enter a miscellaneous charge amount. |
Freight Amount |
Enter the amount of freight, shipping, and handling charges. |
Tax Amount |
Enter sales tax amount. The same value will be entered by default in the voucher as sales tax. |
Entered VAT Amount |
Enter the value added tax amount. The same value will be entered by default in the voucher as Entered VAT Amount. Note: The Tax amount and the Entered VAT Amount are displayed based on the selections made for Hide Sales Use Tax and Hide Value Added Tax in the setup of Payables Definition, on the Tax Options Page. |
Total Amount |
The sum of all the amounts is displayed as Total Amount, which includes the tax amount. |
Currency |
The default currency is displayed based on the Accounts Payable BU, or may be overridden by the currency settings on Payment Request Template page. |
Notes/Comments |
Enter any additional comments for future reference. |
Attachments |
Click the link to access the Payment Request Attachment page and upload attachments. You can add attachments to the payment request, which will be included in the voucher created by the payment request. See Installation Options - Multiple Attachments Page to define the maximum attachment upload limit for various products. |
Save for Later |
Click to save the details entered and click Exit to leave the Payment Request page. You may return to the same page by clicking the Edit icon for the request ID row on the Payment Request Center. |
Next |
Click to proceed to the Payment Request - Supplier Information page after completing all the required details. |

Use the Payment Request - Supplier Information page (PR_VNDR) to enter supplier details.
Navigation:
Click the Next button on the Payment Request - Summary Information page.
This example illustrates the fields and controls on the Payment Request - Supplier Information page. You can find definitions for the fields and controls later on this page.

Field or Control |
Description |
|---|---|
Country |
Enter the country to list suppliers from the country. The default is from the Country entered in the User Preference page. If there is no default set, USA is used. |
Supplier ID |
Enter a supplier ID and click Search to display the details of the supplier. Click the radio button to select the supplier. |
Supplier Name |
Enter a supplier name and click Search to list all suppliers with the name. You can leave blank and click Search to list all suppliers. Select the desired supplier by clicking the radio button. Note: The search results in a list of approved suppliers only. Single payment suppliers are not listed as you cannot create a payment request using single payment suppliers. |
Multiple |
Click the link to open the Supplier Details page to list the multiple locations of the supplier. Select the desired location from available options. Note: This link is displayed only if a supplier has multiple locations saved. |
|
Click to access the Supplier Details page and view more details about the supplier. |

Click the Request New Supplier button to access the New Supplier Request page and enter a new supplier with details.
Use the New Supplier Request (PR_VNDR_ADD_SEC) page to enter a new supplier with details of address, contact Information, and new supplier questions. The Request New Supplier button appears only after you click the Search button. A new supplier can be requested only if existing suppliers are not preferred.
Navigation:
Click the Request New Supplier button on the Payment Request - Supplier Information page.
This example illustrates the fields and controls on the New Supplier Request page. You can find definitions for the fields and controls later on this page.

Field or Control |
Description |
|---|---|
Supplier Name |
Enter a name for the new supplier. |
Country |
Enter the country of the supplier. |
Contact Name |
Enter the name of the contact person for the new supplier. |
Contact Phone |
Enter the phone number of the contact person. |
Contact Email |
Enter the email address of the contact person for mail communication. |
New Supplier Questions |
Enter the necessary information as answers to the questions displayed. The questions are displayed based on the entries and selections setup on the Payment Request Template page. |
Click the OK button to return to the Payment Request - Supplier Information page. You can search for other suppliers or click the New Supplier Request button to add a new supplier.
Note: On the basis of the details given by the requester on the New Supplier Request page, a new supplier will be created and approved by the reviewer or the approver at the time of processing and approving the payment request. The reviewer or the approver creates the new supplier from outside the Payment Request and approves it. Returning to the Payment Request page, the reviewer and/or the approver selects the newly approved supplier and proceeds to process and approve the payment request.
Use the Payment Request - Invoice Details (PR_LINE) page to add invoice lines.
Navigation:
Click the Next button on the Payment Request - Supplier Information page.
This example illustrates the fields and controls on the Payment Request - Invoice Details page.
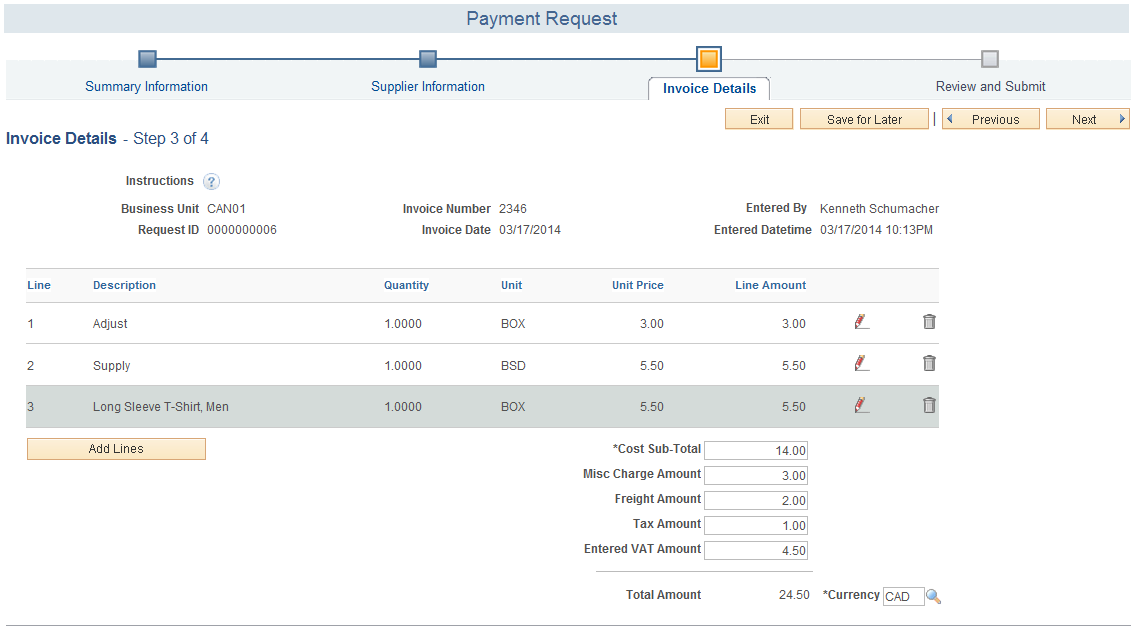
Click the Add Lines button to access the Add a New Line (PR_LINE_SEC) page and add invoice lines for the Payment Request.
This example illustrates the fields and controls on the Add a New Line page. You can find definitions for the fields and controls later on this page.

Field or Control |
Description |
|---|---|
Item ID |
Enter the desired item ID for the line. The corresponding description is automatically displayed if present, based on the template setup. You can enter a description without selecting an Item ID. |
Quantity |
Enter the quantity of the item. |
Unit |
Enter the unit of measure for the item. |
Unit Price |
Enter the unit price for the item. |
Line Amount |
The amount is displayed after multiplying the unit price with the quantity entered. |
SpeedChart Key/ Accounting Tag |
SpeedChart Key: Select the desired SpeedChart key if you want to use this to automatically fill in the Accounting Details lines with predefined ChartFields. Accounting Tag: Select the desired Accounting Tag to populate the ChartField for the distribution line. The display of either the SpeedChart Key field or the Accounting Tag field is determined by the configuration set up in the Tag Registration by Products component. If Use Accounting Tag is selected for Payables, the system displays the Accounting Tag field, else the system displays SpeedChart Key. Note: When you are updating the payment request lines, the SpeedChart selected originally is available as display only and the Accounting tag field is available to enter a new value. |
Accounting Details
The system displays ChartFields based on the setup on the Payment Request template. For the complete list of ChartFields, seeUsing Standard ChartField Configuration
Note: To validate the ChartField values, the system uses the Accounting Date value set up in the Accounting Date Options section on the Payables Options - Payables Options Page. The same applies whether you are creating a payment request for a voucher or quick invoice, irrespective of the Accounting Date value entered in the voucher.
Field or Control |
Description |
|---|---|
Quantity |
Enter the quantity of the item required for each line. |
Amount |
Enter the amount such that all line amounts will add up to the line amount. |
Account |
Enter the account corresponding to the GL Business Unit displayed. |
Alt Acct |
Enter an alternate account for the line. |
Operating Unit |
Enter the operating unit for the line. |
Fund Code |
Enter the Fund code for the line. |
Department |
Enter the department from which the funds are drawn. |
Click the OK button to return to the Invoice Details page. You can edit the line details by clicking the Edit icon or you can delete the line by clicking the Delete icon.
Note: The sum of all line amounts must equal the Cost Sub-Total amount on the Invoice Details page.
Use the Payment Request - Review and Submit (PR_SUBMIT) page to review and submit the Payment Request for approval.
Navigation:
Click the Next button on the Payment Request - Invoice Details page.
This example illustrates the fields and controls on the Payment Request - Review and Submit page. You can find definitions for the fields and controls later on this page.

Payment Request - Review and Submit is the final step of creating a Payment Request. If a reviewer accesses this page, a Payment Message link is available to start message communication with the requester. Click the Review button to review the detailed request. Click the Submit button to submit your request for further processing.
Note: Duplicate invoice check is done for all payment requests before submission, review and approval. You can proceed with payment request creation or reject the request based on the setup done at the business unit level. For additional information, see Defining PeopleSoft Payables Business Unit Options by SetID
Field or Control |
Description |
|---|---|
Submit |
Click to submit the payment request for approval. The system verifies that all the necessary details were entered. A confirmation message is displayed that the payment request has been submitted for approval. If you selected Workflow Approval on the Payment Request template, then the status of the request becomes Pending. Approval framework will only process payment requests that are in Pending status. If you selected Review before Workflow Approval, then the status of the request becomes Submitted. Another user such as a Reviewer or Supplier Administrator will process the request further by completing any missing information and then submitting the request. The request status changes to Pending, enabling Approval Framework to process it. If you selected AP Review - No Workflow Engine, then the payment request becomes Submitted. Another user such as a Reviewer or Supplier Administrator will process the request further by filling any missing information and then submit the request. The request status changes to Approved, and the request is ready for Voucher Build processing. |
Use the Review (PR_REVIEW_SEC) page to review the payment request.
Navigation:
Requester and Reviewer: Click the Review button on the Payment Request – Review and Submit page. Or from the Payment Request Center, click the View icon for the desired payment request row.
This example illustrates the fields and controls on the Payment Request - Review page (1 of 2).

This example illustrates the fields and controls on the Payment Request - Review page (2 of 2).

Click the Return button to return to the previous page.
The Payment Request - Review page can also be accessed from the Voucher Inquiry page and the Voucher - Related Documents page.
See Voucher Inquiry Page and Voucher - Related Documents Page
Use the Payment Request - Approval (PR_APPROVAL) page to approve the requested payment requests.
Navigation:
This example illustrates the fields and controls on the Payment Request - Approval page. You can find definitions for the fields and controls later on this page.

Field or Control |
Description |
|---|---|
Attachments |
Click to view any documents attached by the requester. |
Edit Payment Request |
Click to open the Payment Request train stop to edit the payment request. This link is available only if the approver has Reviewer role permissions. |
Payment Message |
Click to open the Review Messages page to view any messages from the requester. You can reply to the message by entering a response in the Your Response section and posting it by clicking the Post button. |
Line Details |
View all the line details entered by the requester. You can click the Details link to view details of the line on the Payment Request Distributions page. |
Approve |
Click to approve the payment request. The status of the request changes from Pending to Approved after the request is through all the approvers in the approval framework. |
Deny |
Click to deny the payment request. The payment request status changes to Denied and will be submitted back to the requester or reviewer for any changes to be made before resubmitting for approval. |
Add Comments |
Enter any comments for the requester/reviewer and click the button. If the payment request is denied or pushed back, the message appears in the Recent Messages section on the Payment Request Center. |
Hold |
Click to put the payment request on hold. |