Approving Expense Reports
This topic provides an overview of how to approve expense reports.
|
Page Name |
Definition Name |
Usage |
|---|---|---|
|
EX_ALLTXN_APPR |
Approve expense reports on the summary approval page. |
|
|
EX_SHEET_APPR |
Approve expense reports. |
|
|
TE_SHEET_LINES |
Approve expense reports. |
|
|
EX_SHEET_ENTRY |
View, modify, add or delete expense report lines. This page is accessible only to approvers who have Add or Full approval privileges for the transaction line. |
|
|
Approve Expense Report - Expense Detail for [Expense Type] Page |
TE_SHEET_LINE_DTL |
View transaction lines for the expense report. This is accessible only to approvers who have Add, Delete, or View privileges to the transaction line. For approvers who have Full or Modify privileges to the transaction line, see Modifying the Approve Expense Report - Expense Detail for [expense type] Page (EX_SHEET_ERRORS). |
|
TE_SHEET_SPLIT |
View the accounting distribution summary for the expense report. |
|
|
TE_SHEET_DIST |
View, add, or modify accounting details for expense transaction lines. |
|
|
Approve Expense Report - View Exception Comments and Risks Page |
TE_EXCPTN_COMM_SHT |
View exception comments and risks for expense reports. |
|
EX_SHEET_NOTES |
View and add notes. |
|
|
TE_SHEET_VAT_SUM |
View VAT information |
|
|
EX_TA_RES_COMP |
View the comparative totals and variance percentages for any associated travel authorization as compared to the expense report totals. |
After an employee submits an expense report, it goes through the approval process. Part of the approval process can include a review by an internal auditor. Expense reports can be audited before (prepayment) or after (post payment) reimbursement. The audit can be performed by one or many auditors, either sequentially or from a pool of auditors. In some organizations, auditors can only randomly or selectively review expense transactions for audit purposes. To selectively route expense transactions to an approver or auditor, define a refinement template and configure it for selective criteria, then assign it to an approver. The criteria established in the refinement template filters which transaction an approver or auditor sees in his or her queue. For example, a post payment auditor can review only transactions with project expenses associated with it or expense reports that are missing receipts.
You can authorize approvers and auditors to modify expense transactions through the approvals configuration. The privileges associated with an approver determines what he or she can change, add, or delete on expense transactions. If you use PeopleSoft Project Costing, you can charge some of your expense items to project-related ChartFields and your expense report approval procedures might include a review by a project manager. Project managers can also modify expense transactions if you enable that authorization through the privilege configuration. However, if an expense transaction has been processed for payment, some privileges can be constrained to maintain the integrity of payments issued or information already posted to other products.
PeopleSoft Expenses delivers a feature for supplemental or conditional approvers. If you use HR supervisor approvals but want to have an additional approval required as a standard or based on a transaction condition such as a monetary amount, you can use the expense approver list to define the supplemental approver by profile. If the condition is amount-based, you can define the amount rules for the profile on this list. The same concept applies for project approvals. You can use Project Manager as assigned in PeopleSoft Project Costing for standard project approvals, but also use the Project Supplemental Approver list to define a supplemental or conditional approval for project-related expenses.
Note: When you use Business Unit or Department criteria in the refinement template, routing is based on the employee's home business unit and department, not the business unit and department contained in the distributions.
Use the Approve Expense Report – Expense Summary page (TE_SHEET_LINES) to approve expense reports.
Navigation:
. Click the Description or Transaction ID link on the Approve Transactions - Overview page.
Click the Description or Transaction ID link on the Approve Transactions - Overview page.
. Click the Description or Transaction ID link on the Approve Transactions - Expense Reports page.
. Click the Description or Transaction ID link on the Approve Transactions - Expense Reports page.
This example illustrates the fields and controls on the Approve Expense Report – Expense Summary Page. You can find definitions for the fields and controls later on this page.

The fields on this page are the same as the fields on the Create (or Modify) Expense Report Page. Fields that are unique for the expense report approval process are documented in this topic.
Expense Summary
Field or Control |
Description |
|---|---|
Expense Details |
Allow approvers to check detailed expense information. This link is hidden when approver has no privilege on the transaction lines. |
Authorization ID |
Displays the identifier for the travel authorization that is associated with the expense report, as a link. Travel authorizations that are copied to an expense report also appear as a link on the Approve Expense Report – Expense Summary page. Click the Authorization ID link to view the details of the travel authorization. If no travel authorization is associated with the expense report, this field is hidden. |
More Options |
Select from the list to view additional information about this expense report. Options are:
|
Apply Cash Advances |
Click to access the Apply Cash Advance(s) page. Post payment auditors cannot apply cash advances to expense reports. |
Budget Check |
Click to access the Commitment Control page to budget check the expense or view comments. This link is available only if any of the accounting distributions contain a GL business unit that is enabled for Commitment Control. Note: If you make any changes to distributions or amounts, you must budget check the expense report again to reflect the changes in the commitment control ledgers. |
Totals
Field or Control |
Description |
|---|---|
|
Click the Totals icon to view an explanation of each expense total. |

Approval History
This section displays the names of the approvers, auditors, project managers, and other defined approvers who need to review and approve the expense report.
Action History
PeopleSoft Expenses displays the transaction submittal and approval activities that have occurred, as well as the approver's name and date of action.
Comments
Enter information regarding the expense report such as why you denied the expense report or an expense transaction line. If you enter comments and send the expense report back to the employee, PeopleSoft Expenses displays your comments when the employee modifies the expense report. After employees resubmit expense reports, PeopleSoft Expenses displays a Comment icon in the Action History grid next to the name of the approver who made the comment. Selecting the icon transfers the approver to the View Approver Comments page.
Field or Control |
Description |
|---|---|
Review |
Click to indicate that you have reviewed the expense report. Some organizations use expense screeners to review expense transactions for policy compliance. |
Verify Receipt |
Click to indicate that you have verified that a hard or soft copy of a receipt has been received for the expense types that have the Receipt Verified check box selected. When you click this button, all expense lines that have the Receipt Verified check box selected are considered verified, the expense report continues to the next approver in the approval chain, and the status is updated to Approvals in Process. If the receipt verifier is the last approver in the approval chain, the status is updated to Approved for Payment. For more information about this feature, see Understanding Receipt Options for Expense Reports. |
Approve |
Click to approve the expense report. This action changes the status to Approved for Payment. The expense report is ready for payment processing. If more than one approver is required, the status changes to Approvals in Process until the last authorized approver approves the expense report for payment. |
Send Back |
Click to send the expense report to the employee for correction or revision. This action changes the status to Pending. If you send the expense report back to the employee, you must also provide an explanation in the Comments field. |
Hold |
Click to place the expense report on hold. Holding an expense report claims the transaction for the approver. If a pool of approvers exists, each of whom can approve a transaction, placing the transaction on hold means that only the holding user can take action on the transaction. |
Deny |
Click to deny the entire expense report. This action changes the status to Denied. If you deny the expense report, you must also provide an explanation in the Comments field. The system does not route denied expense transactions to subsequent approvers and the employee cannot resubmit it. |
Save Changes |
Click to save any modifications that were made to the expense report, but take no approval-related action. If the expense report approval process uses pooled approvers, another member of the pooled approvers list can access the expense report and take action. Note: If the approver does not have privileges to make changes, this button is hidden. |
Receipt Information
Field or Control |
Description |
|---|---|
Receipts Received |
Select to indicate that the travel and expense department has the appropriate receipts on file. This field appears only if you set up your expense system to check that receipts are received; otherwise, this section and check box are hidden. |
Receipt ID |
Displays when an expense report requires a receipt verifier to approve the expense report. This value is associated with the expense report ID. This field displays only when the Receipts Received check box is selected. |
Expense Line Items
Field or Control |
Description |
|---|---|
|
Click the Exceptions icon to access the Approve Expense Report - View Risk/Exception Comments page. |
Date |
Displays the date on which the Expense line was created. |
Expense Type |
Click to access the Approve Expense Report - Expense Detail for [expense type] page to view or modify expense transaction lines. |
PC Business Unit, Project, and Activity |
If you have one distribution that contains the PC ChartFields, PeopleSoft Expenses displays the existing values in the appropriate columns. If multiple project distributions exist for the expense line, PeopleSoft Expenses displays the Multiple link. Click the Multiple link to access the Approve Expense Report - Accounting Detail page to view, add, or modify the general ledger or project-related ChartFields, general ledger business unit, or distribution split amount. If you change the distribution split amount, the total must equal the original amount of the expense transaction. |
Attachments |
Select to view or add attachments. This link is available based on the Receipts Configuration option selected on the Installation Options - Expenses Page. |
Receipt Verified |
Select if a physical receipt for the expense transaction matches the expense line item. The physical receipt can be received as a hard or soft copy, depending on the rules of your organization. If the combination of the expense type, payment method, and credit card flag does not require a receipt, this field is not available. For more information about this feature, see Understanding Receipt Options for Expense Reports. |
Receipt Required |
If this field is selected, a receipt is required to substantiate the expense definition. Receipt requirements for expense types are controlled by the settings configured in the Receipts Required tab of the Expenses Definition - Business Unit 1 page . This field is display-only. For more information, see Receipts Required Page |
Approve Expense |
Deselect this check box if you do not approve a specific expense line. If you deselect the check box, you must select a reason from the drop-down list box (next to the Approve Expense check box) and optionally enter a comment in the Approval Detail section. Any expense lines that are denied can be undenied by any subsequent approvers. |
Select Reason... |
Select a reason that you did not approve a specific expense line. This field appears after you deselect the Approve check box. |
Expense Details |
Click to access the Approve Expense Report - Expense Details page. PeopleSoft Expenses displays this link only if the approver is authorized to add or modify expense lines. |

Use the Approve Expense Report - Expense Details page (EX_SHEET_ENTRY) to view, modify, add or delete expense report lines. This page is accessible only to approvers who have View, Modify, Add, Delete or Full approval privileges for the transaction line.
Navigation:
From the Approve Expense Report – Expense Summary Page, click the Expense Details link.
This example illustrates the fields and controls on the Approve Expense Report - Expense Details. You can find definitions for the fields and controls later on this page.

This page enables you to add, modify, view, or delete expense report lines as needed based on your approval privileges for transaction lines. If you are authorized to add expense lines, PeopleSoft Expenses records your operator ID and date stamps the transaction. The new transaction line is routed to subsequent approvers for review and approval, if applicable.
Many of the fields on the Approve Expense Report - Expense Report Details page are the same as the fields on the Create (or Modify) Expense Report Page or the Approve Expense Report – Expense Summary Page. Fields that are unique for the expense report approval process are documented in this topic.
Field or Control |
Description |
|---|---|
Actions |
Select an action and click the Go button. Actions include:
|
Additional Fields with Unique Definitions for Approvers
Field or Control |
Description |
|---|---|
Expand Lines / Collapse Lines |
Click the Expand Lines link to open the transaction lines. To close any open transaction lines, click the Collapse Lines link . |
Expand All / Collapse All |
Click the Expand All link to open all transaction lines and accounting information. To close all transaction lines and accounting information, click the Collapse All link. |
Receipts Received |
Select to indicate that the travel and expense department has the appropriate receipts on file. This field appears only if you set up your expense system to check that receipts are received; otherwise, the check box is hidden. |
Receipt Verified |
Select to indicate that a receipt matches a specific expense type. This field is inactive if receipt verification is not required. |
Approve |
Select to approve a expense. Deselect this check box if you do not approve a specific expense line. If you deselect the check box, you must select a reason from the drop-down list box (next to the Approve Expense check box) and optionally enter a comment in the Approval Detail section. |
Date |
Enter the date for any added expense line items. If you have permission to modify transaction lines, you can also modify the expense date for any transaction line item. |
Expense Type |
Select an expense type to add an expense item. Note: You can add a new expense line item only if you have the approval privileges. After you add an expense line item and approve the expense report, the system routes the expense report and new line item to subsequent approvers as needed. |
Amount |
Enter the amount for any added transaction lines or modify the transaction line amount for existing transaction lines. |
Billing Type |
Select one of the following options: Billable, Internal, and Nonbillable. This field can be open for modification, display only, or hidden depending on the value selected in the Billing Action field, on the Approval Privilege Template page, for the expense type. The Approval Privilege Template is associated with an approver profile on the Approver Profile page (Set Up Financials/Supply Chain, Product Related, Expenses, Management, Approval Setup, Approver Profile). If you use PeopleSoft Project Costing, the system requires billing codes to identify project costs that are both billable and charged to project costing ChartFields. PeopleSoft Expenses sends the information to Project Costing, and Project Costing passes these items to PeopleSoft Billing for processing. The billing type determines the billing code that Project Costing uses. |
|
Click to add additional transaction lines to an expense report. Only approvers with the authority to add transaction lines will have access to the add button. The button is hidden if the approver does not have add privileges. When an approver adds a new transaction line, that approver can modify or delete the transaction line that he or she added prior to submitting the transaction, regardless of his or her other privileges. When the expense transaction is submitted by the approver, the transaction is routed to any additional approvers, who can modify the new transaction line if they are responsible for approving that transaction, and if they have privileges to add, delete, or modify the transaction line. |
|
Click the Delete icon to delete transaction lines. To delete a transaction line, the approver must be responsible for approving the transaction line and he or she also must have privileges to delete a transaction line. |


Use the Approve Expense Report – Expense Detail for [expense type] page (EX_SHEET_ERRORS) to view and modify the details of the transaction line. This page can be edited, and is accessible only to approvers who have Full or Modify approval privileges for the transaction line.
Navigation:
From the Approve Expense Report – Expense Summary Page, click the Expense Type link in the Expense Line items section of the page.
This example illustrates the fields and controls on the Approve Expense Report – Expense Detail for [expense type] page.
![Approve Expense Report - Expense Detail for [expense type] page (EX_SHEET_ERRORS)](img/i2a517932n-6b1e.png)
Depending on the Approval Privilege Template that is assigned to the user, some fields may be open for modification, view only, or hidden.
Field or Control |
Description |
|---|---|
Billing Type |
Select one of the following options: Billable, Internal, and Nonbillable. This field can be open for modification, display only, or hidden depending on the value selected in the Billing Action field, on the Approval Privilege Template page, for the expense type. The Approval Privilege Template is associated with an approver profile on the Approver Profile page (Set Up Financials/Supply Chain, Product Related, Expenses, Management, Approval Setup, Approver Profile). |
Accounting Detail |
Click to access the Approve Expense Report - Accounting Detail page to view, add, or modify accounting details for expense transaction lines, depending on the privilege allowed for the approver. Approvers can modify the general ledger or project-related ChartFields, general ledger business unit, or distribution split amount. If you change the distribution split amount, the total must equal the original amount of the expense transaction. |
Previous Expense and Next Expense |
Click to approve the previous or next expense transaction line item from within the Expense Detail page. |
Use the Approve Expense Report - Expense Detail page (TE_SHEET_LINE_DTL) to view transaction lines for the expense report. This option appears only if the approver has add, delete, or view privileges for transaction lines.
Navigation:
From the Approve Expense Report – Expense Summary Page, click the Expense Type link in the Expense Line items section of the page.
This example illustrates the fields and controls on the Approve Expense Report - Expense Details page.
![Approve Expense Report - Expense Detail for [expense type] page (TE_SHEET_LINE_DTL)](img/i2a517932n-6b9b.png)
Field or Control |
Description |
|---|---|
Update Accounting Detail |
Click to access the Approve Expense Report - Accounting Detail page to view, add, or modify accounting details for expense transaction lines, depending on the privilege allowed for the approver. Approvers can modify the general ledger or project-related ChartFields, general ledger business unit, or distribution split amount. If you change the distribution split amount, the total must equal the original amount of the expense transaction. |
Previous Expense and Next Expense |
Click to approve the previous or next expense transaction line item from within the Expense Line Detail page. You can navigate to, and approve each transaction line from the Expense Line Detail page. |
Use the Approve Expense Report - Accounting Defaults page (TE_SHEET_SPLIT) to view the accounting distribution summary for the expense report.
Navigation:
Click the Accounting Defaults link on the Approve Expense Report – Expense Summary Page.
This example illustrates the fields and controls on the Approve Expense Report - Accounting Defaults page (partial page). You can find definitions for the fields and controls later on this page.

Access to this page depends on the Approval Privilege Template for the approver profile.
Use the Approve Expense Report - Accounting Detail page (TE_SHEET_DIST) to view, add, or modify accounting details for expense transaction lines.
Navigation:
Click the Update Accounting Detail link on the Approve Expense Report - Expense Detail for [Expense Type] Page.
This example illustrates the fields and controls on the Approve Expense Report - Accounting Detail page (partial page). You can find definitions for the fields and controls later on this page.

Access to the Approve Expense Report - Accounting Detail page depends on how you set up your Approval Privilege Templates.
Use the Approve Expense Report - View Exception Comments and Risks page (TE_EXCPTN_COMM_SHT) to view exception comments and risks for expense reports.
Navigation:
From the Approve Expense Report – Expense Summary Page:
Select View Exception Comments from More Options in the Report Information grid.
Click the Exceptions button in the Expense Line Items grid.
Click the Risk button in the Expense Line Items grid.
Click the Risk Detail link in the Report Information group box when risk exists for the header.
From the Approve Transactions - Overview Page, click the Risk icon .
This example illustrates the fields and controls on the Approve Expense Report - View Exception Comments and Risks page. You can find definitions for the fields and controls later on this page.
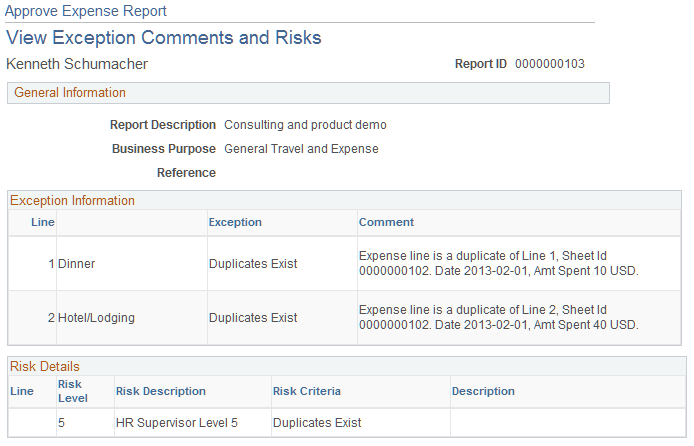
PeopleSoft Expenses displays comments for each expense transaction line. If the system determines risk for the transaction, the approver can view the risk level, the risk criteria that triggered the risk, and the details of the risk.
Use the Expense Notes page to view and add notes.
Navigation:
From the Approve Expense Report – Expense Summary Page:
Click the Notes link.
Select the Expense Report Detail option from the More Options drop-down list box. Then click the Notes link.
This example illustrates the fields and controls on the Expense Notes page.

Field or Control |
Description |
|---|---|
Add Notes |
Click this button to add the note to the Notes section of the page. |
Notes
The Notes section provides the note, the name of the employee who added the note, the approver profile (displays Employee if the employee of the expense report added the note), and a date and time stamp.
Field or Control |
Description |
|---|---|
|
Click the delete button to remove a note that you have entered. Approvers cannot remove a note that was added by anyone else. |
You must save the transaction to save the note.
Use the Approve Expense Report - VAT Information page (TE_SHEET_VAT_SUM) to view VAT information.
Navigation:
Select VAT Information from the More Options drop-down list box on the Approve Expense Report – Expense Summary Page.
Expense Line VAT Information
Field or Control |
Description |
|---|---|
Expense Type |
Click the link in the column to view VAT information about the expense transaction line. |
VAT Accounting Detail
Field or Control |
Description |
|---|---|
Distribution Line Number |
Click the link in the column to access the Approve Expense Report - VAT Accounting Detail page to view the VAT accounting detail for the expense transaction line. |
Use the Approve Expense Report – Compare Totals page (EX_TA_RES_COMP) to view the comparative totals and variance percentages for any associated travel authorization as compared to the expense report totals.
Navigation:
Select the Compare Totals option from the More Options drop down list box on the Approve Expense Report – Expense Summary Page.
This example illustrates the fields and controls on the Approve Expense Report - Compare Totals page. You can find definitions for the fields and controls later on this page.

The Compare Totals page displays the total amounts for an expense report and any associated travel authorizations and calculates the variance between the report totals. The calculations are automatically triggered when the page is opened and display the totals for the types of reports associated with the expense report.
Field or Control |
Description |
|---|---|
Report ID |
Displays the report ID assigned to the expense report. |
Report Type |
Displays report types used in the totals comparison calculations. Values include Expense Report and Travel Authorization. and Only the report types associated with the expense report appear on this page. |
Total |
Displays the calculated summarized total for each report type displayed. |
Variance |
Displays the difference between the expense report total and the total for this report type in units of currency. |
Variance % (variance percentage) |
Displays the difference between the expense report total and the total for this report type as a percentage. |