Creating Travel Authorizations Using PeopleSoft Fluid
|
Page Name |
Definition Name |
Usage |
|---|---|---|
|
EX_TAUTH_SRCH_FL |
View existing and add new travel authorizations. |
|
|
EX_TAUTH_FL (laptops and tablets) EX_TAUTH_PHONE_FL (smart phone) EX_TA_LINE_FL (smart phone and tablet line detail) |
Add, edit, or view travel authorization information. |
|
|
EX_TEMP_SELECT_SCF |
Select a template from which to populate the travel authorization with predefined expense types. |
|
|
EX_TEMPLATE2_SBP |
Determine a date rage for which you want to add expense types, and whether you want selected expense types to be added for one day or all days within your date range. |
|
|
EX_ER_QKFILL_SCF |
Select expense types that you want to add to the travel authorization. |
|
|
EX_TAUTH_FL (laptops and tablets) |
Withdraw a submitted travel authorization. |
|
|
EX_TAUTH_SPLIT_SCF |
View or enter accounting defaults. |
|
|
EX_TAUTH_DISTF_SCF |
View and enter detailed accounting distribution information for an expense type. |
|
|
EX_TA_PMERCMNT_SCF |
Enter or update information about non-preferred merchants. |
|
|
Amount Exceeded Comment Page |
EX_TA_LOCAMT_SCF |
Enter a comment if you exceed your authorized location amount. |
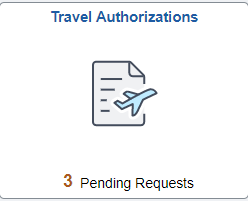
The Travel Authorization tile can be placed on any homepage and alerts you to the total number of requests that have not been submitted.
This example illustrates the Travel Authorizations Tile.
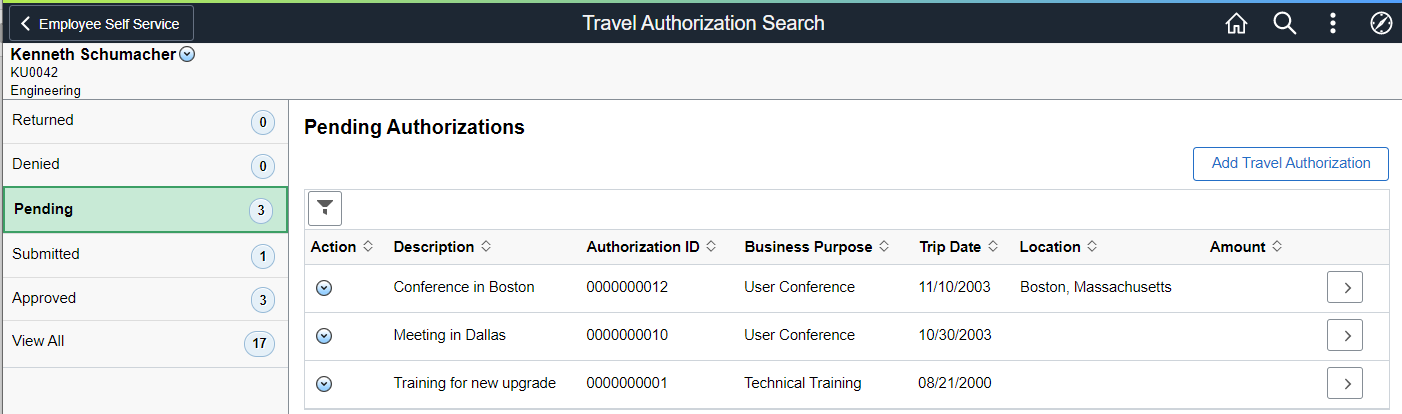
Use the Travel Authorization Search (EX_TAUTH_SRCH_FL) page to view existing and add new travel authorizations.
Navigation:
Select the Travel Authorization tile.
This example illustrates the fields and controls on the Travel Authorization Search page.
Field or Control |
Description |
|---|---|
<Employee Name>: Related Actions |
Select to access related actions for the employee. Options include:
|
Returned, Denied, Pending, Submitted, Approved, or View All |
Select a status in the left navigation panel to display the associated travel authorizations. The number next to the status in the left panel indicates the number of travel authorizations that have that status. |
Add Travel Authorization |
Select to create a new travel authorization. |
|
Select to display actions for the selected status. These actions are available for each status:
You can also perform these actions based on the status of the travel authorization:
|
(row on the page) or
the |
Select a travel authorization row or the right arrow icon to access the detail, where you can modify or view the travel authorization. |
 (Related Actions icon)
 (right arrow icon)
Associating a Travel Authorization to an Expense Report
You can associate a travel authorization to an expense report as long as the travel authorization is in an Approved status. You must be in the expense report to associate a travel authorization to an expense report. This process links the travel authorization to an expense report without copying the travel authorization data into the expense report.
For more information, see Associating Travel Authorizations to Expense Reports in PeopleSoft Fluid
Use the Travel Authorization page (add) ((EX_TAUTH_FL (laptops and tablets), EX_TAUTH_PHONE_FL (smart phone), EX_TA_LINE_FL (smart phone and tablet line detail) to add, edit, or view travel authorization information.
Navigation:
From the Travel Authorization Search page, select the Add Travel Authorization button.
This example illustrates the fields and controls on the Travel Authorization Page when adding a new travel authorization.
Header
Depending on the type of device you are using, the header displays these fields for the travel authorization: When viewing on a smartphone, this section can be expanded or collapsed.
Field or Control |
Description |
|---|---|
Business Purpose |
Select a business purpose from the list. If your user profile is setup with a default Business Purpose, the information is automatically populated in this field. |
Billing Type |
Select a Billing Type. The value selected in this field overrides the value that is determined for the user profile and for the expense type profile. It determines the billing type of all expense lines that are added to the travel authorization. This field appears only when Modify is selected in the Billing Action field on the Employee Privilege Template Page for a travel authorization expense type, and that expense type is associated to the user. |
Create A Cash Advance |
Select to access the Create Cash Advance page. See Create/Modify Cash Advance Page. |
|
Approvals |
Select to access the Approval Status window. This button only appears after you have Submitted a travel authorization at least one time. For example, you can submit a travel authorization and then withdraw it. When this occurs, the travel authorization is in Pending status and it has already entered the approval queue. This is when the Approvals button appears when the TA is in Pending status. |
Details
Field or Control |
Description |
|---|---|
Accounting Default (button) |
Select to access the Travel Authorization Defaults Page. |
Populate from Travel Authorization |
Select to access the Select Travel Authorization window where you can select an existing Travel Authorization. |
|
Populate from Template |
Select to access the Populate from Template Page. Note: All required fields in the header must be completed before selecting this button. |
|
Quick-Fill |
Select to access the Quick-Fill Page. |
Expense Type |
Displays the active expense types that are determined on the Travel Authorization Fluid Expense Type Page. Complete the information in each row for each expense type that applies to your travel authorization. When the authorization is submitted, the system only saves the rows that have a value in the Amount field. |
Merchant |
Select one of these options:
Preferred merchants are set up using the Preferred Merchant Page. |
|
Click to access the Non-Preferred Merchant Comment Page to review or update information that was previously entered. To remove a non-preferred merchant that was previously selected, select another option in the Merchant drop-down list box. |
|
Click to access the Amount Exceeded Comment page where you can enter a reason why you exceeded your limit for the expense type. |
|
Click to access the Travel Authorization Distribution - Accounting Details Page. |
Details (button) |
Select to view the Line Detail window where you can enter the date, payment type, billing type, number of nights, and start and end times. Note: When you enter the number of nights in Fluid, the system does not calculate or adjust the amount. |


Saving a Travel Authorization
When you save a travel authorization using PeopleSoft Fluid, the system validates all required fields for all lines that have a value in the Amount field. If the Amount field has a value but some of the required fields are empty, the system highlights those fields and displays a red flag. You can select the red flag to see what needs to be corrected. The fields that are required for travel authorization lines is determined by Expense Type setup. See Setting Up Expense Types.
Submitting a Travel Authorization
When you submit a travel authorization using PeopleSoft Fluid, the system does not save lines if there is no value in the Amount field. For example, if the Automobile Rental line has no amount, then that line is not saved for the travel authorization and is removed when the submit is complete.
Accounting Distributions
When the expense type is pre-populated in PeopleSoft Fluid, the system also creates distribution line information based on the Employee Profile - User Defaults Page.
If you are updating a travel authorization after it was previously saved and the value in the Amount field is removed, the system removes the line and distribution information from the database when you save or submit.
Use the Populate From Template page (EX_TEMP_SELECT_SCF) to select a public or user template to populate the document with predefined expense types.
Navigation:
From the Travel Authorization Page (add), select the Populate from Template button.
This example illustrates the fields and controls on the Populate from Template page.

The templates displayed on this page are configured using the Public Templates Page and the User Template Page.
|
Field or Control |
Description |
|---|---|
|
Select |
Select to access the Dates and Expense Types Page. |
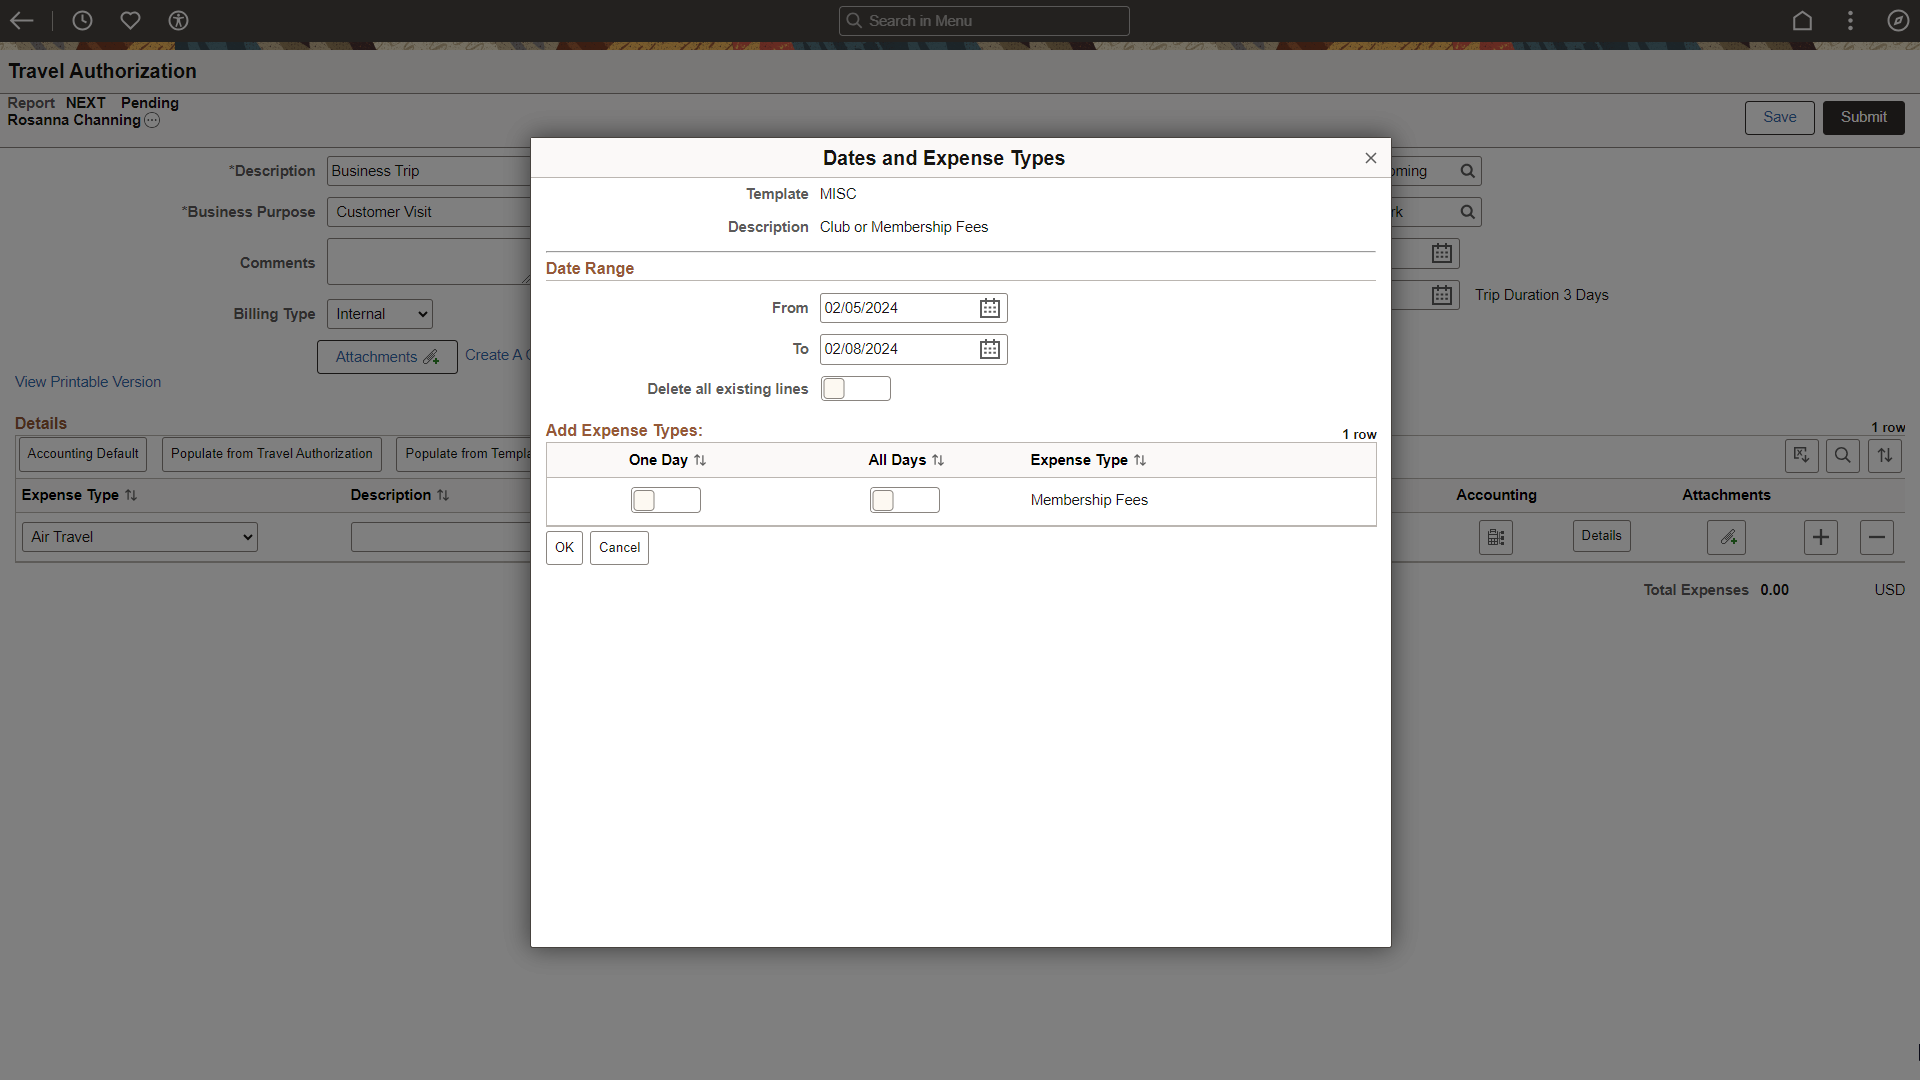
Use the Dates and Expense Types page (EX_TEMPLATE2_SBP) to determine a date rage for which you want to add expense types, and whether you want selected expense types to be added for one day or all days within your date range.
Navigation:
From the Populate from Template Page, select the Select button.
This example illustrates the fields and controls on the Dates and Expense Types page.
|
Field or Control |
Description |
|---|---|
|
From and To |
Enter a date that the system uses to populate the selected expense types into your travel authorization. If you do not enter a date, the system automatically populates these fields with the current date. |
|
Delete all existing lines |
Select Yes to remove the existing expense types from the travel authorization. This clears any default expense types that may have come from another template and allows you to populate only the expense types selected on this page. |
|
One Day or All Days |
Specify whether one instance of the expense type should be addedto the travel authorization or whether one for each day in the date range should be added for thatparticular expense type. Select one of these options. If you try to select Yes for One Day and for All Days, the system changes to other option to No.
|
Use the Quick-Fill Page (EX_ER_QKFILL_SCF) to select expense types that you want to add to the travel authorization.
Navigation:
From the Travel Authorization Page (add) page, select the Quick-Fill button.
This example illustrates the fields and controls on the Quick-Fill page.
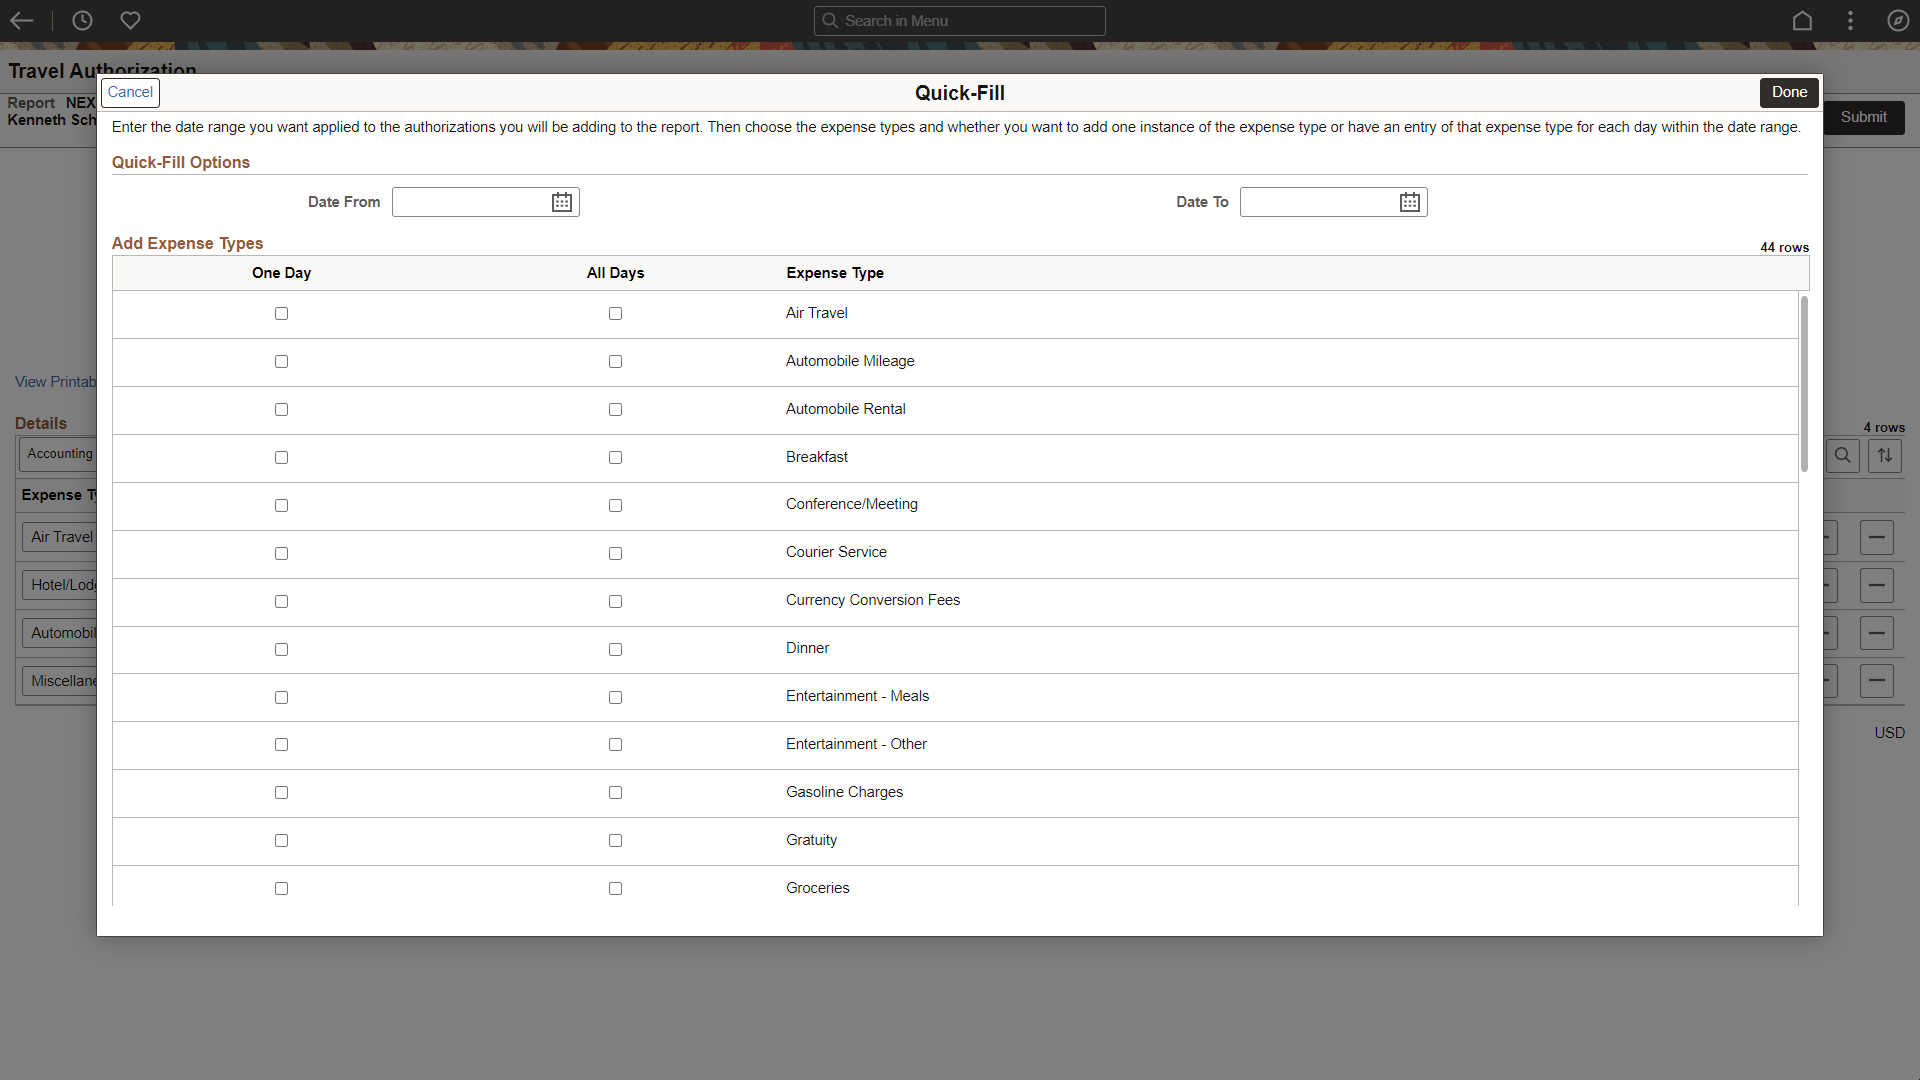
The expense types that appear on this page are determined by the user role and expense type mapping set up on the Expense Role Options – Expense Types Page.
Use the One Day and All Days check boxes to determine whether you want to add one instance of the expense type, or add that expense type for each day within the date range specified in the Date From and Date To fields.
Use the Travel Authorization page (EX_TAUTH_FL) to withdraw a submitted travel authorization.
Navigation:
From the Travel Authorization Search page, select Submitted from the left menu and then the View Details button.
This example illustrates the fields and controls on the Travel Authorization page when a travel authorization has been submitted.

|
Field or Control |
Description |
|---|---|
|
Withdraw |
Select to withdraw the travel authorization from the approval chain. When you select this button, the system changes the status to Pending and the travel authorization is removed from the approvers queue. |
|
Total Authorized |
Displays the amount of Prepaid and Reimbursable rows. |
|
Less Non-Approved |
Displays the amount of Nonreimbursable and Denied rows. |
Use the Travel Authorization Defaults page (EX_TAUTH_SPLIT_SCF) to view or enter accounting defaults.
Navigation:
Select the Accounting Default button on the Travel Authorization page.
This example illustrates the fields and controls on the Travel Authorization Defaults Page.

This example illustrates the fields and controls on the Travel Authorization Defaults - Accounting Details (SFF).

Field or Control |
Description |
|---|---|
Accounting Tag Change Value |
Select this button to access the Accounting Tag Page. This button is only available when Expenses is selected on the Accounting Tag Registration Page. For more information about Accounting Tags, see Setting Up Accounting Tags |
To add a new default split line, select the + button. To delete a split line, select the – button. To cancel and delete any new entries, select the Cancel button. To save the new entries, select the Done button.
Travel Authorization Defaults Summary Page (Small Form Factor)
This example illustrates the fields and controls on the Travel Authorization Defaults - Accounting Summary (SFF).

The Travel Authorization Defaults - Accounting Summary page displays the summary information for each line along with GL ChartFields, PC ChartFields, and the percentage distribution. You can drill into each line and update the default lines by selecting the summary line. Select Cancel to cancel and not save any changes to the Travel Authorization Defaults. Select Done to return to the Travel Authorization Entry page.
Select a line from the summary page to access the Travel Authorization Defaults - Account Details page. When you view a submitted or approved report, the fields are display-only.
Use the Travel Authorization Distribution page (EX_TAUTH_DISTF_SCF) to view and enter detailed accounting distribution information for an expense type.
Navigation:
Click the Accounting Detail icon from the Travel Authorization page.
This example illustrates the fields and controls on the Travel Authorization Distribution - Accounting Detailspage.

Note: ChartFields appear only when selected on the Select GL or PC ChartFields to Display page of the Employee Privilege Template Page.
Field or Control |
Description |
|---|---|
Accounting Tag Change Value |
Select this button to access the Accounting Tag Page. This button is only available when Expenses is selected on the Accounting Tag Registration Page. For more information about Accounting Tags, see Setting Up Accounting Tags |
Click the Done button to save the Accounting default entries. Click the Cancel button to cancel and not save any changes.
Travel Authorization Distribution - Accounting Summary Page (Small Form Factor)
Navigation:
Select an Expense line, and then select Accounting Detail on the Travel Authorization page.
This example illustrates the fields and controls on the Travel Authorization Distribution - Accounting Summary (SFF).

The Travel Authorization Distribution - Accounting Summary page displays summary information for each distribution line along with GL ChartFields, PC ChartFields, and the amount distribution. Drill into each line and update the distribution lines by selecting the summary line.
Use the Non-Preferred Merchant Comment page (EX_TA_PMERCMNT_SCF) to enter or update information about non-preferred merchants.
Navigation:
. Click the Add Travel Authorization button. Select -Non-Preferred Merchant: in the Merchant drop down list box.
Field or Control |
Description |
|---|---|
Non-Preferred Merchant |
Enter the non-preferred merchant that you used for this expense type. This field is free-form text. |
Non-Preferred Justification |
Select an option that describes why you used a non-preferred merchant. If the list of justifications don’t apply, the select Other (please specify).
|
Other |
Enter a reason for using the non-preferred merchant if none of the options for the Non-Preferred Justification field were appropriate. |